Unit 1: Preparing Simulation Data
In this unit, you will learn to create your model and device, set up the storage policies, and store simulation data for later use.
Prerequisites
You need to be assigned the required asset permission and operation permission, and a menu group containing the Model Management and Device Management menu. If not assigned, contact the application administrator.
Step 1. Defining a Model
A model is the abstraction of the features of an object that is connected to the IoT Hub. The device model defines the features of a device, including its attributes, measurement points, services, and events.
In the EnOS Application Portal > Developer Console, select Model Management from the navigation menu.
Select New Model, enter the following in the New Model window, and select OK.
Identifier:
SmartBattery_ModelModel Name:
SmartBattery_ModelCategory:
NACreated From:
NoSource Model:
NoValidate Model:
OnDescription:
Model for smart battery
From the list of created models, select Edit button, and then select Feature Definition tab on the Model Details page.
There are two ways to create custom features:
Manually adding features: select Edit > Add > Create Custom Feature, and create the following custom features in the Add Feature window.
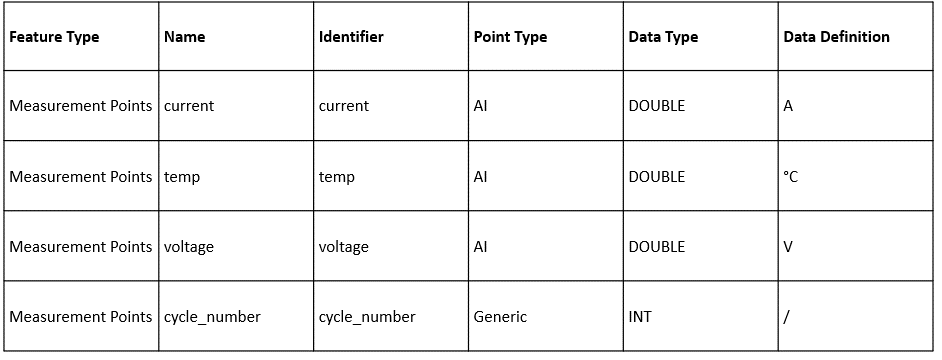
Importing from a file: Select Edit > Import Model and upload an Excel or JSON file.
Select Publish to save and publish the features you have added above.
For more information about how to create a model, see Creating a Model.
Step 2. Creating a Product
A smart battery product is a collection of battery devices that have the same features. With the model as a base, a product further defines the communication specifications for the device.
In this step, create a product called SmartBattery_Product. We shall assume that a device of this product model sends data in JSON format and that the CA certificate is not used (only secret-based authentication is enforced).
In the EnOS Application Portal > Developer Console, select Device Management > Products from the navigation pane.
Select New Product, enter the following in the New Product window, and select OK.
Product Name:
SmartBattery_ProductAsset Type:
DeviceModel:
SmartBattery_ModelData Type:
Only EnOS IoTCertificate-Based Authentication:
DisabledDescription:
Computer Battery
For details about the configuration of a product, see Creating a Device Collection (Product).
Step 3. Registering a Device
A device is the instance of a model and belongs to a certain product. It inherits not only the basic features of the product, but also its communication features.
In this step, create a device named SmartBattery_Device, which belongs to the SmartBattery_Product created in the previous step.
In the EnOS Application Portal > Developer Console, select Device Management > Device Assets from the navigation pane.
Select New Device, enter the following in the New Device window, and select OK.
Product:
SmartBattery_ProductDevice Name:
SmartBattery_DeviceDevice Key: Leave it blank to let the system generate a key for you
Timezone/City:
UTC+08:00Use DST: No
Step 4. Configuring TSDB Storage Policy for Storing Device Data
EnOS Time Series Database (TSDB) provides a variety of storage options for you to store important and frequently-accessed business data. Through configuring storage policies, time-series data can be routed to different datastores based on data types and storage time, thus reducing data storage costs and enhancing data access efficiency.
Note
By default, the uploaded data will not be stored in TSDB. You must configure the data storage policy before the data is uploaded to EnOS Cloud.
Each model can be associated with only one storage policy group.
In this step, configure a storage policy for the measurement points that are defined in the SmartBattery_Model model.
Create a Storage Policy Group (Optional)
You can store the time-series data for different projects separately by storage policy groups. Before configuring storage policies for measurement points, you need to create a storage policy group or select an existing storage policy group.
Note
Each OU can have up to 5 storage policy groups. If the SmartBattery_Model storage policy group already exists in the OU, skip this step.
You can create a storage policy group by the following steps:
In the EnOS Application Portal > Developer Console, select Data > Storage Policies from the navigation menu.
Select + > Create Group in the upper right corner of the page to create a storage policy group and configure the following fields:
Group Name: enter a name for the storage policy group.
Group Model: select SmartBattery_Model to link with the storage policy group.
Select OK to save the storage policy group configuration.
Configure Storage Policies
After the storage group is created, you can see all the TSDB storage policy options listed under the storage group tab. Configure storage policies separately for the above listed measurement points. You need to configure the storage policy for each of the above model measurement points in the SmartBattery_Model group. Using the AI Raw Data storage type as an example:
Move the cursor on the AI Raw Data storage type and select Edit button to open the Edit Storage Policy page.
From the Storage Time drop-down list, select the storage time for the data. For this example, we shall save the data in TSDB for 3 months.
Select the SmartBattery_Model model and the listed measurement points.
Select OK to save the storage policy.
Refer to the above steps to configure the Generic Data storage policy.
Step 5. Adding a Device Simulator
In the EnOS Application Portal > Developer Console, select Device Management > Simulators from the navigation menu.
Select New Simulator, and select the device that you have registered for the simulation.
The device list shows all the devices that have been created in the current OU.
Note
You can only simulate a device with an inactive or offline status.
Select OK to create a simulator for the selected device.
In the list of simulators, you can see the simulator you just created.
Step 6. Defining and Uploading the Simulation Data Sample
Next, you need to define the simulation data sample for it.
In the list of simulators, select Edit Sample for the simulator you just created.
Select Download in the pop-up window.
Input the simulation data sample in the downloaded template.
The first column timeOfDay refers to the relative time stamp: you can enter the relative timestamp within one day (24 hours) using the format
HH:MM:SS.The rest of the column headers are for the measurement points that are defined in the device model. You only need to enter the identifier of the measurement points to be simulated rather than entering all of them.
The values are simulated measurement point values. If the data type is array, the format is [value1, value2, value3, …]. Leave the cell empty if there is no value at the current time point.
When completed editing the template, in the Define Sample pop-up window, select Upload to upload the simulation data.
Select OK.
See AESC_DEMO_Easy.csv for a ready-to-use template with simulated data.
Step 7. Starting the Device Simulator
After uploading the simulation data sample, you need to start the device simulator by the following steps:
In the list of simulators, locate the smart battery simulator and select Start button.
On the Start Simulation pop-up window, select an end date for the simulation. In this lab, set the end time for 24 hours later.
Select OK to start the simulator.
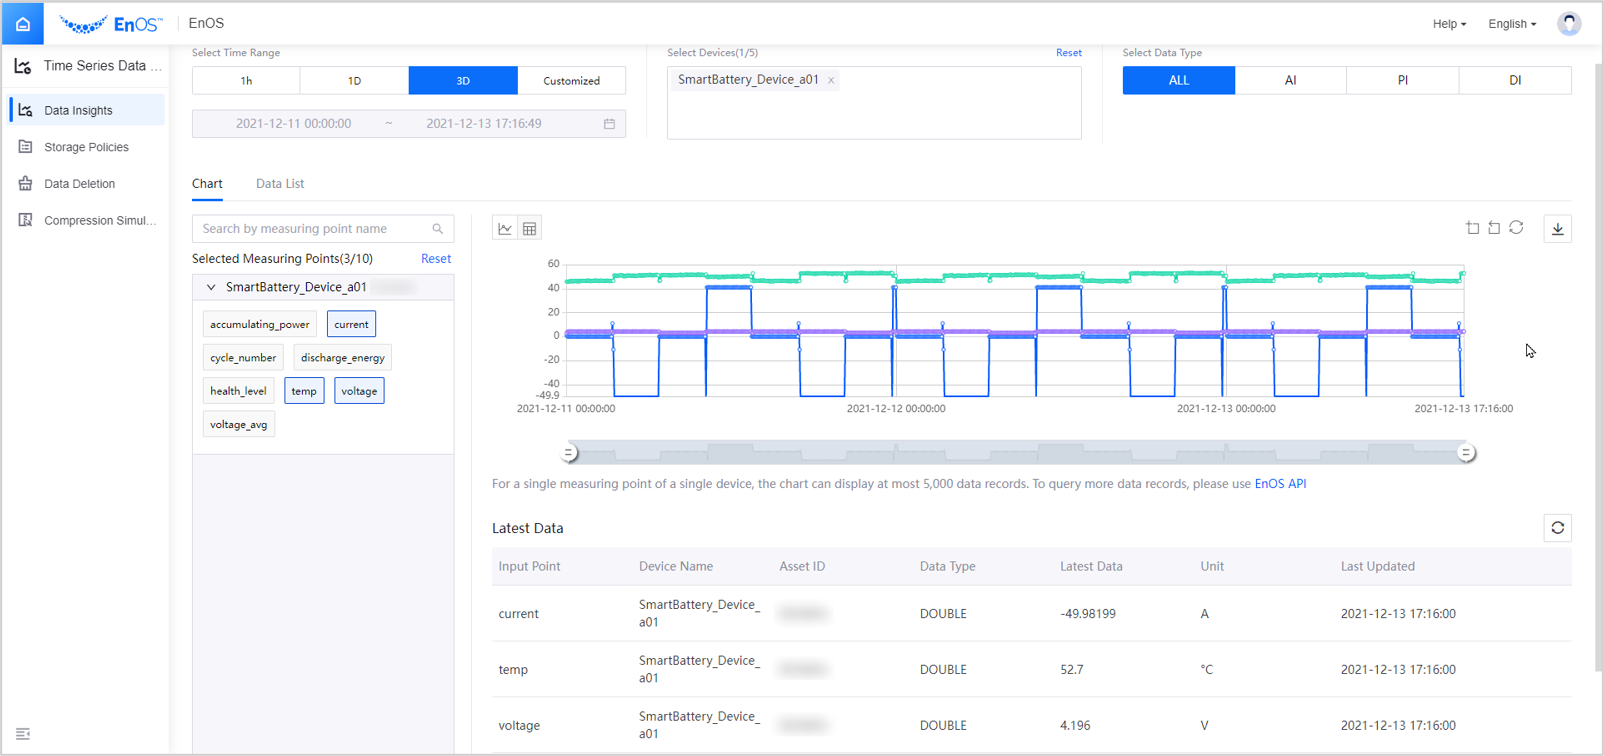
Step 8. Checking the Device Data
Go to Data > Data Insights and select the SmartBattery_Device device to view the real-time current data report in minutes. See the following example:
Step 9. Tagging the Model
Before DTV can use the data generated by your model, you need to tag the model so that the data can be synchronized to the DTV application.
In the EnOS Application Portal > Developer Console, select Model Management from the navigation menu.
Find the model that you want to configure and select Edit next to Tags.
Add a new tag, and enter
auth_unitfor the key andtruefor the value.