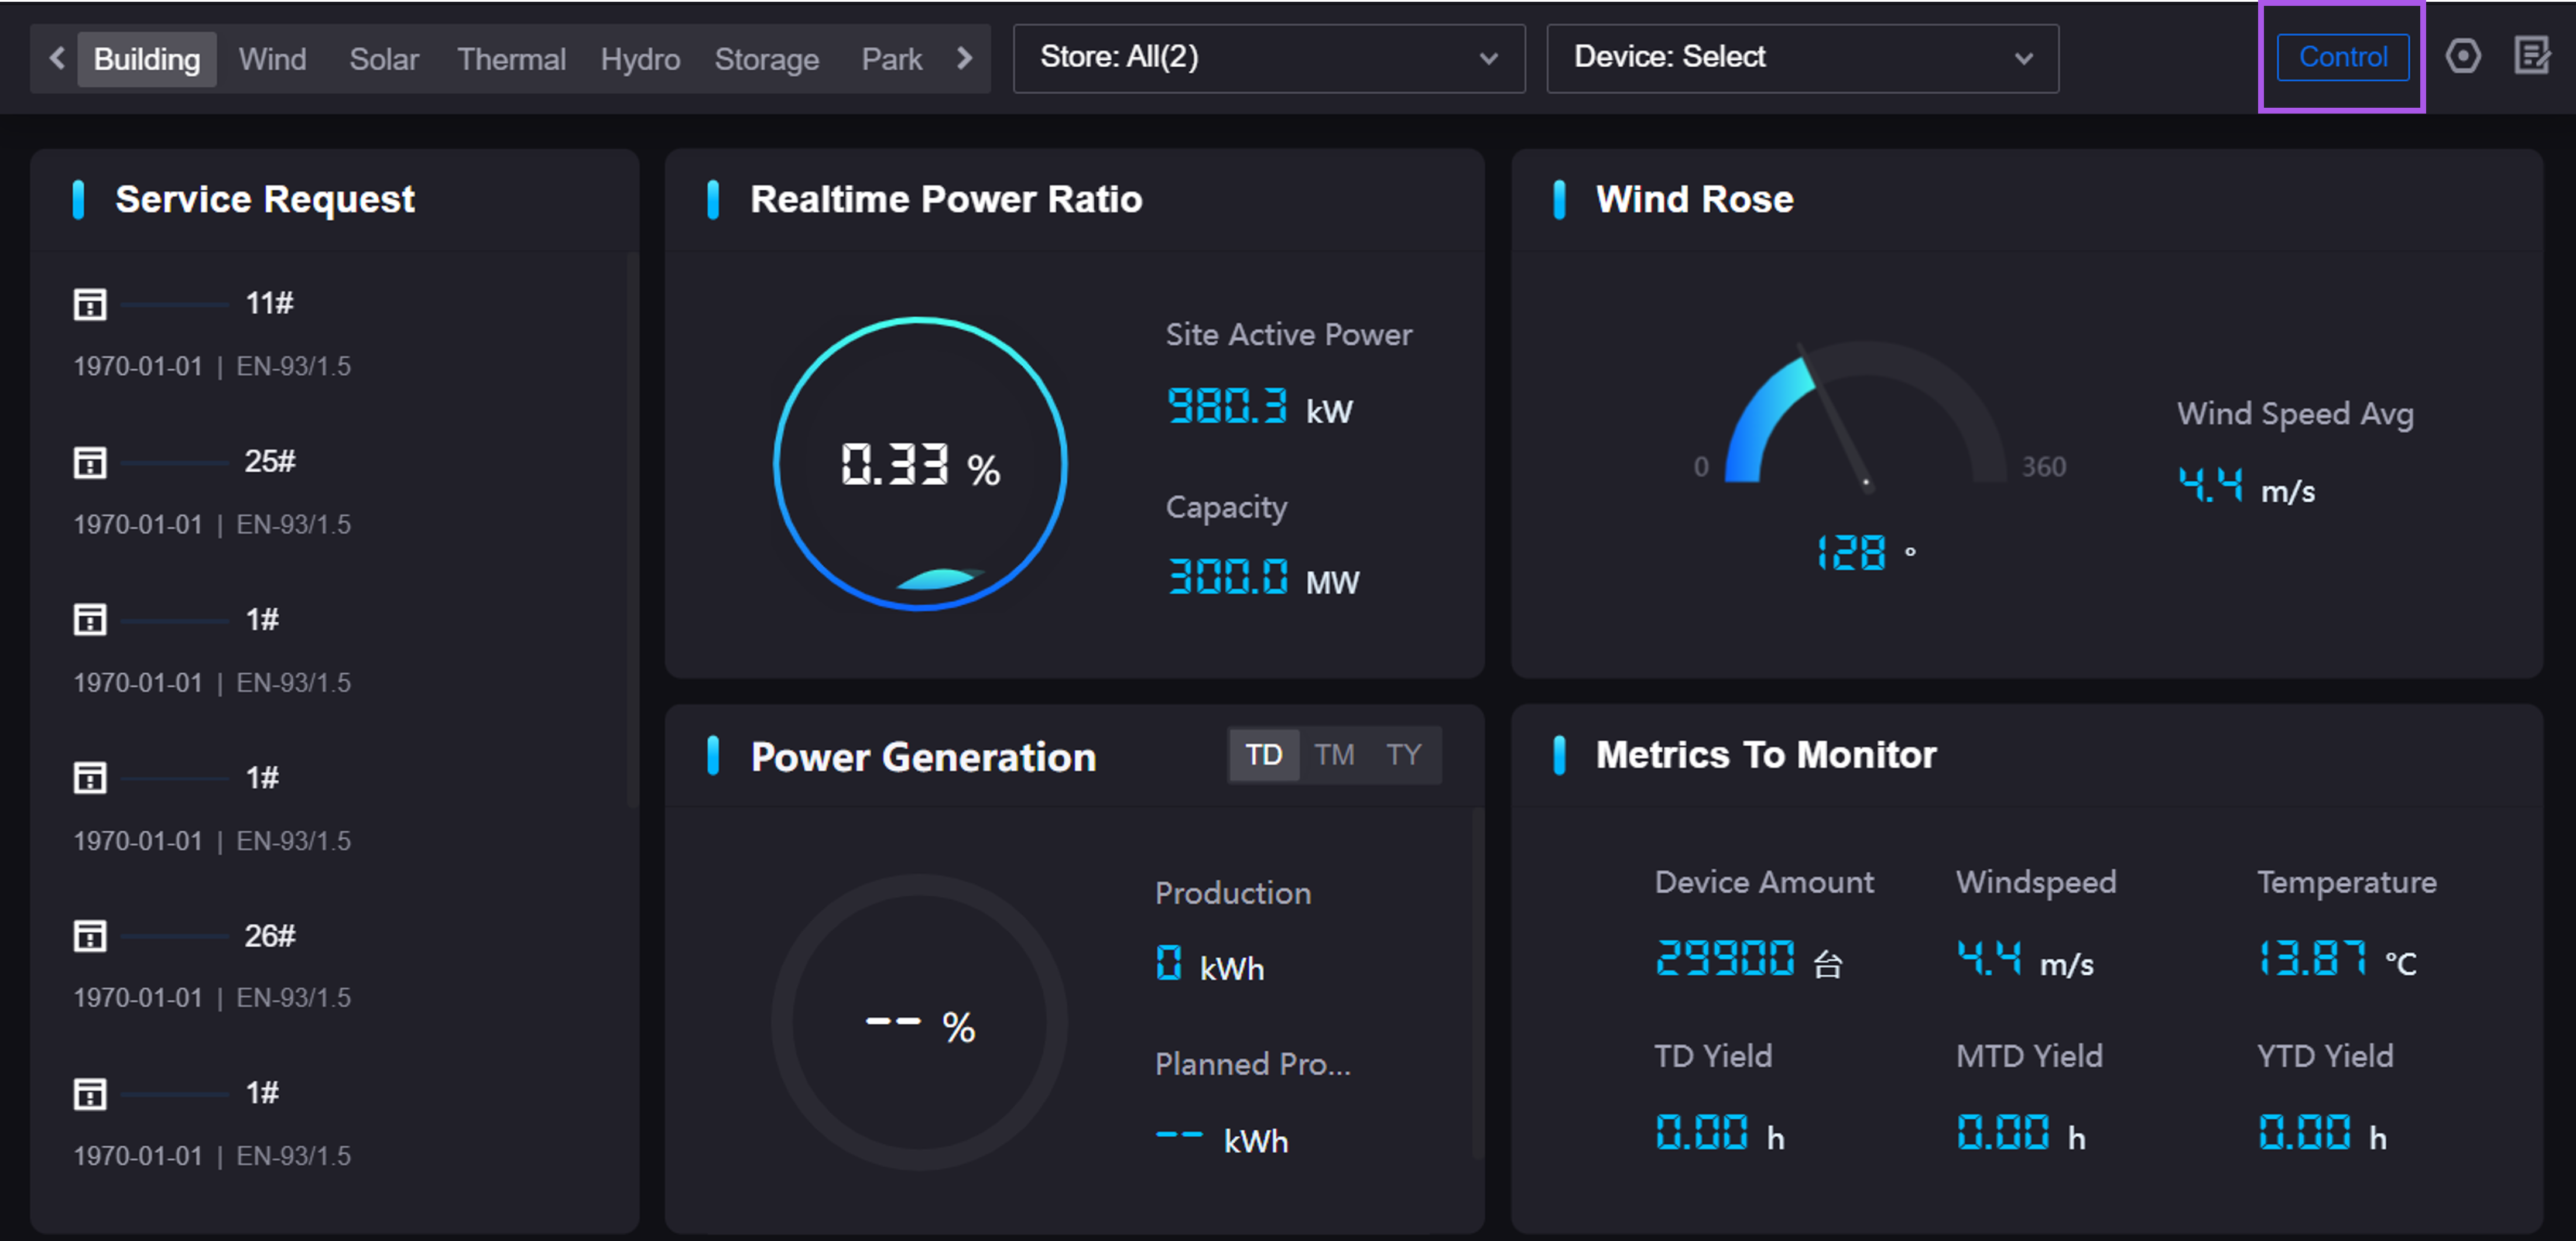
Building a Monitoring Landing Page
Overview
EnOS Unified Monitoring is a one-stop monitoring configuration center with diverse, cross-domain monitoring capabilities. The landing page of Unified Monitoring provides multi-level asset filtering, multi-dimensional time filtering, and real-time page editing functions, supporting the integration of EnOS Digital Twin Visualization (DTV) pages to achieve visualization monitoring of multi-type and multi-domain asset data.
This page introduces how to integrate the global filter of the DTV dashboard into the landing page of Unified Monitoring. The involved products are shown in the table below:
Product/Service |
Required/Optional |
Dependent Function |
|---|---|---|
EnOS Digital Twin Visualization (DTV) |
Required |
To create landing pages |
EnOS Unified Monitoring |
Required |
To host and configure landing pages |
EnOS Application Portal |
Optional |
To host applications |
Scenario
In the scenario of multi-domain comprehensive monitoring, monitoring personnel often need to monitor the sites or assets of multiple domains (such as wind, solar, hydro, thermal, etc.). This tutorial uses multi-domain asset monitoring as an example to introduce how to associate multiple DTV pages to the landing page in Unified Monitoring, thereby building a visualization monitoring application applicable to multiple domains, helping you master the complete process from obtaining Unified Monitoring to building a visualization monitoring application.
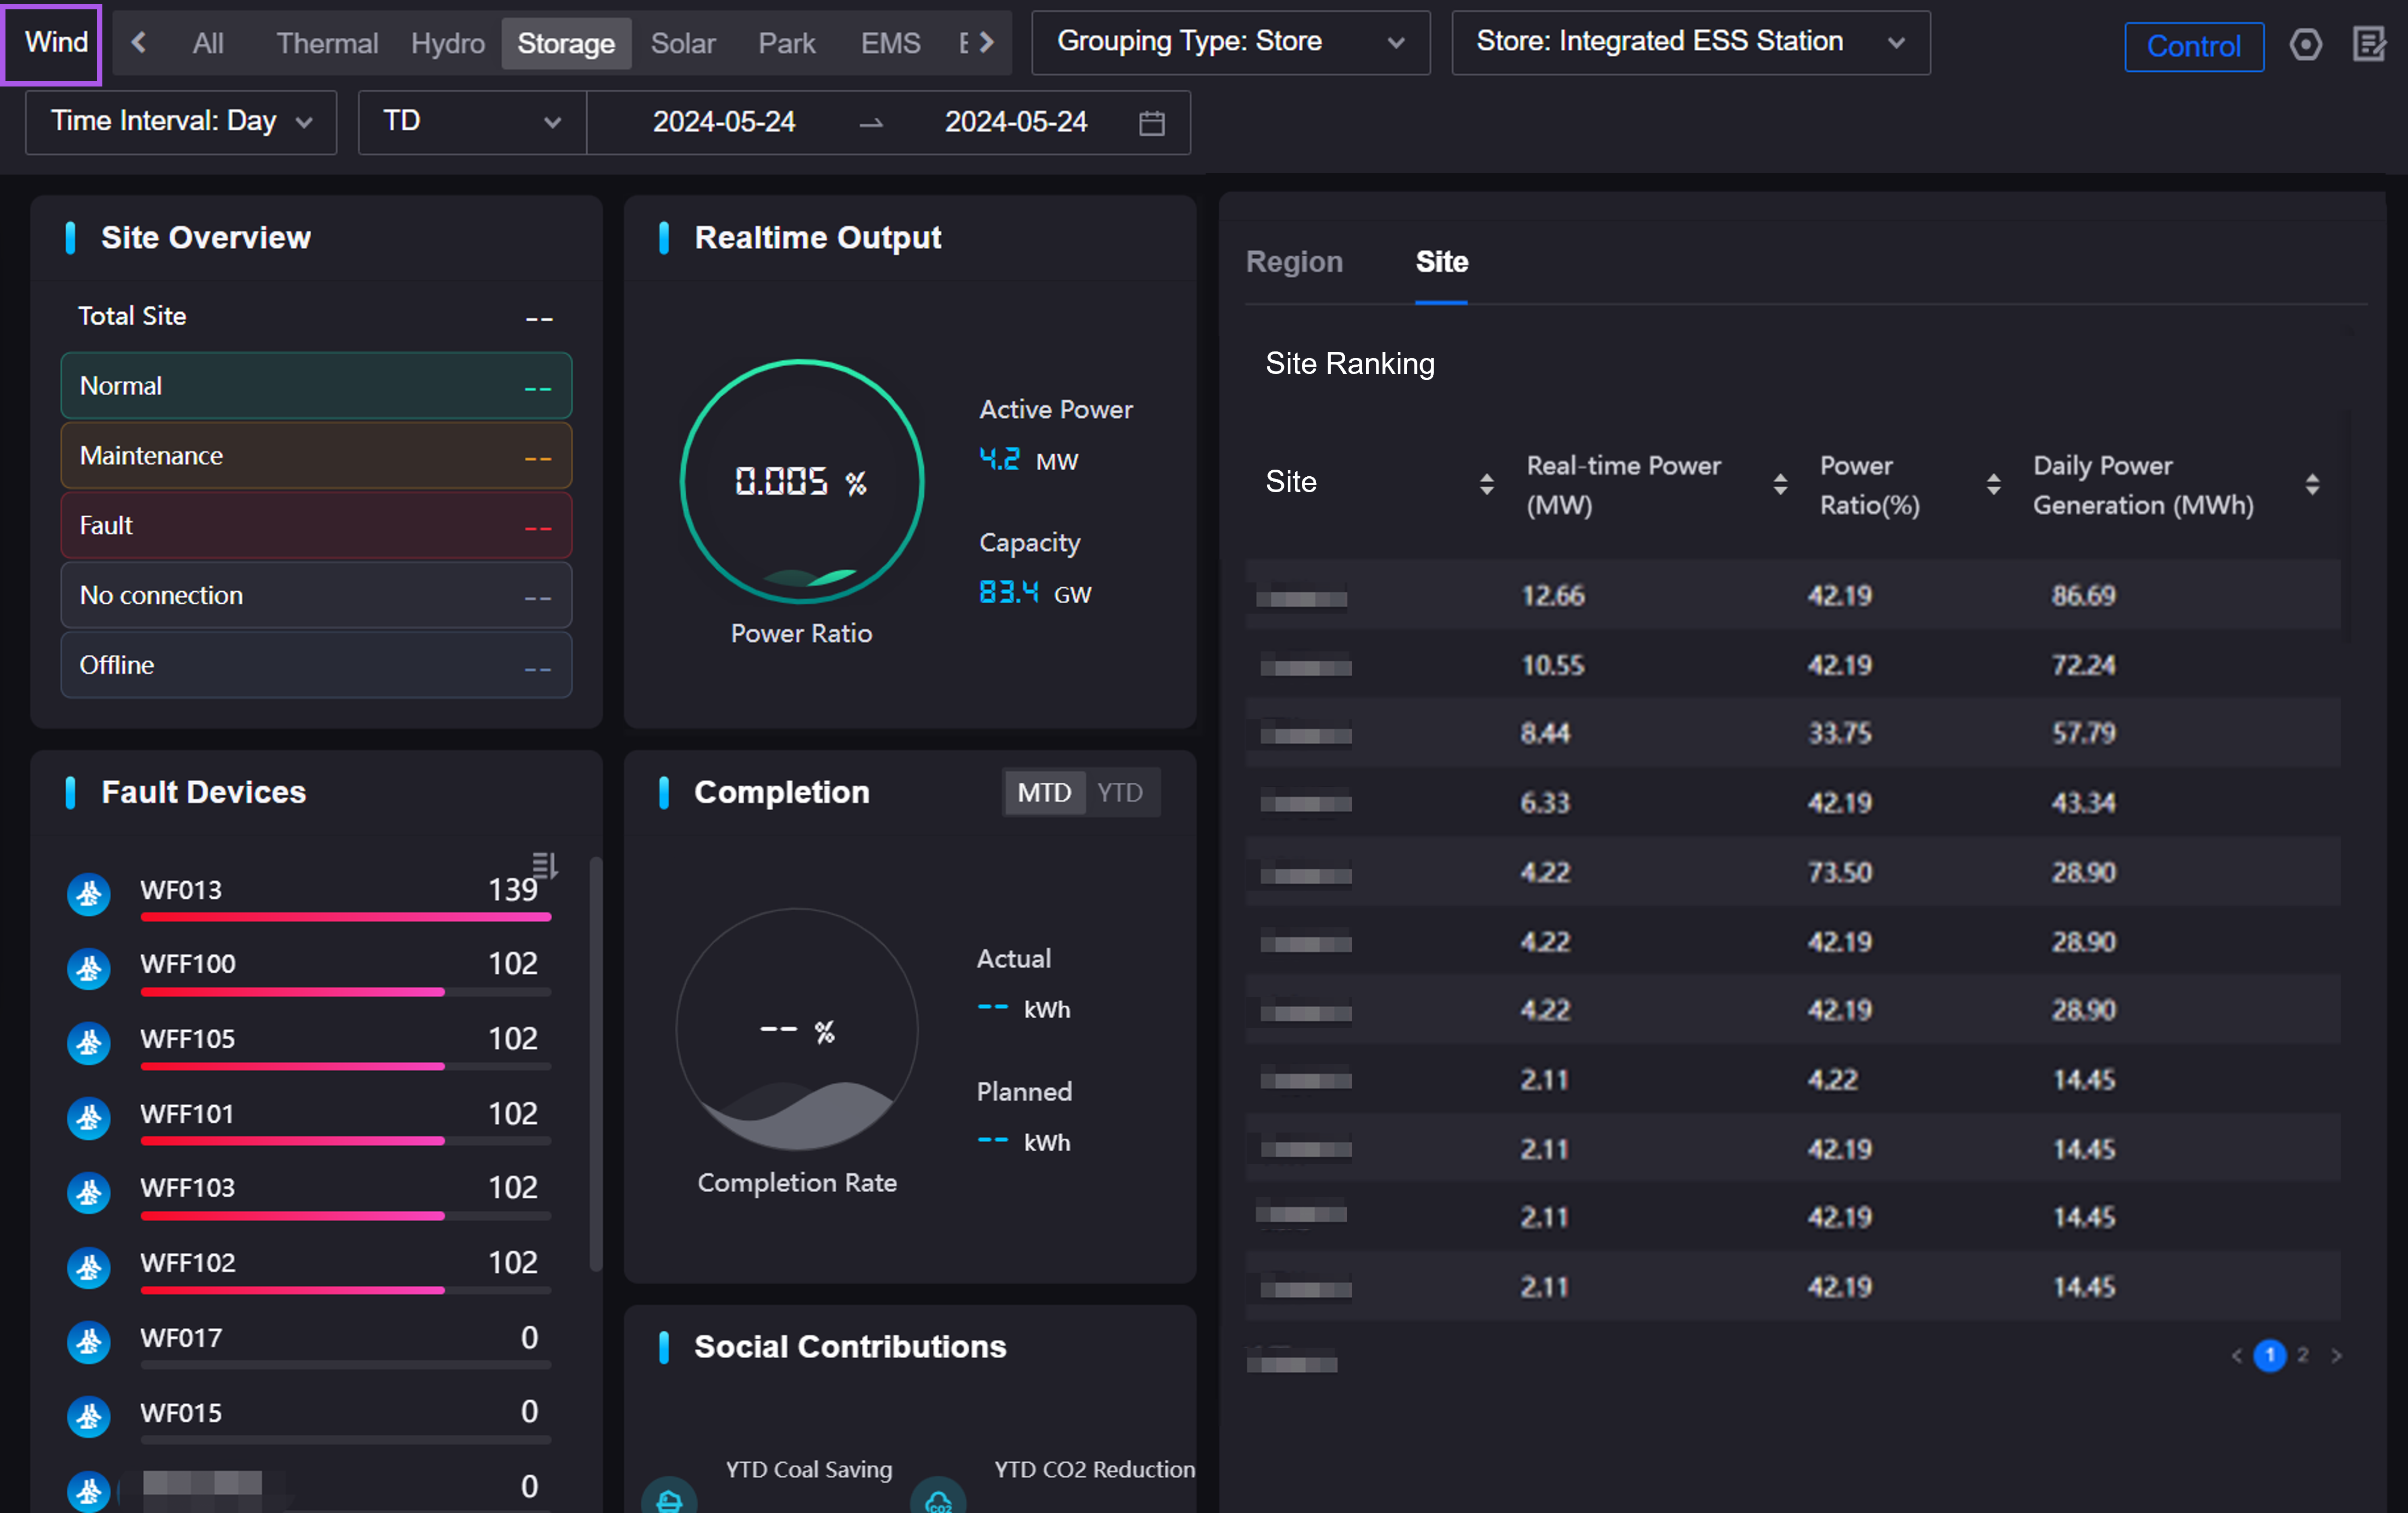
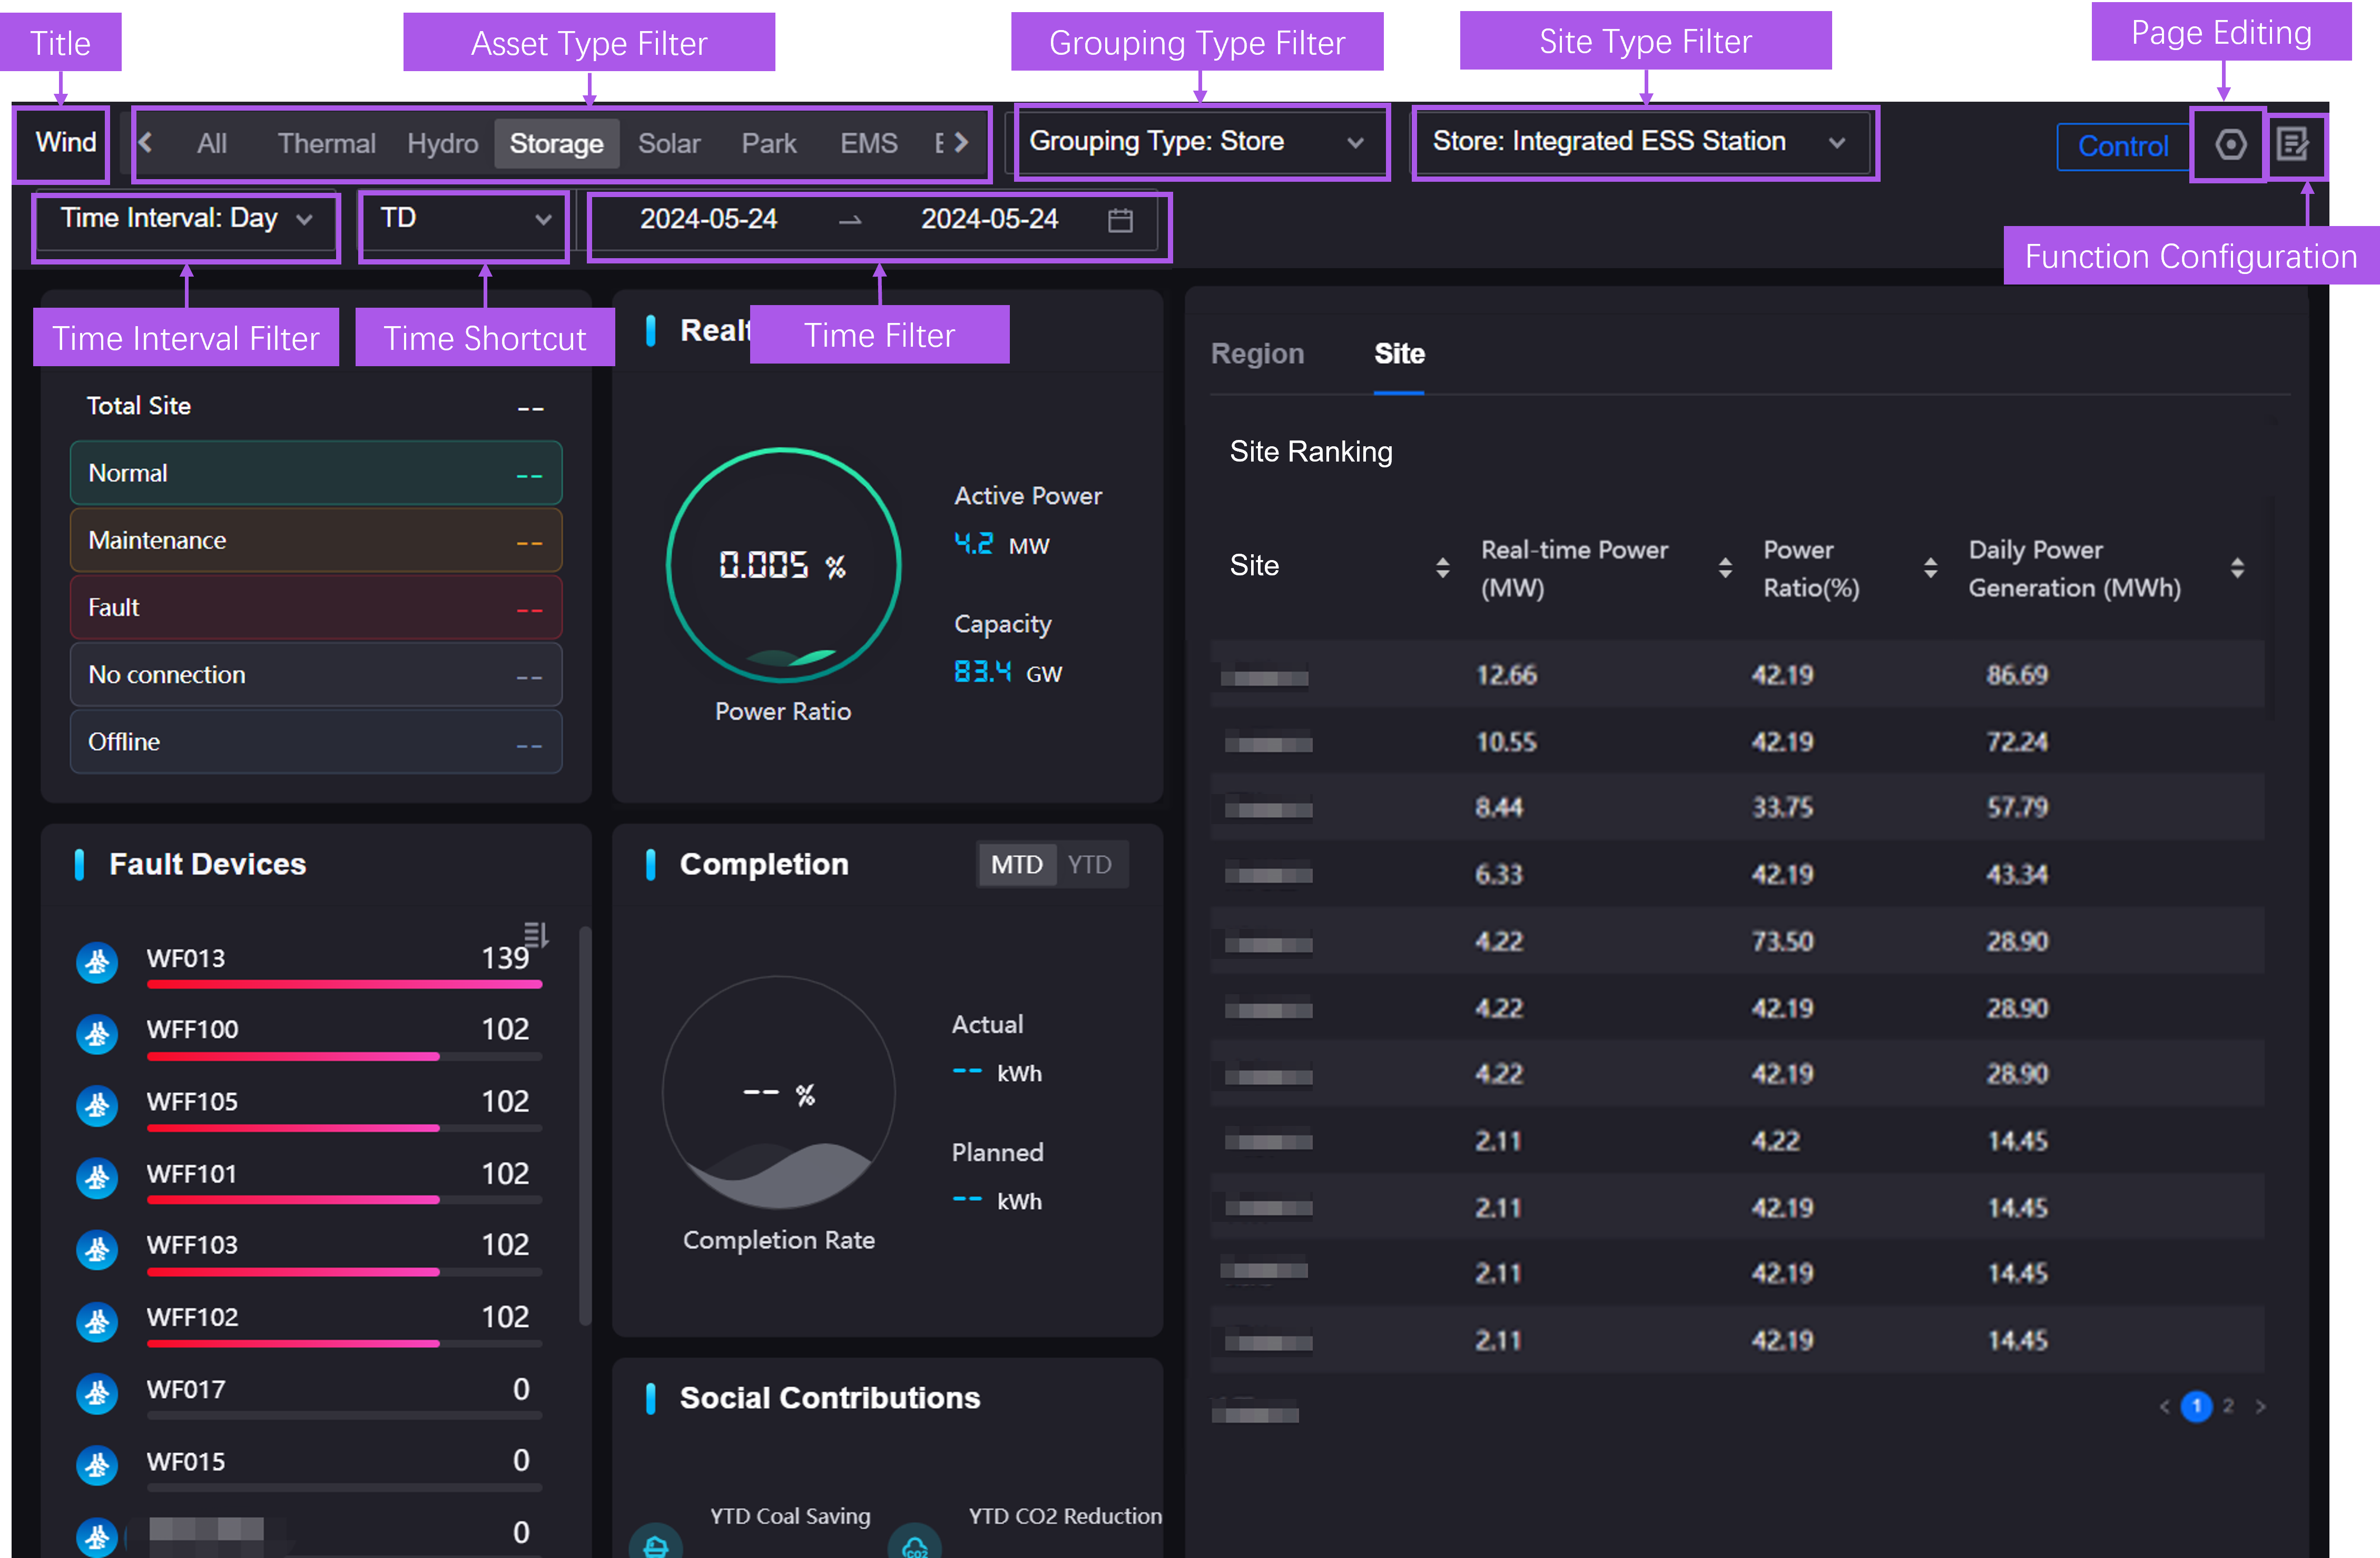
Here is an example of a landing page:
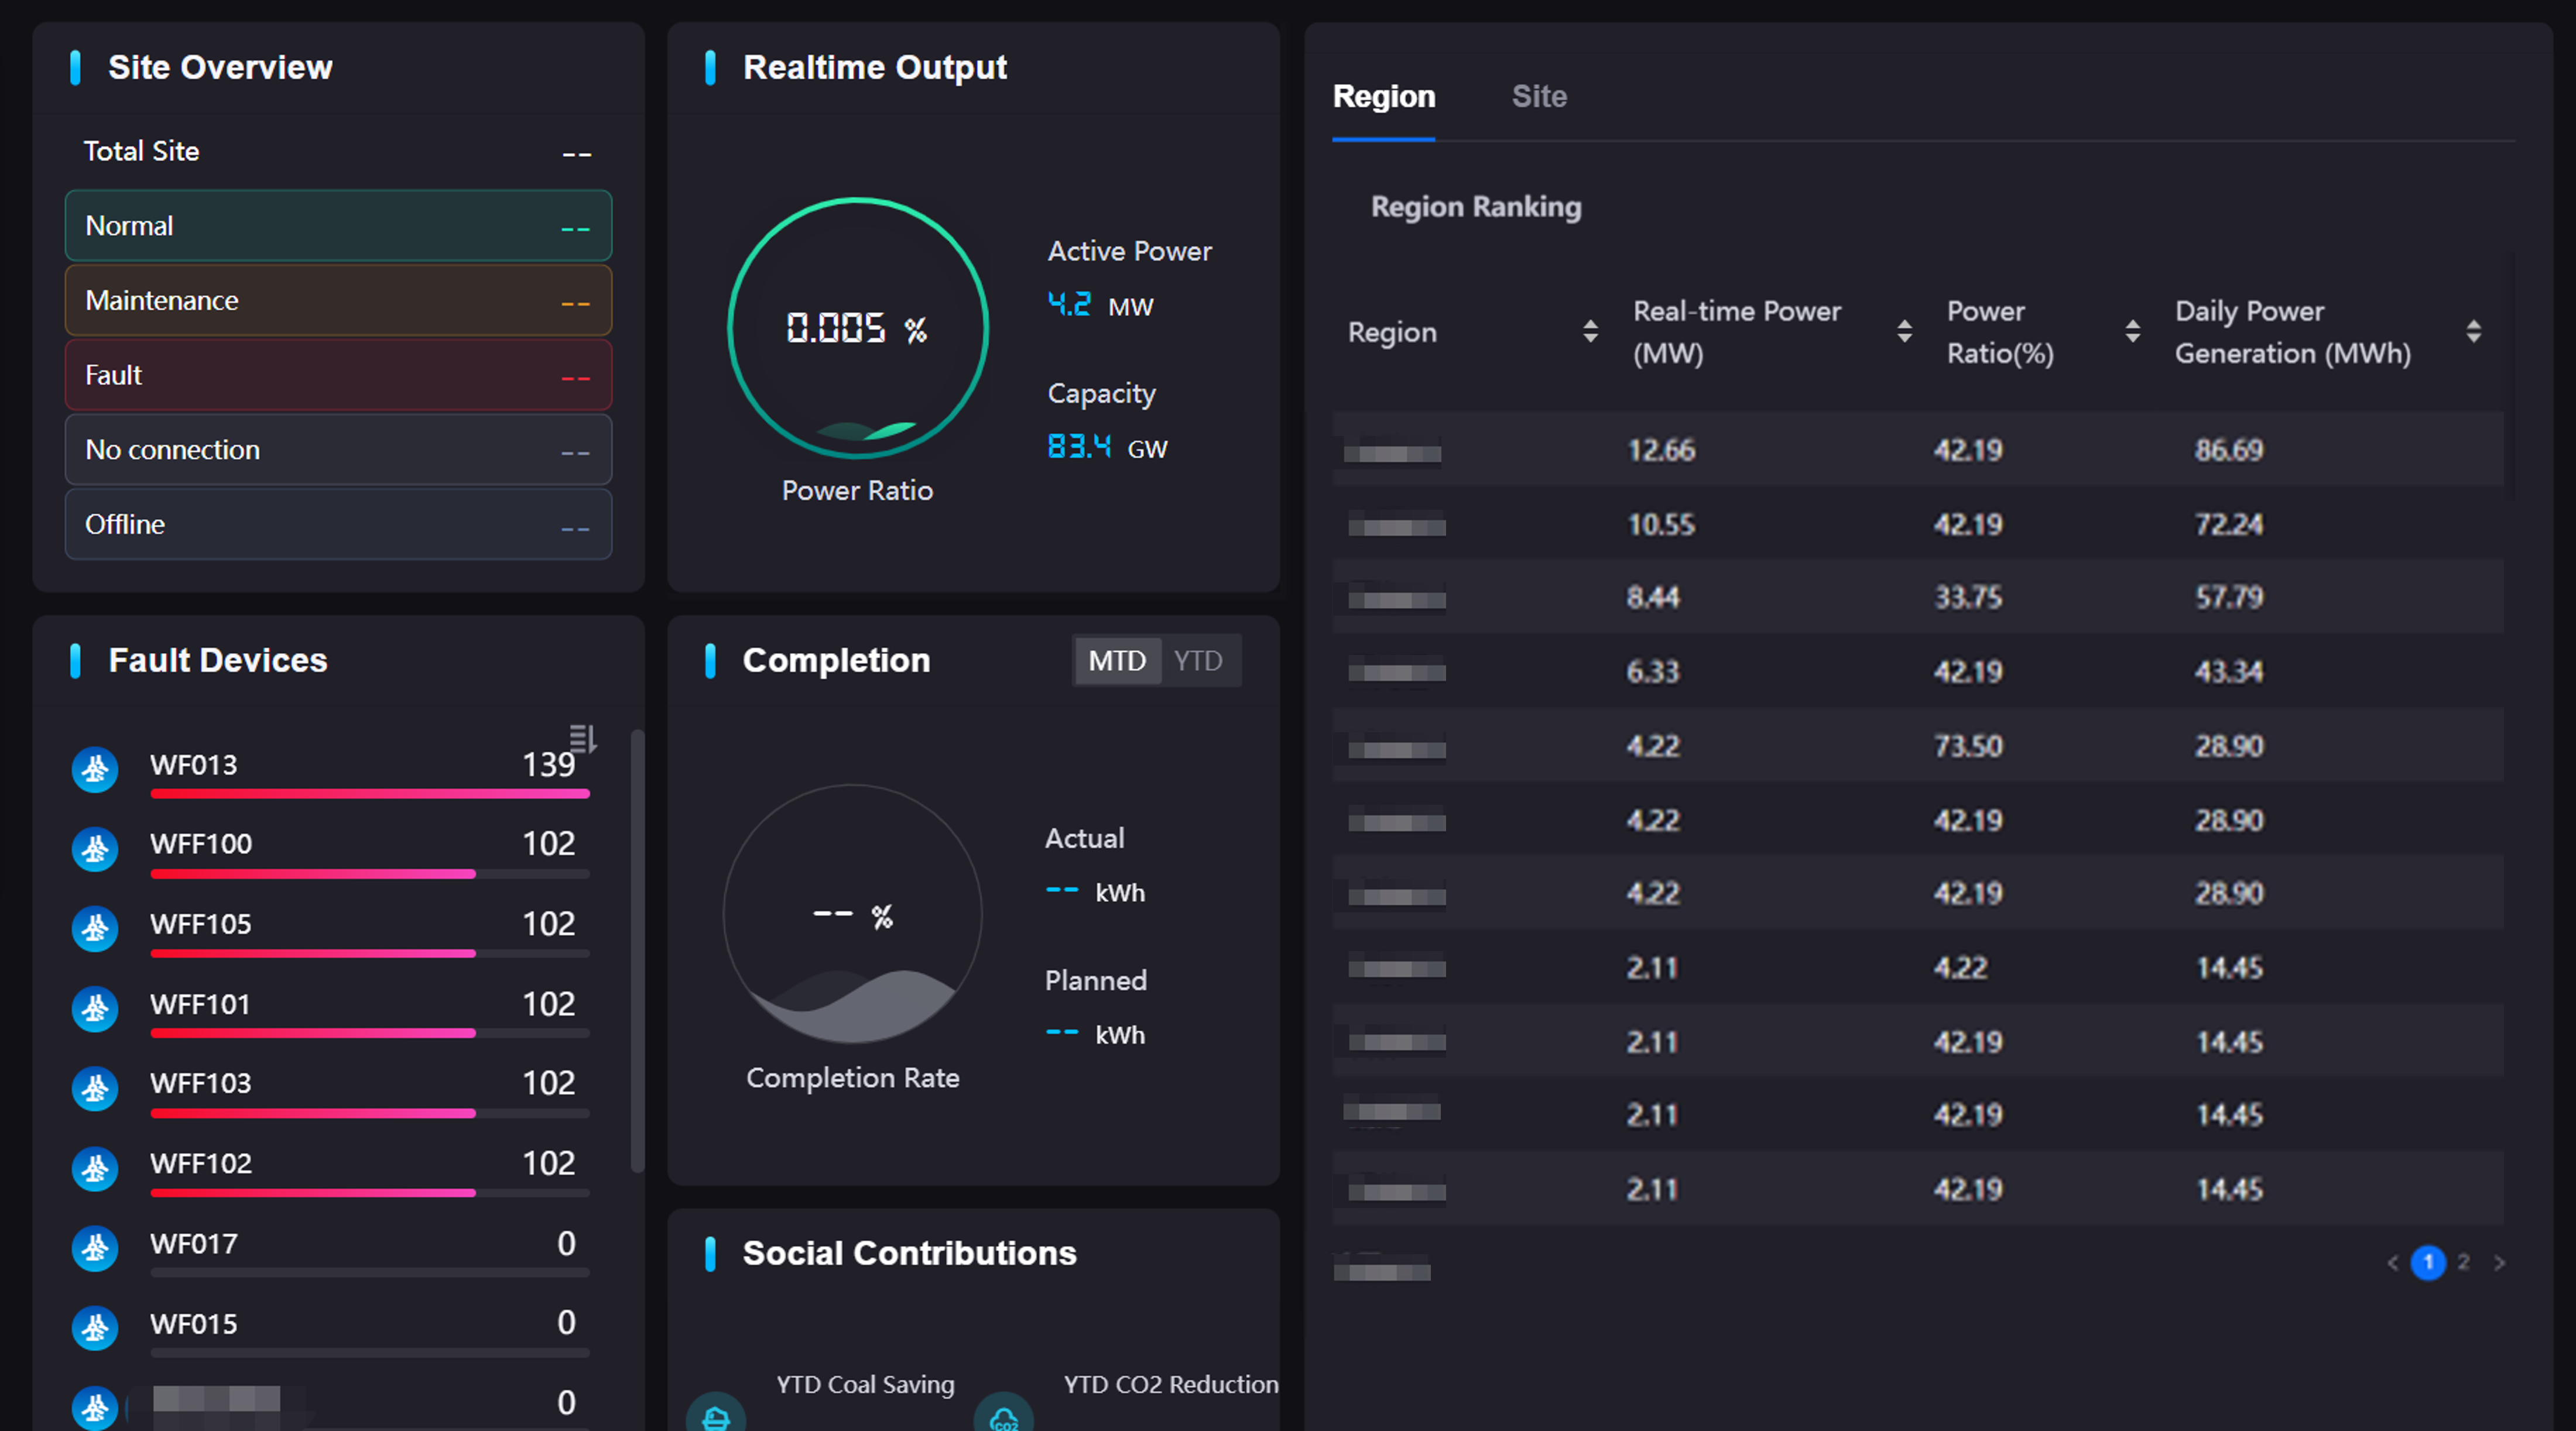
Prerequisites
Before you start, ensure the following:
The required assets are connected to EnOS and the following tags have been added. Additionally, the current account has been granted access to the assets in Application Portal.
Tag |
Description |
|---|---|
auth_unit:true |
To synchronize the assets from Application Portal > Developer Console to Application Portal. |
EnosCDS:true |
To obtain asset data through Common Data Service (CDS). |
You have admin permissions in Application Portal > Developer Console (contact the system admin for permissions).
You have (sub)administrator permissions in Application Portal, with the ability to manage menu groups and access the following Common Building Blocks (CBBs):
Design Mode
This section introduces how to create pages in DTV and configure global filters for multi-domain assets.
Step 1: Importing or Creating DTV Pages
In Application Portal, select Digital Twin Visualization > DTV Center, and choose the DTV dashboard page that you want to add to the landing page. If none exist, you can prepare the DTV page using one of the following methods:
Method 1: Importing Sample Pages
Download the sample pages, without the need to unzip or edit the compressed file.
In Application Portal, select Digital Twin Visualization, and choose Import/Export under Common Used on the right. If you cannot find the Import/Export entry, contact the OU administrator to grant you the permission.
In the Import tab, select Choose File to upload the sample pages zip file.
Select Import. You can check the import status in the latest import log at the bottom of the page.
After the import, you will find the imported page in the Dashboard.
Method 2: Creating Pages from Scratch
In addition to importing pages, you can also create pages from scratch in DTV. You can refer to the following documents:
Building a Smart Battery Dashboard: Build a DTV dashboard page using the smart battery monitoring page as an example.
Building a Water Purification System Monitoring Page: Build a DTV dashboard page using the wind power industry workbench as an example.
Step 2: Configuring Global Filters
To ensure that the filters provided by the landing page can properly filter the assets and related data on the page, you need to configure the global filters on the dashboard page so that the dashboard page can receive the parameters passed in by the landing page.
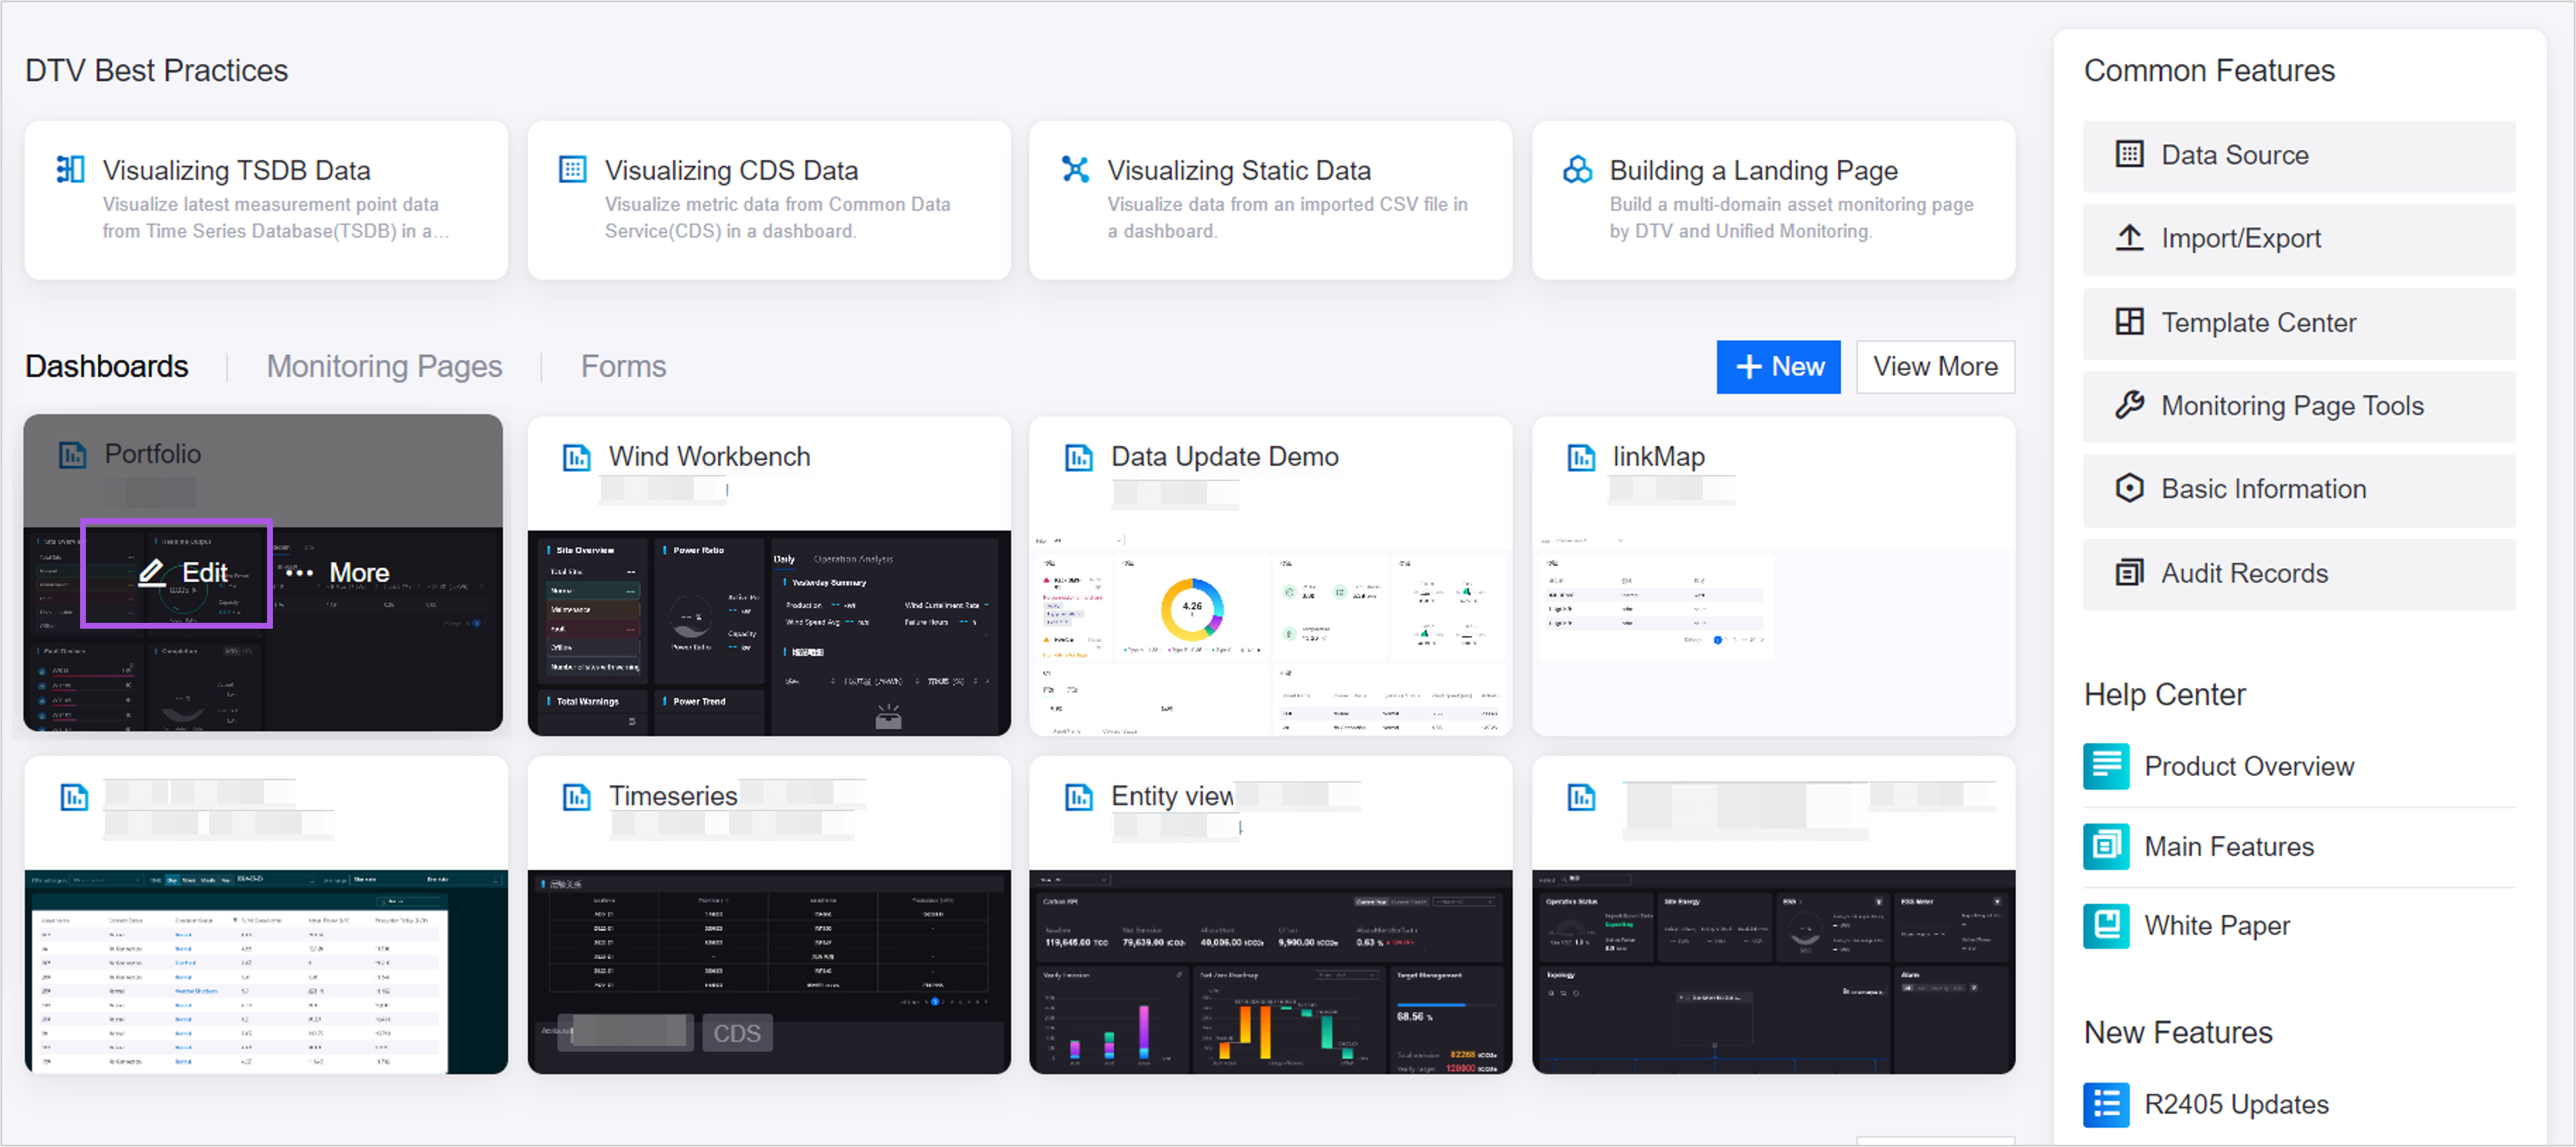
Select the DTV dashboard page that you want to add to the landing page, and click the Edit button.
In the top left corner of the canvas, select Add > Global Filter, and you can edit the existing filters as needed.
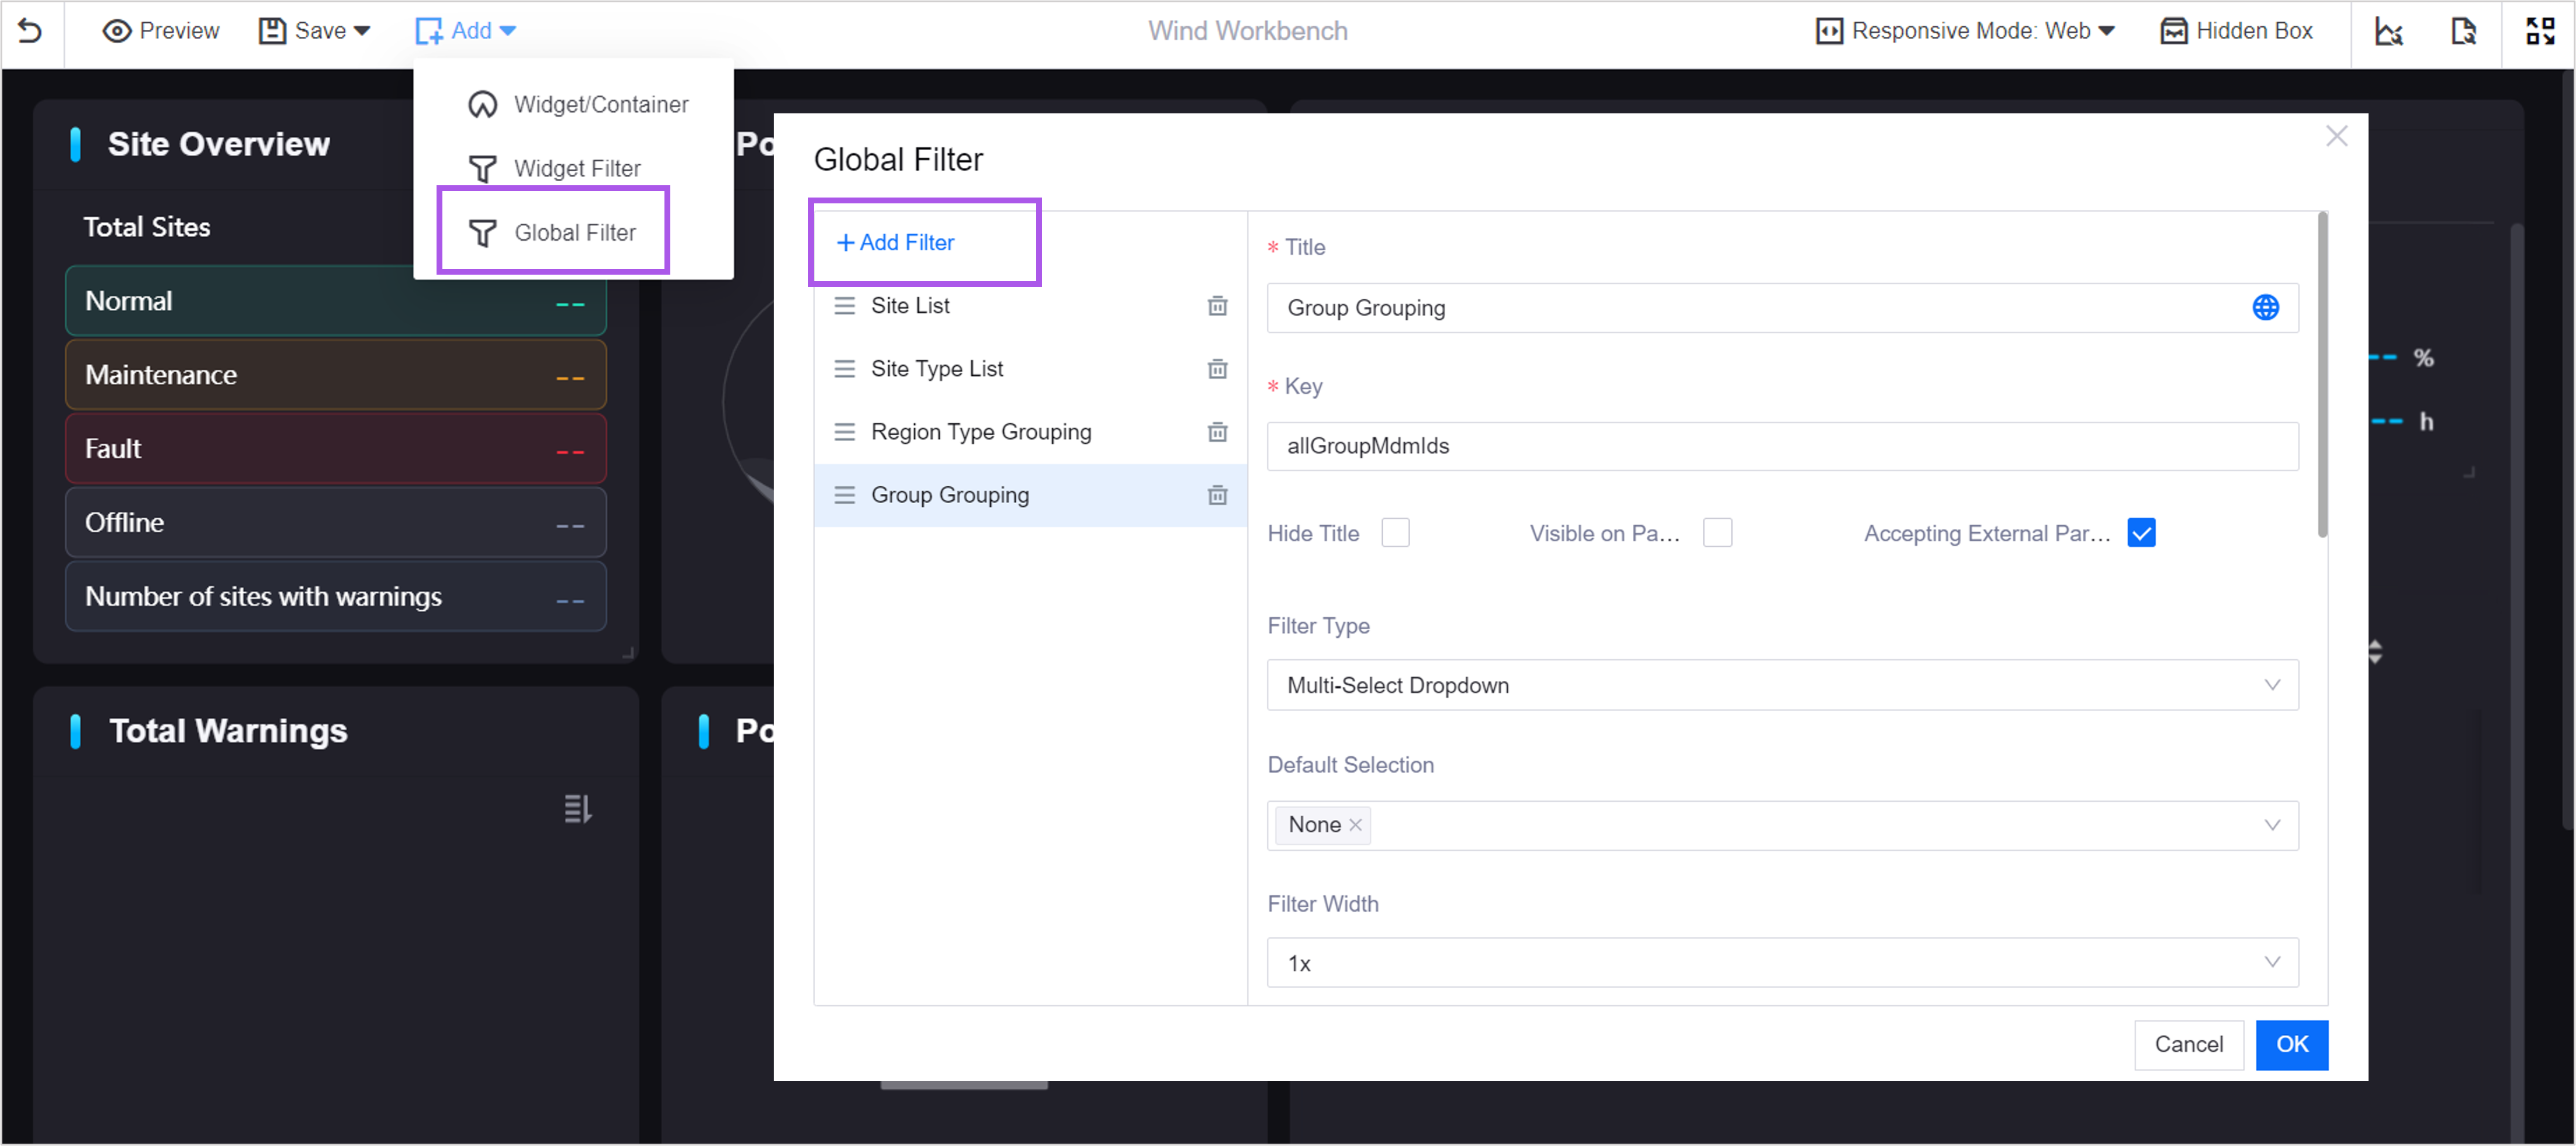
In the Key input box, you can enter the parameters of the landing page to achieve specific effects, such as:
Mix Gauge - Realtime Output: Aggregated data at the group level, it is recommended to add the
allGroupMdmIdsparameter to pass in the site IDs grouped by the group.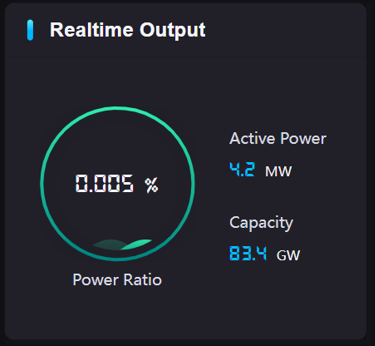
Table - Region Ranking: Aggregated data at the region level, it is recommended to add the
mdmIdsByRegionparameter to pass in the data grouped by the region node.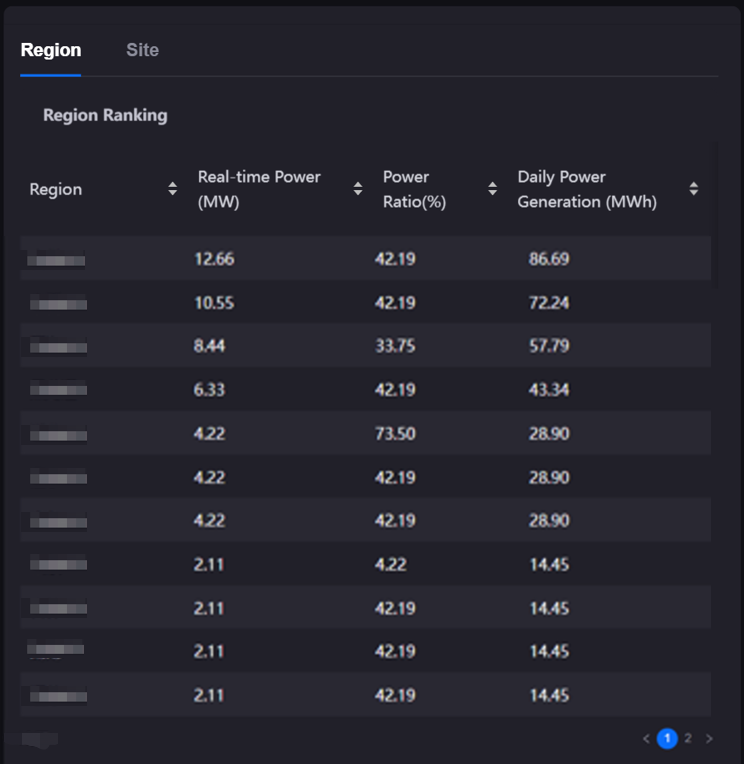
Table - Site Ranking: Separately display the data of each site/device, it is recommended to add the
mdmIdparameter to pass in the data of all asset IDs.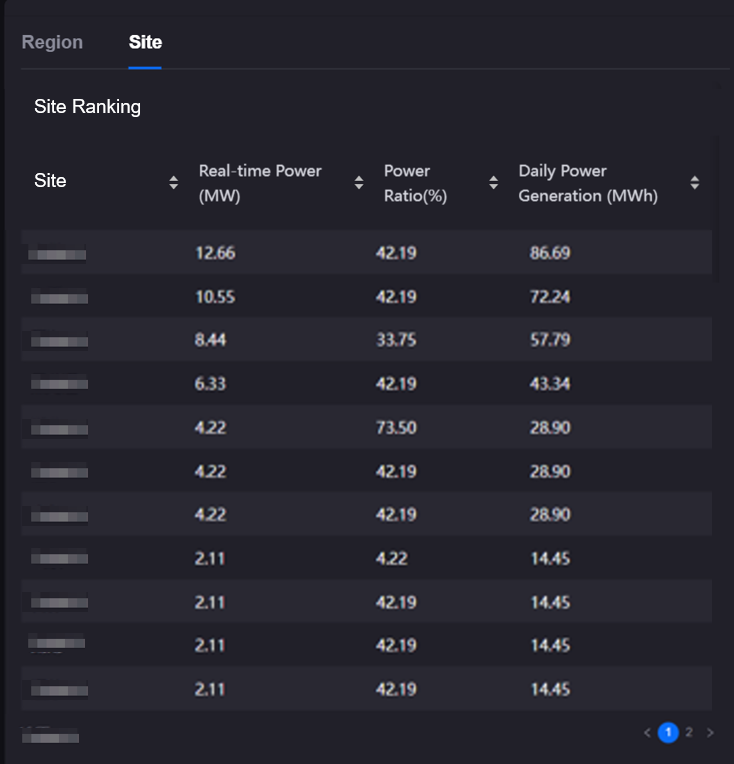
For the supported parameters and their descriptions, see landing page Parameters.
In the Properties section, disable Hide Title and Visible on Page, and enable Accepting External Parameters.
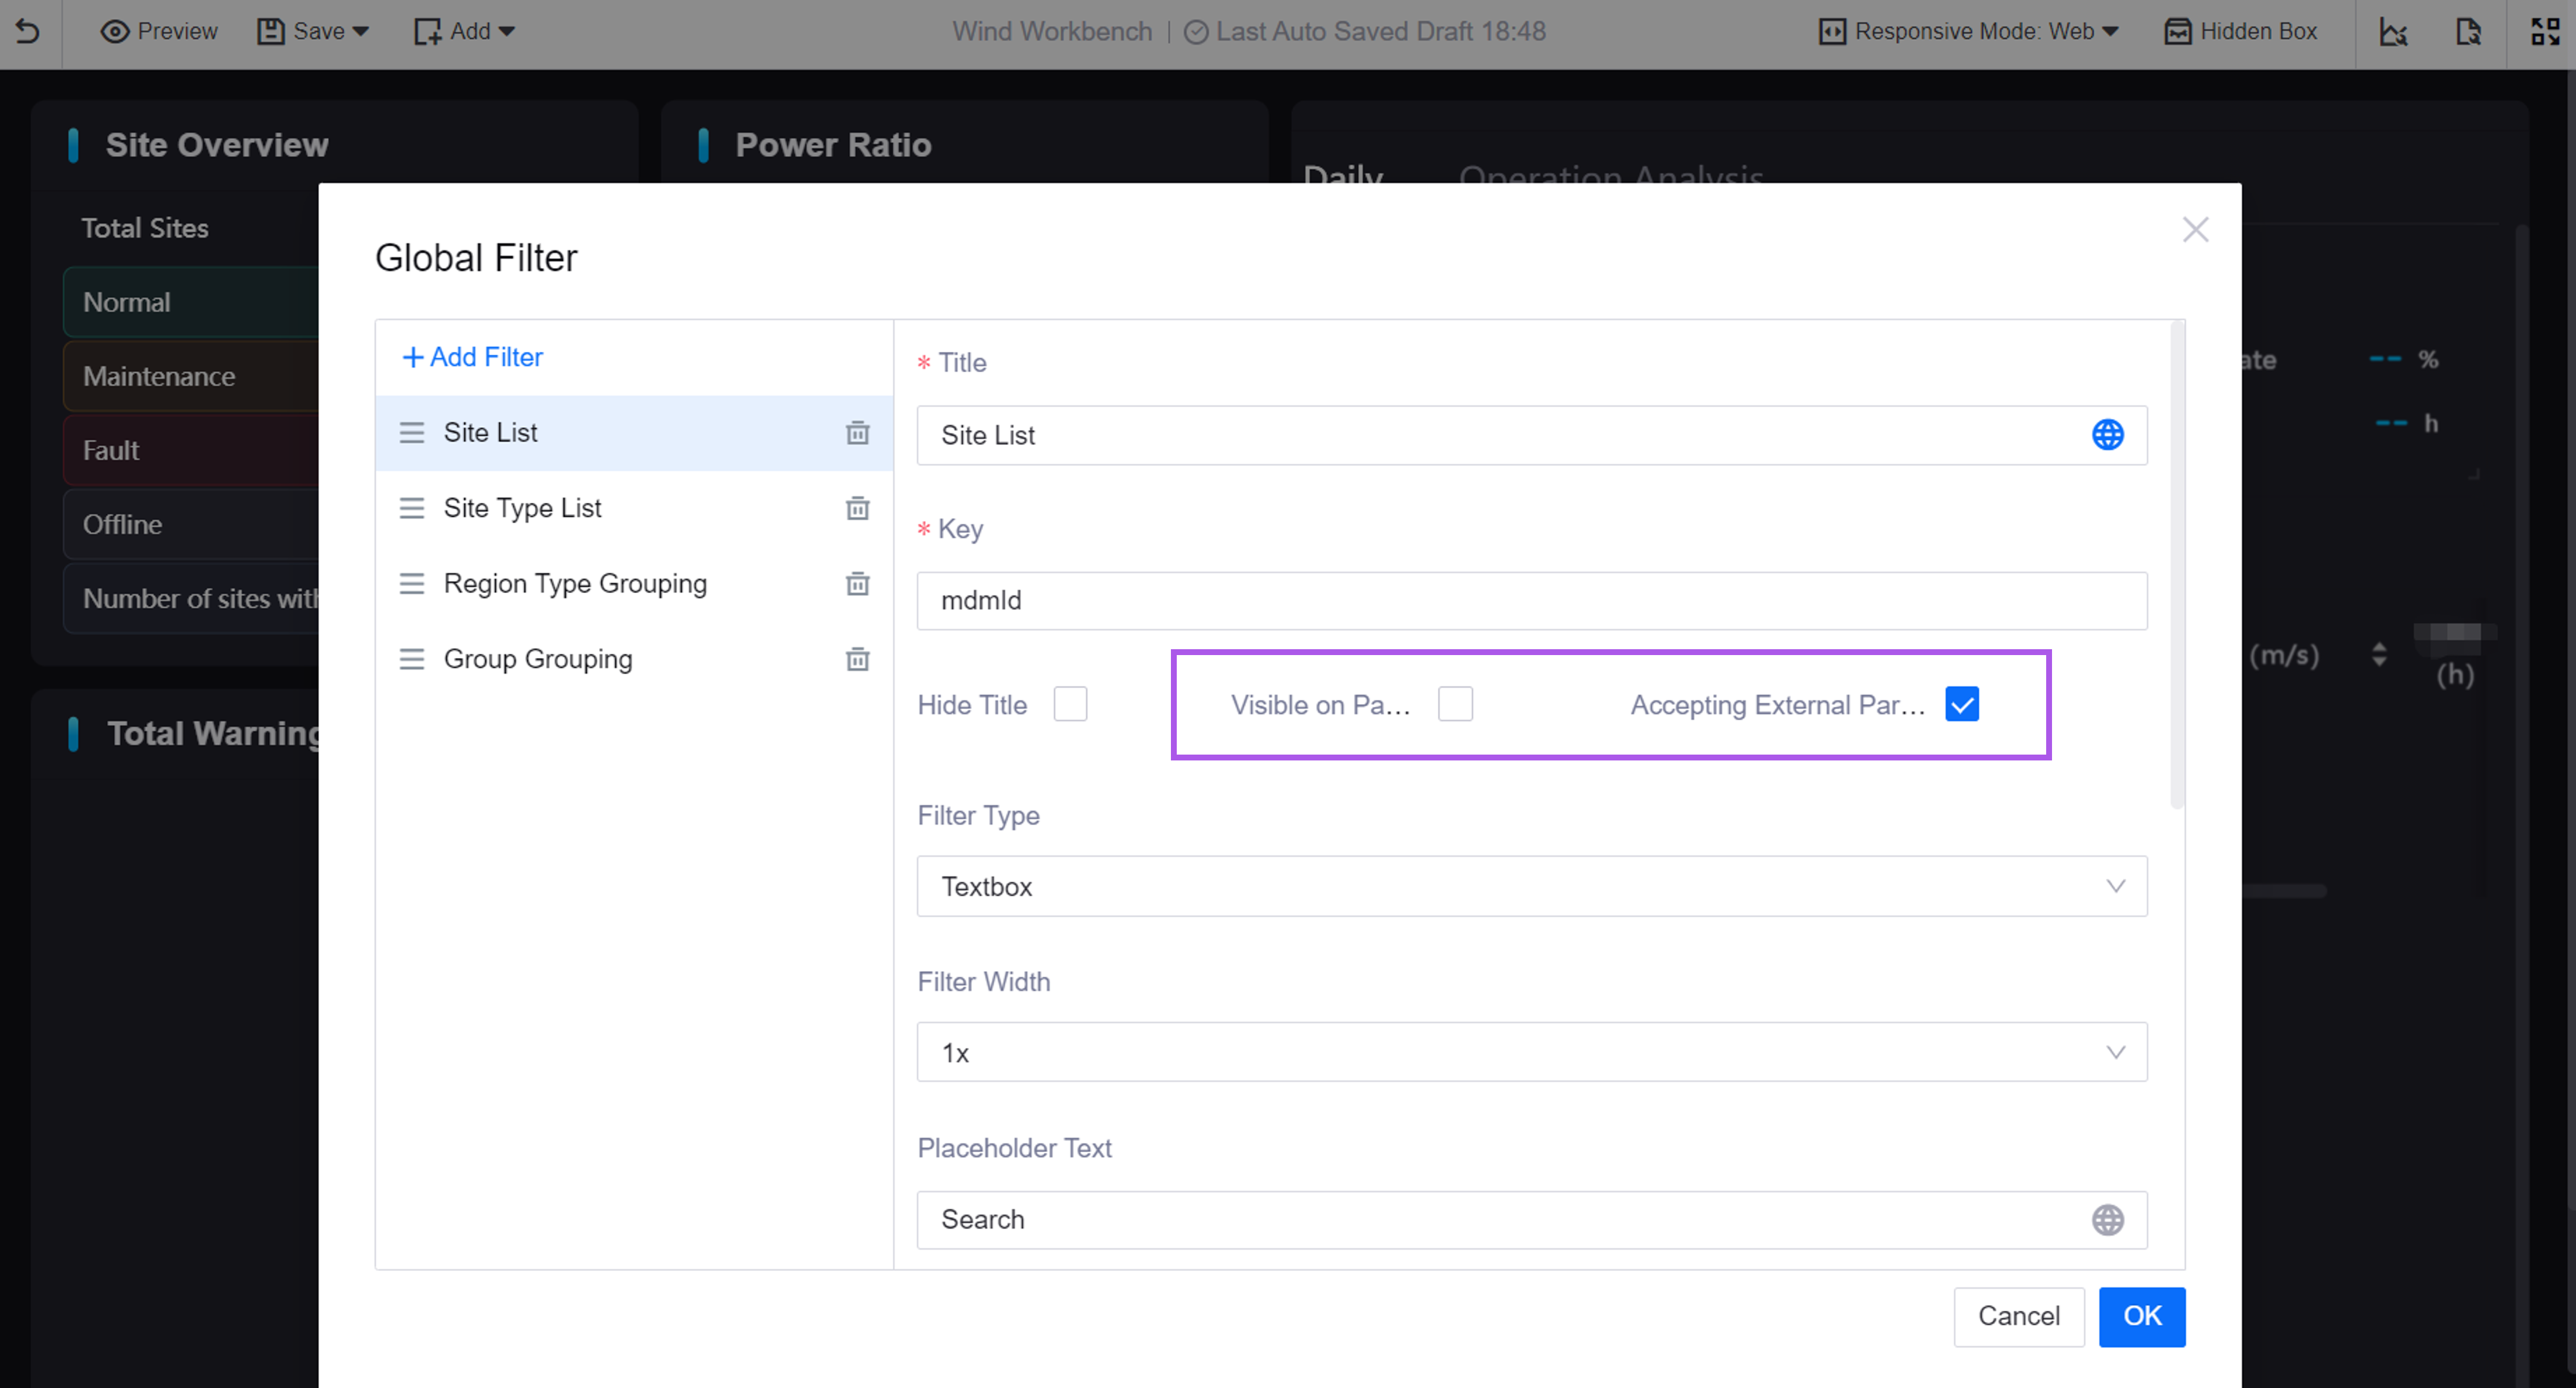
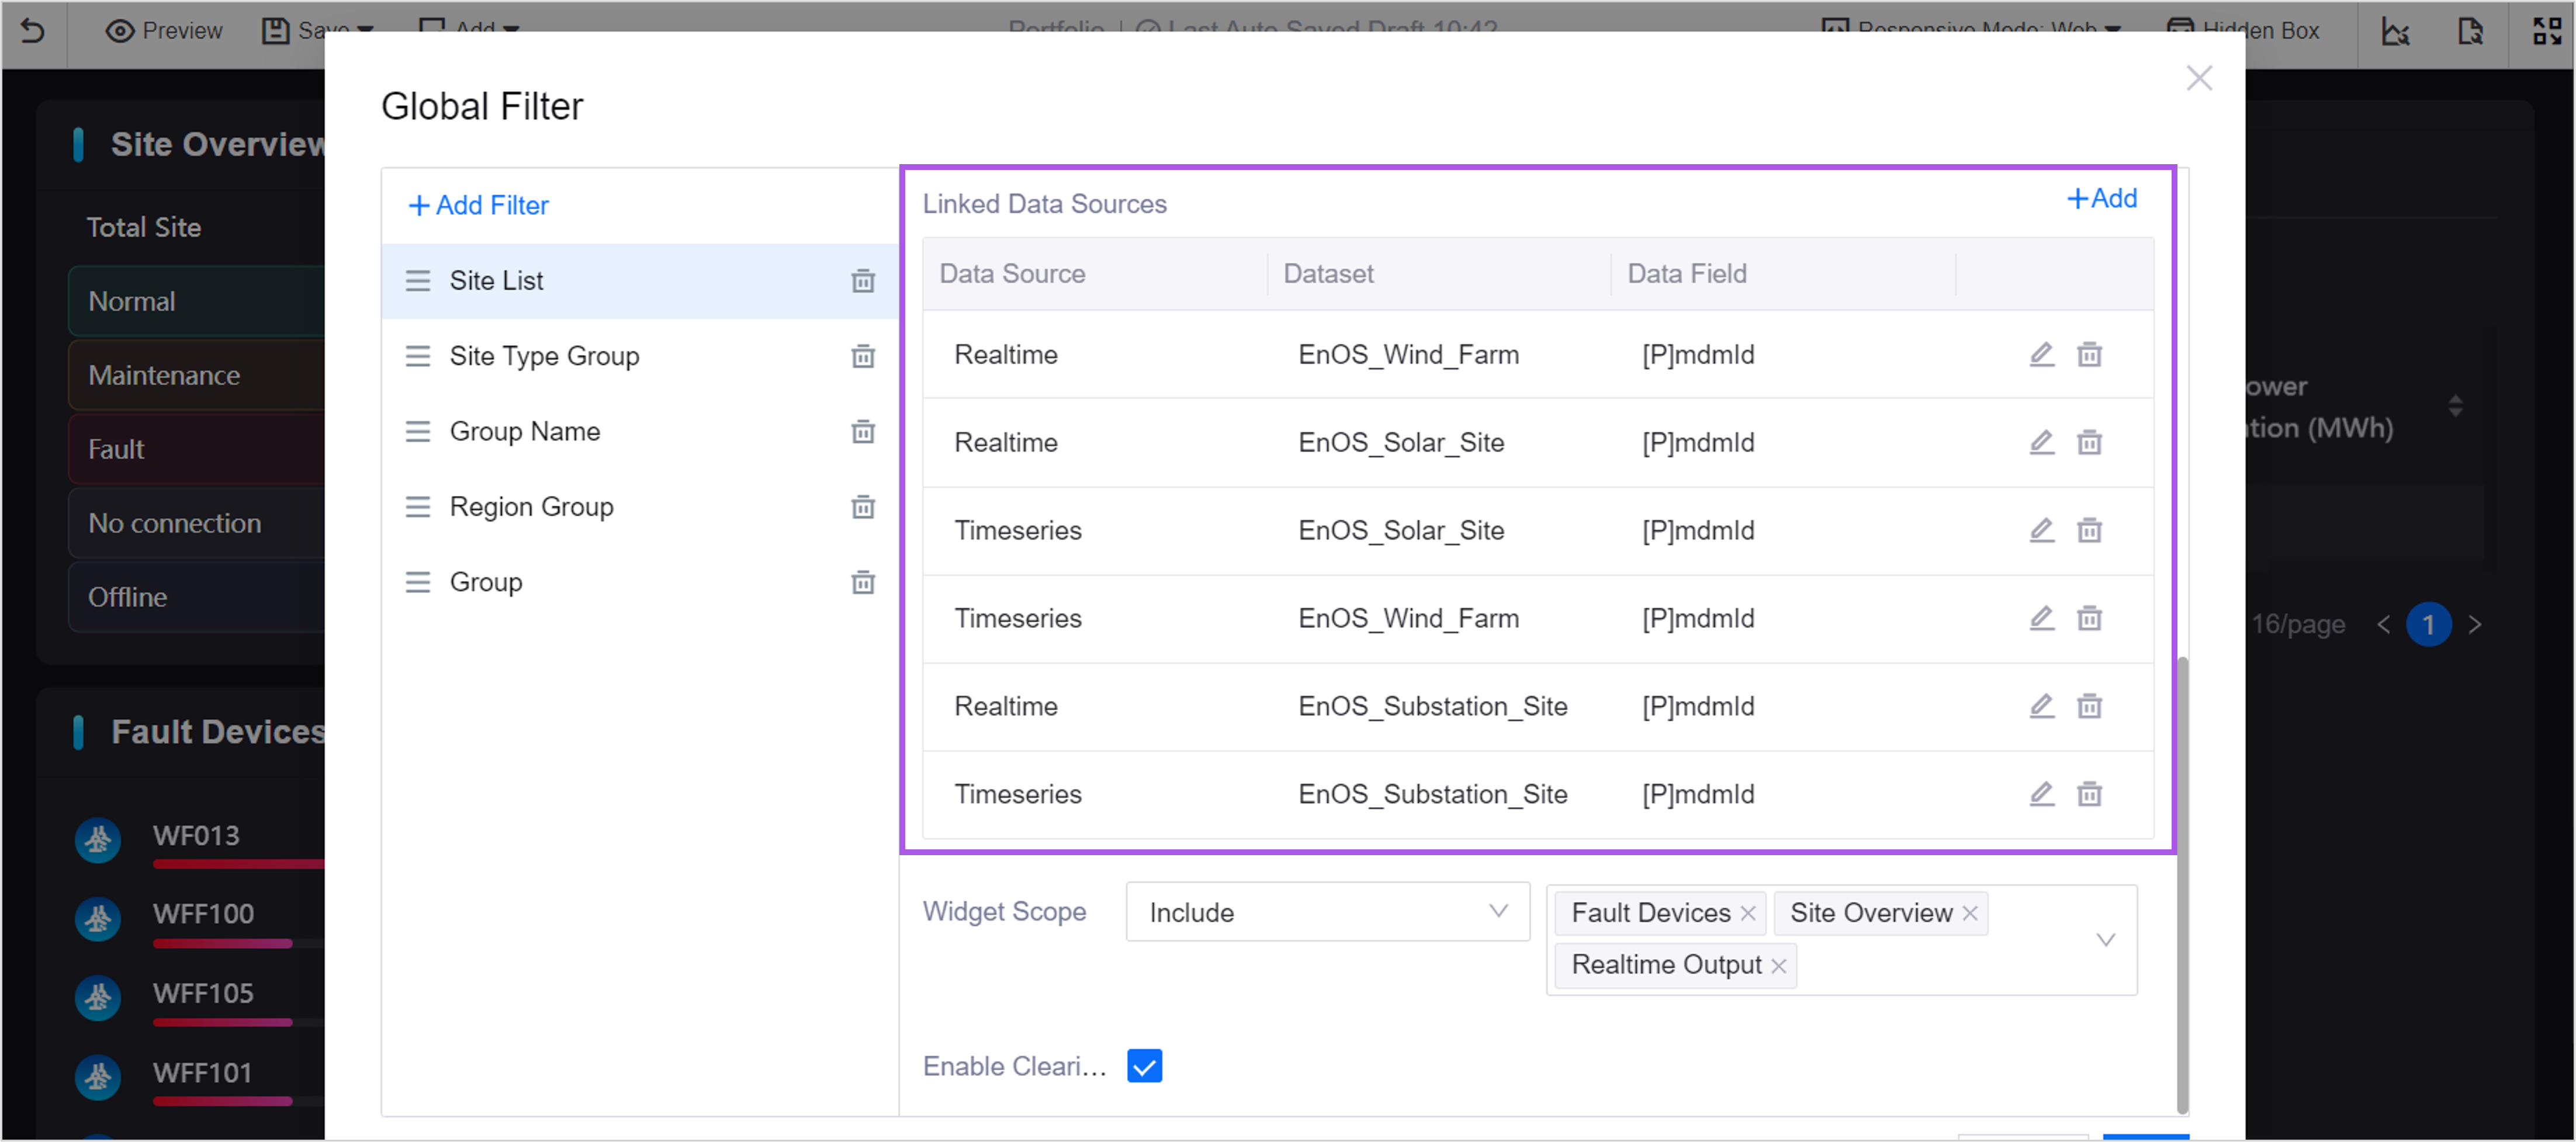
In the Linked Data Sources section, add the Common Data Service (CDS) data sources used by the current page to determine the filtering object of the global filter.
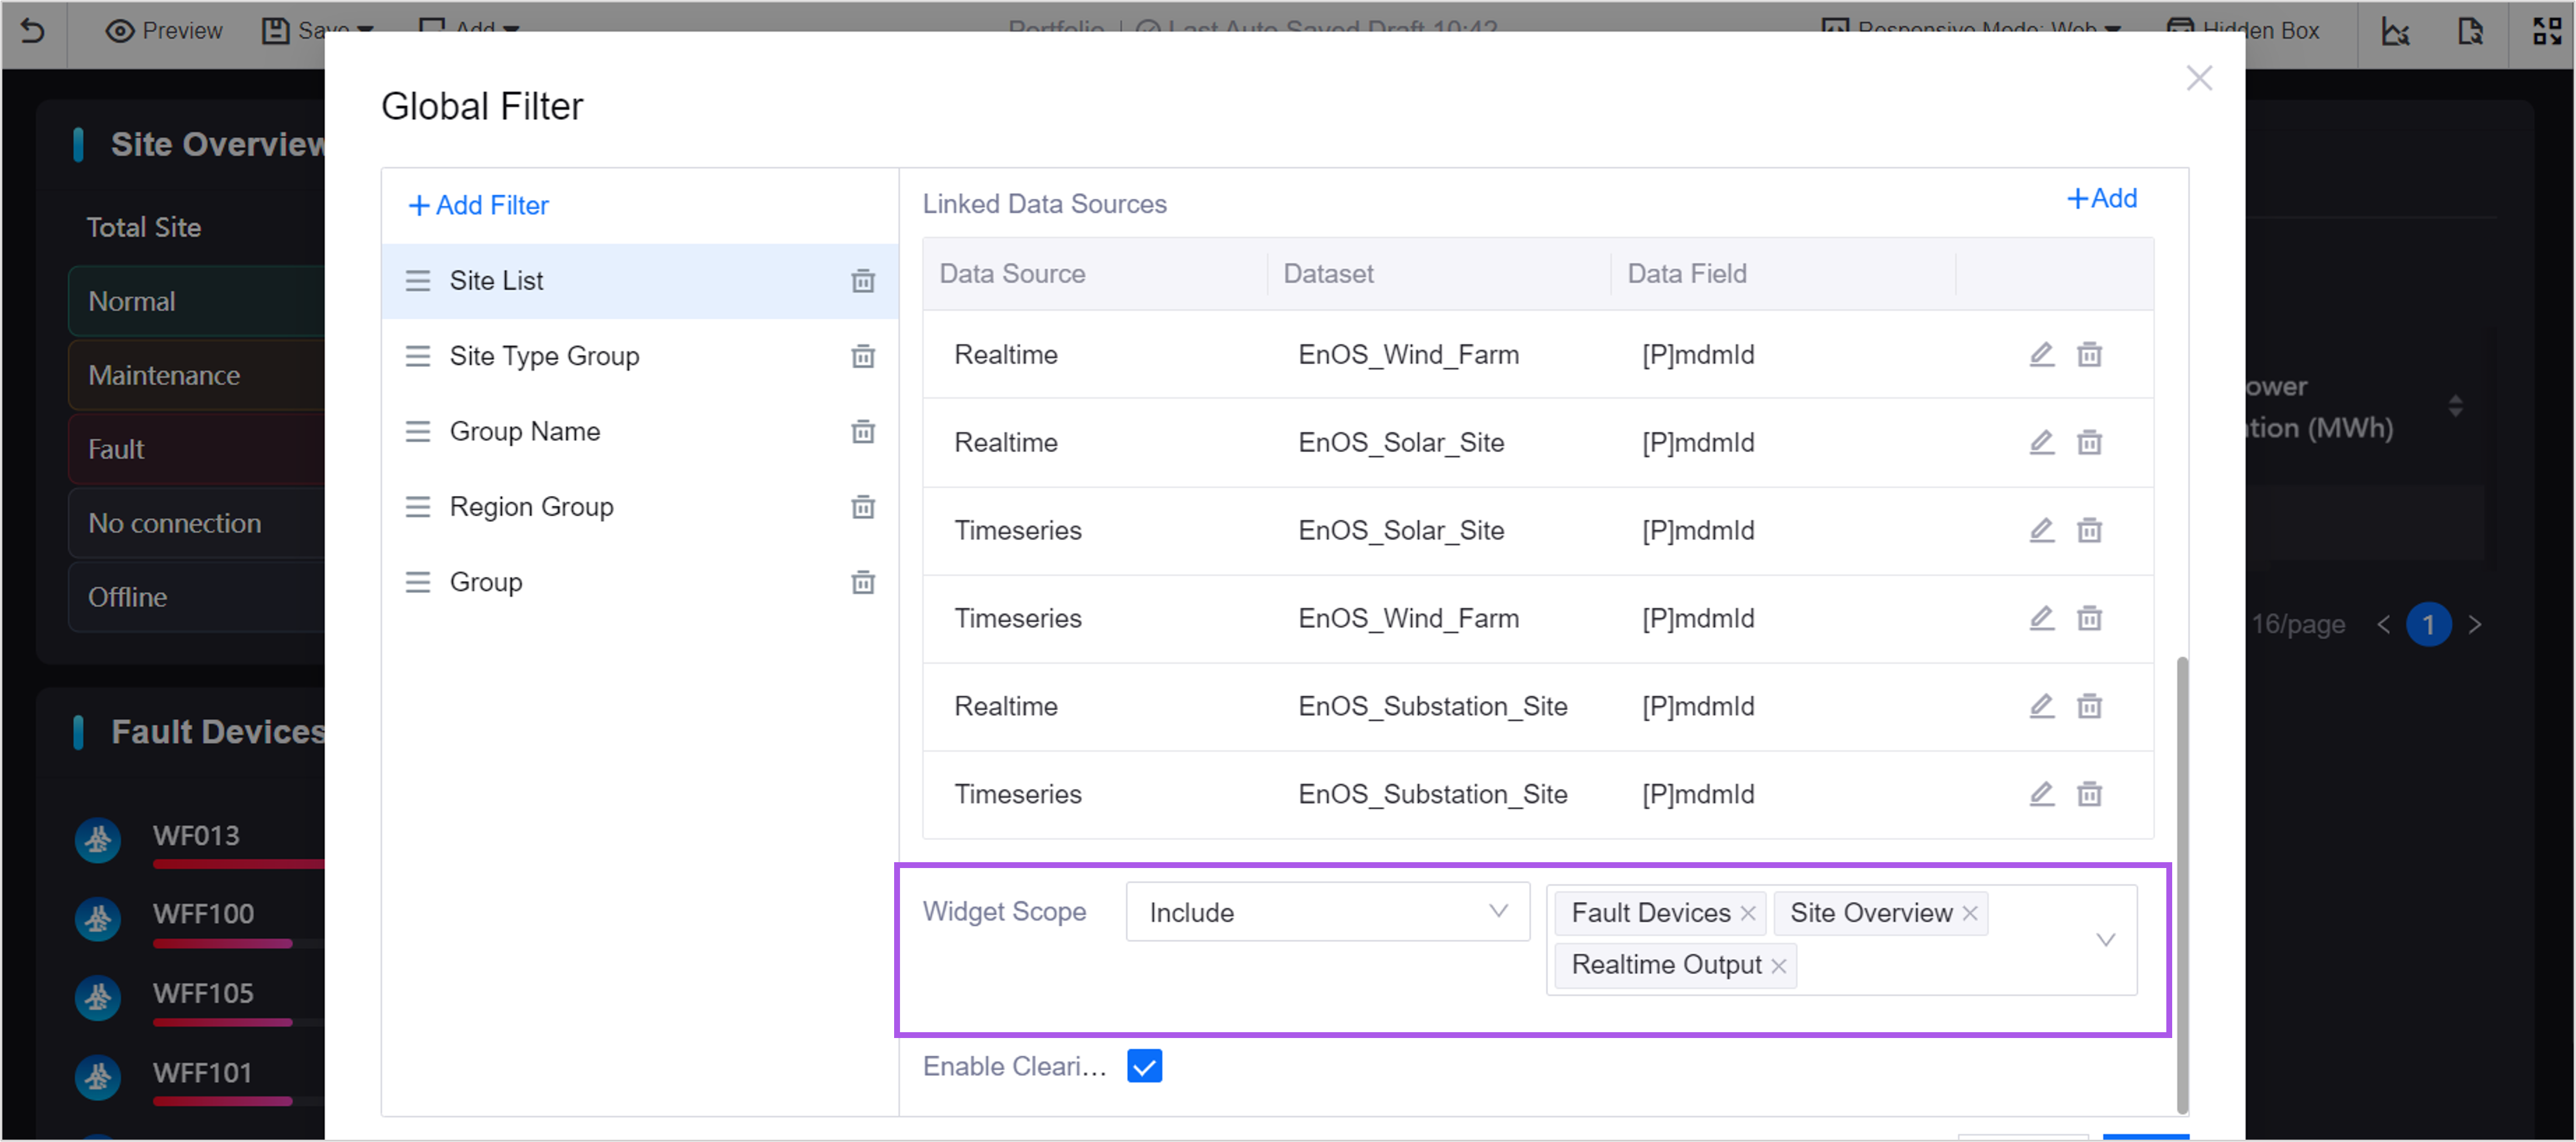
In the Widget Scope section, select the widget range that needs to receive the current parameter to determine which widgets’ assets and data will be filtered by the global filter.
Step 3: Copying the Page URL
In the Digital Twin Visualization of Application Portal, select the Edit button for the dashboard page.
In the top left corner of the canvas, select Save > Save and Publish to publish the page.
After successful publishing the page, copy the page URL. For subsequent configuration, you only need to extract the content from “/dt/” and afterwards.
Configuration Mode
In the Unified Monitoring of Application Portal, when you first enter the landing page, the page will prompt “The page is not configured yet, click the button below to configure”. At this point, you can click the Functional Configuration button in the middle of the page or in the top right corner to enter the configuration mode.
Step 1: Configuring Basic Information
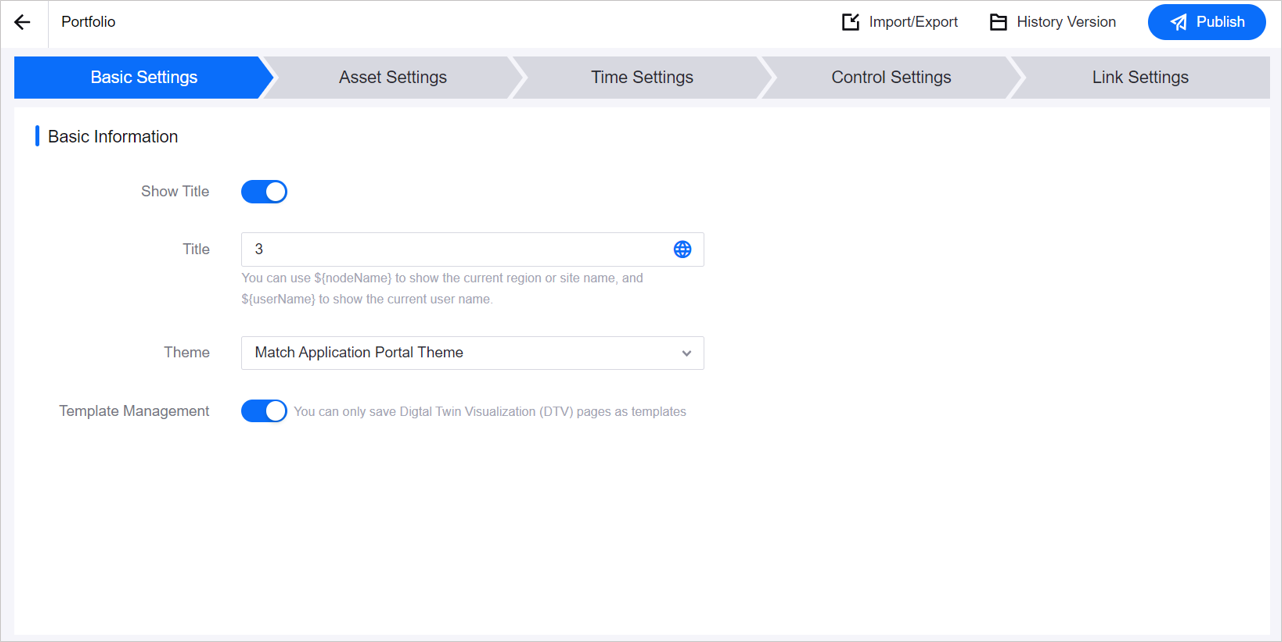
In the Basic Settings page, you can configure the following:
Show Title: If you need to add a title in the top left corner of the page, you can turn on this switch and enter the title content in the Title input box. It supports:
Theme: The landing page provides black, green, and white themes, and you can define the theme color of the landing page here. If you select Follow Application Portal Theme, the theme color of the landing page will switch according to the switching of Application Portal theme. The correspondence between Application Portal system theme and the landing page theme color is: dark corresponds to black, blue-green corresponds to green, and black and white correspond to white.
Template Management: Before enabling the template management function, you need to ensure that: (1) the page to be associated is a DTV page; (2) the DTV page editing relevant permissions have been obtained. After enabling, when the DTV page editing is completed and saved, you can choose to save the page as an organization template or a personal template.
Step 2: Configuring Assets
Asset Scope
In the Asset Scope section of the asset configuration page, you can configure the following:
Enable Asset Settings: The asset-related configuration can only be performed after the asset configuration switch is turned on, which is generally required. When there is already asset data on the page and the unified monitoring does not need to pass asset parameters to the page, this option can be disabled.
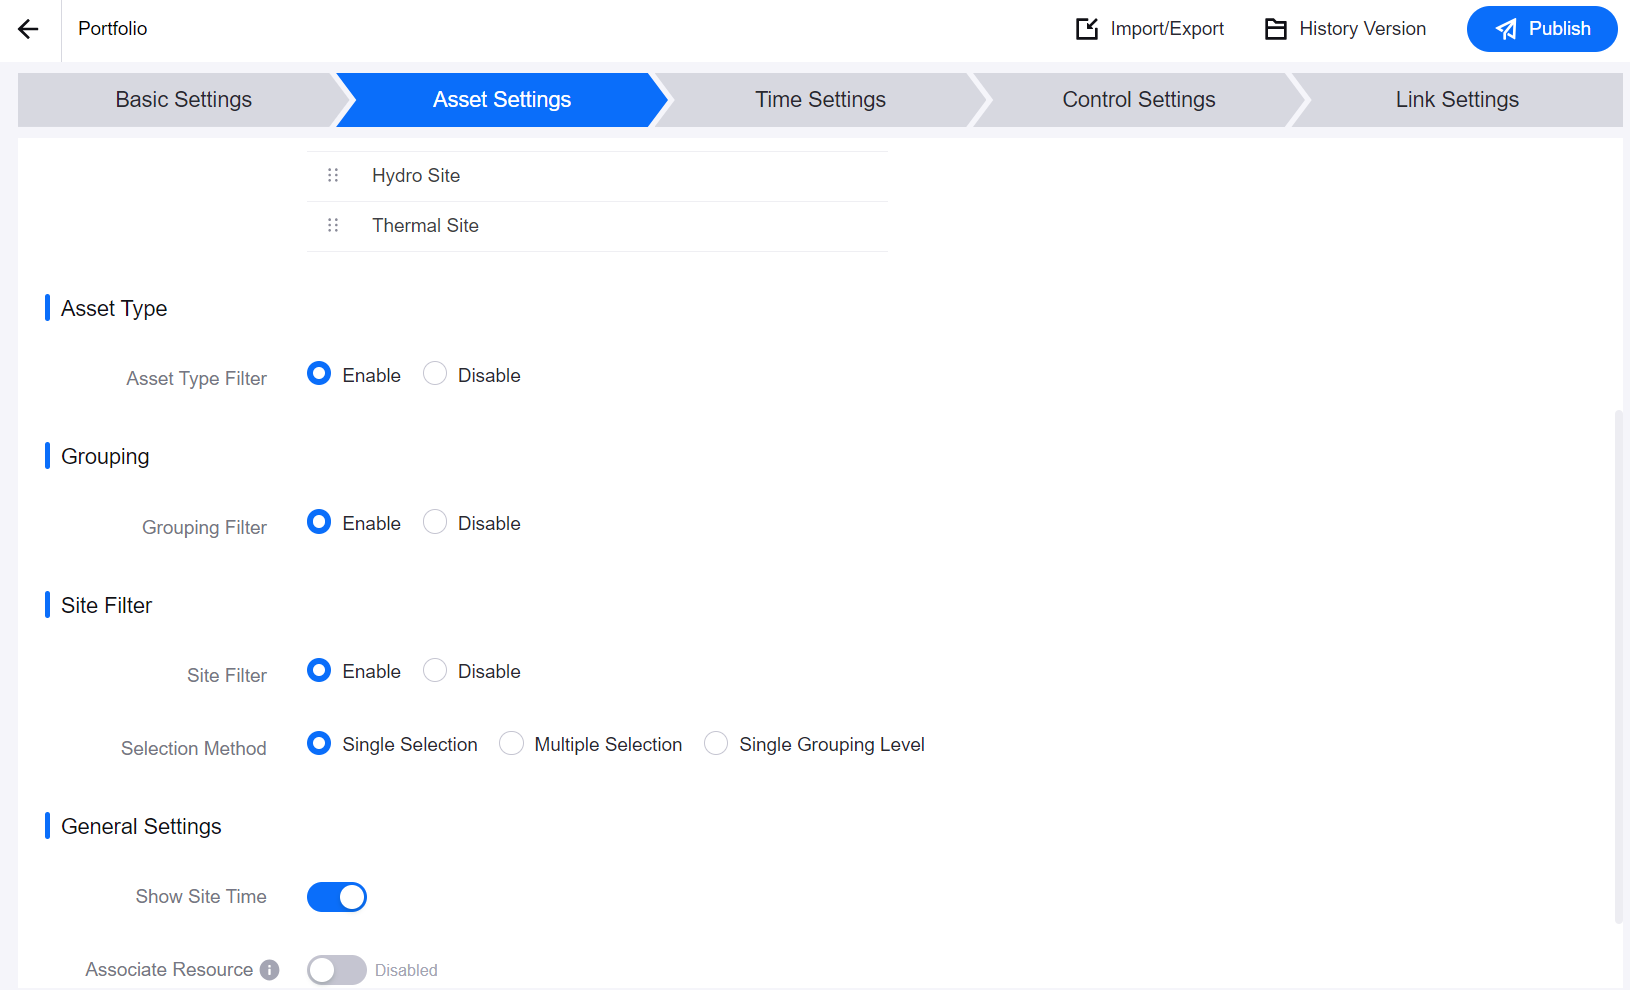
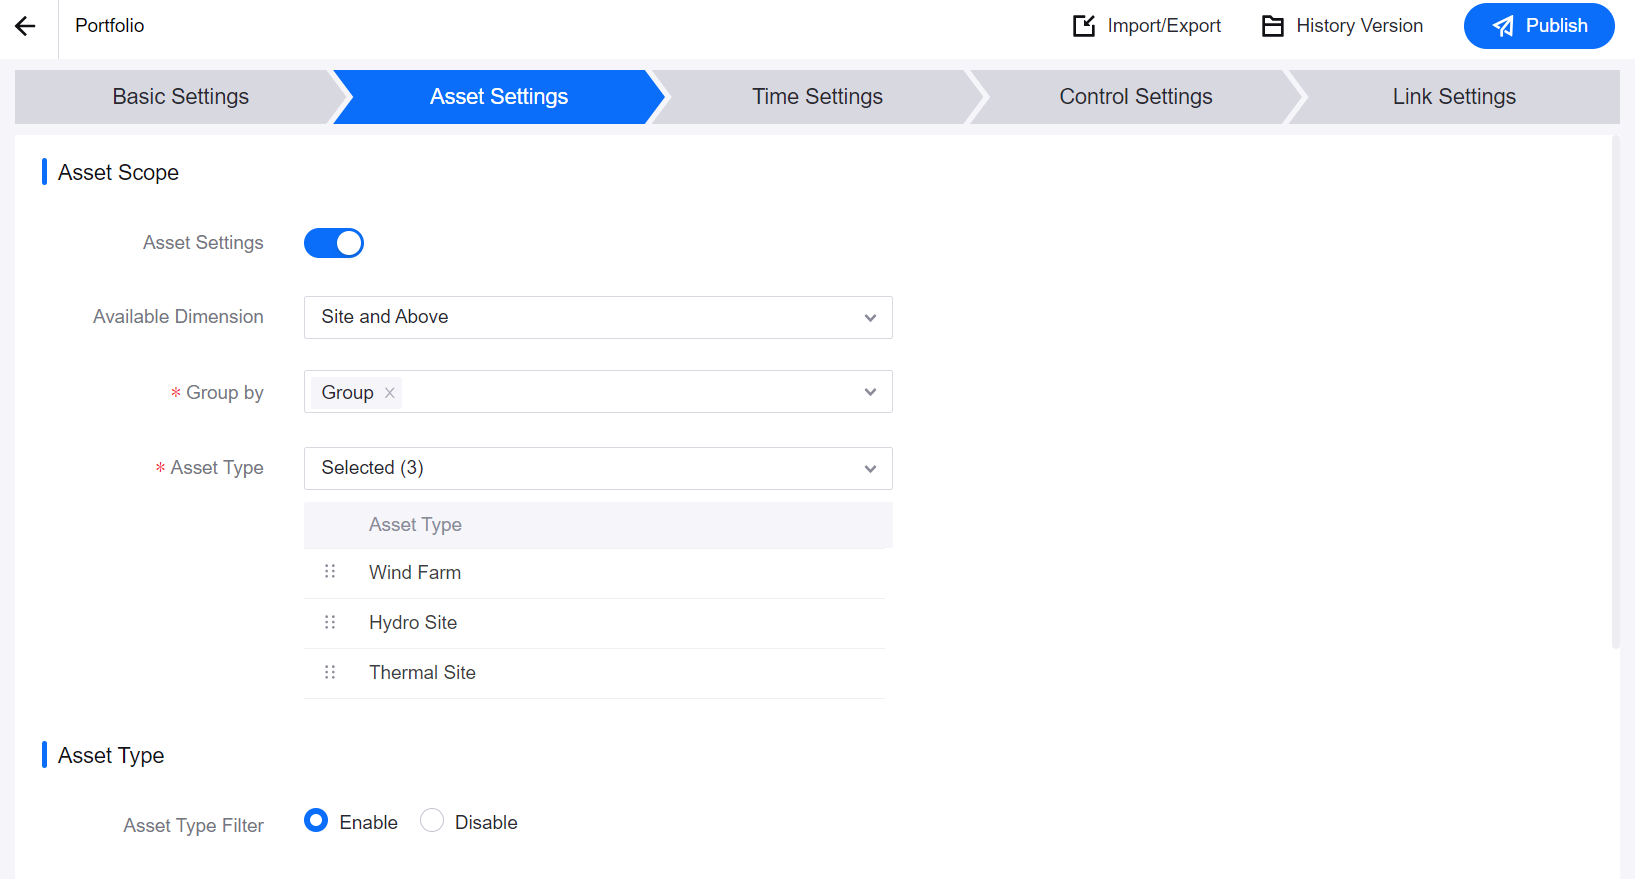
Available Dimension: As shown in the figure below, the Available Dimension item can choose Site and Above or Site and Device. This configuration item determines whether the current landing page is a page for the site and above levels (e.g., site details page) or a page that drills down to the device level (e.g., device details page). The asset configuration under the two dimensions is slightly different, which can be divided into the following two paths.
Site and Above
When Available Dimension is set to Site and Above, you need to configure the following:
Group by: Determines whether the Site Filter is grouped by site, region, or group level. You can select multiple levels or only one level as needed.
Asset Type: The dropdown list will display all asset types available under the current OU. Select the asset types required for the current page. You can drag and adjust the display order. All is the aggregation of the currently selected domains. If the landing page is applicable to multiple domains, All is generally required.
Site and Device
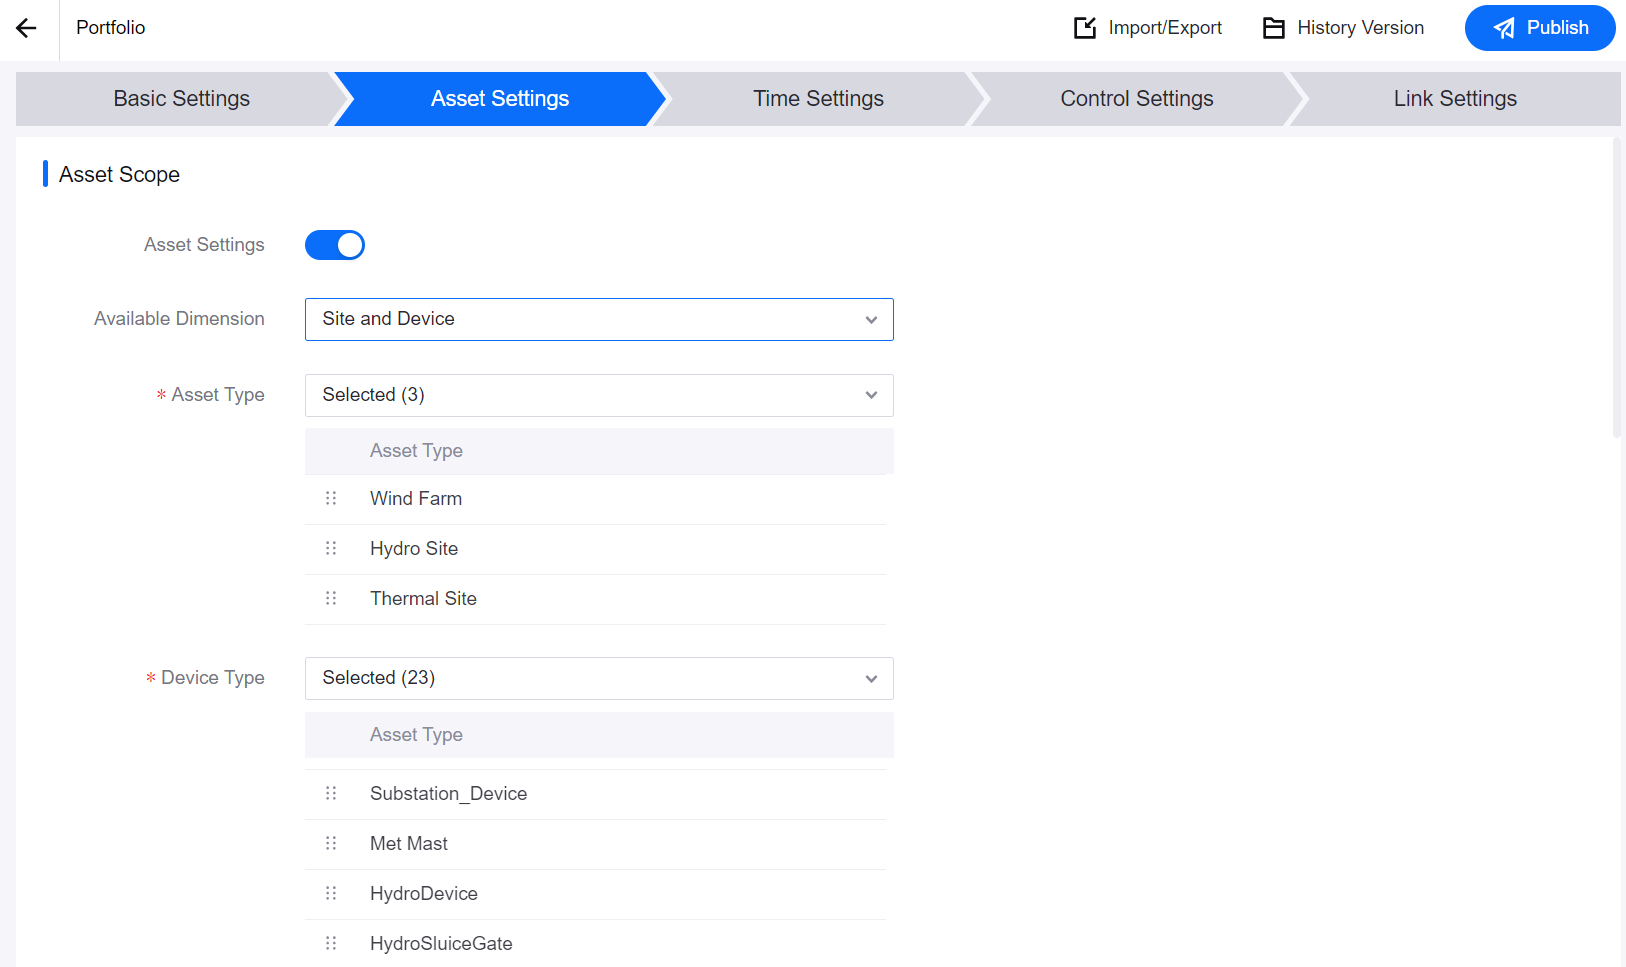
When Available Dimension is set to Site and Device, you need to configure the following:
Asset Type: The dropdown list will display all asset types available under the current OU. Select the asset types required for the current page. You can drag and adjust the display order. All is the aggregation of the currently selected domains. If the current landing page is applicable to the comprehensive energy field, All is generally required.
Device Type: The dropdown list will display all device types available under the current OU. Select the device types required for the current page. You can drag and adjust the display order.
Asset Type Filter
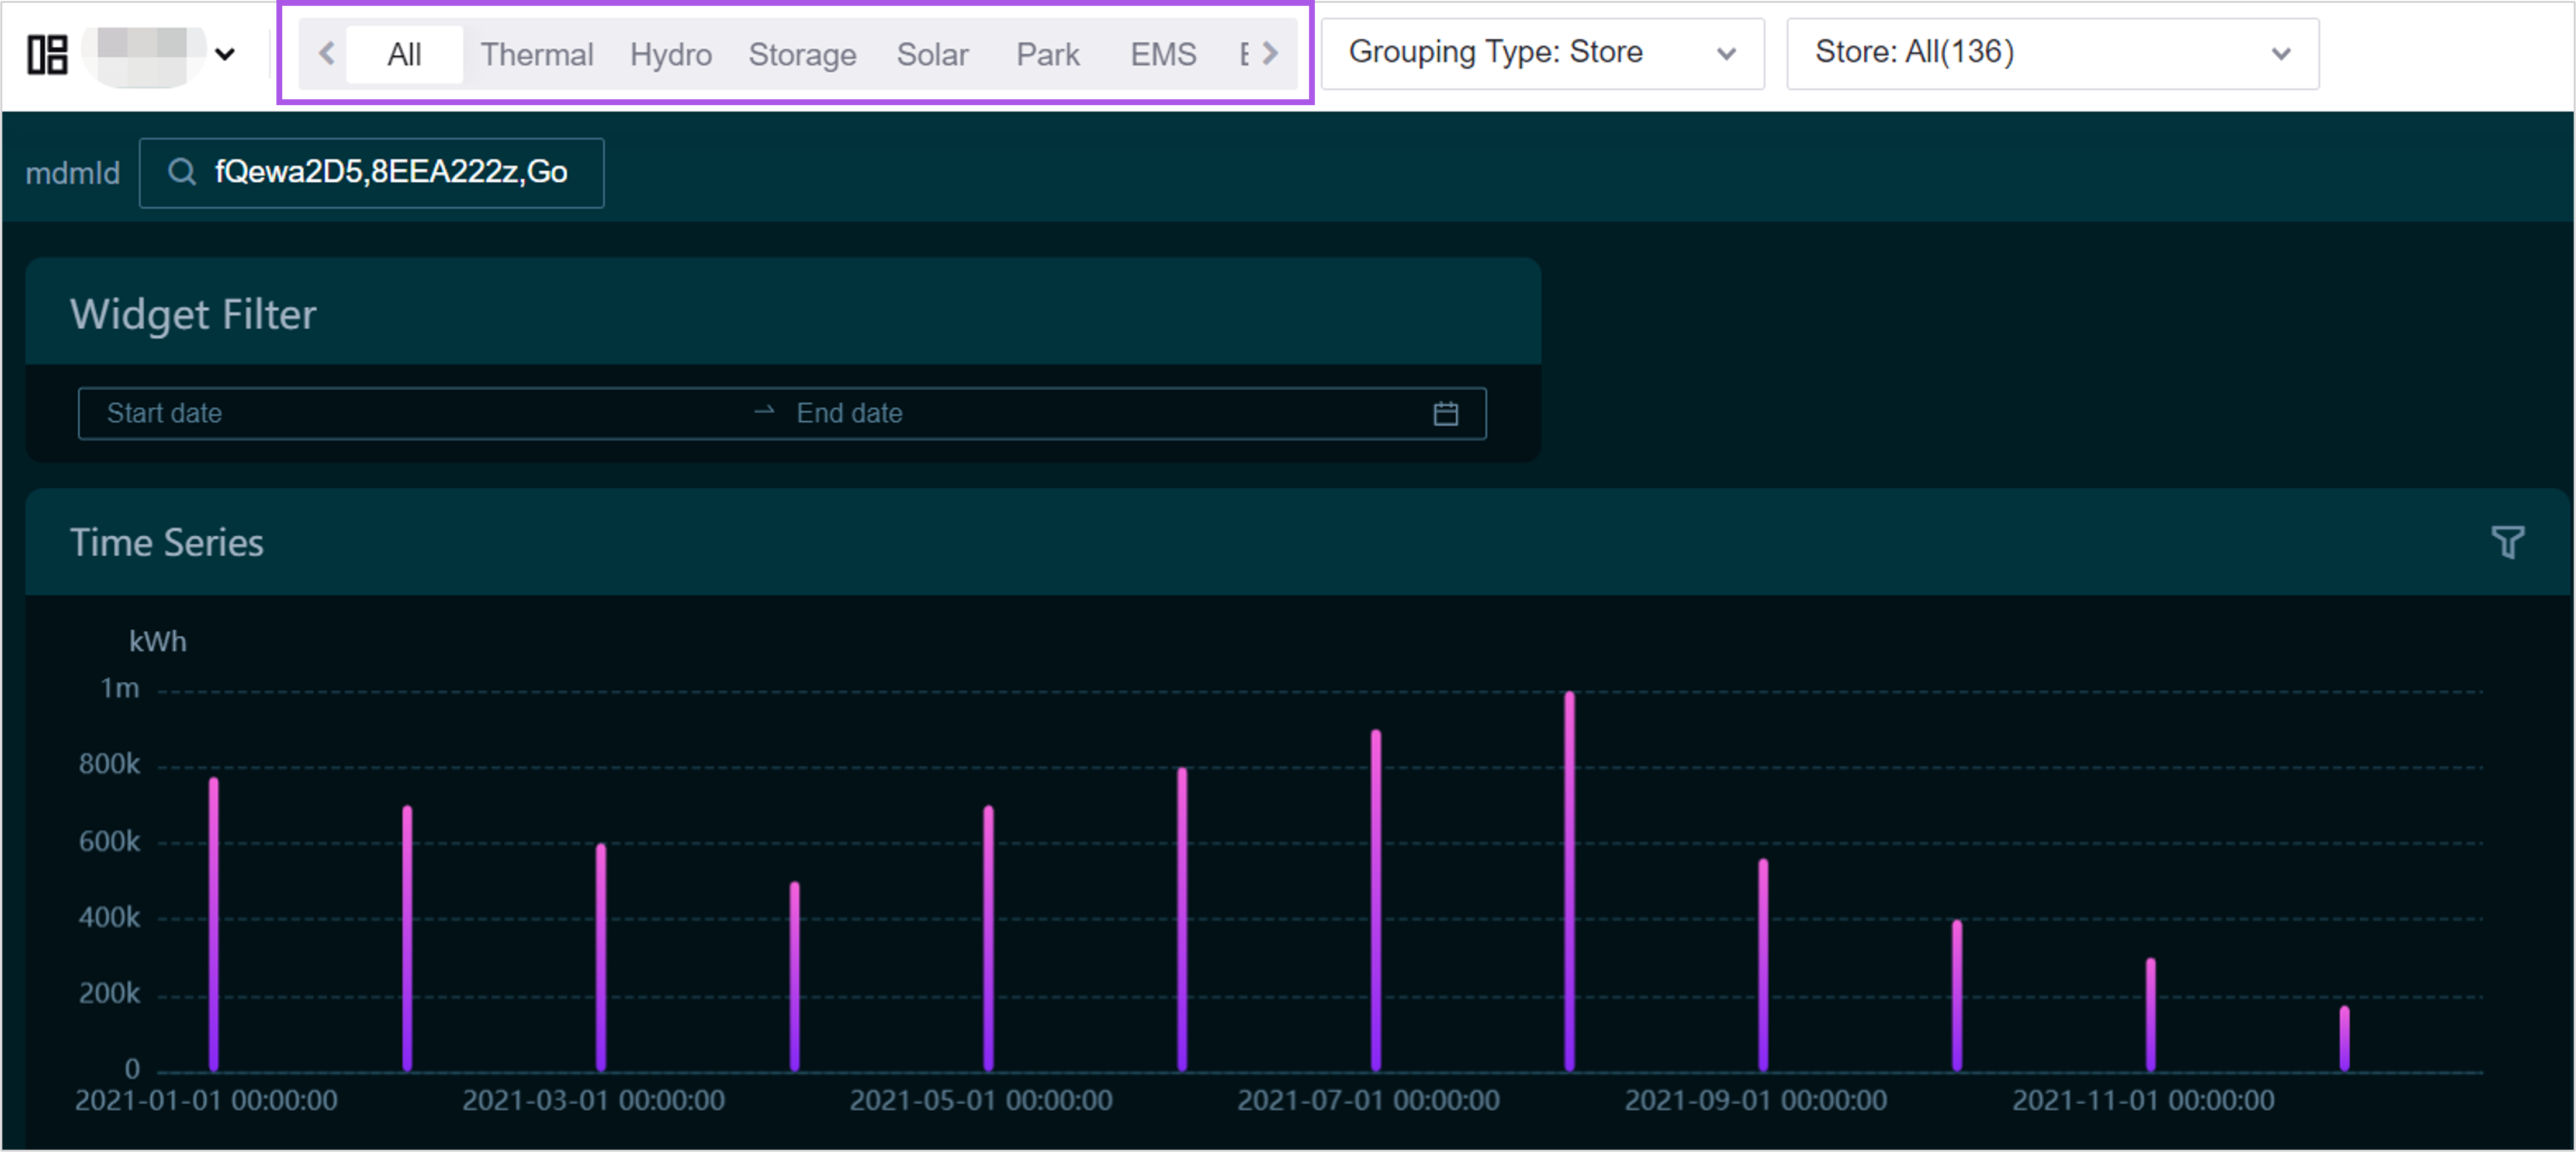
The asset type filter is located in the top toolbar of the landing page, used to switch the asset types displayed on the current page. The options are the asset types selected in the Asset Type dropdown list.
When disabled, if All is selected in Asset Type, the site filter will default to displaying all asset types; otherwise, the site filter will default to displaying the first asset type.
When enabled, the page will display the asset type filter, and you can filter assets by asset type.

Grouping Filter
The grouping filter is located in the top toolbar of the landing page, used to switch the asset level of the current page. The options are the grouping methods selected in the Grouping Method dropdown list. Only when Available Dimension is set to Site and Above can the grouping filter be available.
For example, when the grouping method is Region, the page displays data for different regions, and users can only select the nodes representing the region in the site filter on the page. When the grouping method is Site, the page displays data for one or more sites, and users can select one or more nodes representing the sites in the site filter on the page.

Site Filter
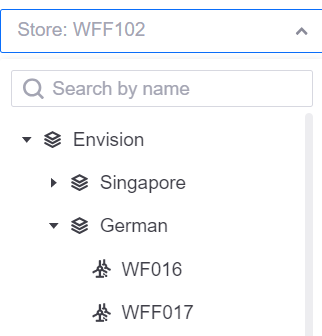
The site filter is located in the top toolbar of the landing page, used to filter the group, region, or site (the specific type can be determined by the grouping method) displayed on the current page. The options are the various nodes in the organizational structure associated with the current application. If the site filter is disabled, the first site in the organizational structure will be selected by default.
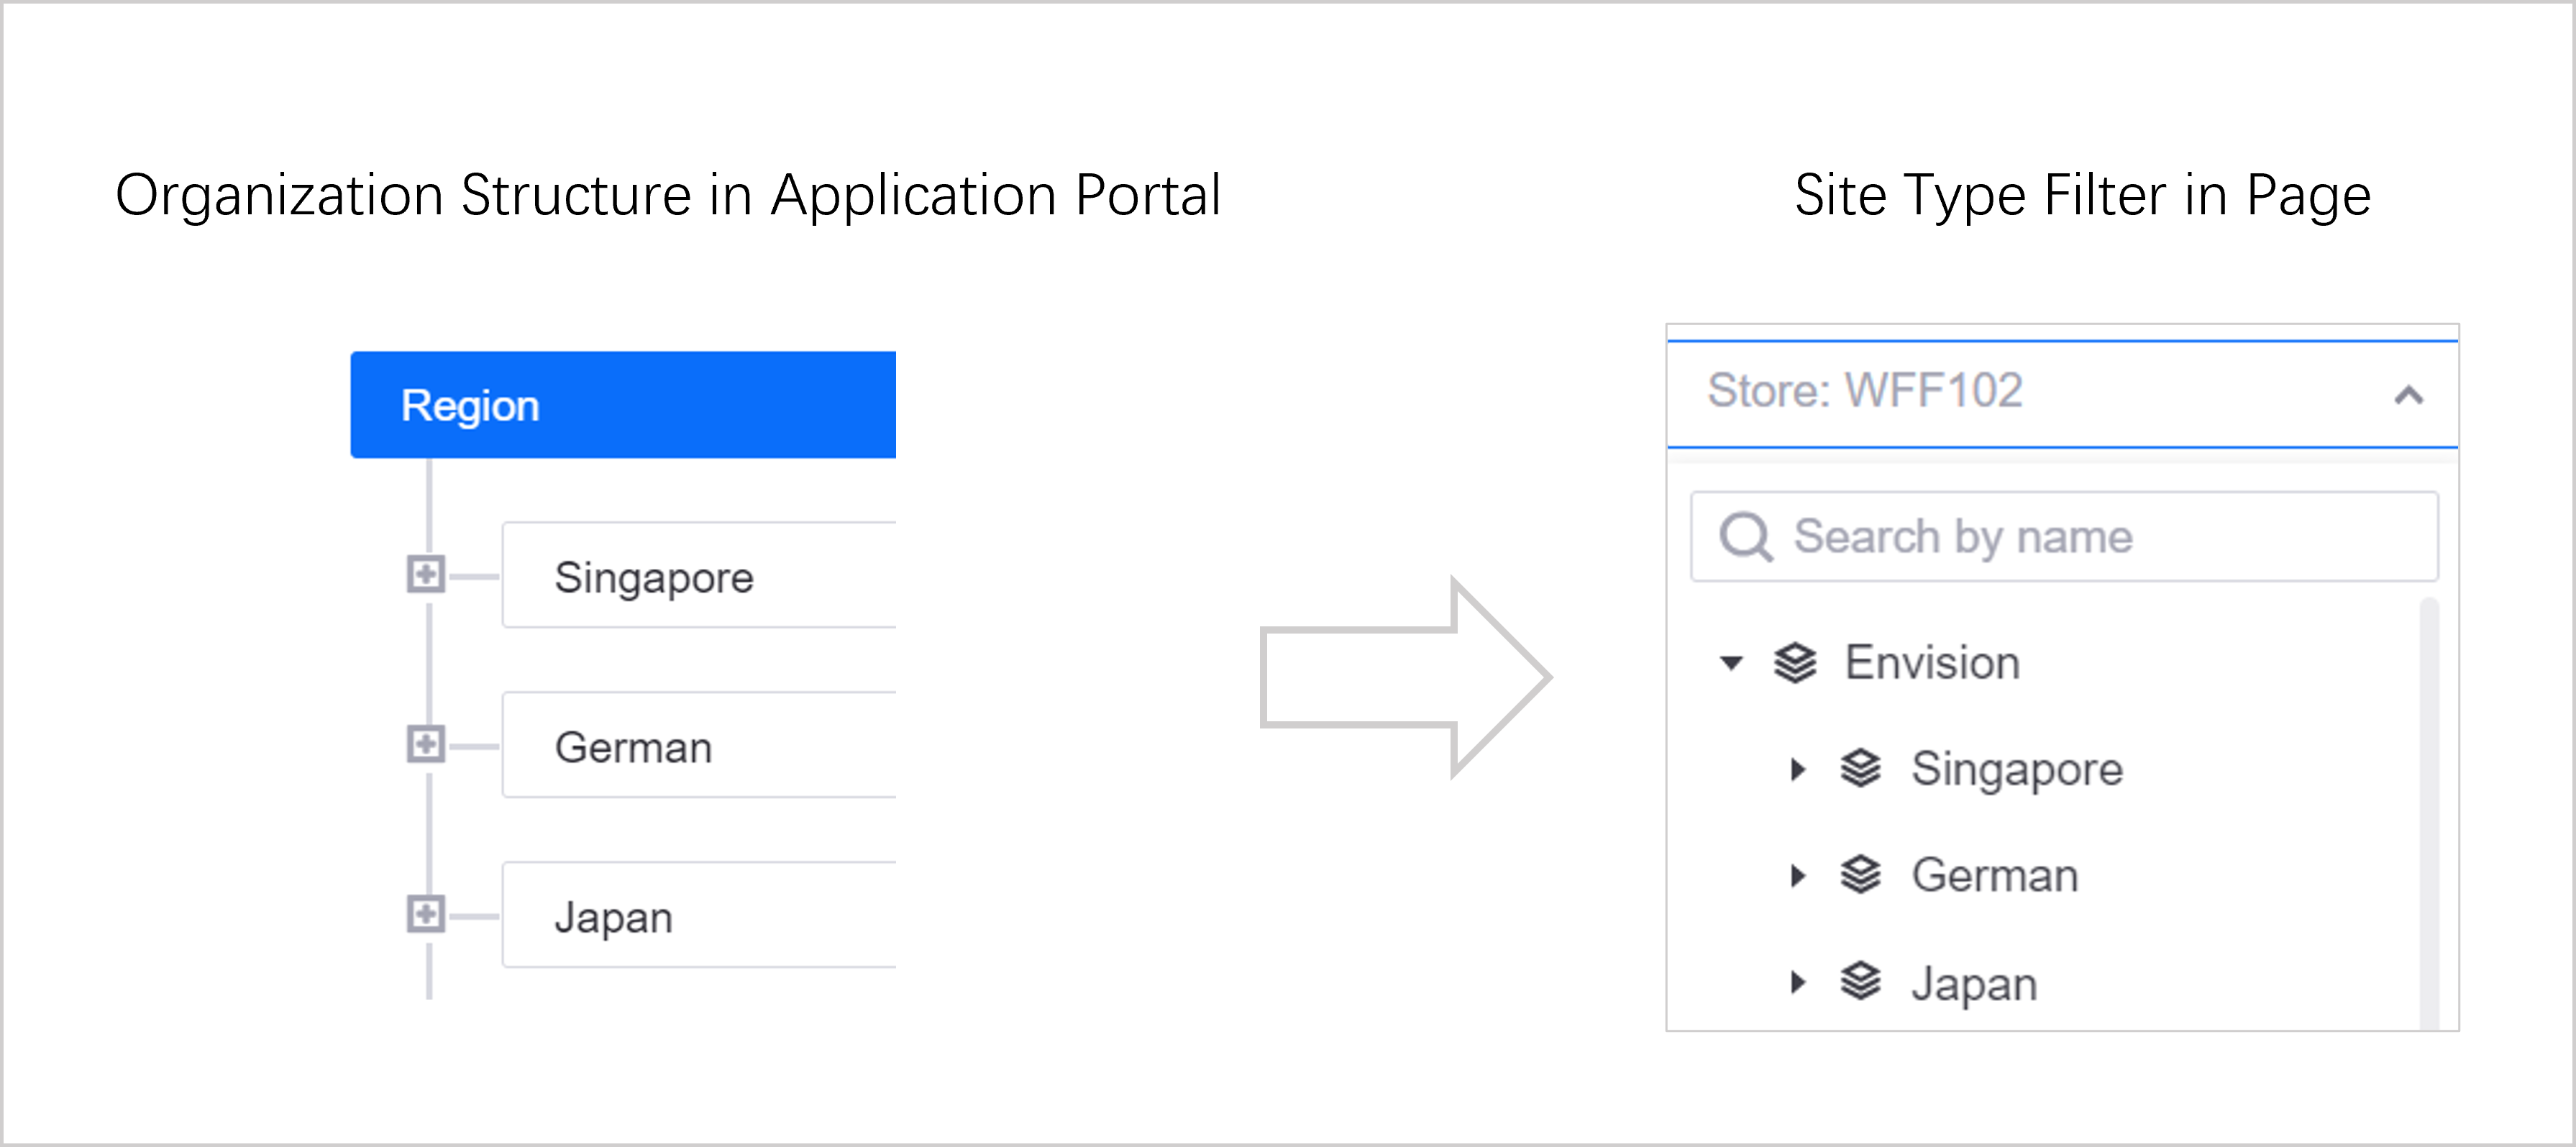
After enabling the site filter, the selection method can be single selection, multiple selection, or combined single selection of hierarchical levels.
Single selection filter:
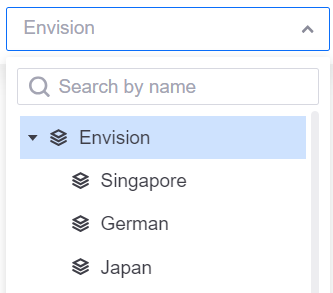
Multiple selection filter:
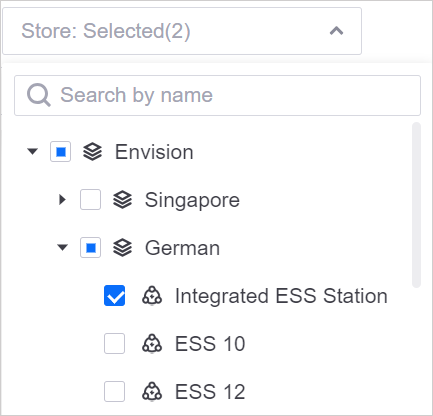
Single Grouping Level: When Asset Scope > Available Dimensions is set to Site and Device, you can select both the group node and the region and site nodes in the site filter. When Asset Scope > Available Dimensions is set to Site and Above, you can select the group/region nodes in the site filter.
Device Type Filter
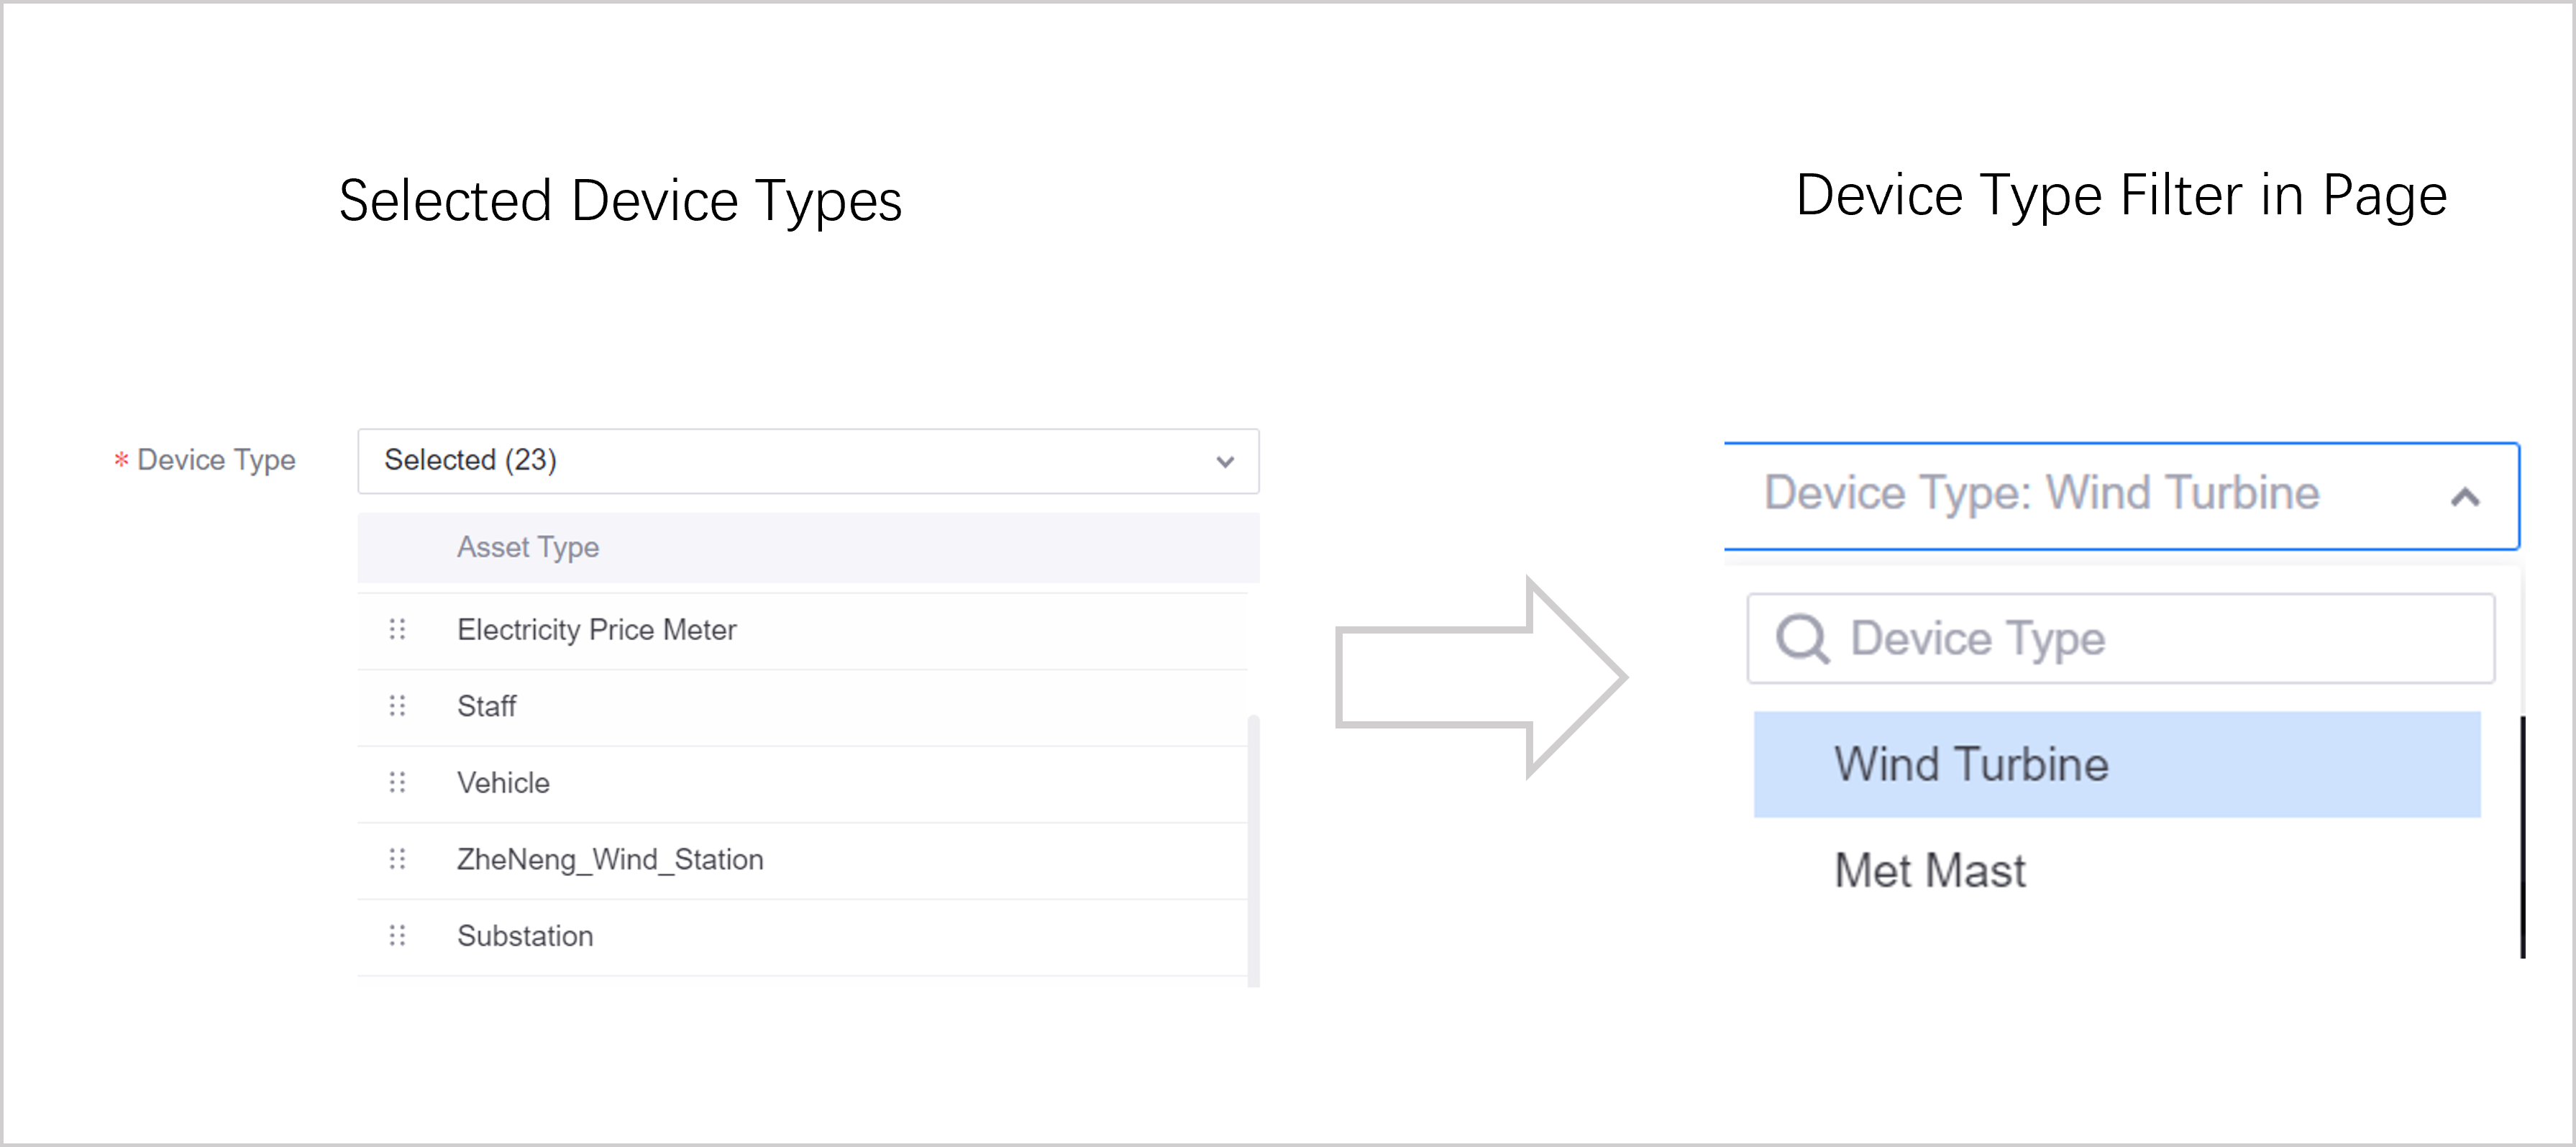
The filter is located in the top toolbar of the landing page, used to filter the device types displayed on the current page. The options are the selected device types. When switching different groups, regions, or sites, the device types within the range will be displayed. The title in the device type filter can be customized.
Device Filter
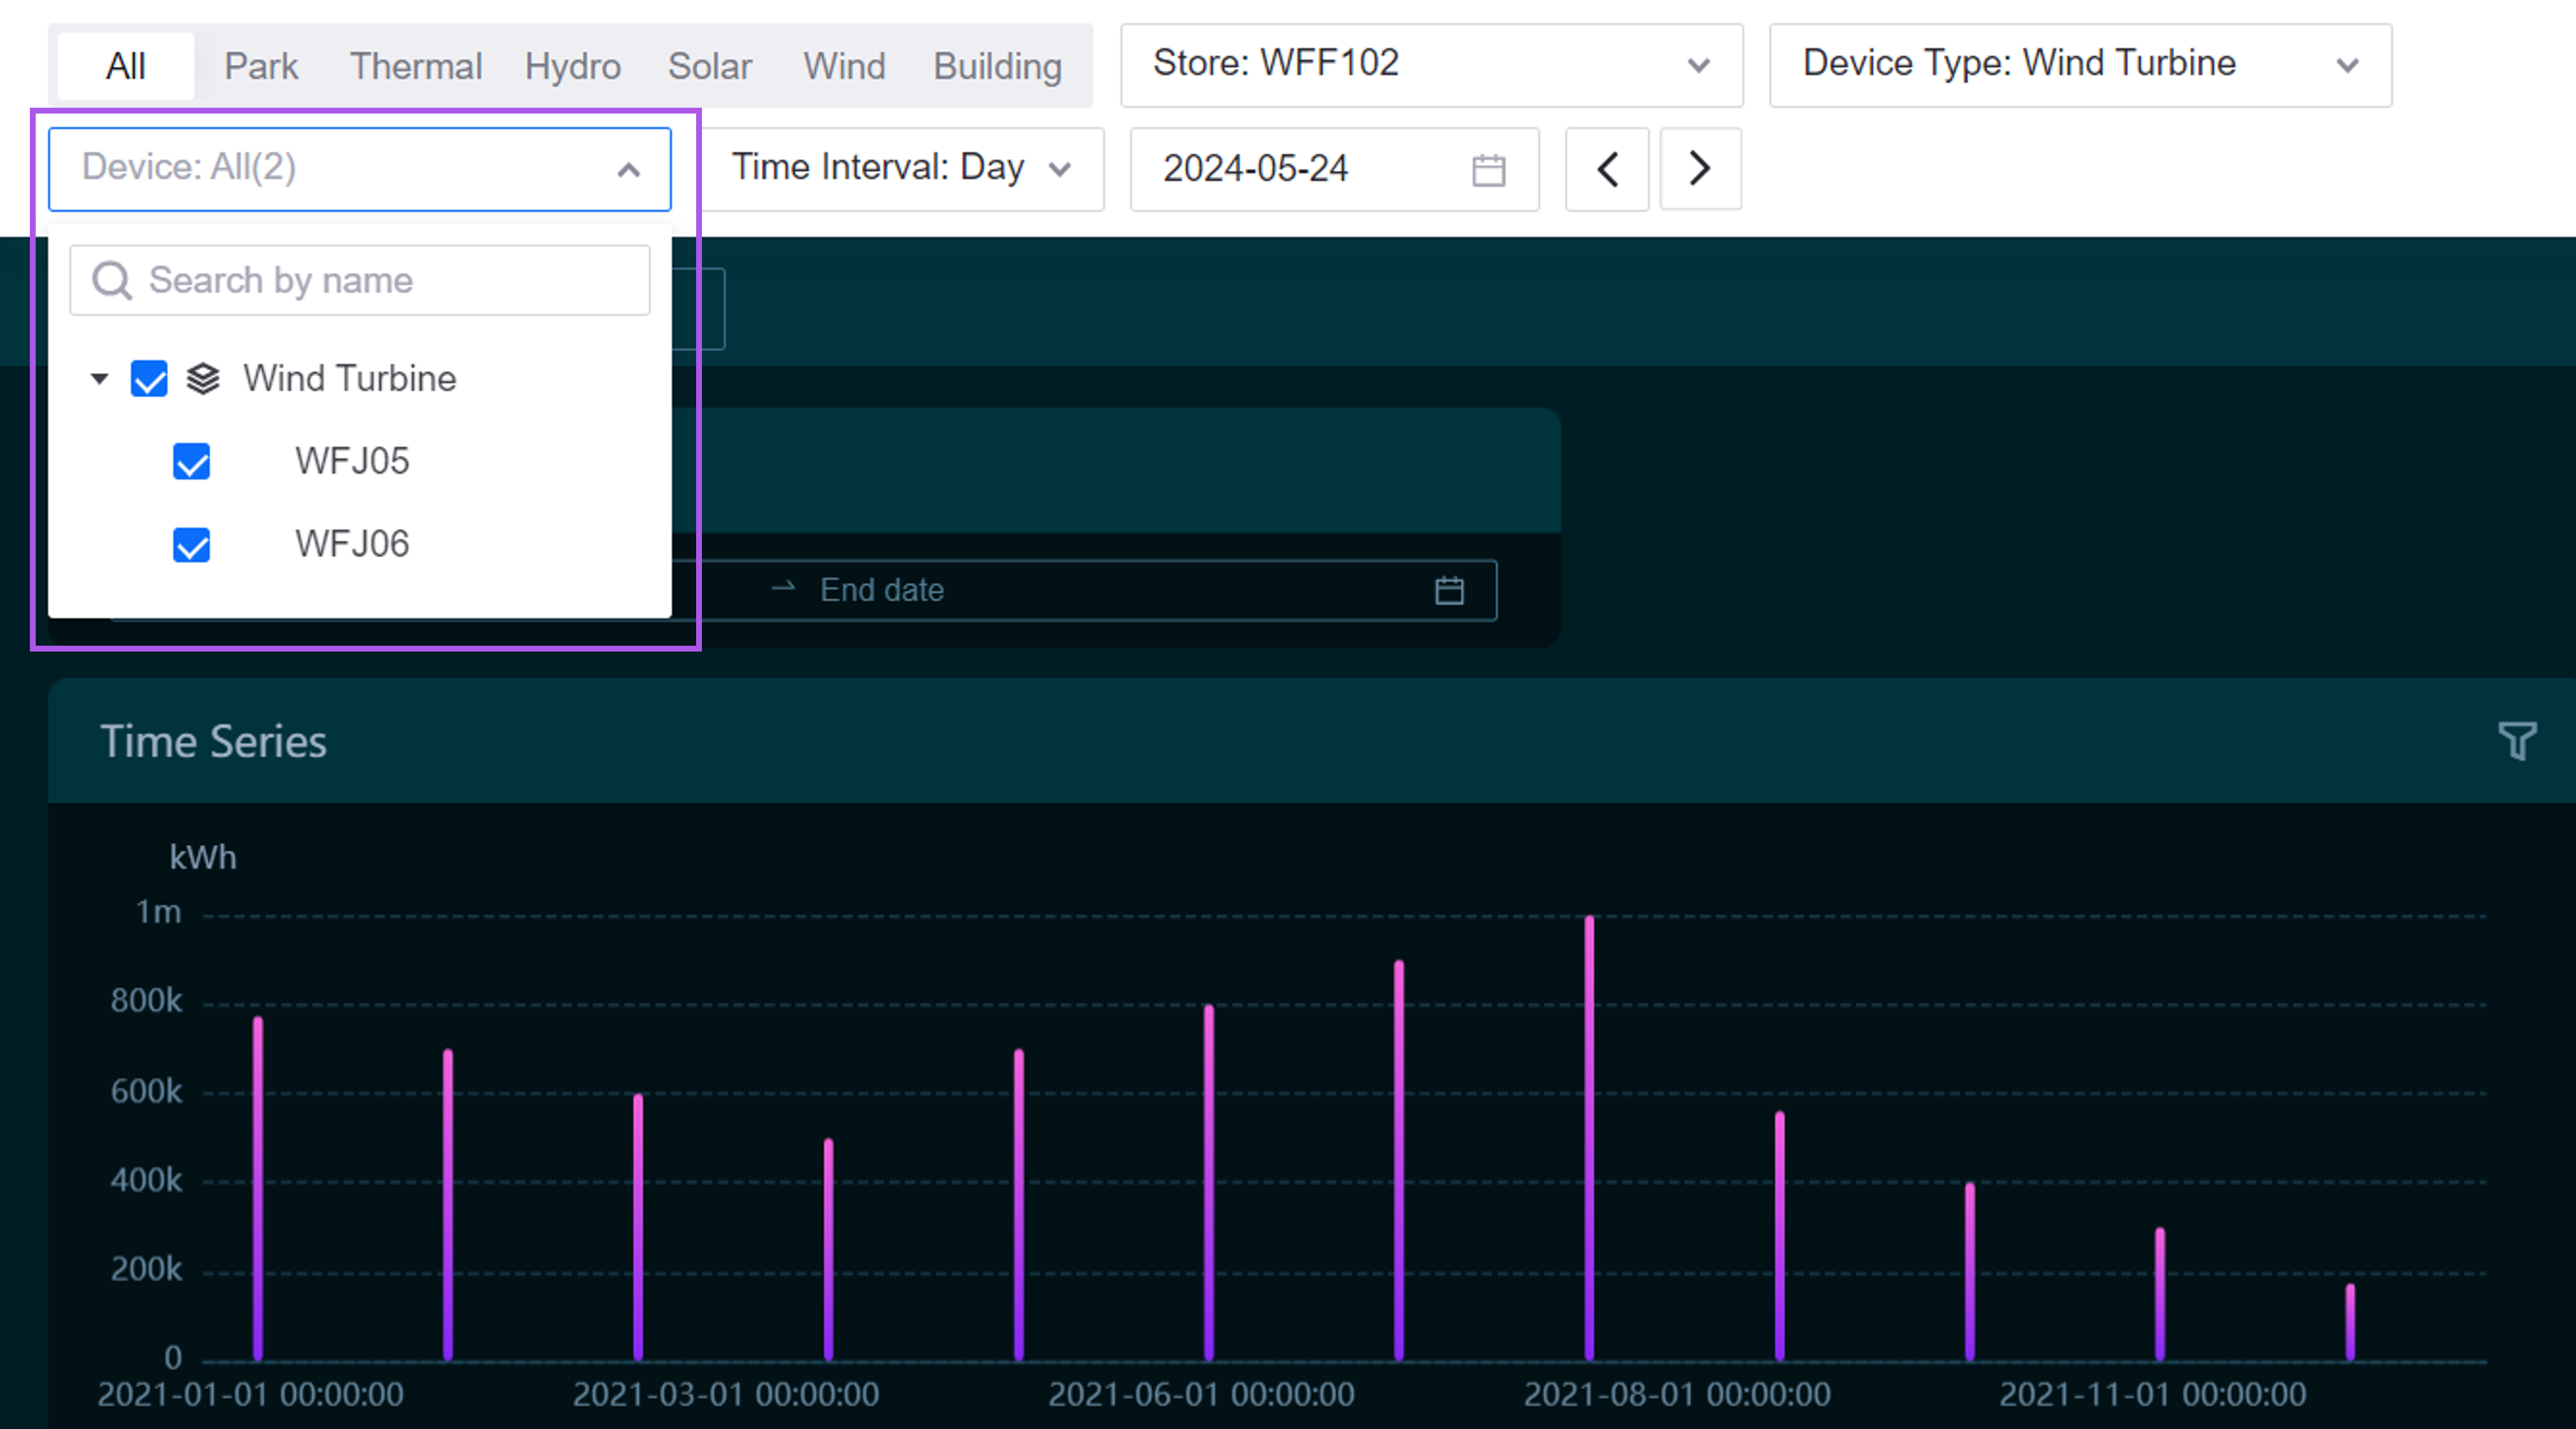
The filter is located in the top toolbar of the landing page, used to filter the devices displayed on the current page. If the device type filter is enabled, the options will vary according to the device type.
When Asset Scope > Available Dimensions is set to Site and Device, the device filter is enabled by default and cannot be disabled.
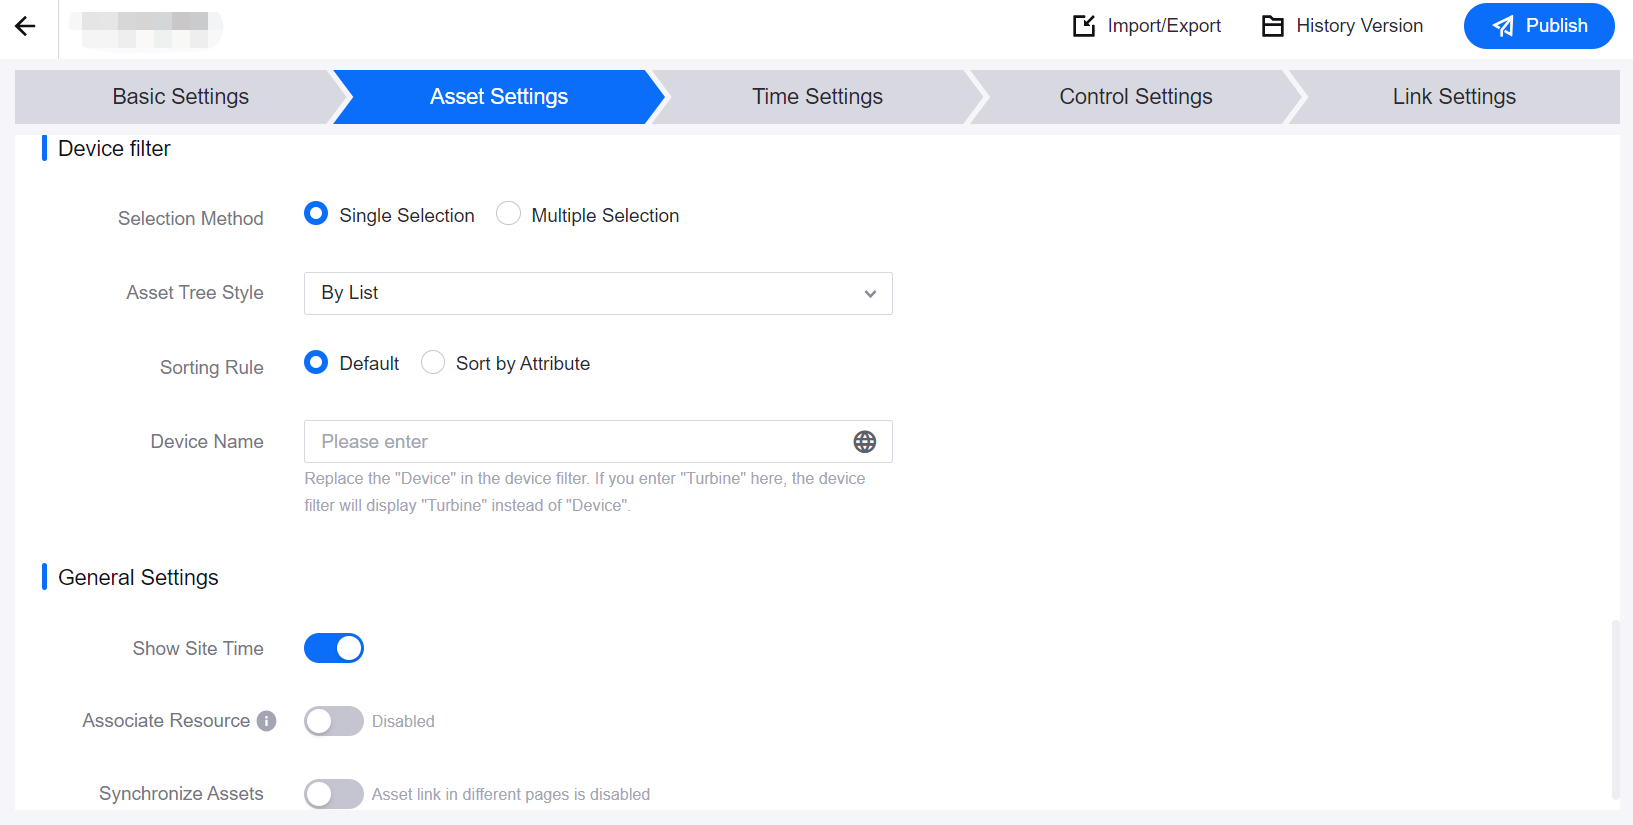
The following content of the device filter can be defined:
Selection Method: Single selection or multiple selection can be selected.
Asset Tree Style: Choose to display in a list or display in a hierarchical structure. When displayed in a list, the hierarchical structure of the asset tree will be filtered out in the device filter, and all devices will be displayed in a tiled manner by device type. When displayed in a hierarchical structure, the device tree will be displayed according to the hierarchical structure of the asset tree.
Sorting Rule: Devices are sorted by character by default. If sorting by character does not meet the project requirements, you can choose to sort by specified attributes.
Device Name: The title in the device filter can be customized.
Associating Resources
After enabling, if resource instances are associated with the group and region nodes in the organizational structure, when selecting the corresponding group or region nodes, the landing page will pass the parameters of the associated assets to the Associated Page (Step 5).
Synchronizing Assets
This function is only effective when the Selection Method in the site filter is set to Single Selection. It is used to automatically display the assets and related data selected on the current page when jumping to a new page.
For example, if wind turbine-1 and wind turbine-2 are selected on the landing page, the asset data of wind turbine-1 and wind turbine-2 will be automatically displayed on the Asset List page.
Step 3: Configuring Time Filters
If you need to perform unified time filtering on the page, you can turn on the Time Settings switch. After enabling, the following configuration is required:
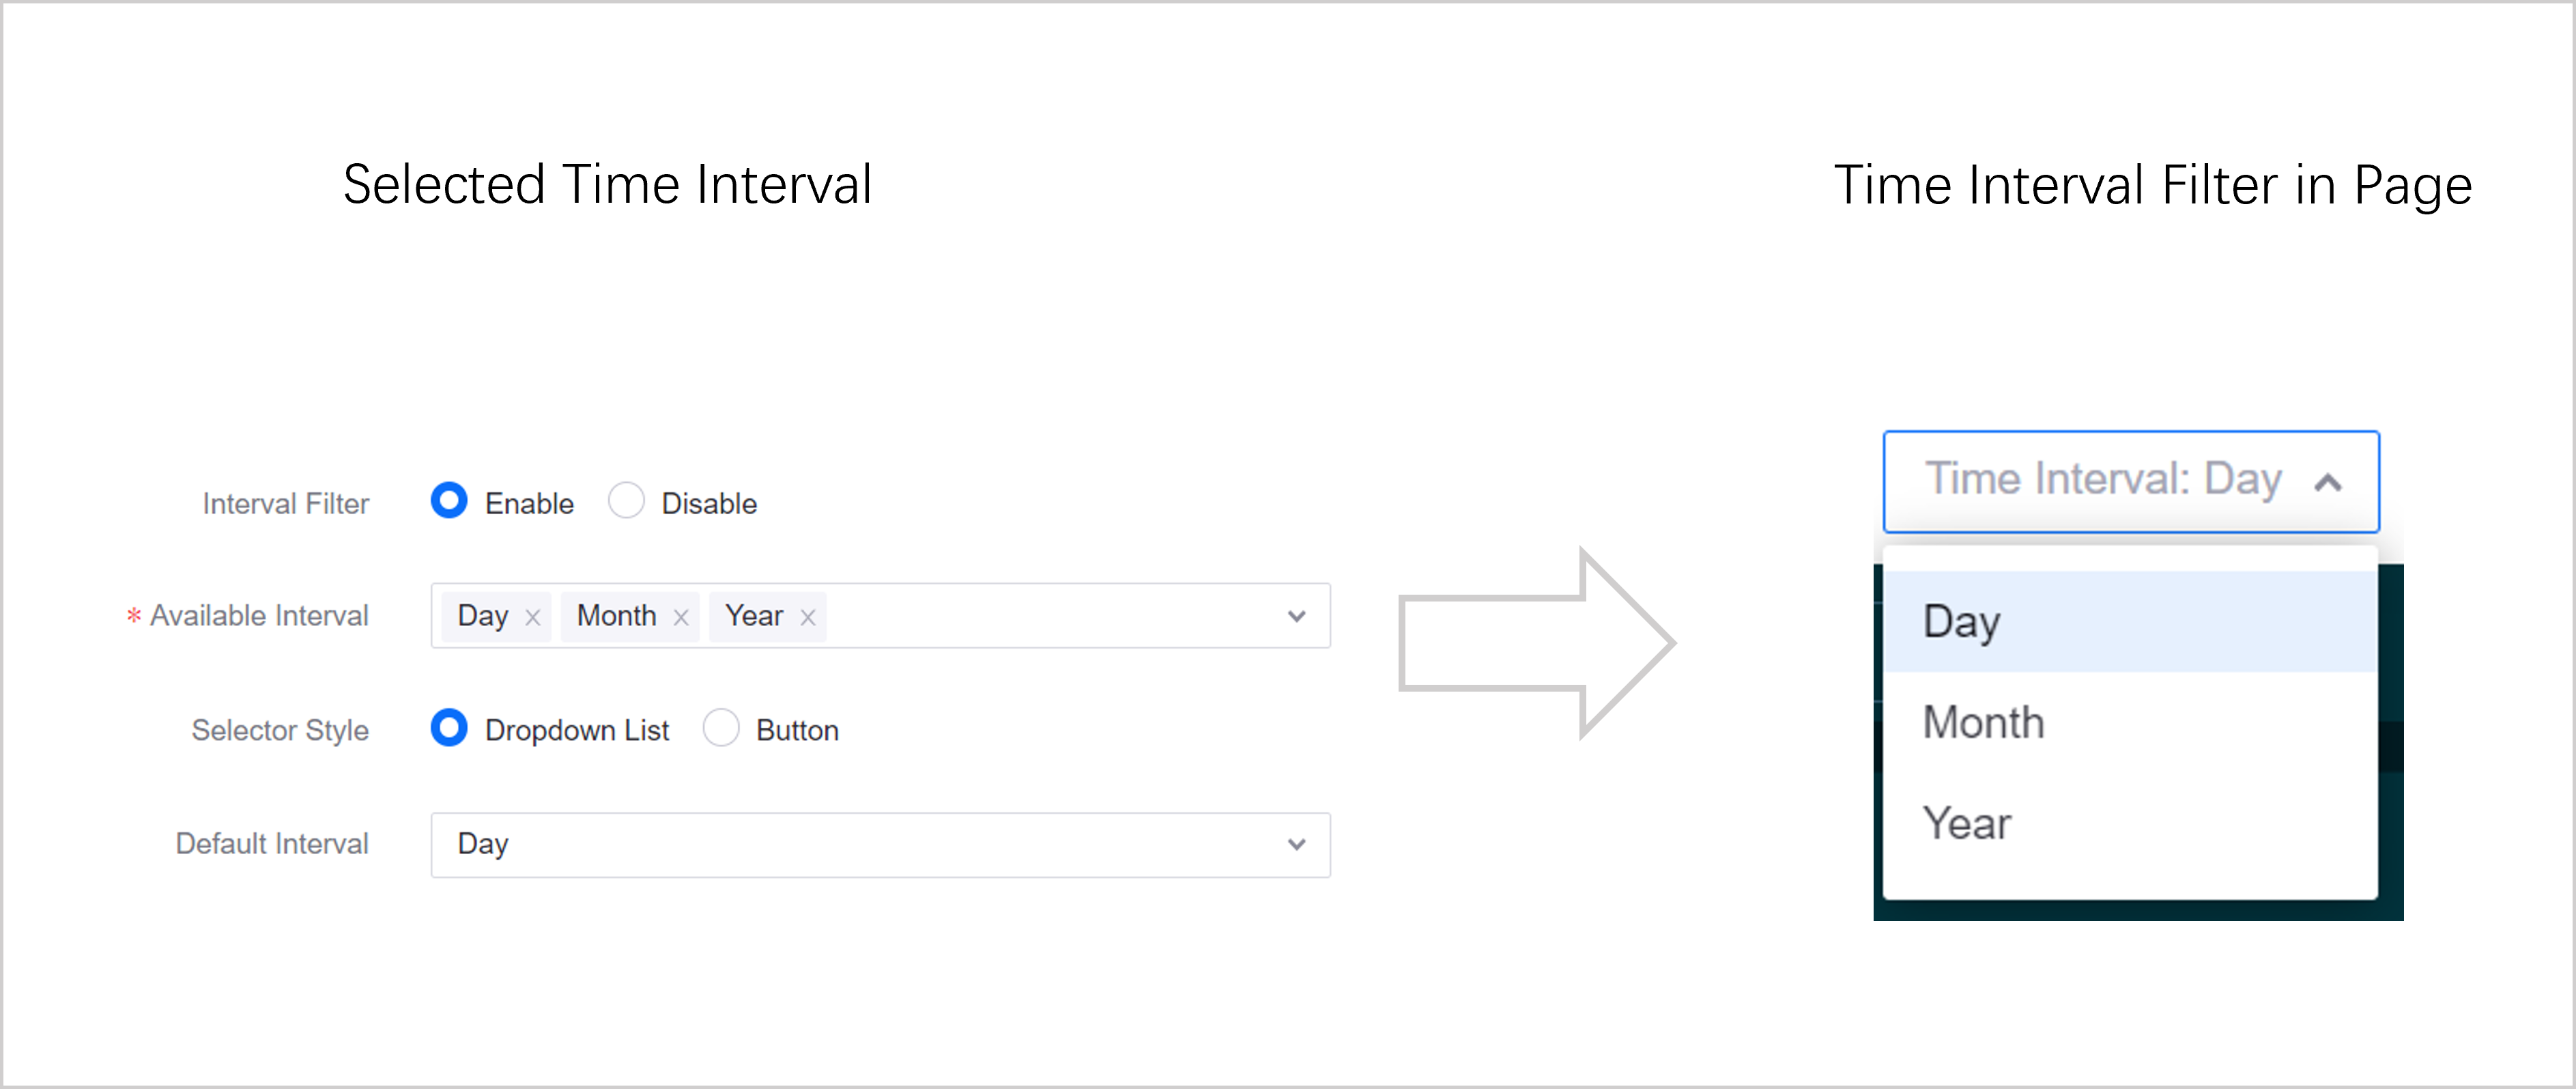
Interval Filter
The interval filter is used to determine the adjacent time intervals in the time range filter, which will affect the time granularity available on the page.
When enabled, select one or more time intervals, filter style, and the default interval.
When disabled, select a default interval, and the page will filter data based on the default interval.
Time Range Filter
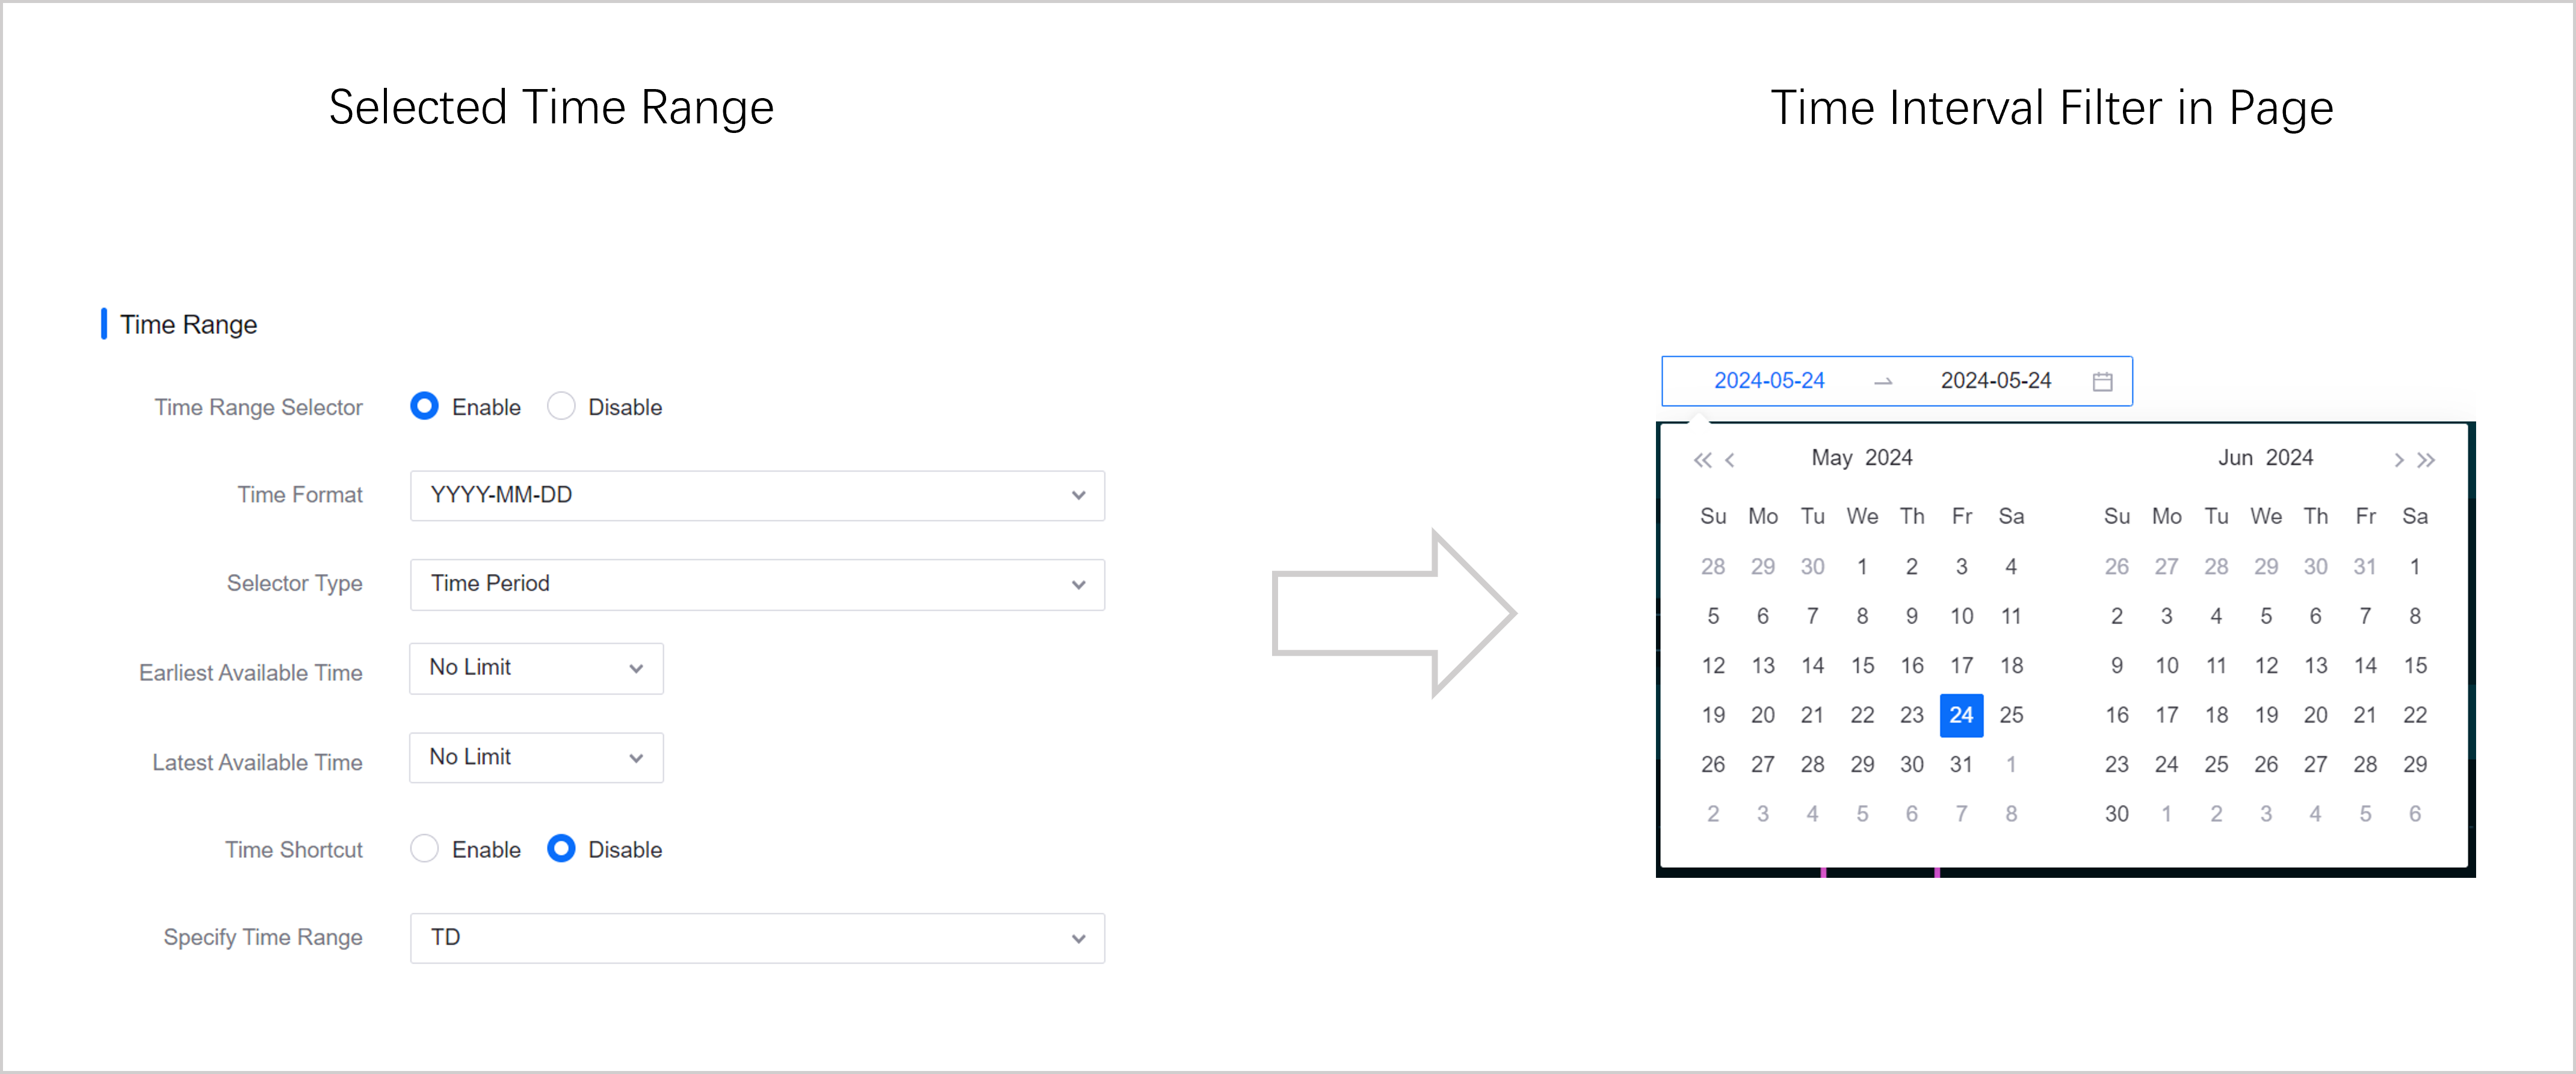
The time range filter is used to filter the asset data within a specific time period.
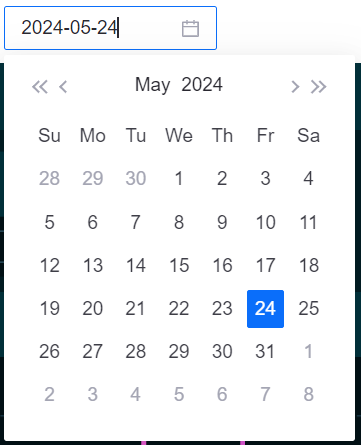
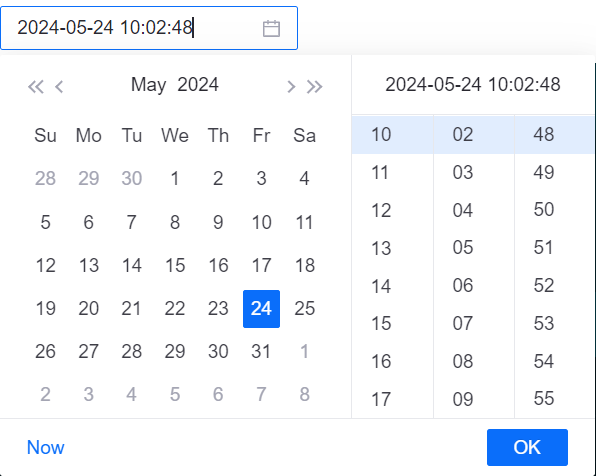
Time Format: The default is year-month-day (YYYY-MM-DD), and second-level time (YYYY-MM-DD HH:mm:ss) is also supported.
Selector Type: Supports selection by time point or time range. When selecting by time point, only a single day or a single moment in time can be selected. When selecting by time range, a custom time interval can be defined.
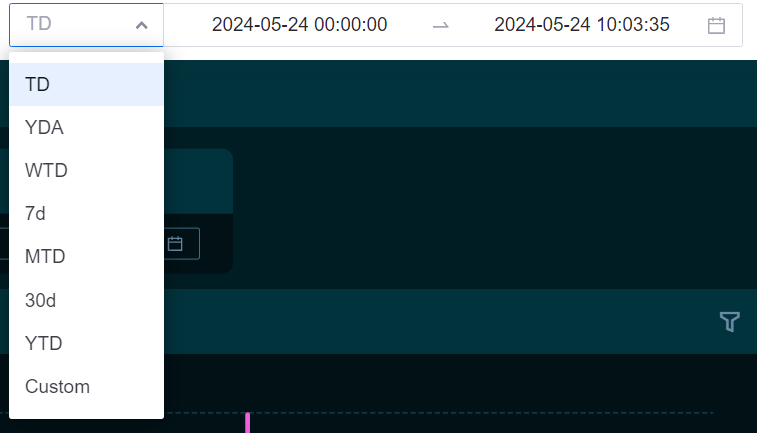
Quick Switching: After enabling, the effect is as shown below, and you can quickly view the data in the current day/yesterday, etc. time range. The quick switch is only effective when the selector type is Time Range.
Earliest/Latest Available Time: Typically, the time range of the data accessed by each customer is different, so the earliest/latest selectable time range should be limited as needed. If No Limit is selected, the time range can be selected freely. If limited, currently two limitation methods are provided: Absolute Time and Relative Time.
Absolute Time: After selecting a certain time point, the time before or after this time point cannot be selected. For example, if the earliest selectable absolute time is set to 2023-12-07 17:08:28, the time before this time point cannot be selected.
Relative Time: You can enter an integer and specify a time interval (day/month/year). The time earlier or later than this relative time cannot be selected. The relative time is the time added forward from today, for example, if the earliest selectable relative time is set to 1 year, then the earliest selectable time is next year’s today; if set to -1 year, then the earliest selectable time is last year’s today.
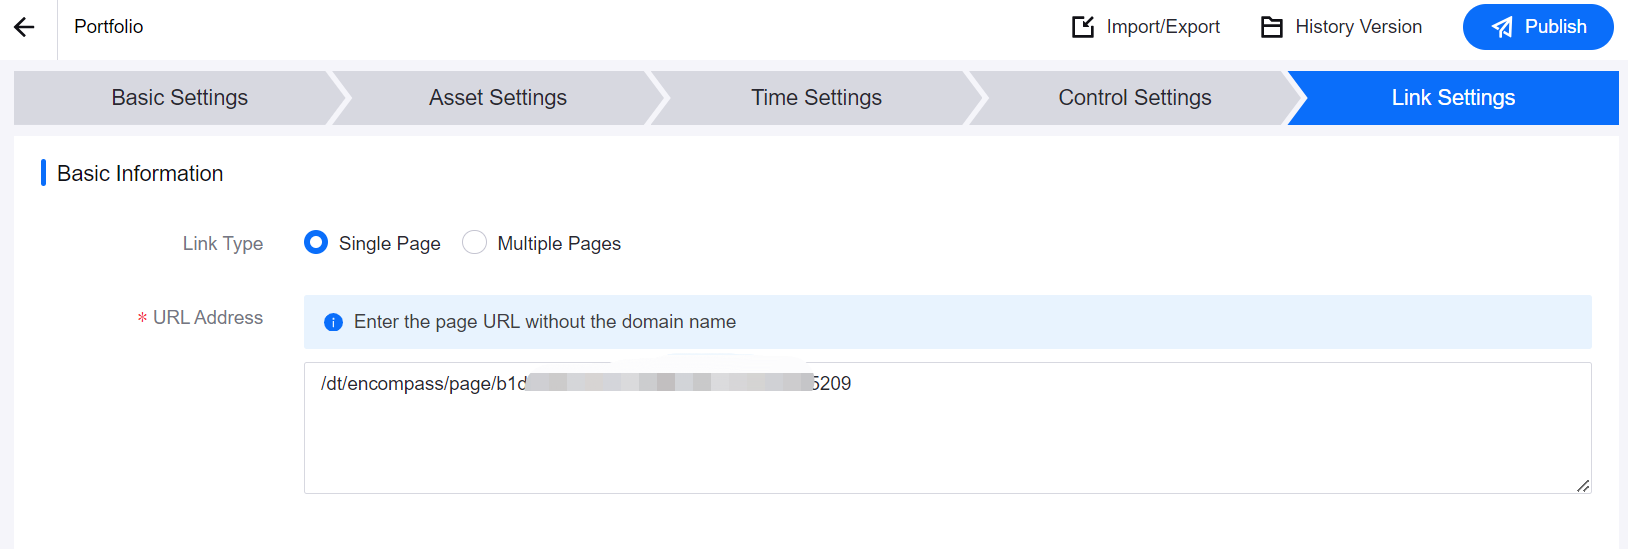
Step 5: Associating DTV Page
Copy the DTV page URL obtained in Step 3 of the design phase to the URL Address field, making sure to enter the URL starting with /dt.
If you need to associate multiple DTV pages, you can choose the following methods as needed:
Associate multiple pages by asset type: Make sure you have selected multiple asset types in the Asset Settings step and enabled the asset type filter. Select a property as the switching condition, enter the property ID in the Condition, and add a multilingual name for each property. After that, you can switch to different DTV pages in the asset type filter.
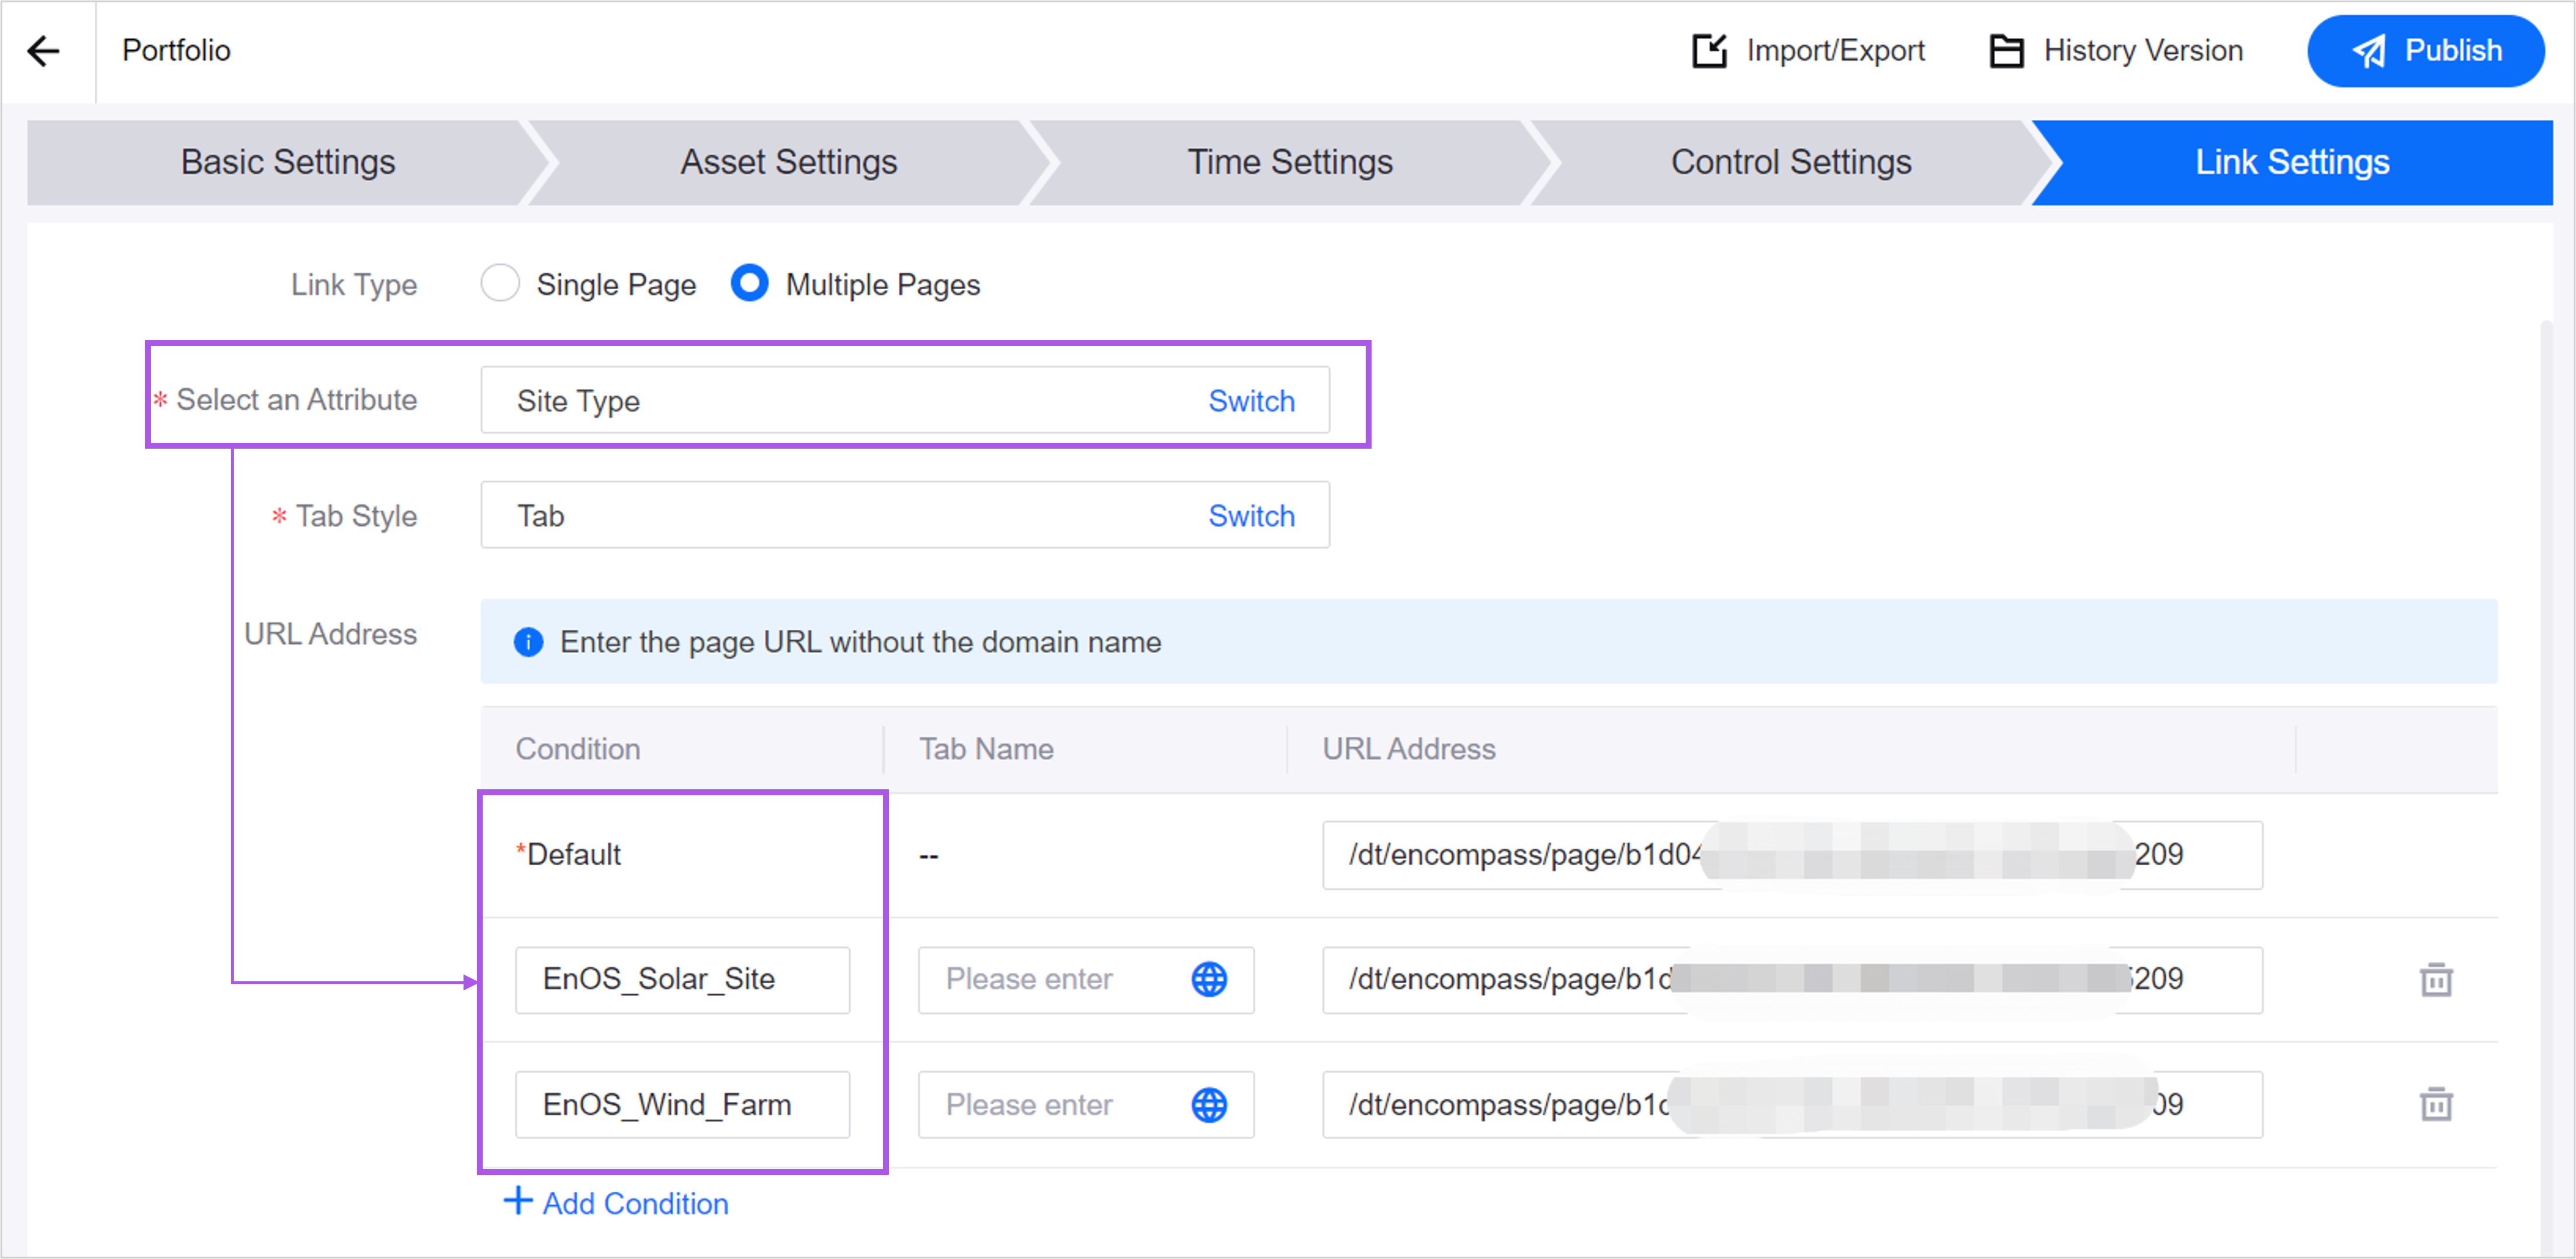

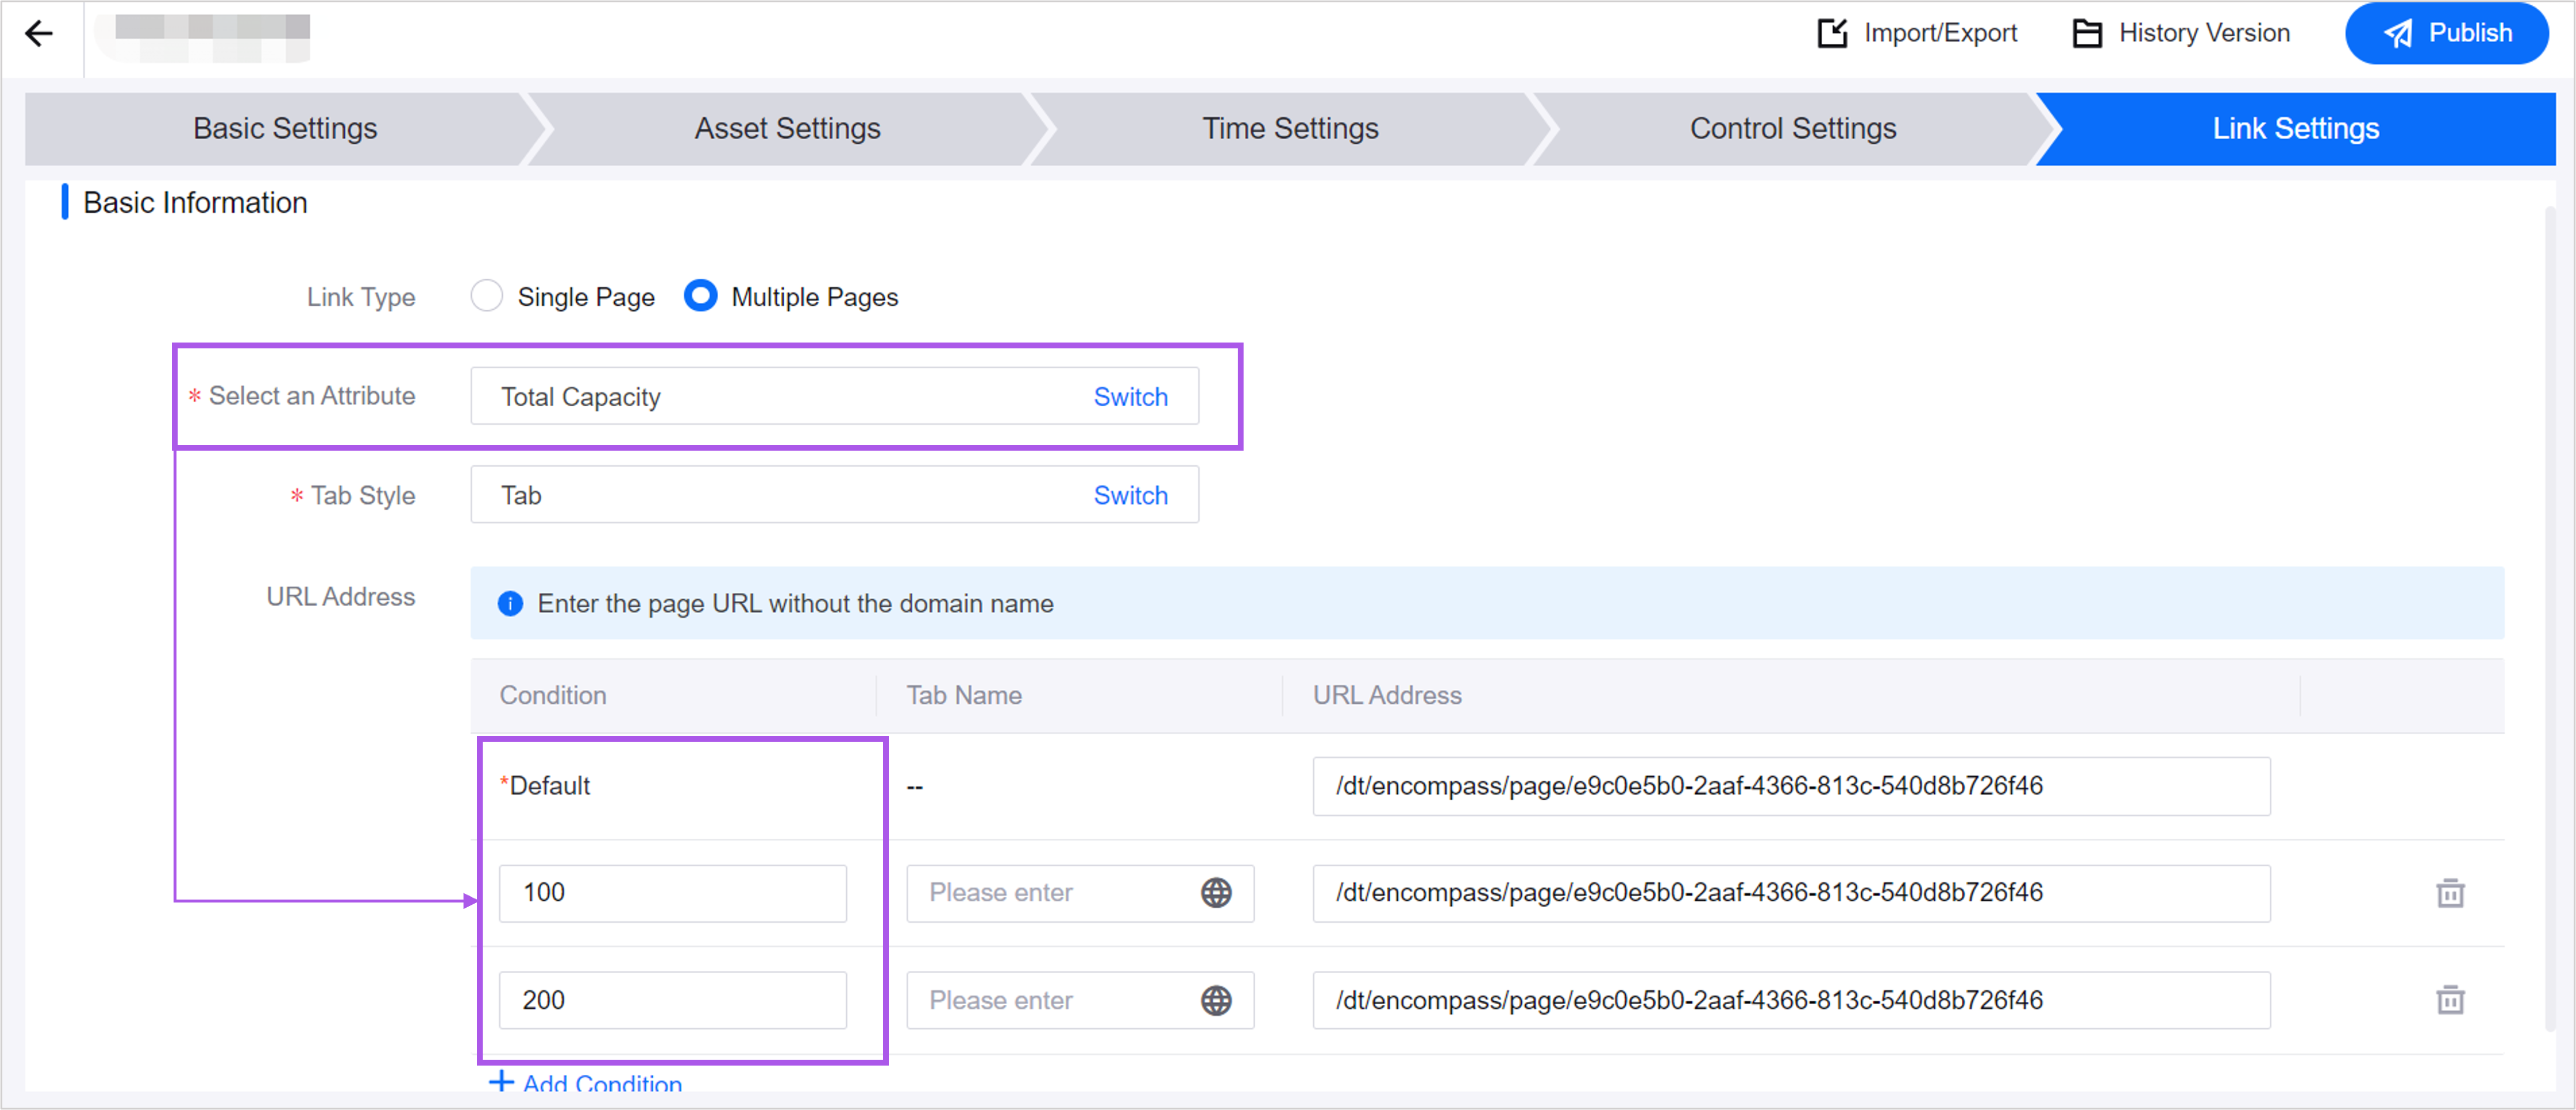
Associate multiple pages by asset: Make sure you have selected multiple asset types in the Asset Settings step and enabled the asset type filter. Select a property as the switching condition, enter the corresponding value of the asset property in the Condition, and add a multilingual name for each value. After that, you can switch to different DTV pages in the asset type filter.
Running Mode
Viewing the Landing Page
Access the application that has added this page in the App Portal, and select the corresponding menu name in the left menu bar, such as “Wind Workbench”, to view the landing page.
When viewing the landing page, you can filter the page data, send remote control commands to the device, and perform operations depending on your configuration. For more information, see Use the Landing Page.
FAQ
Q: Why can’t I select Realtime or Timeseries data sources when configuring widgets?
A: It’s possible that the Realtime or Timeseries data sources have not been enabled in DTV. In Application Portal, select the Digital Twin Visualization > Data Source, turn on the switch for the Realtime or Timeseries data source.
