Building a Water Purification System Monitoring Page
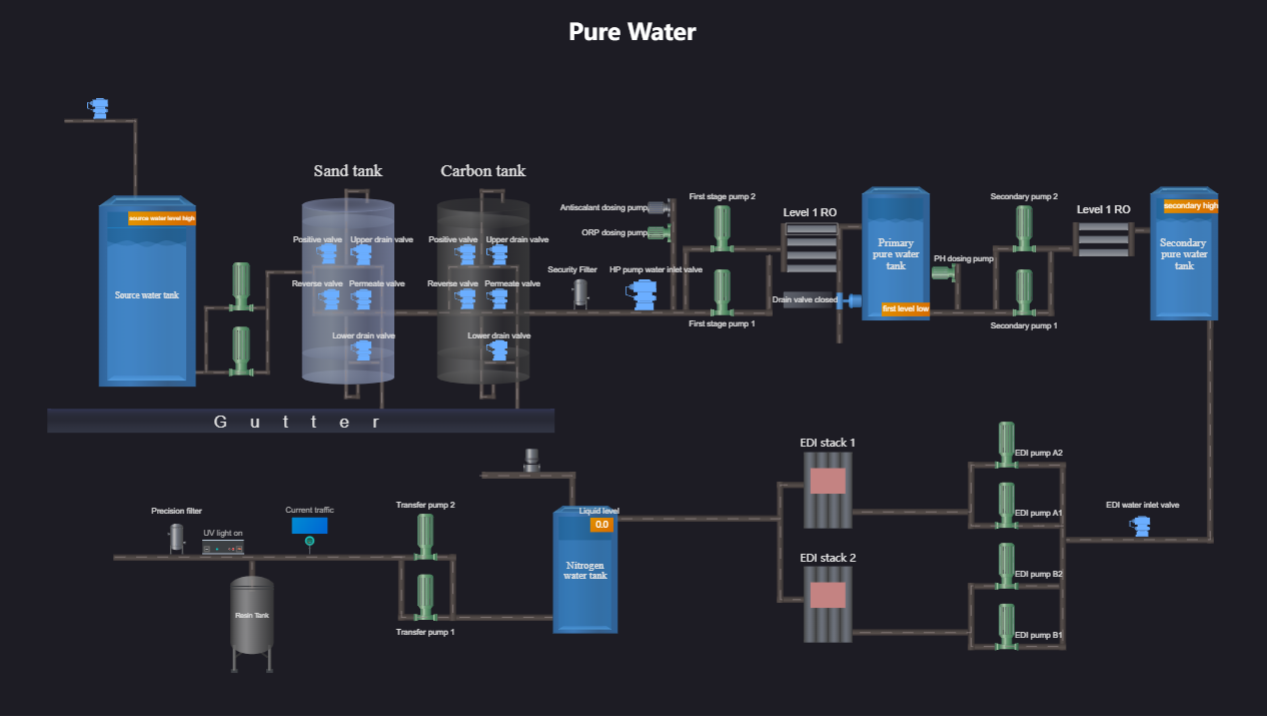
Digital Twin Monitoring (DTM) visualization tool is often used to build real-time monitoring pages for device operation conditions. This tutorial takes the intelligent monitoring of the water purification system as a sample scenario to achieve real-time monitoring of device data such as the level of the nitrogen water tank, the opening and closing status of the carbon tank valve and the interactive jumping of the high-pressure pump inlet valve.
Tutorial Objectives
In this tutorial, you will learn how to build water purification system monitoring pages and data binding in the DTM visualization tool.
Prerequisites
Ensure that you have signed up for an individual account or an enterprise account to access the EnOS Application Portal > Developer Console and EnOS Application Portal.
You need to be assigned the required asset permission and operation permission, and a menu group containing the Device Connectivity and Management and Digital Twin Visualization menu. If not assigned, contact the application admin.
Ensure that the current OU has the
Water Purification Systemmodel andEDT_Water Purification Systemasset, see Preparing Simulation Data.In trainings or simulations where no real devices are connected, you can simulate asset data uploading by importing
sample_PureWater.csvto the Device Simulator.Ensure that the current OU’s
EDT_Water Purification Systemasset is under the Trainee Tree asset tree, see Creating an Asset Tree.Ensure that the current OU’s Digital Twin Visualization > Monitoring > Monitor has Training folder. And Pure water template and Valve Popup panels are available in the folder. If not, you can download
panel_PureWater.zipandpanel_Valve.zipto import panels. Since the template contains panel path information, it will be automatically imported into the Training folder. If the Training folder does not exist in the current OU, it will be created automatically. For more information about importing panels, see Exporting and Importing panels.
Step 1: Creating Panel
Before configuring the element, you need to create a panel to place the element.
Log in to EnOS Application Portal and select Digital Twin Visualization from the application list.
Select Monitoring > Monitor from the navigation pane.
Select Panels > Root of Panel > Training, right-click in the left preview area and select New Folder.
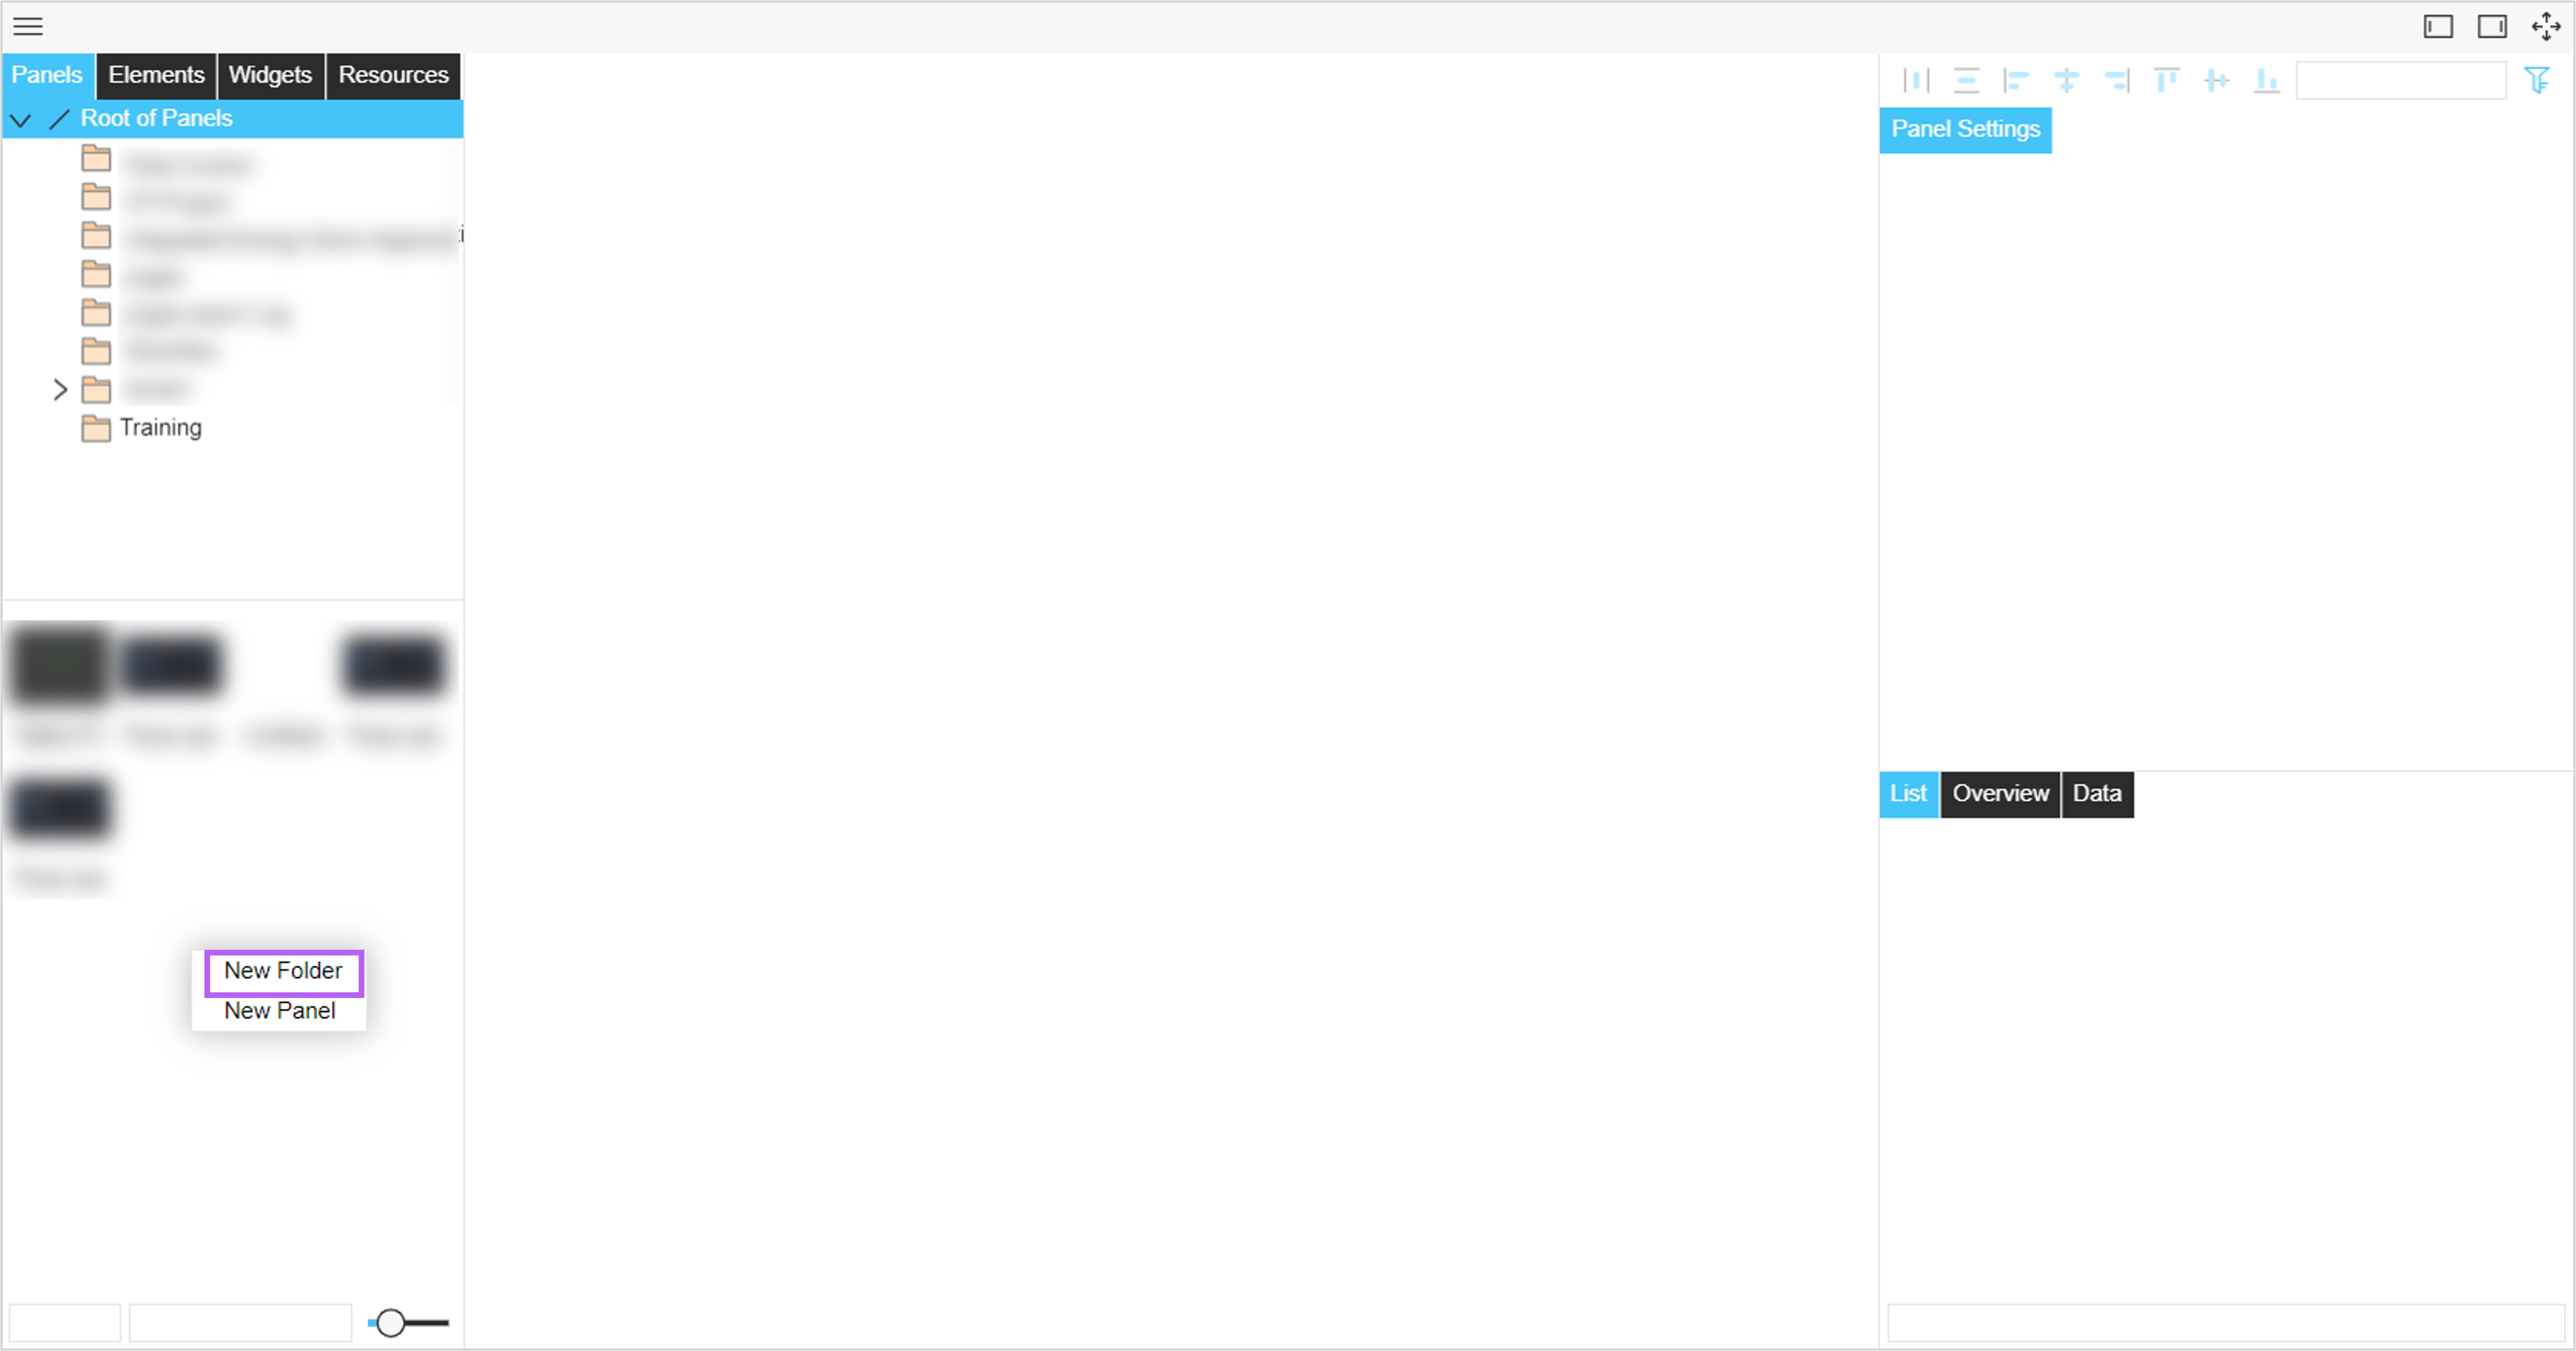
In the pop-up window, confirm that the folder path is displays/Training and enter the folder name
Demo.Select OK to create the folder, and the new folder can be viewed in the Root of Panel list in the sidebar.
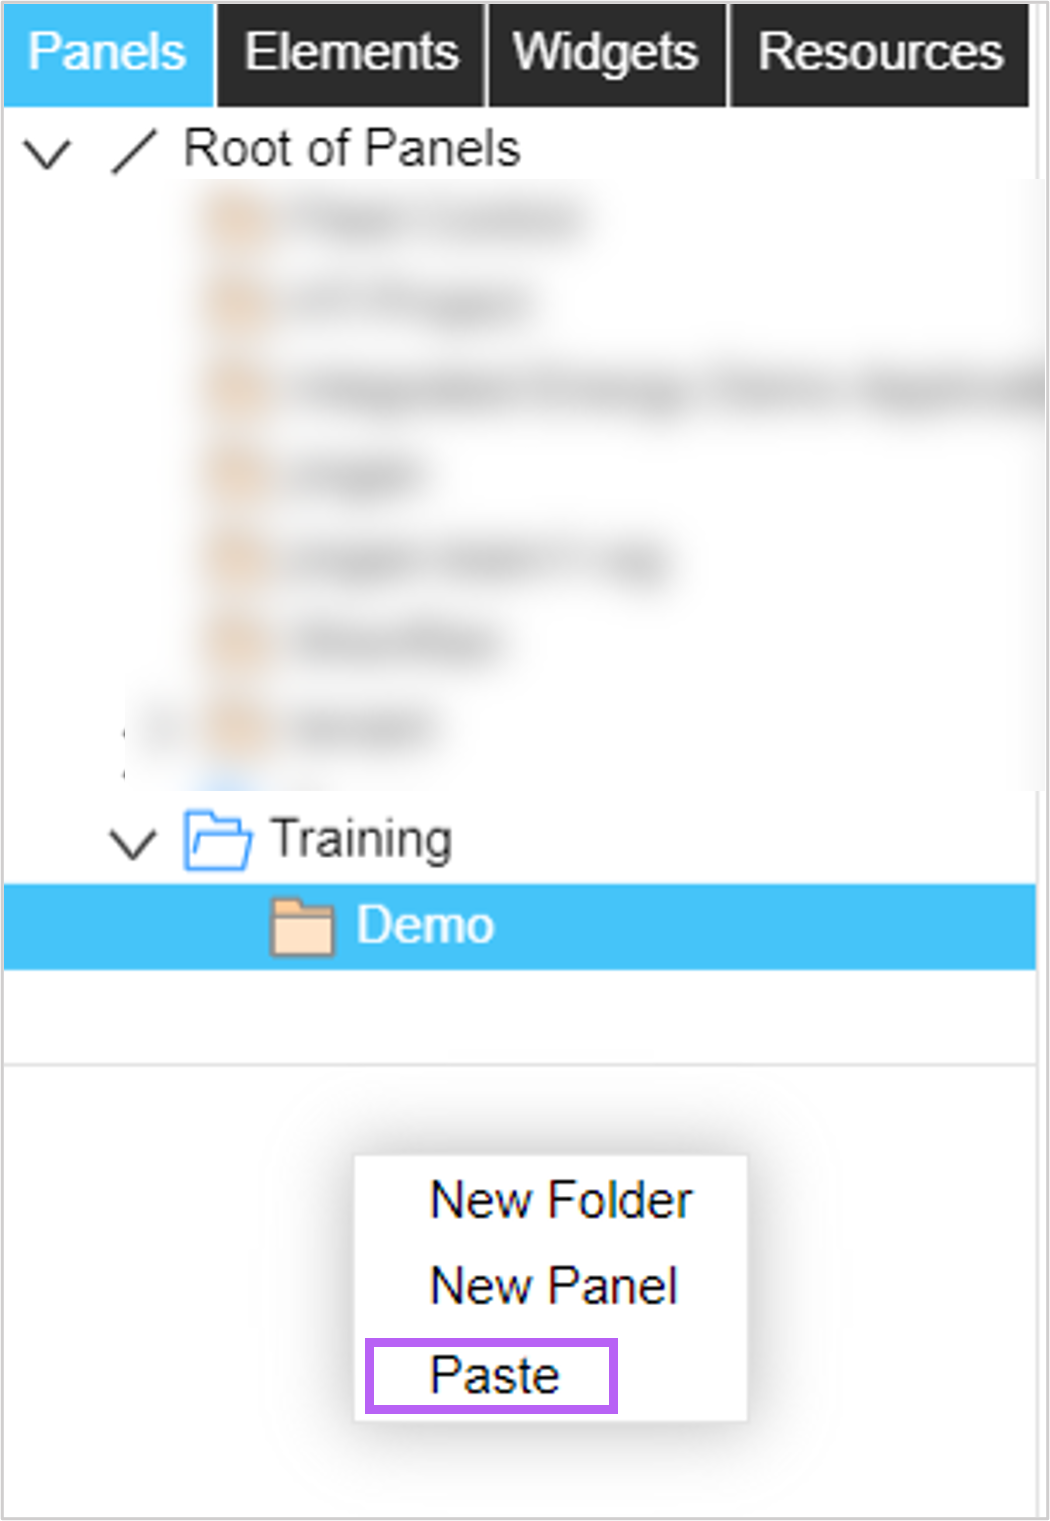
Select the Pure water template panel in the left preview area, right-click and select Copy.
Select Demo to enter the folder.
Right-click in the left preview area and select Paste. After a short while, the Pure water template panel will be available in the Demo folder in the sidebar.
Step 2: Binding Assets
The new folder and panel have been successfully created and you can now bind assets to the panel. Follow the steps below to complete the connection of the water purification system’s asset data to the pure water template panel.
Double-click Pure water template to enter the panel settings.
Select Bind Asset
 in the upper right toolbar to open the pop-up window, and select Add Asset.
Select the Trainee Tree tab (the asset tree to which the asset belongs).
Search for EDT_Water Purification System and select the asset.
Select OK and the asset has been displayed in the asset list.
Select OK to complete the asset binding for the panel.
Step 3: Adding and Configuring Elements
After creating the panel and binding the assets, you can add and edit elements on the page to bind data to the element. The DTM visualization tool provides a rich variety of element types to help you present your data most appropriately.
Binding Element Data
Follows the steps below to complete the binding of the text content below the liquid level of the nitrogen water tank with the nitrogen water tank liquid level measurement data of the water purification system asset, so that the monitoring page can display the real data in real-time.
Select the value under Nitrogen water tank > Liquid level and enter the element edit state.

Note
Ensure that the text element is selected, not the orange color block at the bottom of the value area.
Select the connect button
 to the right of the Panel Settings > Text > Content configuration item on the right to open the data binding pop-up window.
Select Add Data to enter the data selection pop-up window.
Select the EDT_Water Purification System asset and select the Points tab to enter the list of measurement points.
Search for Nitrogen water tank Liquid level in the upper right and select the measurement point.
Select OK to bind this measurement point data to the text element.
The added point is displayed in the data list with the data number
v1. Add the logical codereturn Number(v1).toFixed(2)to the function edit area so that the text is the returned point data with two decimal places.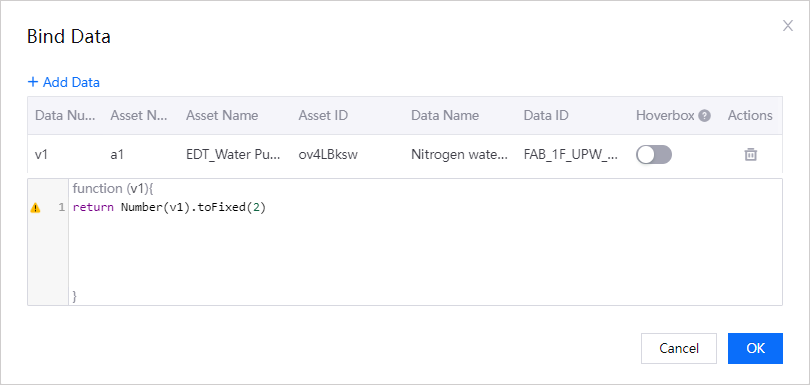
Select OK to complete the data binding of the element.
Select the save button
 in the upper-right corner of the panel to save the panel, then select Preview
  to preview it and see the effect of the element after binding data.
Binding Element Business Attributes
Follow the steps below to finish binding the valve of the sand tank positive inlet valve with the carbon inlet electric valve opening and closing status measurement data of the water purification system, so that the monitoring page can display the valve status in real-time.
Copy the Upper drain valve of sand tank element under Positive valve.

Select the element and check the right Panel Settings > Basic > state to turn on the business attributes of the element. Next, link the on/off status of the valve to the background color, which is blue when open and grey when closed.
Select the connect button
on the right side of the Panel Settings > Basic > state configuration item to open the data binding pop-up window.Select Add Data to enter the data selection pop-up window.
Select the EDT_Water Purification System asset and select the Points tab to enter the list of measurement points.
Search for Carbon water inlet electric valve open at the top right and select the measurement point.
The added measurement point is already displayed in the data list with the data number
v1. Add the logic codereturn v1to the function edit area.Select OK to complete the data binding of the element.
Select the save button
in the upper-right corner of the panel to save the panel, then select Preview to preview it and see the effect of the element after binding data.
Binding Element Interaction Events
Follow the steps below to complete the interactive events for configuring the HP pump water inlet valve. A pop-up window can appear after selecting the HP pump water inlet valve.
Select the HP pump water inlet valve element and enter the element editing state.

Select Add Interaction on the right side Panel Settings > Interaction > Interaction List to enter the interaction configuration pop-up windows.
Event:
ClickAction:
New PageTarget Page:
Training > Valve PopupReplace Target Assets:
a1Open Mode:
Popup WindowWindow Size: Width
640px, Height480px
Select OK to complete the interactive configuration.
Select the save button
in the upper-right corner of the panel to save the panel, then select Preview to preview itSelect the HP pump water inlet valve element to see the pop-up window.

Step 4: Getting the Panel URL
After editing the panel and selecting the save button
, select Preview in the upper right toolbar to enter the preview pop-up window.Select Copy URL
 to copy the URL of this page for embedding in other pages.