Configuring Widgets
A widget is the smallest configurable unit in DTV pages. Widgets present and analyze data in various ways and represent different business metrics. Widgets are categorized into two types—charts and containers—based on their functions and purposes. For more information, see DTV Key Concepts.
After configuring the canvas, layers, and panels, you can start designing the widgets following the guide below.
General Widget Operations
Adding a Widget
You can add widgets to a panel in two ways:
Drag a widget from the Widget Library onto the panel and configure it from scratch.
Import ready widgets from existing pages. You can find the Import Widgets from Dashboard button in the layer configuration drawer. Be noted that all widgets on the dashboard and their configuration will be added to the current panel if you use Import Widgets from Dashboard, replacing what is currently on the panel.

Checking Widget Position
You can check a widget’s position on the page or a chart’s position in the container by moving the cursor to the position icon on the top left corner of the widget.

Widget Position in Page
DTV uses the upper left corner of the canvas as the origin of the coordinate system. The position of a widget is defined by the location of its own top-left corner.
Vertical axis: extends downward in units based on the configured grid height.
Horizontal axis: extends rightward in units based on the configured grid number.
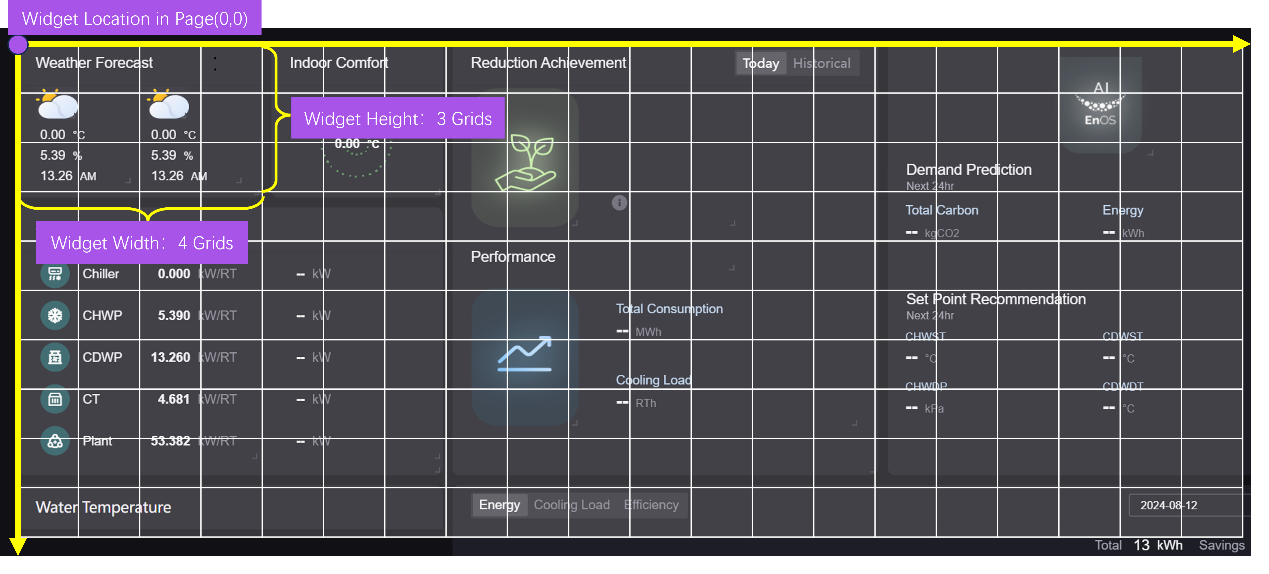

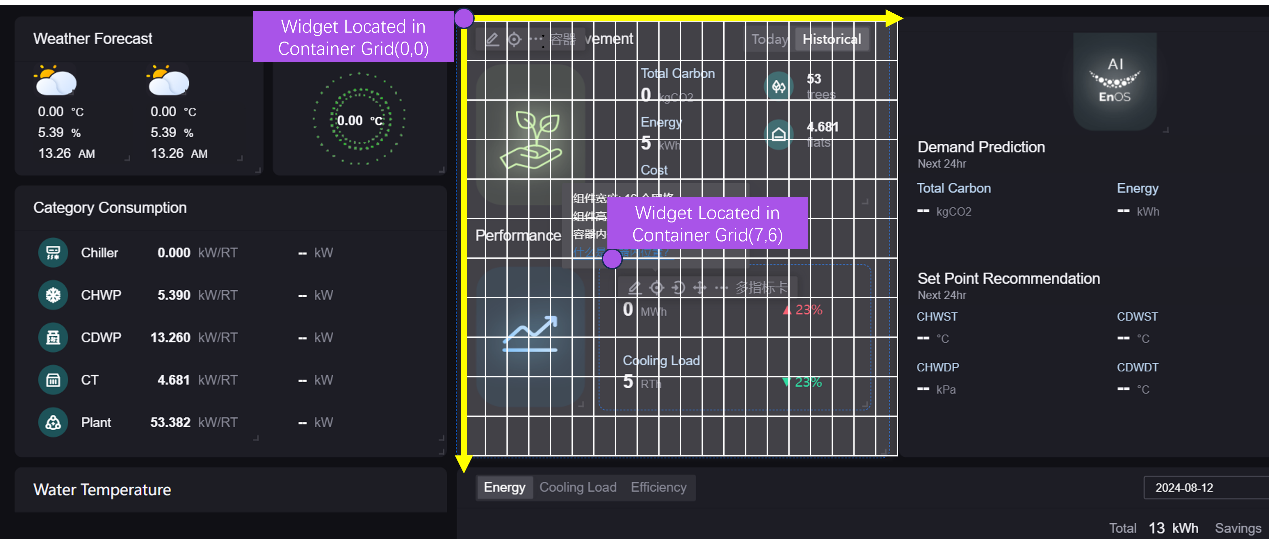
Chart Position in Container
The upper left corner of the container is the origin of the coordinate system. The position of a chart in a container is defined by the location of the char’s top-left corner.
Vertical axis: extends downward in units based on the configured grid height.
Horizontal axis: extends rightward in units based on the configured grid number.

Moving a Widget
You can select the widgets to reposition them in the panel. To resize a widget, drag the double-sided arrow icon that appears when your cursor is on its lower-right corner.
If you need to move a widget from one panel to another, hover over the (…) icon on the widget and select Move to Another Panel.

Deleting a Widget
To delete a widget, hover over the (…) icon on the widget and select Delete.
Note
If you delete a container, all charts in the container will be deleted.
Deleting a widget will erase its relevant linkages.
Saving as Template
Following the steps below, you can save a widget that you have designed and configured as a template for future use.
Move the cursor to the widget and hover over the (…) icon.
Select Save as Template from the dropdown menu, and assign its Belonged Group, Folder Name, Template Name, and Tag in the popup window.
Select OK to save the template.
Container-Chart Interactions
Adding Charts into Containers
Containers are used to host and manage charts. After adding a container to a panel, you can follow the steps below to place a chart into the container.
Move the cursor to the chart.
Select Add to Container.
Select a container and a tab (if the container has multiple tabs).
Removing Charts from Containers
You can follow the steps below to remove a chart from a container.
Move the cursor to the chart.
Select Remove from Container.
The removed chart will be taken out of the container and placed in the same panel.

Widget Configuration
Editing Containers
To enter the container settings popup, hover over the container and select Edit. See Grouping Widgets Using Containers for instructions on how to configure containers.

Editing Charts
Common Configurations
Select Edit on a chart to enter its configuration drawer. See Common Configurations for Widgets for instructions on how to configure charts.

Duplicate Charts
Follow the steps below to duplicate a chart that you have already configured on the current page.
Move the cursor to the chart and hover over the (…) icon.
Select Duplicate from the dropdown menu
The duplicate will be placed in the same panel. If you intend to use it in another panel, hover over the (…) icon on the chart and select Move to Another Panel.

Adding Linkage Between Widget and Widget
Widgets such as table, pie chart, and series chart can be linked to each other to achieve interactive data updates. When a user selects a data point in one widget, the linked widgets will update their data based on the selected data point.
Follow the steps below to configure the linkage between widgets:
Enter the configuration panel of a widget and go to the Filter tab.
In the Link Other Widgets section, select +Add to open the Add Widget Link drawer.
Select Trigger in This Widget to choose the actions in the current widget that trigger the data update in the linked widgets.
Select Refreshed Widgets to choose the widgets that need to be updated when the trigger action occurs.
Select OK to save the linkage configuration.
After completing widget configuration, you can move on to Linkage Configuration to establish linkage between the navigator, canvas, and widgets.