Submitting Static Data
Static data entry allows developers to input or modify static data for DTV Single-Page Applications on a designated data entry page, without altering or contaminating the actual business database. This feature enables users of the application page to toggle between static data and live device data for comparison or presentation purposes.
Business Value of Static Data Entry
Designated Data Presentation: Static data is ideal for testing or demonstration purposes. The use of static data prevents the exposure of sensitive business information, reduces the risk of misinterpretation, and supports effective visualization of a specific collection of data.
Improved Collaboration Efficiency: Product managers or other business personnel can independently prepare scenario-specific demo data via the static data entry URL, without relying on application developers. This significantly shortens the time required to prepare a presentation.
Enhanced Data Security: All static data operations are performed in an isolated environment, fully separated from the production database. This ensures data integrity and safeguards the live system.
Seamless Data Integration: The static data entry page can be accessed as a standalone interface or embedded into EnOS applications or third-party platforms. This ensures a unified and streamlined experience.
Key Concepts
Understanding the following concepts will help you navigate the subsequent workflow for static data entry.
Static Data Primary Key
A static data primary key is a field, or a combination of fields used to uniquely identify a data record—similar to the primary key in a database table.
The primary key functions as data identity during data matching and updating. After you define the primary key, the system will use the primary key value to determine whether to update an existing record or create new data. This prevents accidental data overwriting.
You can appoint one of the original data items used by the widget to be the primary key, such as:
Dimension: Original data fields already added in the Dimension section and those referenced in the calculated fields.
Metric: Original data fields added in the Metric, Comparison, and Extension sections, as well as those referenced in the calculated fields.
Others: Data fields linked during navigator-and-widget interactions. For example, a time-tamp field used exclusively for time filtering can be designated as a primary key, even though it is not added to Dimension or Measurement.

To ensure the uniqueness of primary key values, you may select one or more data fields as the static data primary key:
If a single data field can uniquely identify a record, specify it as the primary key (e.g., “Asset ID” uniquely identifies an asset).
If uniqueness cannot be guaranteed by a single field, use a combination of multiple data items as the primary key (e.g., “Year + Asset ID” uniquely identifies a record for an asset in a given year).
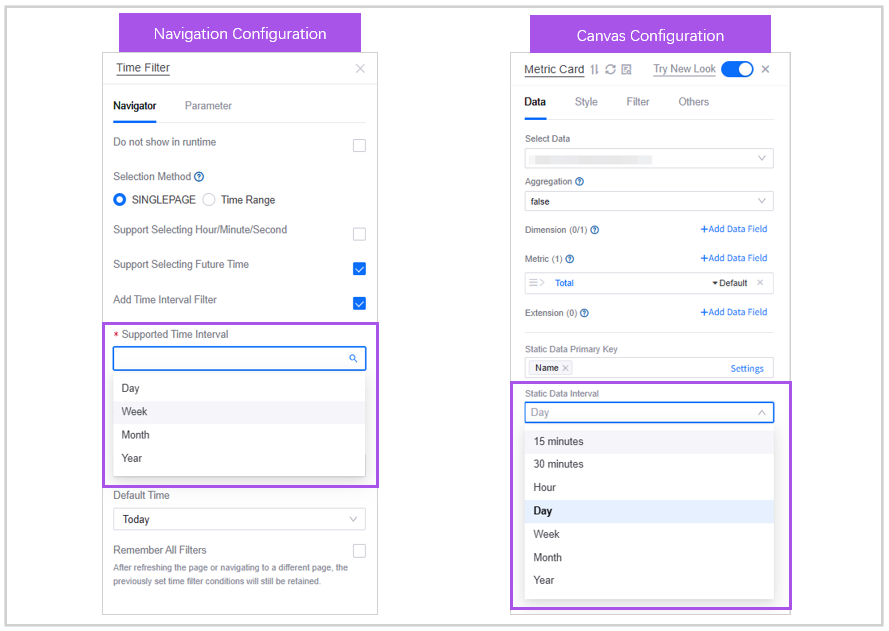
Static Data Interval
The static data interval defines the time-based granularity for each data record. The time interval determines how static data interacts with time filters and widgets.
For example, selecting “Day” to be the static data interval indicates that each data record represents the total of one day (e.g. daily sales). If the user selects “September 2025” in the time filter, the widget displays the total sales for that month by aggregating the static data for each day in September.
Pay attention to the following when configuring static data interval:
Static data intervals are only effective when the widget data fields are linked to the time filter.
If no interval is specified in widget configuration, or the widget is not linked to the time filter, the default static data interval is Day.
If the interval is larger than the selected time range in the time filter, the widget will not update new data. For instance, if the static data interval is “Day”, and the user specifies the time range as “15 minutes”, the widgets will continue to display daily data, as there is no available data in smaller granularity.
Static Data Entry Workflow
Application developers may follow the workflow below to enable static data entry:

Enabling Static Data Entry: Select the checkbox to enable static data entry.
Selecting Static Data Primary Key: Set primary key for the widgets that require static data.
Selecting Static Data Interval (Optional): Set up Static Data Interval to enable interaction between widget data and the time filter
Accessing Static Data Entry Page: Publish the DTV application page to obtain static data entry URL.
Submitting Static Data: Import static data on the static data entry page.
Viewing Static Data in Runtime Interface: Go to runtime interface to view static data on the application page.
Providing Static Data Entry URL to Users (Optional): Provide the static data entry URL to users of the application page.
Prerequisites
Before you start submitting static data for your application page, ensure that:
You have access to DTV products. Contact OU administrator if you need any help.
You have created a Single-Page Application page in DTV and have selected data sources for the widgets on the page. Or, you have permission to edit a target page. Contact OU administrator if you need any help.
Note
After submitting static data, if you modify the static data configuration (such as changing the Static Data Primary Key) and republish the page, you will need to re-submit static data for the page.
Step 1: Enabling Static Data Entry
From DTV Center > Single-Page Apps, go to the configuration interface of a single-page application.
In Basic Configuration, check the checkbox for Enable Static Data Entry.
Select Use Real Data or Use Static Data to determine the default data displayed on the page. Users of the page can use the Integrated/Static toggle to switch between data sources.

Step 2: Selecting Static Data Primary Key
Go to Canvas Configuration.
Select Edit of the widget that requires static data input.
On the Data tab, ensure that you have selected data sources for the widget. For more information on data sources, see Configuring Data.
Select Settings for Static Data Primary Key.
In the Select Static Data Primary Key popup window, select one or multiple data fields. If you select Use Recommended Primary Key, the system will select the recommended item(s).
Select OK to complete Static Data Primary Key configuration.
Step 3: Selecting Static Data Interval (Optional)
Static Data Interval is an optional configuration item to achieve the following:
The widget displays time series data.
The widget data updates as the users interact with the time filters.
Before selecting a static data interval, ensure that:
You have added time filters to the page. For more information, see Configure Time Filter.
You have established linkage between the time filter and the widget. For more information, see Link Navigator and Widget.
To configure the Static Data Interval:
In Canvas Configuration, open the configuration panel of a widget.
On the Data tab, select Static Data Interval. It is recommended to select an interval smaller than the Supported Time Interval of the time filter, so that the widget can update its data to reflect changes in time filter selection.
For example, when the Supported Time Interval of the time filter is Week, if the Static Data Interval is Day, DTV can sum up the daily record of the week to generate the week total. On the other hand, if the Static Data Interval is Month, the widget will continue to display monthly data when users specify a week range, because DTV cannot derive weekly figures from monthly data.

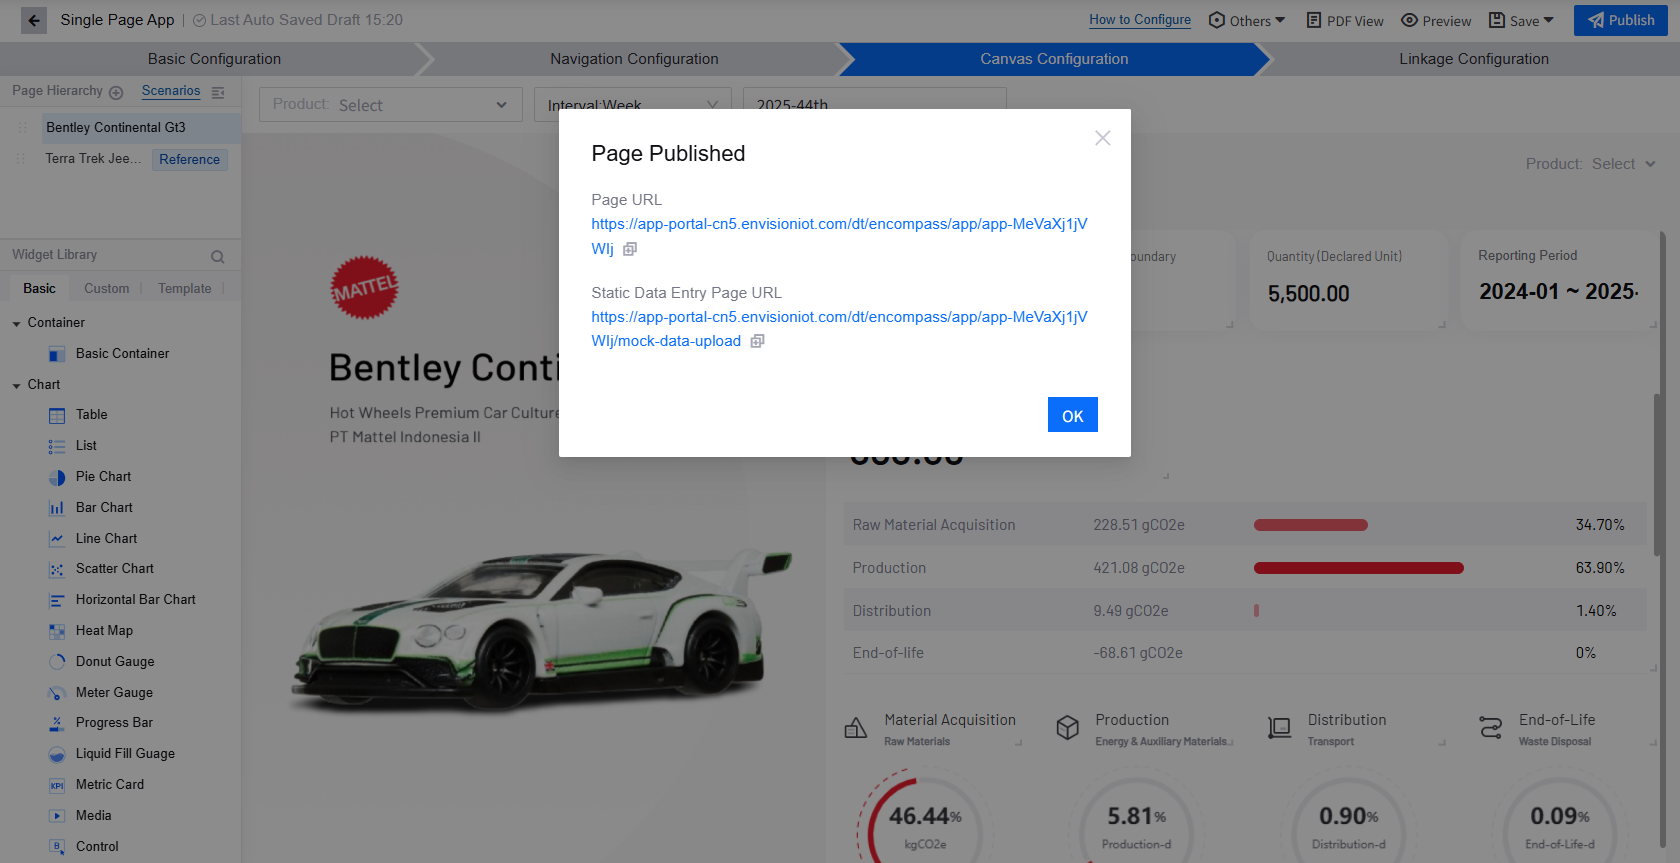
Step 4: Accessing Static Data Entry Page
To obtain the Static Data Entry Page URL:
In the configuration interface of a single-page application, select Publish.
Find the Static Data Entry Page URL in the popup window. For more information, see Check and Publish the Page.
The Visibility range you select for the application page is also applied to the static data entry page.
Internal: Users in the current OU can access the application page and its static data entry page.
Public: Users in all OU in the same environment can access the application page and its static data entry page.
The Page URL and the Static Data Entry Page URL will remain unchanged after revising and re-publishing the page.

If you have already published the page, go to the configuration interface of the page, and select Others > Publish Information to obtain the Static Data Entry Page URL.

Step 5: Submitting Static Data
You can submit static data either by entering directly on the Static Data Entry Page for each widget, or by importing a completed template file to submit in batch. After submitting the data, review the published page to ensure that all data appears as intended.
Open the Static Data Entry Page in your browser. If the application page has multiple canvases, switch between tabs to submit data. In each tab, widgets that have Static Data Primary Key are displayed, with their data sections empty until you submit data.
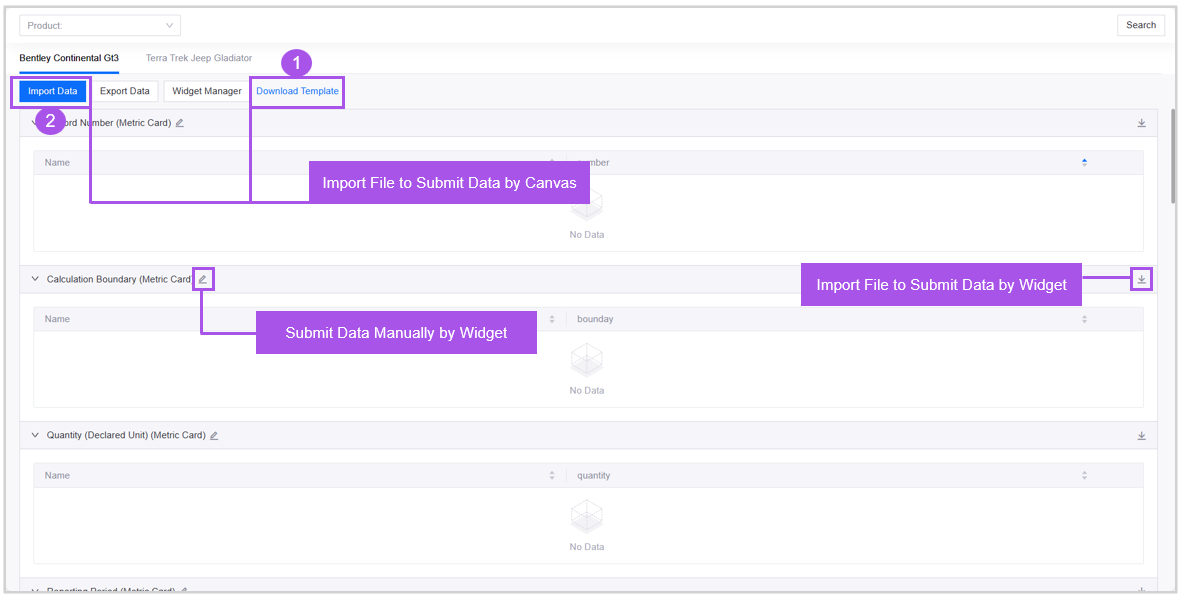
On the Static Data Entry Page, choose one of the following ways to submit static data:
Import File to Submit Data by Canvas
Select Download Template to obtain the canvas-specific data entry template.
Enter data into the template file. Each sheet represents a widget.
Select Import Data and upload the completed template file.
Submit Data Manually by Widget
Select Edit of each widget.
Select Add Data to manually enter data for this widget.
Select OK to save the entered data.
Import File to Submit Data by Widget
Select Download on each widget to download the widget-specific template.
Enter data into the template file.
Go back to the Static Data Entry Page, select Import Data, and then upload the completed template file.
After submitting static data for the page, if you modify the Static Data Primary Key or the Data Sources and republish the page, you can export the widget-specific data file containing both the previous and updated versions of the static data.
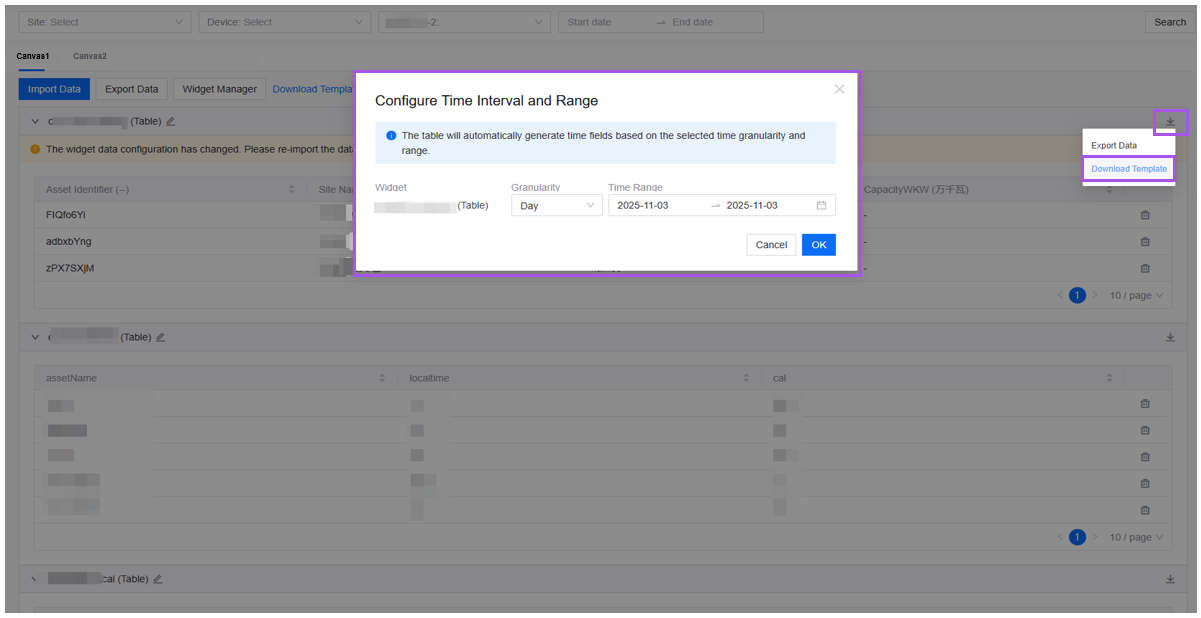
If you submit data by importing files, when you download the template, you need to select Granularity and Time Range in the Configure Time Interval and Range popup window. They will determine the default values of the widget-to-navigator Linked Data Field in the template that you download.
Granularity refers to Static Data Interval. If you haven’t selected a Static Data Interval, the default interval is “Day”. To use a different interval, open the configuration panel of the widget in Canvas Configuration and modify the selection.
Time Range refers to the values automatically populated in the template for the data fields linked to the time filter based on the selected Granularity.
The following scenario illustrates how it works:
Granularity (i.e. Static Data Interval): Select Month.
Time Range: Select 2025-09 to 2025-10.
Linked Data Field for the widget-and-navigator linkage: Select “time”.
In this case, the downloaded template will automatically populate the “time” column with two rows:
The first row:
2025-09-01 00:00:00, indicating that you should enter monthly data for September 2025 in this row.The second row:
2025-10-01 00:00:00, indicating that you should enter monthly data for October 2025 in this row.
Pay attention to the following while submitting static data:
The value of Static Data Primary Key must be the unique field that identifies the widget.
If the widget is linked to the navigator, it is recommended that the static data you submit includes the data associated with the widget-to-navigator linkage. This is to ensure that when the user selects an option in the navigator, the system can find correspondent data from your submitted static data to enable smooth interaction.
If calculated fields are used in the widget, you need to enter the values for the original fields when submitting data. After submission, the system will display the calculated fields and automatically generate their values.
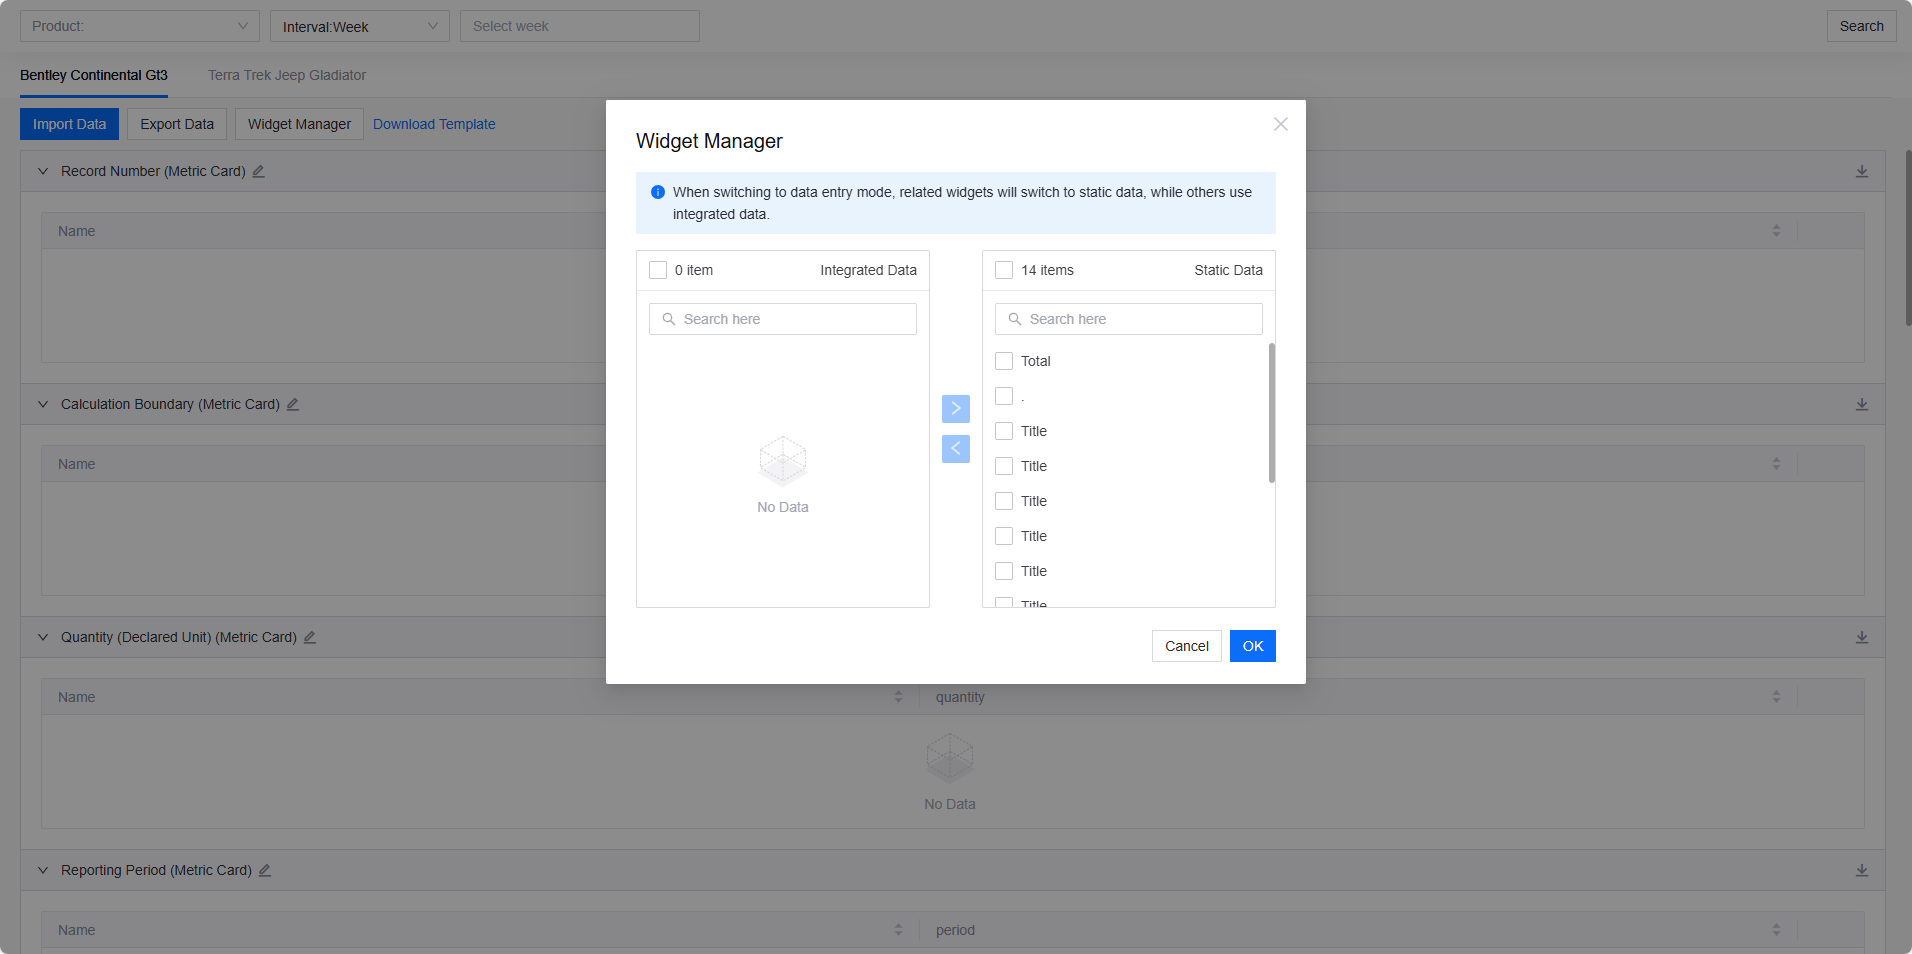
To present some widgets with static data and others with integrated data, select Widget Manager on the Static Data Entry Page and assign widgets to either the Integrated Data or Static Data list. Once assigned, these widgets won’t be affected by users toggling between Integrated and Static on the application page.
Use the navigators on the Static Data Entry Page and select Search to confirm that the static data displays as intended during navigator interaction.


Note
Make sure you submit data for all canvases and widgets.
Step 6: Viewing Static Data in Runtime Interface
In the runtime interface, use the Integrated/Static toggle to switch to static data and verify that the data is displayed as intended.

Step 7: Providing Static Data Entry URL to Users (Optional)
Now you can provide the Static Data Entry Page to the users of your DTV application page. Choose one or more of the following ways:
Provide the Static Data Entry URL directly.
Embed the URL into an EnOS application. For more information, see Creating Applications.
Embed the URL into a third-party application. Contact the system administrator if you need any help.
With the URL, end users can follow Step 5 and Step 6 to submit and view static data.
Following this tutorial, you have learned how to use DTV’s Static Data Entry feature. You are now equipped to build a secure, flexible, and efficient workflow for demonstrating and testing data visualization applications.