Creating Alert Rules
By creating alert rules for monitoring, you can create alert rules for hosts and application-related metrics. When an alert rule is triggered, the system sends an alert message to the receiver of the alert in the specified notification mode to remind to take necessary resolution measures.
Prerequisites
Before you start, please make sure of the following.
The user account has been assigned the required permissions. If you need to be assigned, please contact Organization Admin.
It has been created for receiving alert notifications. To create a new one, see Creating Receiver Groups。
Procedure
Creating Host Alert Rules
You can create host alert rules with the following steps.
Log in to the EOC and select Alerts > Alert Rules > Hosts in the left navigation bar.
On the host alert rule page, click New Rule to complete the configuration of the host rule information.
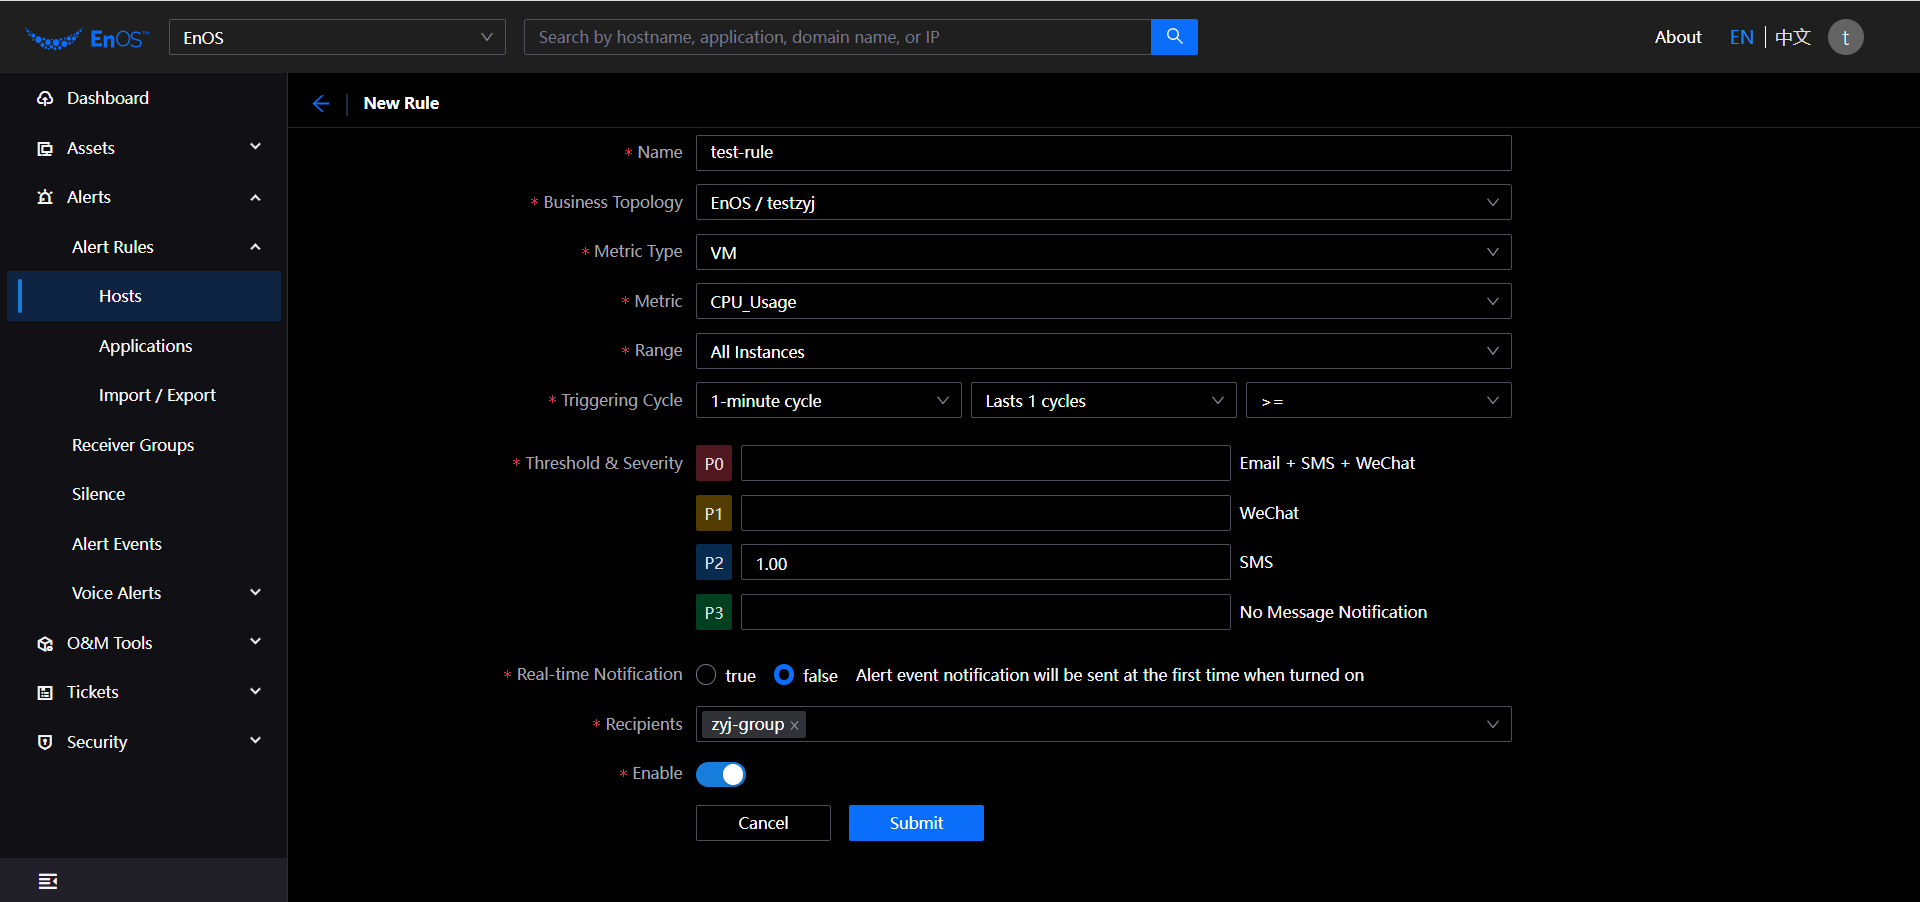
Name: Required, enter the host alert rule name, with the maximum of 128 characters including English case, numbers and special characters ( - , _ , . ** , **[ , ] ).
Business Topology: Required, select the business topology associated with the rule, at least to the product line level.
Metric Type: Required, select VM type only.
Metric: Required, select the host-related metrics.
Range: Required, select the range of this metric to monitor (all instances / customized instances / applications).
All Instances: The scope includes all instances under the selected organization, product line, product (optional).
Customized Instances: Show the instance list and select the instance object to be monitored by the host name.
Application: Show the application list and select the instance object to be monitored by the application name.
Triggering Cycle: Required, select the trigger cycle duration (1/5/10/30/60 minutes cycle), cycle frequency (1/3/5/10 cycles) and operator (>/>=/==/<=/</! =).
Threshold & Severity: Required, enter the threshold values for different alert levels.
Real-time Notification: Required, no real-time notification is sent by default. Once turned on, an alert event notification will be sent at the first time.
Recipients: Required, select the recipient of the alert message.
Enable: Required, select alert rule is enabled or not, the default is enabled state.
Click Submit.
Note
The alert level is considered invalid if it is null.
In order to reduce the number of alert notifications, some low-level alert events can be configured as No Message Notification , and if an alert level is configured as one with no message notification, no corresponding alert notification is sent after the alert event is generated or aggregated.
WeCom alerts can only be sent by AD domain type accounts, local accounts are not supported at the moment.
Creating Application Alert Rules
The system provides two ways (standard format and PromQL format) for application alert rule configuration. You can create application alert rules on demand, and the rules created in different formats are different.
Standard Format
You can create standard format application alert rules with the following steps.
Log in to the EOC and select Alerts > Alert Rules > Applications in the left navigation bar.
On the application alert rule page, click New Rule, different formats create different rules. Complete the configuration of the application rule information in the standard format as follows.
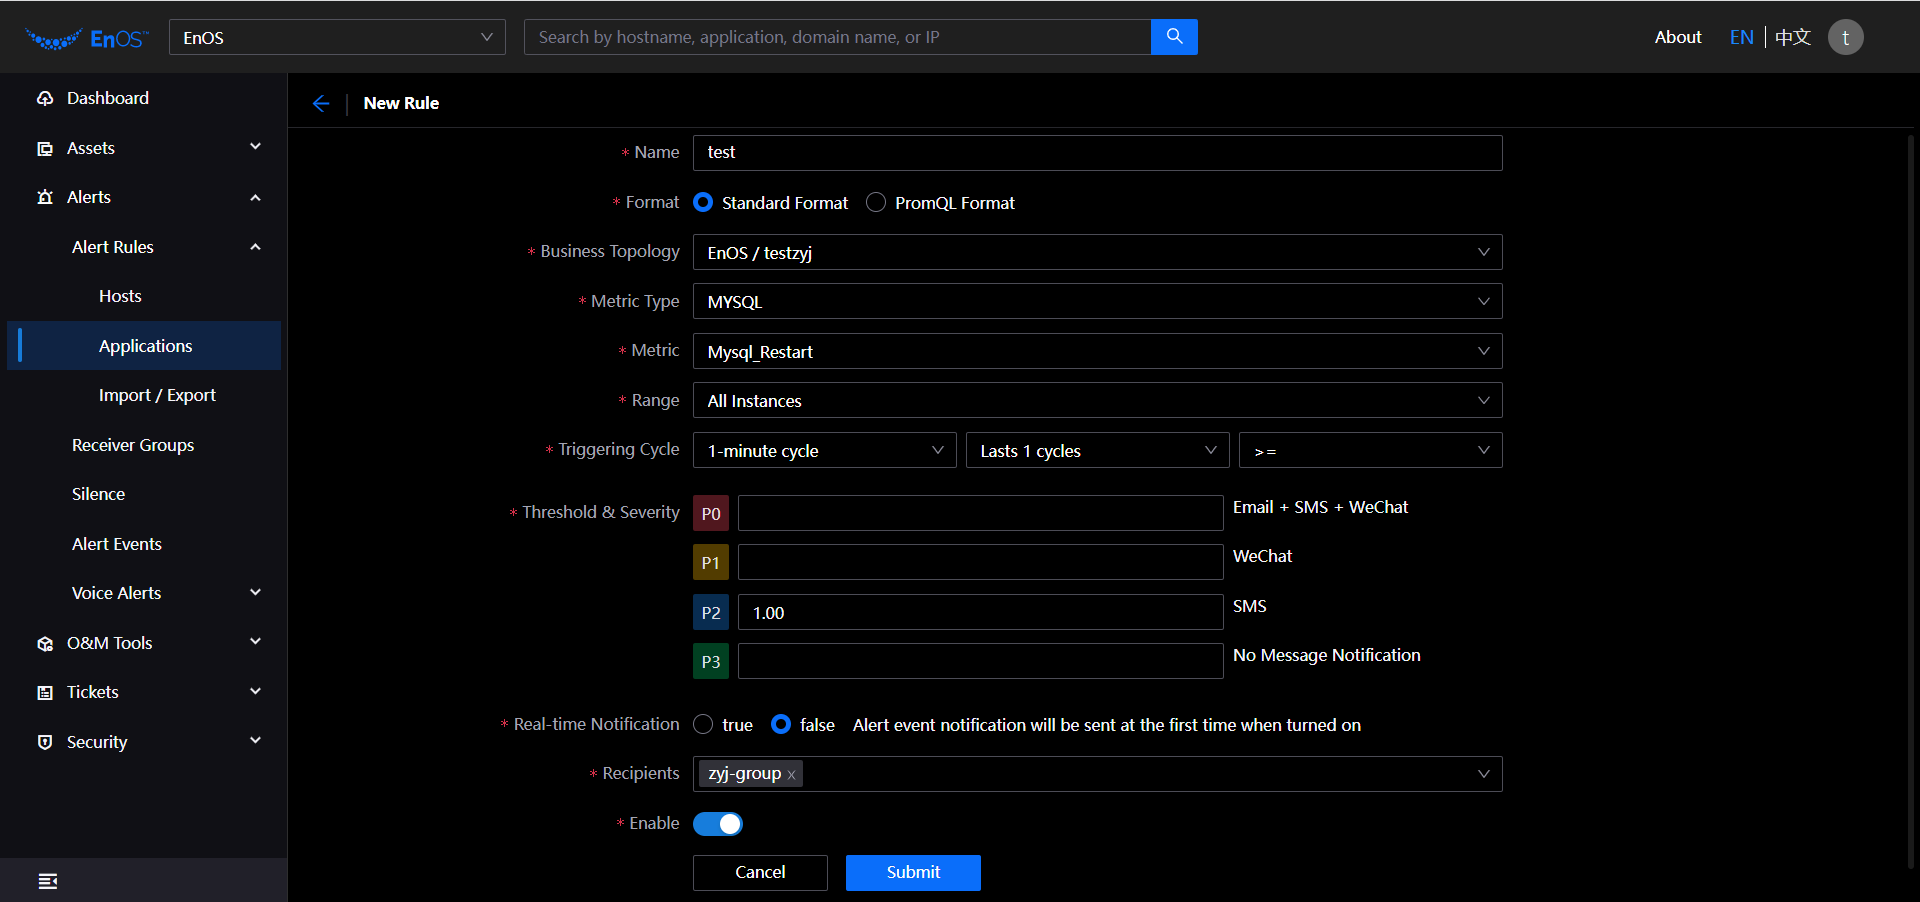
Name: Required, enter the application alert rule name, with a maximum of 128 characters including English case, numbers and special characters ( - , _ , . ** , **[ , ] ).
Format: Required, select Standard Format.
Business Topology: Required, select the business topology associated with the rule, at least to the product line level.
Metric Type: Required, select the standard format of alert rule metric type (MYSQL / MONGO / POSTGRESS / REDIS / NEO4J).
Metric: Required, select the metrics related to the metric type.
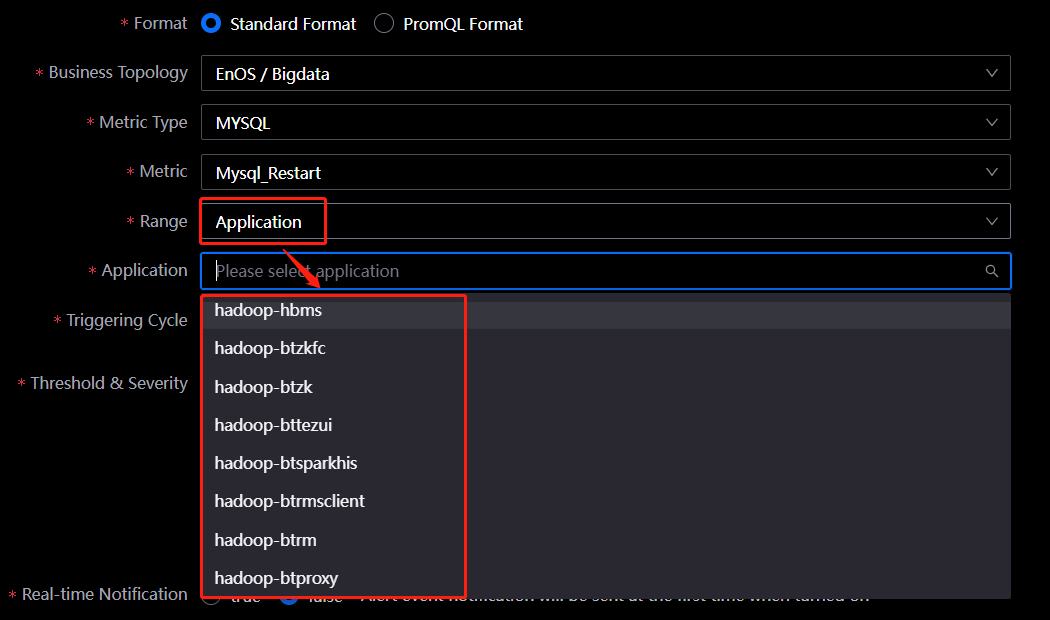
Range: Required, select the range of this metric to monitor (All Instances/Customized Instances/Application).
All Instances: By default, all instances under the selected product are monitored.
Customized Instances: Select on-demand instance objects to be monitored under selected products.
Application: Select the instance object to be monitored by the application name.
Triggering Cycle: Required, select the trigger cycle duration (1/5/10/30/60 minutes cycle), cycle frequency (1/3/5/10 cycles) and operator (>/>=/==/<=/</! =).
Threshold & Severity: Required, enter the threshold value for different alert levels. It provides three forms of message notification: email, SMS, and WeCom.
Real-time Notification: Required, no real-time notification is sent by default. Once turned on, an alert event notification will be sent at the first time.
Recipients: Required, select the recipient of the alert message.
Enable: Required, select alert rule is enabled or not, the default is enabled state.
Click Submit.
Note
The alert level is considered invalid if it is null.
In order to reduce the number of alert notifications, some low-level alert events can be configured as No Message Notification , and if an alert level is configured as one with no message notification, no corresponding alert notification is sent after the alert event is generated or aggregated.
WeCom alerts can only be sent by AD domain type accounts, local accounts are not supported at the moment.
PromQL Format
You can create PromQL format application alert rules with the following steps.
Log in to the EOC and select Alerts > Alert Rules > Applications in the left navigation bar.
On the application alert rule page, click New Rule, different formats create different rules. Complete the configuration of the application rule information in the PromQL format as follows.
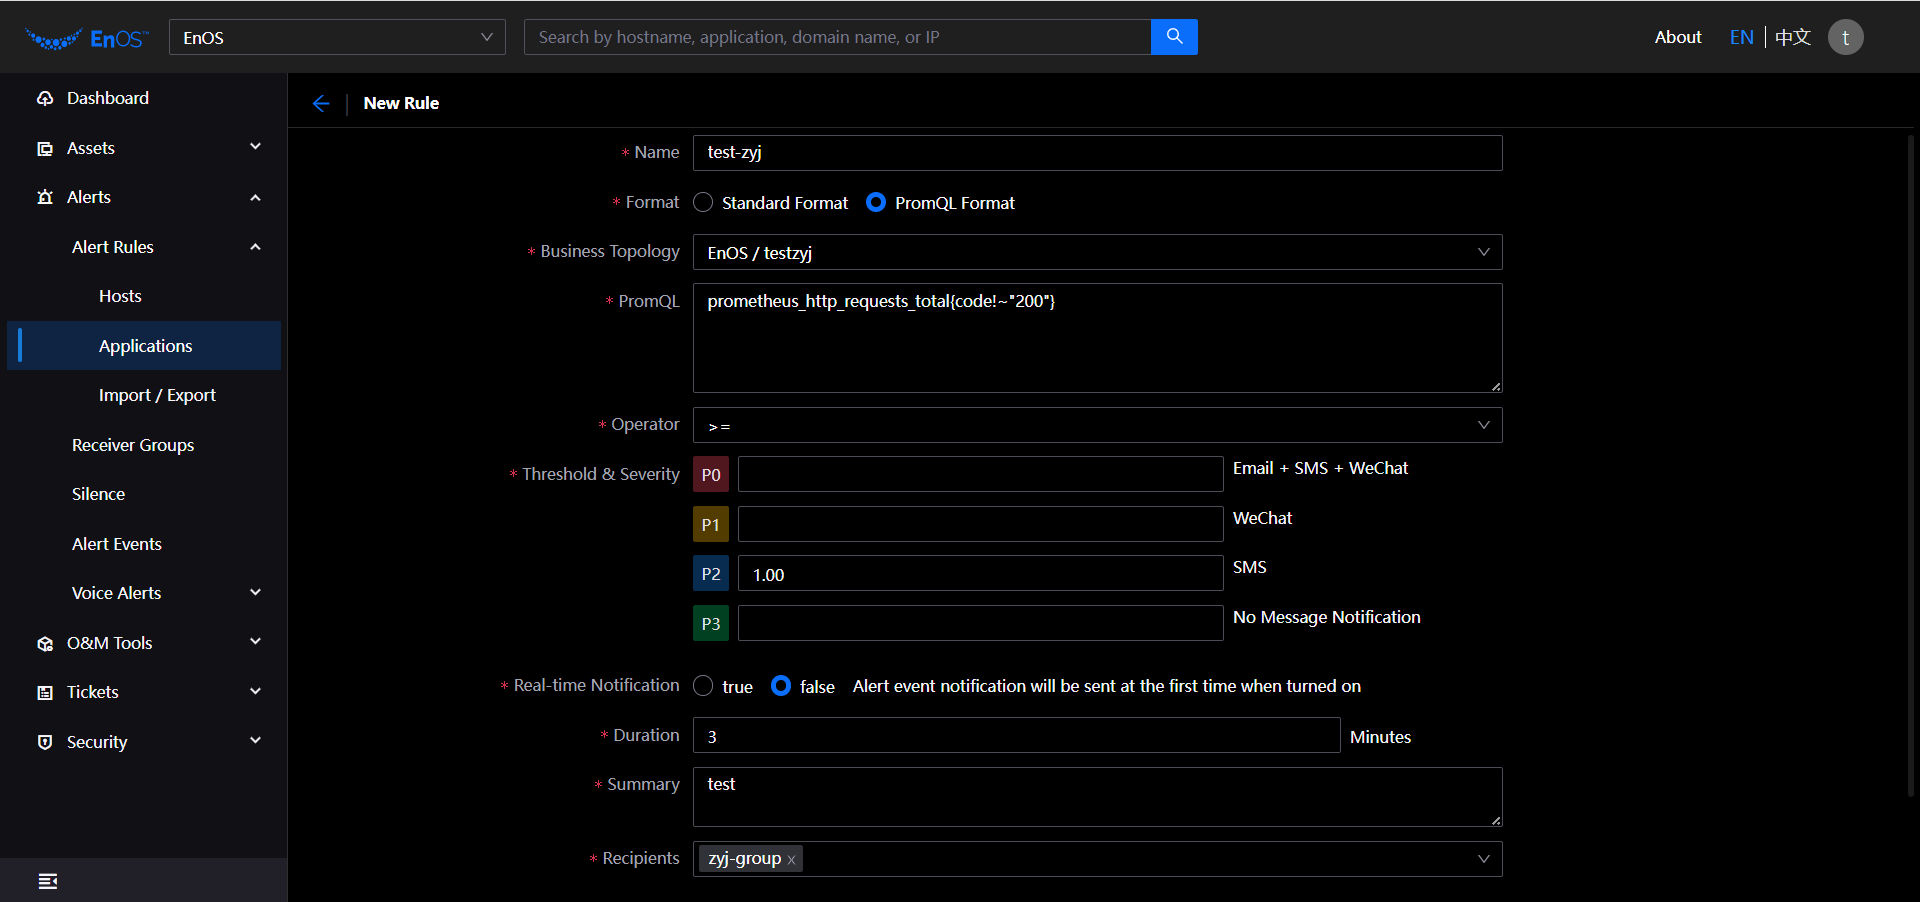
Name: Required, enter the application alert rule name, with a maximum of 128 characters including English case, numbers and special characters ( - , _ , . ** , **[ , ] ).
Format: Required, select PromQL Format.
Business Topology: Required, select the business topology associated with the rule, at least to the product line level.
PromQL Format: Required, enter the PromQL statement to set the alert regular expression.
Operators: Required, select the operator for threshold comparison (>/>=/==/<=/</! =).
Threshold & Severity: Required, enter the threshold value for different alert levels. It provides three forms of message notification: email, SMS, and WeCom.
Real-time Notification: Required, no real-time notification is sent by default. Once turned on, an alert event notification will be sent at the first time.
Duration: Required, enter the duration of the alert.
Summary: Required, enter the description of the alert description.
Recipients: Required, select the recipient of the alert message.
Enable: Required, select alert rule is enabled or not, the default is enabled state.
Click Submit.
Note
The alert level is considered invalid if it is null.
In order to reduce the number of alert notifications, some low-level alert events can be configured as No Message Notification , and if an alert level is configured as one with no message notification, no corresponding alert notification is sent after the alert event is generated or aggregated.
WeCom alerts can only be sent by AD domain type accounts, local accounts are not supported at the moment.
Results
After the alert rule is successfully created, you can view the details in the rule plan list and do the following operations.