Unit 6: Building Applications
After asset onboarding and data configuration, you can build application menus to define how the application functions are combined and visually presented. Application menus can come from the following sources:
For generic menus, you can reuse the menus of EnOS Industry Application Common Building Blocks (CBBs). For example, reuse the Portfolio menu of Unified Monitoring to monitor asset status, and reuse the alarm-related menus of Alarm Management for configuring alarm rules, viewing alarms, and other scenarios.
For menus with customized needs, you can use Digital Twin Visualization to configure custom menus.
Before You Start
Before start, ensure the following items:
Application creators, asset administrators, and system administrators have been assigned the required permissions. If not, contact the application administrator.
Asset administrators have decided the alarm trigger conditions, levels, types and content for the application. For example, when the temperature of battery cells is higher than the threshold value, an alarm is triggered; the generated alarm is of the “Info”, “Warning” or “Fault” level; the alarm type is “Status Alarm”; the alarm content is “battery cell temperature is too high”.
(Optional) Task 1: Building Custom Menus
Performed By |
Performed In |
|---|---|
Application Creator |
EnOS Application Portal |
If the generic menus provided by CBBs do not meet your needs, you can use Digital Twin Visualization to customize application menus by drag-and-drop widgets and low-code configurations.
Procedure
Follow the steps below to build custom menus using Digital Twin Visualization.
Configuring Data Sources
Select Digital Twin Visualization from the applications list in EnOS Application Portal.
In the left navigation bar, select Dashboards > Dashboards. Enable the needed data sources in the Built-in Data Sources and Public Data Sources tabs, or create a new data source in the External Data Sources tab. For more information, see Configuring Data Sources.
Creating Projects, Pages, and Widgets
Select Dashboards > Dashboards in the left navigation bar.
Select New Project, fill in the project name in the pop-up window, and select OK.
Select New Page, fill in the page name in the pop-up window, select the project created in the previous step as the project to which it belongs, and select OK to enter the page editor.
Select Add > Widget in the toolbar at the top of the page editor. Configure widgets on-demand in pop-ups. For more information, see Adding Widgets.
Publishing Pages
Return to the page editor and drag the widgets to adjust the page layout.
Select the disk button
 to save the page configuration. Select the ellipsis (…) and choose Copy URL to save the URL of the current page. This URL will later be inserted into the application as a menu URL.
Select the ellipsis (…) and select Publish.
Results
After the application is built in the subsequent tasks, the widgets will appear in the corresponding menus to display the configured data.
Task 2: Creating Applications
With the generic and custom menus provided by CBBs, you can combine and configure the application menus according to actual needs to quickly reuse the common capabilities that EnOS has consolidated from industry practices.
Procedure
There are two ways to create an application.
Registering an application in EnOS Application Portal.
Creating an application shortcut in EnOS Application Portal.
Registering Applications
Performed By |
Performed In |
|---|---|
Application Creator |
EnOS Application Portal > Developer Console |
Log in to EnOS Application Portal > Developer Console and select Application Registration in the left navigation bar.
Select the Apps of This OU tab and choose Create Application.
Fill in the basic information of the application and select Confirm.
In the Apps of This OU tab, select the application created in the previous step.
Select the Menu tab and choose Create Menu. Create all menus in order as needed.
For the menus reused from CBBs, fill in URL with the URL of the corresponding CBB. For the URL of each CBB menu, contact the system administrator.
For the menu customized using Digital Twin Visualization, fill in URL with the URL of the page copied in the previous task.
(Optional) If you need to use the Alarm Statistics menu of Alarm Management, contact the system administrator to obtain the page template of the menu and import the template in Digital Twin Visualization. For how to import templates, see Importing Page Templates.
Creating Application Shortcuts
Performed By |
Performed In |
|---|---|
Application Creator |
EnOS Application Portal |
Log in to EnOS Application Portal and select Admin Console > Application Management.
In the application list, find any CBB whose menu you want to reuse, hover over the corresponding ellipsis (…) and select New Shortcut.
On the Shortcut Details page, select Edit. In the pop-up window, fill in the basic information as required and select Submit.
Select Add Menus > Add from other applications. Select the CBB you want to use in the pop-up window, check the menu you want to reuse and select Submit.
Follow the previous step to add all the CBB menus that need to be reused in turn.
(Optional) If you want to change the menu name, select Edit
 of the target menu under Added Menus. Change the menu name as needed in the pop-up window.
(Optional) If you want to create a top-level menu, select Add Menus > Add top-level menu and fill in the menu information as required.
Select Sort, sort and restructure all menus by dragging and dropping them in the pop-up window, and select Submit.
(Optional) If you need to use the Alarm Statistics menu of Alarm Management, contact the system administrator to obtain the page template of the menu and import the template in Digital Twin Visualization. For how to import templates, see Importing Page Templates.
Results
After application administrators assign application permissions, authorized users can access the created application in EnOS Application Portal, which displays all configured menus in order.
(Optional) Task 3: Configuring Menu URLs
If the application reuses the asset monitoring menus of Unified Monitoring (such as Site List and Device List) or the Alarm Statistics menu of Alarm Management, and the following scenarios are met, you can configure the menu URLs of the application accordingly.
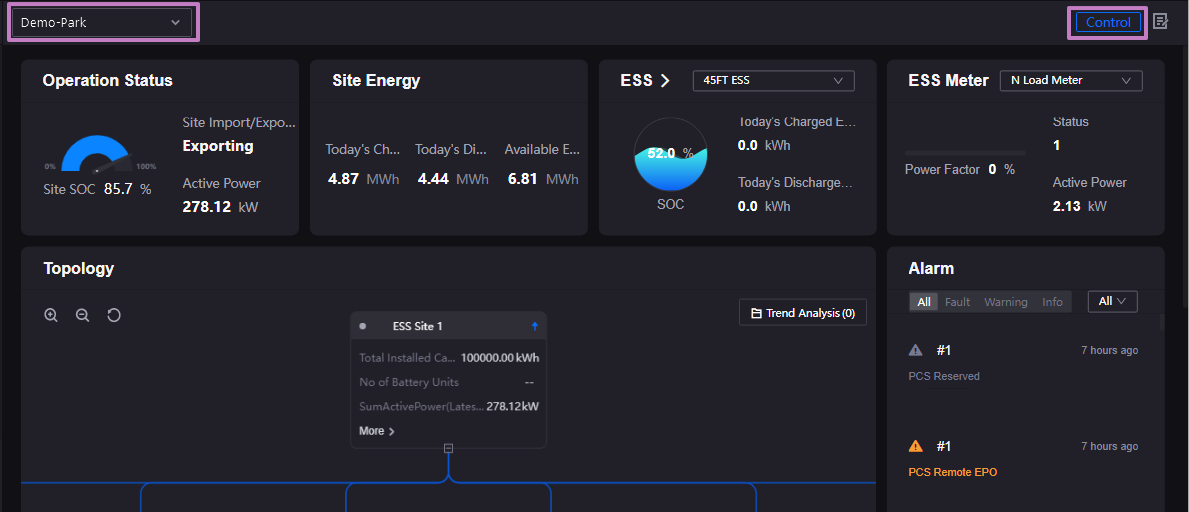
If you need the application to control devices remotely, you can embed a control panel in an asset monitoring menu by adjusting the menu URL. The control panel can be used to issue control commands.
If the application connects assets from multiple sites, you can add asset filters in asset monitoring menus and the Alarm Statistics menu by adjusting the menu URLs. The asset filters allow users to switch between sites to quickly monitor the real-time status of assets and alarm statistics in a specific site.
Procedure
Follow the steps below to adjust and update the URLs of the monitoring menus and the Alarm Statistics menu.
Adjusting URLs
Performed By |
Performed In |
|---|---|
Application Creator |
EnOS Application Portal |
Select Digital Twin Visualization from the application list in EnOS Application Portal and select Dashboards > Dashboards in the left navigation bar.
Find the page corresponding to the target menu and select Edit
 to enter the page editor.
Select the ellipsis (…) and choose Copy URL. The URL consists of multiple parts:
https://{host}/{dtv-url}.{host}is the domain name of the current environment, e.g., “app-portal-cn5.enos-iot.com”.{dtv-url}is the remainder of the URL.
Adjust the URL in the previous step as needed. For example,
/encom-landing-page/?url=/{dtv-url} \&landingpage={"controlOptions": {"show":true}, "dtvOptions" :{"filters":[], "saveBy": "ou", "tags": "Storage"}, "filters":[{"type& quot;: "asset", "mdmTypes":["Park"]}]}controlOptions": {"show":true}means enabling a control panel in the menu. When enabled, the control panel is embedded in the monitoring page and used to send control commands to control devices remotely."filters": [{"type": "asset", "mdmTypes":["Park"]}]means adding an asset filter to the menu and users can select the “Park” site type in the filter."type": "asset"means the Asset filter is added in the menu."mdmTypes": ["Park"]means the filter includes the Park site type. Separate multiple site types by commas.
Updating URLs
Performed By |
Performed In |
|---|---|
Application Creator |
EnOS Application Portal |
The steps to update the URL differ depending on how the application was created in the previous task.
If you create an application by registering the application:
Select Application Registration in the left navigation bar of EnOS Application Portal and select the application created in the previous task.
Select the Menu tab and choose Edit Menu
 for the corresponding menu.
Update the URL to the adjusted URL in the pop-up window.
If you create an application by creating a shortcut:
Select Application Management in Admin Console of EnOS Application Portal.
Select the ellipsis (…) corresponding to the application created in the previous task and select Manage.
Under Added Menus, select Edit
for the corresponding menu.Update the URL to the adjusted URL in the pop-up window.
Results
Once configured, the asset filter and the control panel appear in the relevant menus. At this point, the control panel does not yet have real control capability, and can be used to control devices remotely only after control rules are configured.
(Optional) Task 4: Configuring Alarms
If the application uses the alarm-related capabilities provided by Alarm Management, you need to configure alarm rules according to the actual scenario to define how alarms are triggered in the application.
Procedure
Configure alarm severities, types, and rules by the following steps.
Creating Alert Severities and Alert Types
Performed By |
Performed In |
|---|---|
Asset Administrator |
EnOS Application Portal > Developer Console |
Select Alert Engine > Alert Severity from the left navigation bar of EnOS Application Portal > Developer Console.
Select New Severity. Enter the ID and description of the severity in the pop-up window and select Confirm.
Select Alert Types from the left navigation bar and select New Type. Enter the ID and description of the type in the pop-up window and select Confirm.
Configuring Alarm Groups
Performed By |
Performed In |
|---|---|
System Administrator |
EnOS Application Portal |
In the left navigation bar of the EnOS Application Portal, select Configuration Center > Global Business Objects > Dimensions.
In the card pool of the current page, find the “Domain Group” dimension, hover over the ellipsis icon (…) in the upper right corner of the dimension, select Configure Records, and define the domain of alarm severity and alarm type on the dimension record page.
Select New Record, enter the name and identifier of the domain in the pop-up window, and select OK.
Return to the dimension card pool, find the “Type Mapping to Domain Group” dimension, hover over the ellipsis icon (…) in the upper right corner of the dimension, select Configure Records, and define the device type that generates alarms on the dimension record page.
Select New Record, enter the device type information in the pop-up window, and select OK. Where:
Device Type Identifier: the device type identifier of the alarm device. Can be obtained in Configuration Center > Global Business Objects > Device Type.
Domain Identifier: the identifier of the domain configured in the “Domain Group” dimension.
Select Global Business Objects > Alarm Meta in the left navigation bar.
Select the Alarm Severities tab, and then select New Severity Group. In the pop-up window, select the domain configured in the “Domain Group” dimension as the Name, and select Save.
In the severity group list, select the plus button
 in front of the severity group created in the previous step, and select New Severity.
After filling in the required alarm severity information in the pop-up window, select Save. Where, the Name and Identifier need to be consistent with the severity description and severity number filled in the Creating Alert Severities and Alert Types step.
Select the Alarm Types tab, and click New Type Group. In the pop-up window, select the domain configured in the “Domain Group” dimension as the Name, and select Save.
In the type group list, select Configure
 corresponding to the type group created in the previous step.
In the new page that opens, select New Alarm Type, fill in the required alarm type information in the pop-up window, and select Save. Where, the Name and Identifier need to be consistent with the type description and type number filled in the Creating Alert Severities and Alert Types step.
Configuring Alarm Rules
Performed By |
Performed In |
|---|---|
Asset Administrator |
EnOS Application Portal |
Select Alarm Management from the application list of Application Portal and select Alarm Rules from the left navigation bar.
Select New Rule to create alarm rules in different alarm severities where:
Alarm Group: Select the domains defined in Creating Alert Severities and Types.
Alarm Severity: Select the severities created in Creating Alert Severities and Types.
Alarm Type: Select the types created in Creating Alert Severities and Types.
Provide the system administrator with the environment information and OU ID to apply for the “Configuring Alarm Data Subscription” and “Enabling Alarm Message Monitoring” services, so that the alerts generated in Alert Engine will be automatically synchronized to the alarm list in Alarm Management.
(Optional) If you want to configure email, SMS, or pop-up notifications for alarms, select Alarm Notification from the left navigation bar, select New Notification, and configure alarm notification rules as required. For more information, see Managing Alarm Notification Rules.
Select Alarm Response from the left navigation bar, select New Response Configuration > Acknowledge Response / Ticket Response, and configure alarm response rules as required. For more information, see Managing Alarm Response Rules.
(Optional) If you want to customize the fields in the alarm list, select Alarm Config from the left navigation bar, select New Configuration on the Field Configuration tab, and configure the fields in the alarm list as required. For more information, see Creating a Field Configuration Rule.
Results
The application generates alarms in different severities when the alarm rules are triggered, and sends notifications to relevant users based on configurations.
(Optional) Task 5: Configuring Control Rules
Performed By |
Performed In |
|---|---|
System Administrator |
EnOS Application Portal |
Control rules are templates defined by cluster control for control commands. Each control rule corresponds to a control command that can be issued to assets. If the application needs to use the remote control capabilities provided by cluster control, the system administrator needs to configure control rules according to the actual needs of the application.
Procedure
Select Configuration Center in the application list of EnOS Application Portal and select Global Business Rules > Control Rules in the left navigation bar.
Refer to Configuring Control Rules to configure control rules.
Results
After the configuration is completed, the control panel will display and issue control commands according to the configuration.
(Optional) Task 6: Configuring Data Quality Rules
Performed By |
Performed In |
|---|---|
Asset Administrator |
EnOS Application Portal |
If the application needs the data assessment capabilities provided by Data Quality, you need to configure data quality rules to define how to assess data according to actual scenarios.
Procedure
Select Data Quality from the application list in EnOS Application Portal.
(Optional) Select Configuration Management > System Configuration from the left navigation bar, select New on the Quality Dimension Table tab, and configure information such as models and attributes as required. For more information, see Creating a Quality Dimension Table.
Select Assessment > Assessment Rules from the left navigation bar, select New Monitoring Group, and configure data source and monitoring objects as required. For more information, see Creating a Monitoring Group and Monitoring Objects.
Select Configure Rule
 on the Assessment Rules page, select New Rule on the Rule Configuration page, and configure quality assessment rules for selected monitoring objects as required. For more information, see Configuring Quality Assessment Rules.
Results
After configuration, the application assess the data according to the defined quality assessment rules.
(Optional) Task 7: Configuring Work Management Forms
Performed By |
Performed In |
|---|---|
Application Creator |
EnOS Application Portal |
If the application requires the work order and service request management capabilities provided by Work Management and the default form fields of work orders and service requests are unable to meet the needs, you can customize the form fields.
Procedure
Download and fill out the
Form Configuration Template. You can modify the existing fields, add new fields or configure different fields for different types of work orders in the template.Select Work Management from the application list in EnOS Application Portal.
Select Settings > Custom Fields from the left navigation bar.
Select Default Form Field Configuration and upload the completed template file.
(Optional) If you want to customize field permissions, configure field permissions for different workflow nodes by the following steps.
Select Field Permission Configuration and select Download Configuration File.
The first workbook of the configuration file displays the fields currently in use, and the second workbook displays all fields available. Add or delete the fields in the first workbook as required.
Upload the modified configuration file.
Results
After configuration, the forms in the related work management menus display the fields as configured.
(Optional) Task 8: Configuring Report Templates
Performed By |
Performed In |
|---|---|
Application Creator |
EnOS Application Portal |
If the application needs the report customization and management capabilities provided by Reporting Tool, you can configure report templates as required to display data in the form of charts, tables, and texts.
Procedure
Select Reporting Tool from the application list in EnOS Application Portal.
Select Report Templates from the left navigation bar and create a new template by the following ways:
If you want to use an existing BIRT template, upload the report template. For more information, see Uploading a Custom Report Template.
If there is no existing template, use the online editor to design a template. For more information, see Creating a Custom Report Template.
Results
After configuration, the application can generate reports and display data based on the uploaded or created templates.