Creating a Custom Report Template
You can create a custom report template by using the online editor to define the parameters, widgets, and page layouts of the template. The created template takes effect for the current OU only. For more information about custom templates, see Report Template.
Prerequisites
You need to be assigned the required asset permission and operation permission, and a menu group containing the Templates menu. If not assigned, contact the application administrator.
You need to learn the components and functions of the online editor. For more information, see Exploring Online Editor.
EnOS Common Data Service is the built-in data source of the online editor. Make sure Common Data Service is set up in the current OU. For more information, see Setting up Common Data Service.
Procedure
Select Templates from the left navigation pane.
Hover over New Template and select Create. Enter the following information in the pop-up window.
Template Name: Enter up to 50 characters as the template name.
Language: Select a language from the drop-down list. Chinese, English, Japanese, and Spanish are supported.
Click Create and the online editor opens. The workflow to design a template online and the editor components are as below.
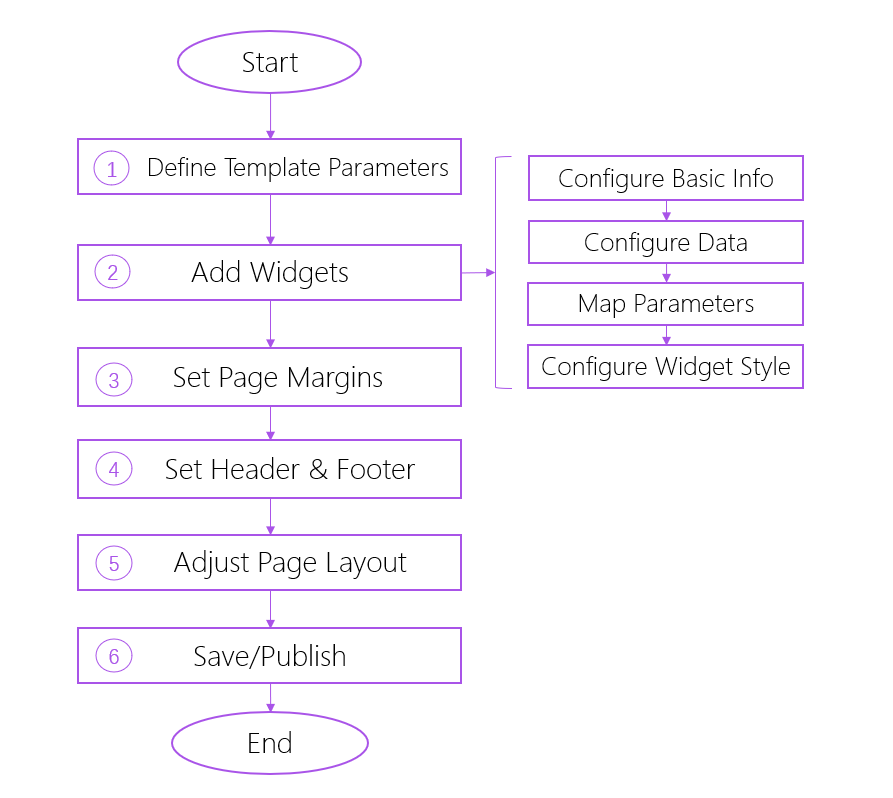
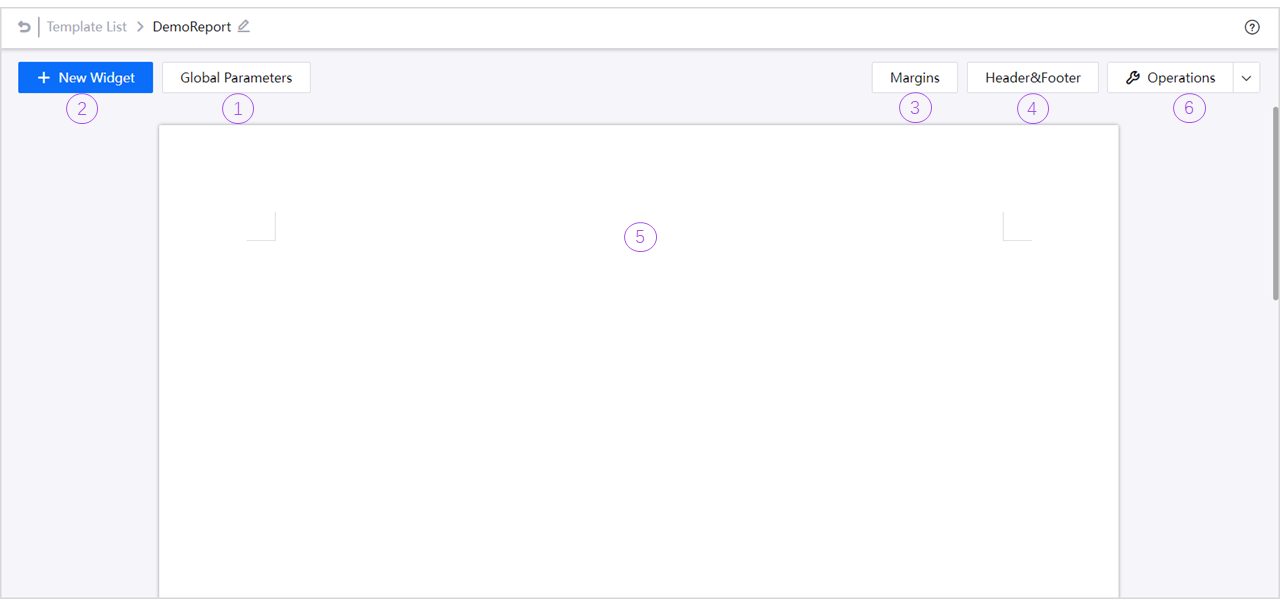
Click Global Parameters to enable default and custom parameters:
Default Parameters: Default parameters are provided by the online editor. Click the plus icon
 in the Default Parameters section to enable a default parameter. After enabling a default parameter, you can select it in the Enabled Parameters section and edit its default value. The table below lists all default parameters.
Parameter Name
Description
Default Value
Single Site
Decide the asset scope of the report.
The first site that you have access to
Multiple Site
Decide the asset scope of the report.
All sites that you have access to
Start Date
Decide the time scope of the report.
Today
End Date
Decide the time scope of the report.
Today
Custom Parameters: If default parameters cannot meet your requirements, you can customize parameters based on actual needs. Click Add Custom Parameters
 in the Enabled Parameters section and enter the following information.
Field
Description
Name
Enter up to 20 characters as the name of this parameter.
Is Required
If this parameter is required, users must fill in its value when previewing or creating schedules based on the template.
Template Parameter
If this parameter is a template parameter, non-creator users cannot view and edit it. For more information about the difference between template and non-template parameters, see Template/Non-template Parameters.
Default Value
Enter the default value of this parameter, which is used when the parameter value is not filled in.
Note
You can add custom parameters as variables to the content of text widgets.
Click New Widget to add display widgets to the template. You can add a table, chart, text, or image as the widget. For more information about how to configure widgets, see the Template Widget Configurations section. You can perform the following actions on the added widgets in the preview canvas:
Edit: Click Edit at the top right of the added widget and modify its configurations on the opened panel.
Delete: Click Delete at the top right of the added widget. Widgets cannot be restored after deletion.
Copy: Click Copy at the top right of the added widget to copy the configuration information of the current widget to a new widget.
Click Margins to adjust the distance from the page edge to the report content.
Click Header&Footer to display text, images, or page numbers in the header or footer.
Text: Enter a piece of text as the header or footer. You can insert global parameters and customize text styles.
Image: Upload an image (such as a logo) as the header or footer. The image size changes with the set header/footer height.
Page Number: Insert page numbers in the form of “current page number/total page number” on each page of the generated report.
Adjust the position of widgets by dragging them in the report canvas, or adjust the size of a widget by dragging the ruler
 icon in the lower right corner of the widget.
Click Operations at the top right and select one of the following actions:
Save Layout: Temporarily save the configurations in the current template, and you can continue to edit it later.
Publish: Officially publish the current template to the unified template list, and authorized users can create report schedules and report subscriptions based on this template.
Template Widget Configurations
The table below lists the configuration details of each display widget.
Category |
Configuration Item |
Applicable Widget |
Description |
|---|---|---|---|
Basic Information |
Background Color |
Table, Chart, Text, Image |
The background color of the report. The default is white. |
Basic Information |
Page Break |
Table, Chart, Text, Image |
Widgets with page breaks are displayed from a new page. |
Basic Information |
Margins |
Text, Image |
Distance from page edge to the widget. |
Basic Information |
Repeat Header |
Table |
When a table spans multiple pages, repeat the header row at the top of each page. |
Basic Information |
Title/Title Format |
Chart |
Define the content, font, font size, color and other styles of the title. For Chart Title, enter up to 100 characters. |
Data Configuration |
Asset/Data Type |
Table, Chart, Text |
For Asset Type, select an asset type to display in the report. For Data Type, choose to display the “cross-sectional data” up to the moment when the report is generated or the “time series data” that changes over time. Time series data supports the following intervals: year, month, week, and day. Note that the selectable data are provided by Common Data Service. For more information, see Data Source. |
Data Configuration |
Add Singles |
Table, Chart, Text |
Click Add Singles and select a data field under the specified asset type and data type in the pop-up window. Alternatively, click Add Calculated Data to configure a formula based on the existing data. |
Widget Parameters |
Select Asset/Start Date/End Date |
Table, Chart, Text |
Select the asset scope and time scope to display in the report. You can check Global Parameters to use global parameters as widget parameters, which support offsetting start/end date. You can also select a fixed asset, start date, and end date that do not change as parameters. |
Table Style |
Head/Body Style |
Table |
Customize the font, font size, alignment, background color and other styles of table header and table body. |
Chart Style |
Axis Style/Legend Settings |
Chart |
Customize the font, font size, color, unit, legend position and other settings of chart X/Y axis and chart legend. |
Select Image |
Upload Image |
Image |
Click Upload to select an image of up to 10 M. The following formats are supported: .bmp, .jpg, .jpeg, .jpe, .jfif, .gif, .png, .tif, .tiff, .tiff, .tiff. |
Note
For text widgets, you can configure the contents and styles in the preview canvas.
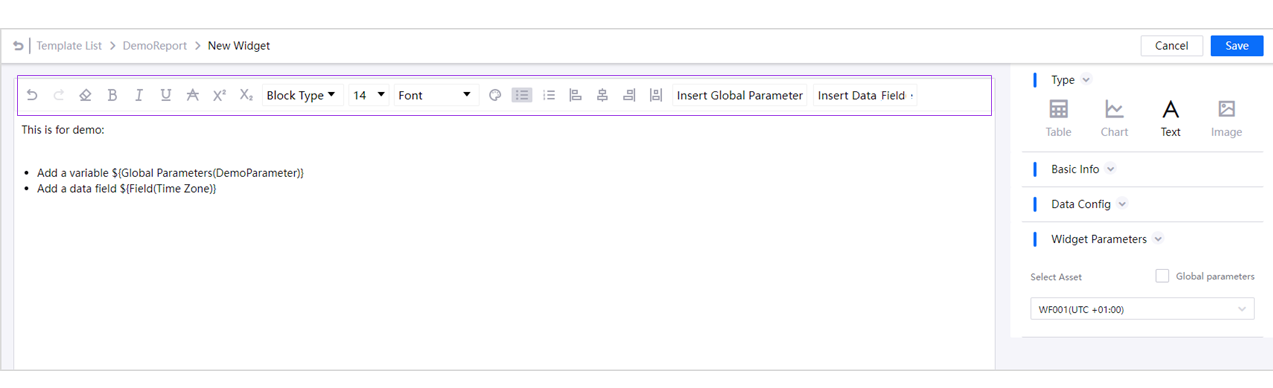
The following configurations are supported:
Insert global parameters and data fields into the text content.
Customize the font, font size, alignment and other styles of the text.
Results
Once published, the template appears in the template list. You can view its details and perform the following actions on it: