Scheduling Work Orders Using the Schedule Board
In the Schedule Board, managers drag and drop work orders to quickly set the work order owner and schedule the execution time.
Prerequisites
Before starting, make sure that the current account has the required asset permissions, operation permissions, and menu groups including the Schedule Board. If these are not assigned, contact the application administrator.
Procedure
The process to use the Schedule Board is as follows:
- Filtering tickets to schedule
- Selecting schedule mode
- Scheduling tickets
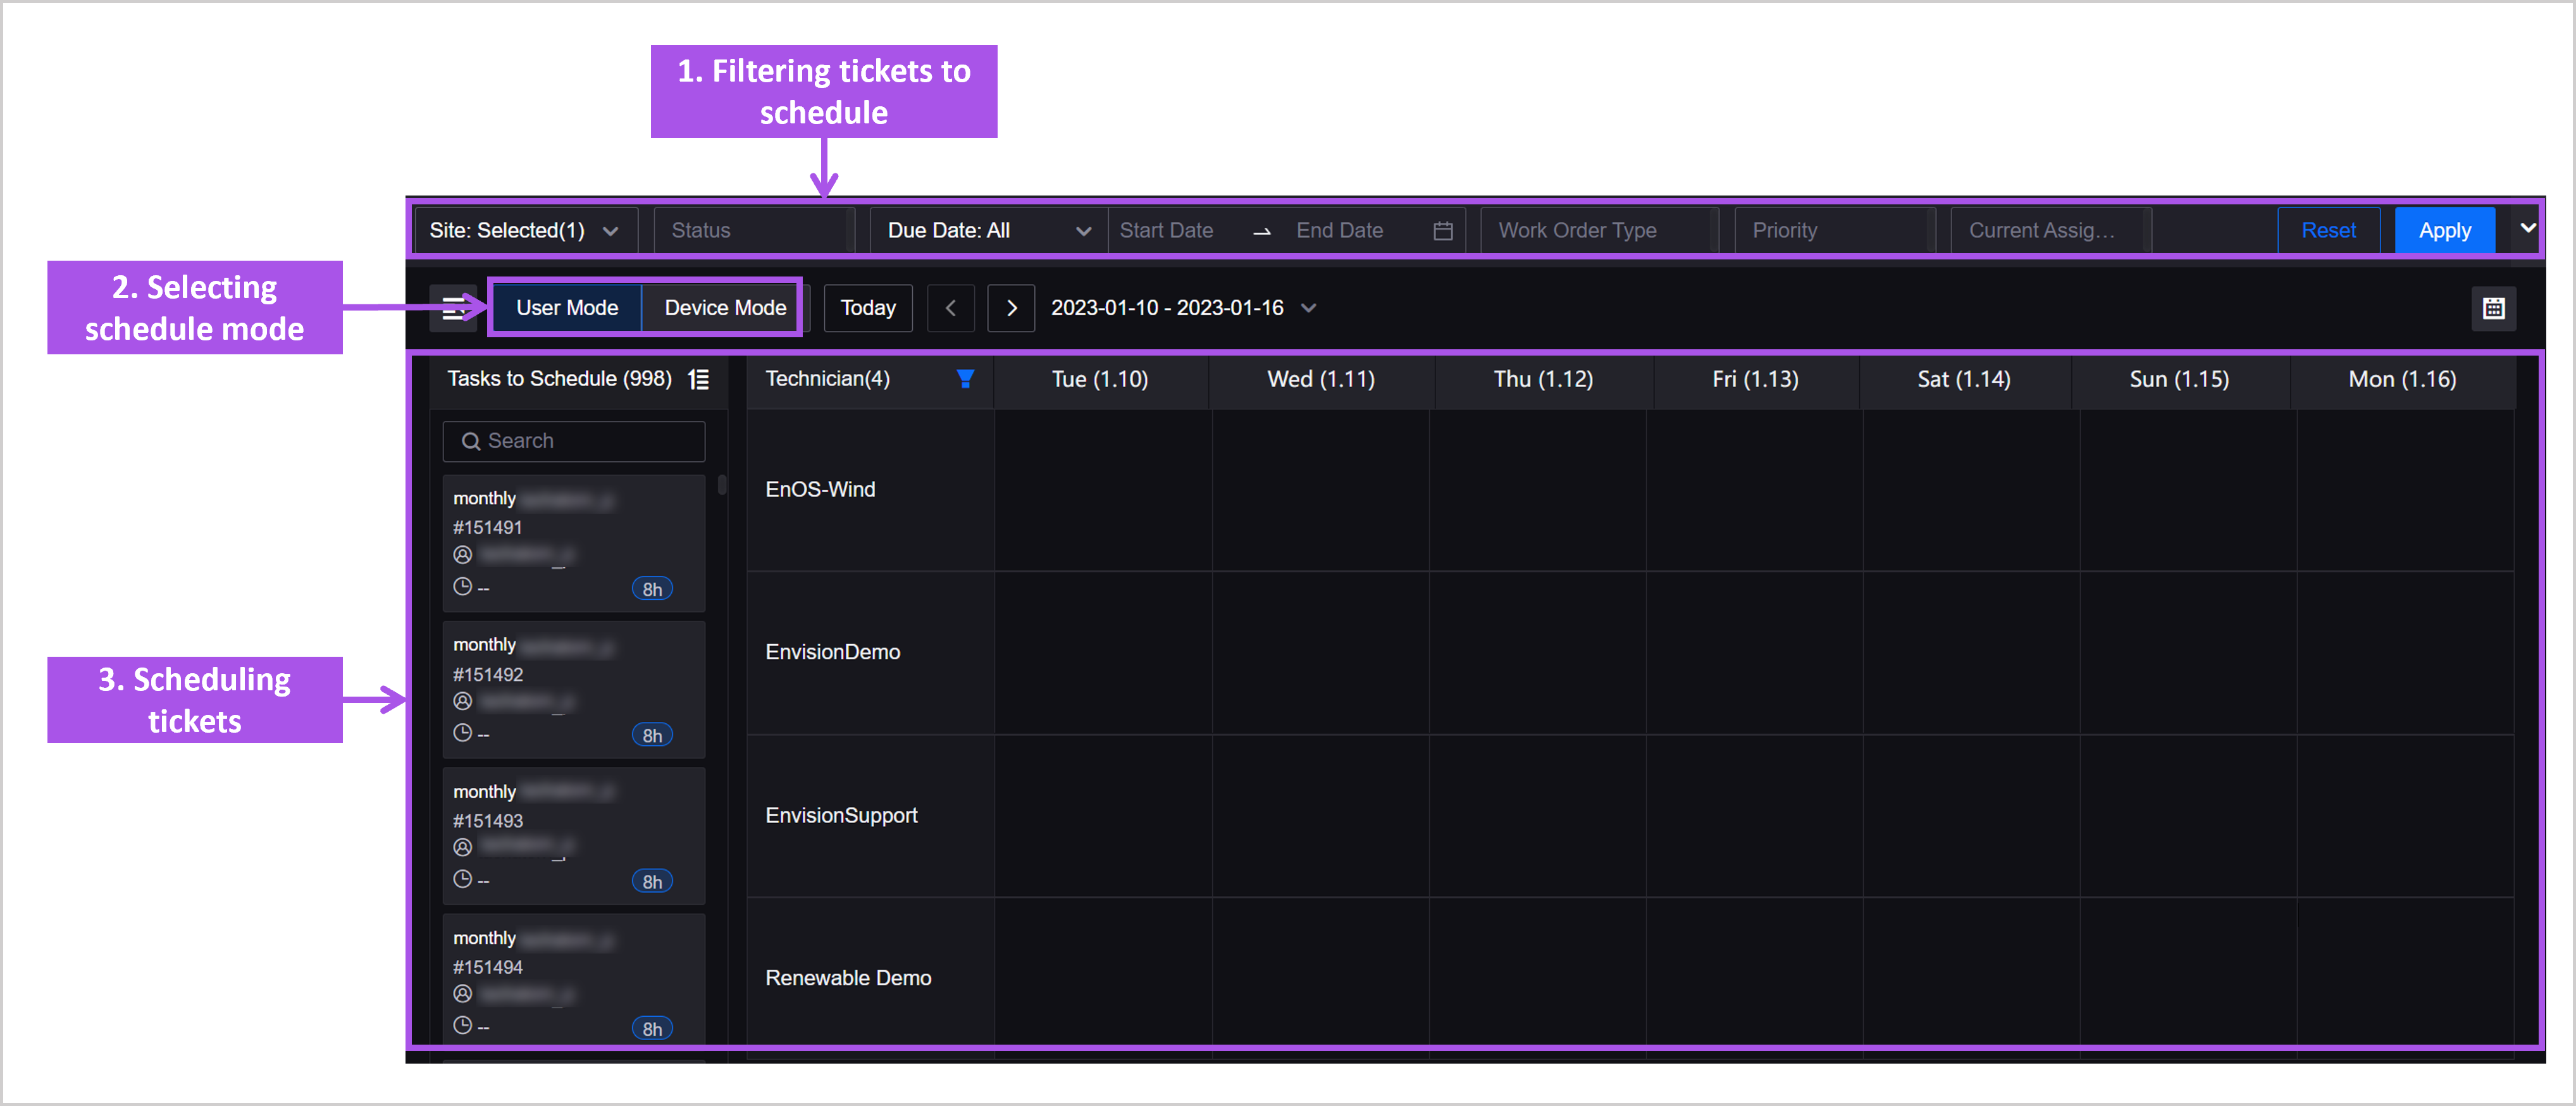
Filtering Tickets to Schedule
First, the tasks to schedule need to be filtered among all the tasks waiting for scheduling.
- In the left navigation bar, select the Schedule Board menu to enter the Schedule Board page.
- In the fixed filter bar, you can filter tasks to schedule by filter items such as site, status, due date, work order type, priority, and current assignee.
- Site: only single selection is supported. That is, only one site’s work orders can be scheduled at a time.
- Status: only open work orders can be selected.
- After setting filter conditions, select Apply to enable the filter. The filtered work orders will be automatically listed in Tasks to Schedule.
Selecting Schedule Mode
There are User Mode and Device Mode in the Schedule Board. The default is User Mode.
Tasks To Schedule
The tasks to schedule Area displays all work orders that meet the filter conditions, but different modes have different definitions for unscheduled work orders:
- User Mode: when the work order’s current assignee, planned start, and planned end are blank, it is unscheduled.
- Device Mode: when the work order’s current assignee, planned start, and planned end are blank, or when neither planned start nor planned end is within the range of T+6 days, it is unscheduled.
Scheduling Area
- User Mode: the first column on the left of the scheduling area displays all users under the current site. Select any user to filter all work orders currently assigned to the user in the Tasks to Schedule. Select the user again to cancel the filter.
- Device Mode: the first column on the left of the scheduling area displays all devices linked with work orders that meet the filter conditions under the current site. Select any device to filter all work orders for the selected device in the Tasks to Schedule. Select the device again to cancel the filter.
Scheduling Tickets
After filtering tasks to schedule, you can start scheduling tasks. Scheduling can be done by dragging and dropping to a quick schedule or manually entering information. Scheduled tasks also allow you to quickly remove the schedule.
Scheduling by Drag and Drop
Follow the steps below to perform drag-and-drop scheduling:
Drag the work order from the Tasks to Schedule to a cell in the Scheduling Area to schedule it, after which the work order’s current assignee, planned start, and planned end fields will be automatically updated.

If you drag and drop the work order into a new date or adjust the width of the work order, the planned start and planned end will be modified accordingly.


Scheduling Manually
Manually enter the schedule by following these steps:
- Hover the mouse over a work order in the scheduling area, after which an ellipsis (…) will appear on the right.
- Hover the mouse over the ellipsis (…) and a pop-up window will appear showing more information about the work order.
- Select Details in the upper right corner to go to the work order’s details page in the Work Orders menu to enter scheduling info.
- Select the ellipsis (…) to directly edit information such as Estimate Effort, Planned Start, Planned End, and Technician, and manually adjust the work order’s scheduling info.
Turbine Scheduling Auxiliary Functions
Note
This function requires the OU to purchase EnOS Fleet Control. The scheduling mode is device mode, and the device type to be scheduled is the turbine. To learn more about Fleet Control, contact your system administrator.
The system will automatically compare the suggested work window period with the work order’s estimated effort, and then provide risk reminders for work orders at risk of being overdue. The following information also will be displayed under the selected device to help select the optimal time to execute the work order.
- Suggested working window period within T+6 days for each turbine
- Power loss forecast data
Removing Schedule
You can quickly remove the schedule for scheduled work orders.
When you hover over a scheduled work order, an ellipsis (…) will appear to the right.
Select the ellipsis (…) and a pop-up will appear showing more information about the work order.
Select Remove Schedule in the lower left corner to delete the scheduling information and return the work order to the pending scheduling area.
