Quick Start: Using the Work Order System
This article introduces the common process of using work orders in EnOS Work Management.
Prerequisites
Before starting, make sure you have the following ready:
- The current account must have the required asset permissions, operation permissions, and menu groups including Work Orders and Work Calendar. If these are not assigned, contact the application administrator.
- The asset tree for use by Work Management is configured in the EnOS Management Console and tagged with
EnosSolar:true.
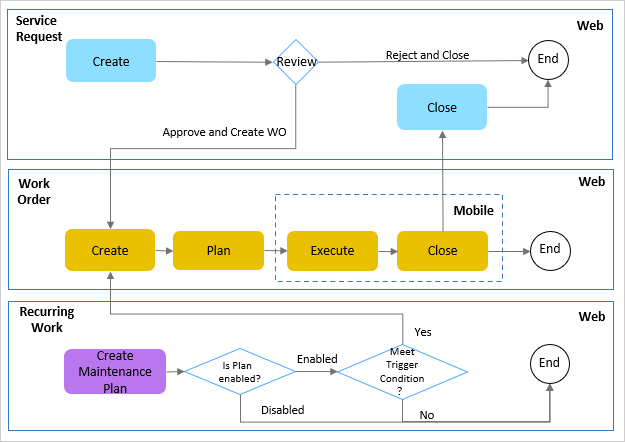
Step 1: Creating a Work Order
Work orders can be created in several ways:
- Creating work orders using service requests. When monitoring staff finds an alert, they can submit a service request to the execution team for handling, after which a manager can review the service requests and create a follow-up work order if necessary.
- Creating work orders using recurring works. Operators can create periodic plans based on preventive maintenance arrangements, after which Work Management will automatically generate work orders according to the set schedule.
- In EnOS EnOS Monitoring & Control and Advanced Analytics applications, alerts or early warning records can create work orders in Work Management.
- Creating work orders manually
Step 2: Scheduling Work Orders
When a work order is generated, managers can view the work order information under calendar view in the Work Calendar. In the Schedule Board, managers can quickly set the work order’s assignee and execution time by dragging and dropping.
Step 3: Execute and Close the Work Order
After the work order is assigned to the operator, on the Work Orders page, the operator processes the work order, performs O&M work, submits the work order summary, and closes the work order after completing the work.
The flow chart is as follows: