(Optional) Configuring Connections
The Configure Connections step connects the devices and components in the site that need to access EnOS Cloud to EnOS Edge gateway devices, and then configures the connection between the Edge gateway devices and EnOS Cloud.
A connection can be used to access the data of one device or a group of devices. A connection needs to use a communication protocol to communicate with the device.
Note
If EnOS Edge access is not required in your onboarding step, you can skip the Configure Connections and Map Points steps and directly submit the site. For more information, see Submitting Sites.
Prerequisites
The current account has access to Site Onboarding. Contact the application administrator if necessary.
Ensure that there is no limit to Configure Connections and Map Points step, or you cannot enter the two steps. Contact the application administrator if necessary.
Ensure that the role of the current account has operation permissions for the Configure Connections step. If you need to obtain the permissions, contact the application administrator. For more information, see Assigning Onboarding Processes.
Make sure that at least 1 EnOS Edge gateway device and 1 other type of device have been created in the current site. For more information, see Configuring Devices.
Make sure you’ve finished building your topology. For more information, see Building Topologies.
Step 1: Creating an EnOS Edge Connection
Select Site Onboarding in the left navigation bar.
Select the site for which to configure the connection, and then go to Configure Connections step page.
Select New between the device and the Edge gateway device, select an onboarding method, and select Submit to enter the details page. The following is a description of the attributes that need to be entered on the onboarding method and its details page:
Direct: the Edge gateway device is directly connected to the device without forwarding through a third party.
Connection method:
Ethernetis currently supported.Mode:
TCP/IP: select Working Mode of the Edge device, use the Edge device as the
ClientorServer, and enter IP Address of the client or server.Other: enter Address of the connection.
Tunneling: through the local SCADA or third-party system, the measurement points of the device are tunneled centrally for mapping.
Connection method:
Ethernetis currently supported.Mode:
TCP/IP: select Working Mode of the Edge device, use the Edge device as the
ClientorServer, and enter IP Address of the client or server.Other: enter Address of the connection.
SFTP/FTP: upload the measurement points of the device through the SFTP/FTP file transfer protocol.
Connection method:
Ethernetis currently supported.Mode:
FTP: select an FTP Mode, then enter the connection Address, Username, and Password.
SFTP: enter Address, Username, and Password for the connection.
Other: enter Address of the connection.
API: upload the measurement points of the device through the API forwarding protocol.
Connection method:
Ethernetis currently supported.Mode:
HTTP(s): select Working Mode of the Edge device, use the Edge device as Client or Server, and enter Address of the client or server.
Other: enter Address of the connection.
After selecting Protocol Type, Protocol will be automatically generated. The protocol is a data communication agreement that both communicating parties must abide by when EnOS Edge is connected to the device. The protocol determines the point table file template for the subsequent measurement point mapping step. The system will automatically input the recommended specification and give the reason for the recommendation, after which you can edit it based on your situation. If there is no applicable protocol type or version, contact your system administrator to add it.
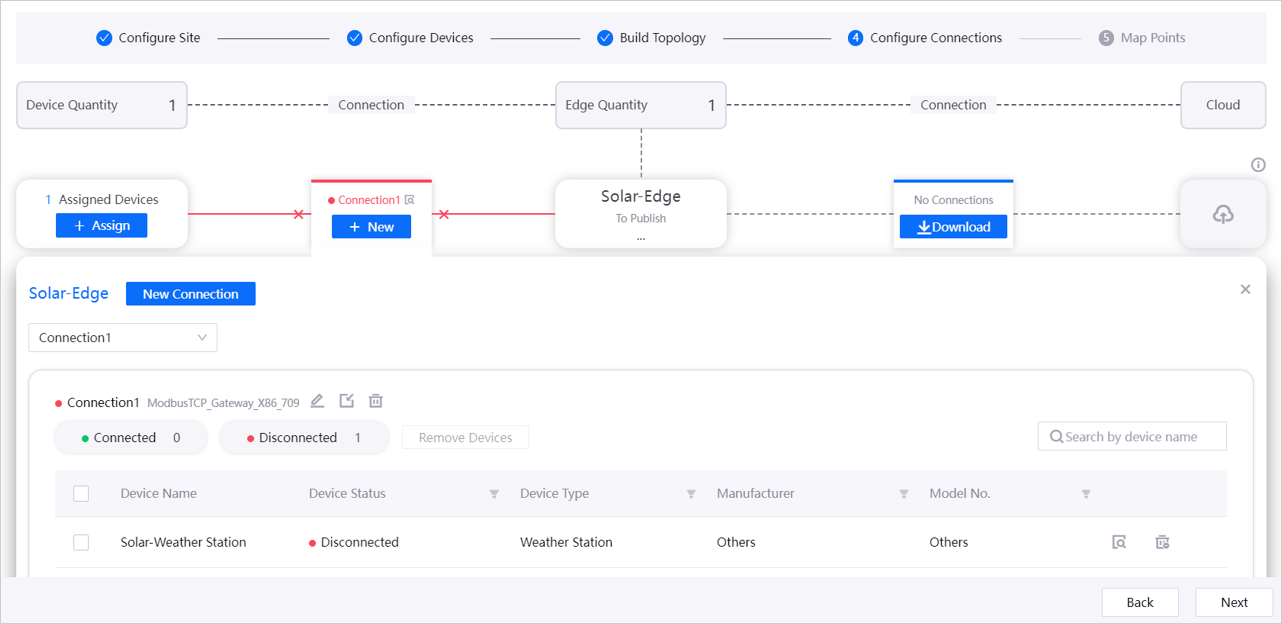
After entering, select Submit to finish creating the connection. At this point, you will automatically enter Assign Devices pop-up.
The created devices in the current site are displayed in the pop-up. Check the devices that need to be connected to the Edge gateway, then select Submit.
Once successfully assigned, on Site Onboarding > Configure Connections page, Total Assigned quantity will be automatically updated, and the device connection and cloud connection will be displayed as Disconnected.
Step 2: Connecting EnOS Edge with EnOS Cloud
After connecting the device to the Edge device, you need to configure the Edge to EnOS Cloud connection. This step is primarily performed offline by EnOS Edge technical support team.
Select Site Onboarding in the left navigation bar.
Select the site for which to configure the connection, and then go to Configure Connections step page.
Select Download between Edge and Cloud.
In the pop-up, Download Configuration File, hand over the downloaded .conf file to EnOS Edge technical support team, and complete the Edge to EnOS Cloud offline connection deployment.
After connecting, you can judge the effectiveness of the connection by the color. Grey is No Connection, red is Disconnected, orange is Partially Connected, and green is Fully Connected.
Managing Connections
Configure Connections step page allows you to reassign devices to created connections, as well as edit and delete devices that have been assigned to Edge connections.
Editing Assigned Devices
In the left navigation bar, select Site Onboarding to go to Configure Connections step page for the target site.
Select Assign, choose an Edge Device and a Connection, and then select Next.
Enter the Assign Devices pop-up, check or uncheck devices as required, and select Submit to complete the edit.
Editing Connections
In the left navigation bar, select Site Onboarding to go to Configure Connections step page for the target site.
Select View Details
 on the target connection to open the connection details pop-up.
Select the connection to edit in the drop-down box and select Edit
 to enter the connection details page. After editing, select Submit to finish editing the connection.
Select View Details
on the target device to open the detailed information page for the device. On this page you can edit the device details.Select Remove
 on the target device to remove the device under this connection.
Select Delete
 on the target connection to delete the connection. Once a connection is deleted, it cannot be restored.