Onboarding a Solar Site and a Weather Station to EnOS
This tutorial uses the example of a solar site and its internal weather station device to introduce how to use EnOS Onboarding Tool to connect sites and devices to EnOS Cloud via an EnOS Edge gateway.
Scenario
In solar sites, monitoring weather conditions is a common business scenario. Weather stations provide real-time readings of meteorological parameters such as temperature, humidity, wind speed, wind direction, rainfall, air pressure, and radiation at the site in real time. For solar sites, meteorological data provides important information for power forecasting, daily maintenance, and alarm overhaul, and is one of the guarantors of maximum power generation and revenue of Solar projects.
Connecting the the weather devices to EnOS Cloud via EnOS Edge gateway is a convenient way to send instructions and control status to the devices remotely. Unattended, meteorological parameters can be sent directly to EnOS Cloud for display, storage, analysis and alerting through EnOS Industry Application Common Building Blocks to ensure the efficient operation of solar sites.
Tutorial Objectives
This tutorial enables you to:
Onboard a solar site, a weather station via an EnOS Edge gateway using EnOS Onboarding Tool.
Build the topologies of the site and its devices.
Configure the connection of the devices and EnOS Edge.
Map the measurement points of the devices to the measurement points of the EnOS models.
Prerequisites
The operations in this tutorial use Site Onboarding menu. Therefore, ensure that the account has access to this menu. Contact the application administrator if needed.
Onboarding Tool allows you to assign permissions to different roles for the different steps of Site Onboarding. This tutorial assumes that the onboarding process is performed entirely by the same role. Therefore, ensure that the account role has operation permissions for all processes on Site Onboarding. If necessary, contact the application administrator to obtain operation permissions. For more information, see Assigning Onboarding Process.
Ensure that the current OU can create solar sites, weather station devices, and EnOS Edge gateway devices, and ensure that the associated business objects are assigned the appropriate model, manufacturer, and model. Contact your system administrator if necessary.
Ensure that topology rules are in place that allow weather station devices to be assigned in solar sites. Contact your system administrator if necessary.
This tutorial uses EnOS public models to onboard assets. The assets to be onboarded and the models to be associated are as follows.
Asset Name |
Model Name |
Model ID |
Manufacturer |
Model No. |
|---|---|---|---|---|
Solar-Site |
Solar Site |
EnOS_Solar_Site |
/ |
/ |
Solar-WeatherStation |
Weather Station |
EnOS_Solar_WeatherStation |
WST_ManufacturerSimulation |
WST_ModelSimulation |
Solar-Edge |
EnOS_Edge_Standard_Model |
EnOS_Edge_Standard_Model |
Univers |
EnDTU-A |
This tutorial teaches you to build the topologies in a solar site. The configuration information of the topology rules used is as follows.
Attribute |
Configuration Information |
|---|---|
Topology Rule Name |
Solar-Weather Station Topology |
Generate standalone asset tree |
No |
Root Node Object |
Site Type > Solar |
Topology Object Constraints |
Other Object > Weather Station |
Step 1: Configuring a Site
Site Onboarding menu page displays the list of established sites, and you can create new sites on this page. For more information, see Configuring Sites.
Follow the steps below to create a solar site.
Log in to EnOS Application Portal, and select Onboarding Tool.
In the left navigation bar, select Site Onboarding menu, and then select Solar Site tab.
Select New Site to go to Configure Site step page.
After entering the following information, select Save.
Name:
Solar-SiteLongitude:
116.5Latitude:
22.5Time Zone:
UTC + 08:00Capacity:
30
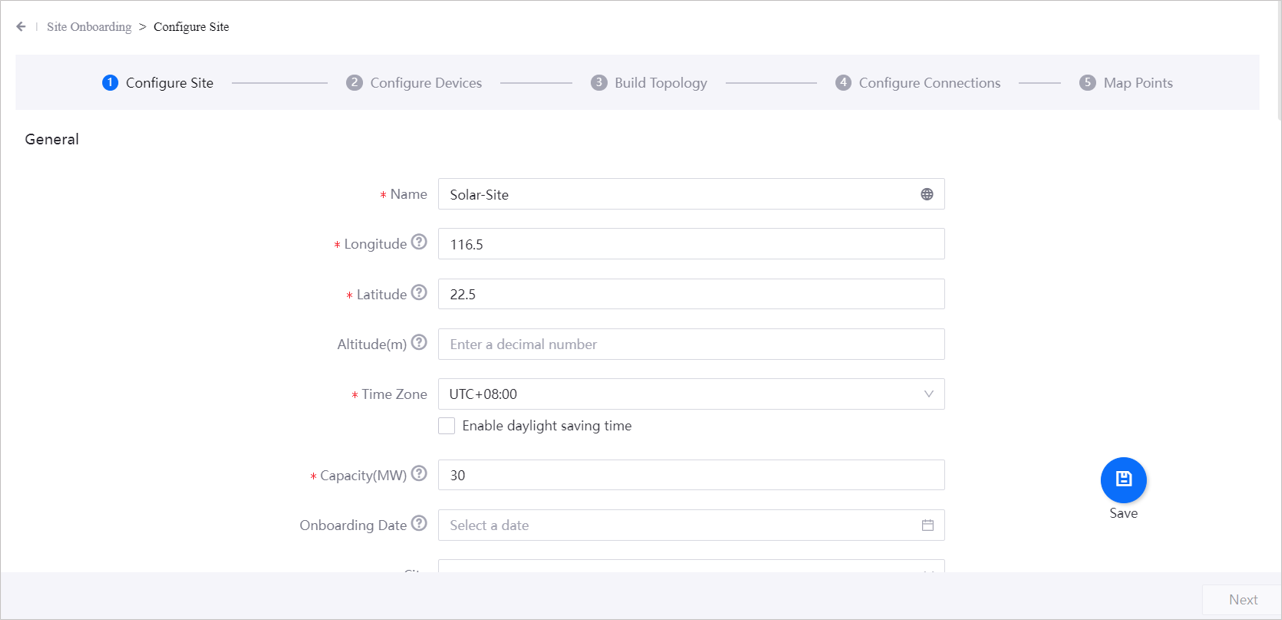
Click Save and then Next in the lower right corner to go to Configure Devices step.
Step 2: Configuring Devices
Configure Devices page displays the created devices, components, and groups, and you can create new devices, components, and groups on this page. For more information, see Configuring Devices.
In the following operations, you will create a weather station device and an EnOS Edge gateway device within the solar site.
Configuring a Weather Station Device
Go to Configure Devices step, and select New Device/Component on Device/Component tab.
In the pop-up, select in the following information:
Type:
Weather StationManufacturer:
WST_ManufacturerSimulationModel No.:
WST_ModelSimulation
Depending on the manufacturer and model, the linked model
EnOS_Solar_WeatherStationwill be displayed automatically. Select Submit to be redirected to the device details page.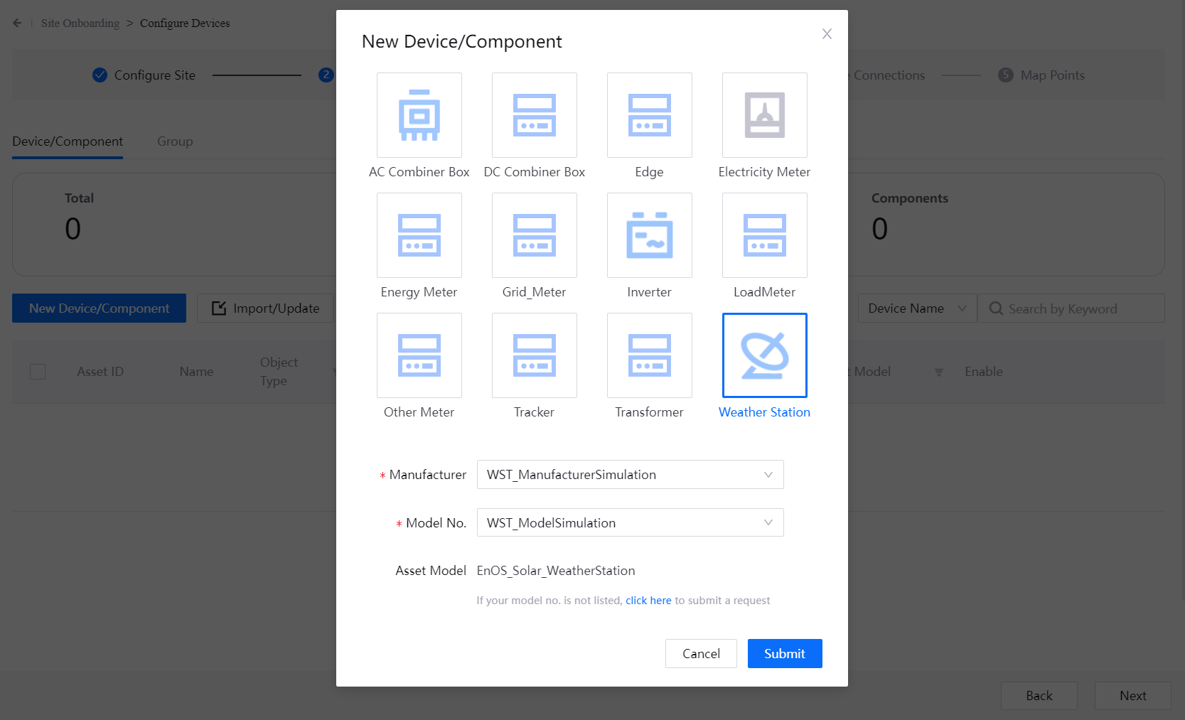
On the device details page, enter the basic information about the weather station device:
Name:
Solar-WeatherStationCalculation Method for Daily Radiation:
Integration
When finished, select Save to complete creation of the weather station device.
Configuring an EnOS Edge Device
In Configure Devices page, select New Device/Component on Device/Component tab.
In the pop-up, select in the following information:
Type:
EdgeDevice Subtype:
Cloud EdgeManufacturer:
UniversModel No.:
EnDTU-A
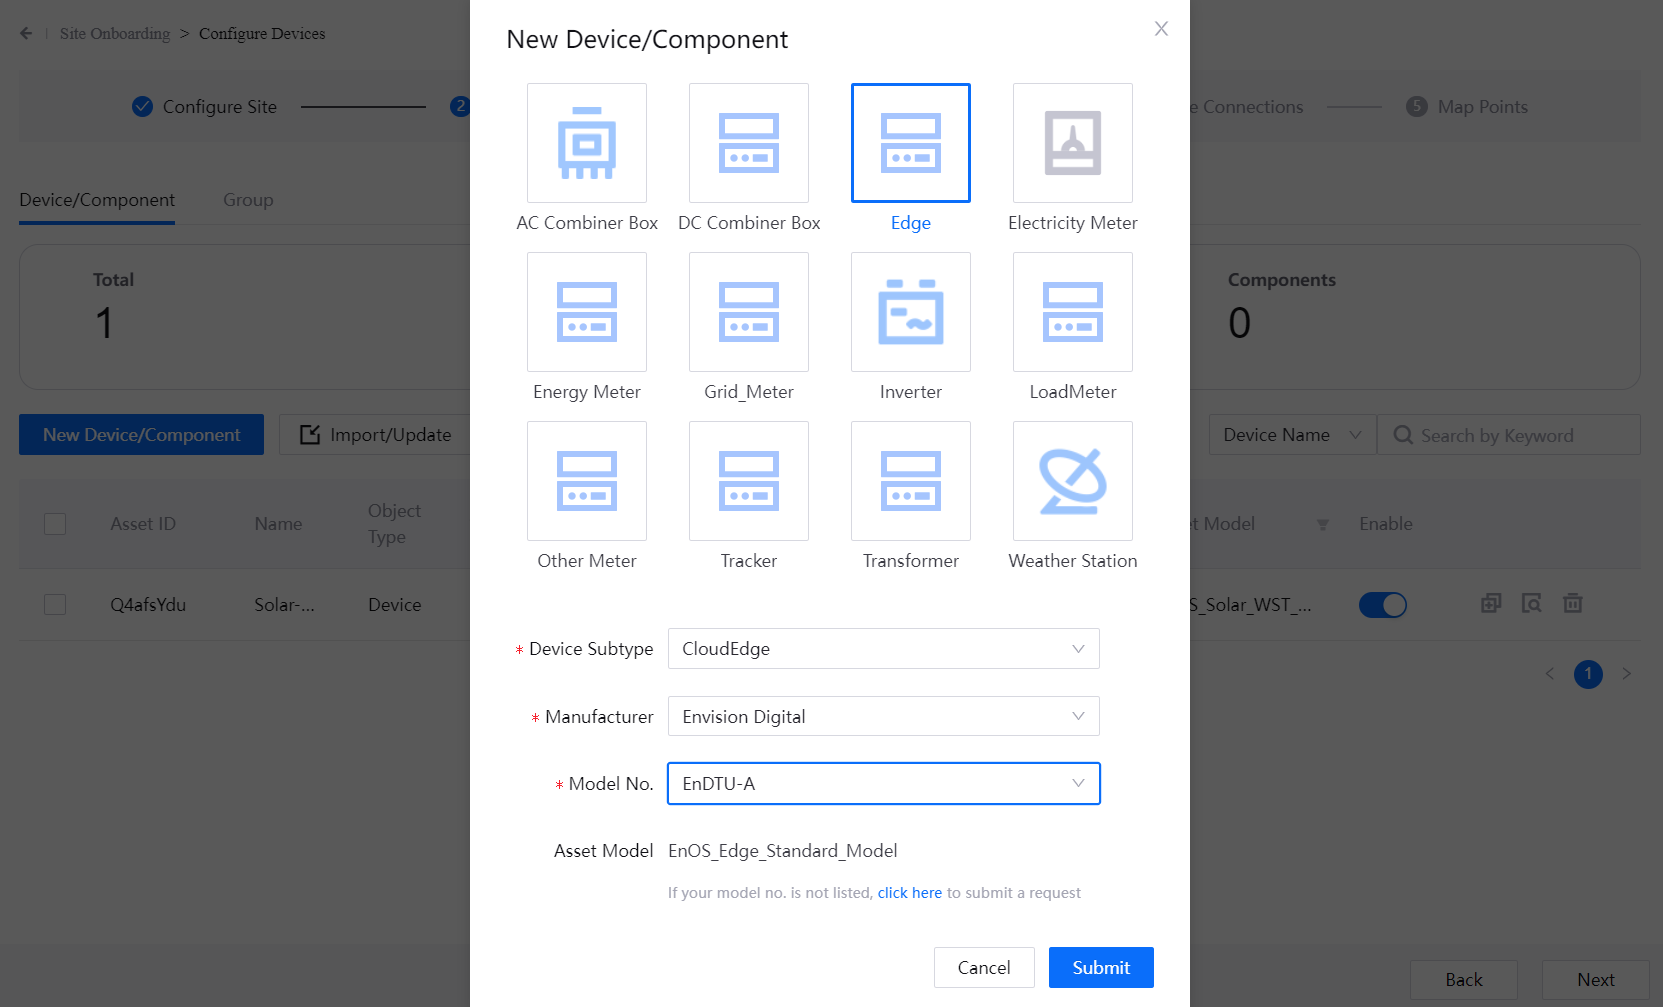
Depending on the manufacturer and model, the associated model
EnOS_Edge_Standard_Modelwill be displayed automatically. After clicking Submit, enter the basic information about the EnOS Edge device on the details page:Data Source:
Manual entryName:
Solar-EdgeEdge Type:
EdgeGateway
Select Save to finish creating the EnOS Edge Gateway device.
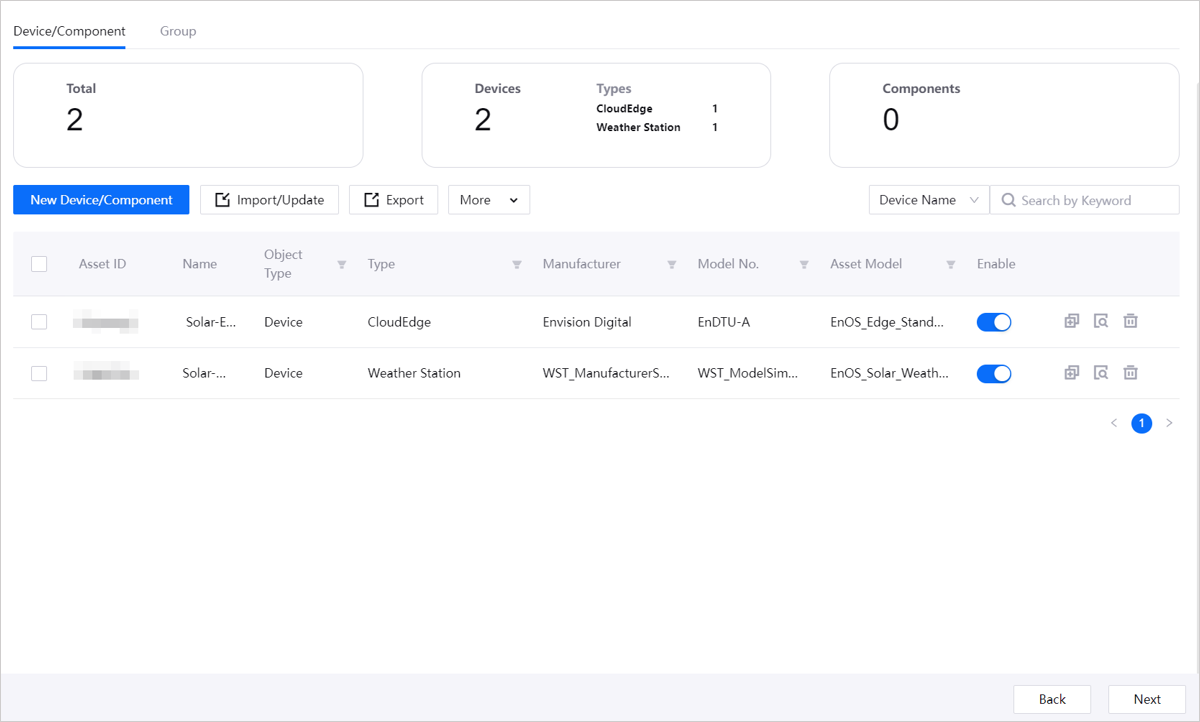
Select Next in the lower right corner to enter Build Topology step.
Step 3: Building a Topology
In Build Topology page, you can build the hierarchical relationship between sites and devices by assigning them to topology nodes. The assigned asset will automatically be added the tags of the topology tree. For more information, see Building Topology.
Through the following operations, you will build a topology with the solar site assigned to the root node and the weather station device assigned to the child node.
Go to Build Topology page, and in the list of topology rules on the left, select the
Solar-WeatherStation Topologytopology rule. For more information on topology rules, see Topology Rule.Under the topological rules with solar-type site as the root node object, a topology will automatically created with its root node where
Solar-Siteis automatically assigned. If not, follow the steps below to create a topology manually.Click Create Topology and enter Topology Name with
Solar-WeatherStation Topology.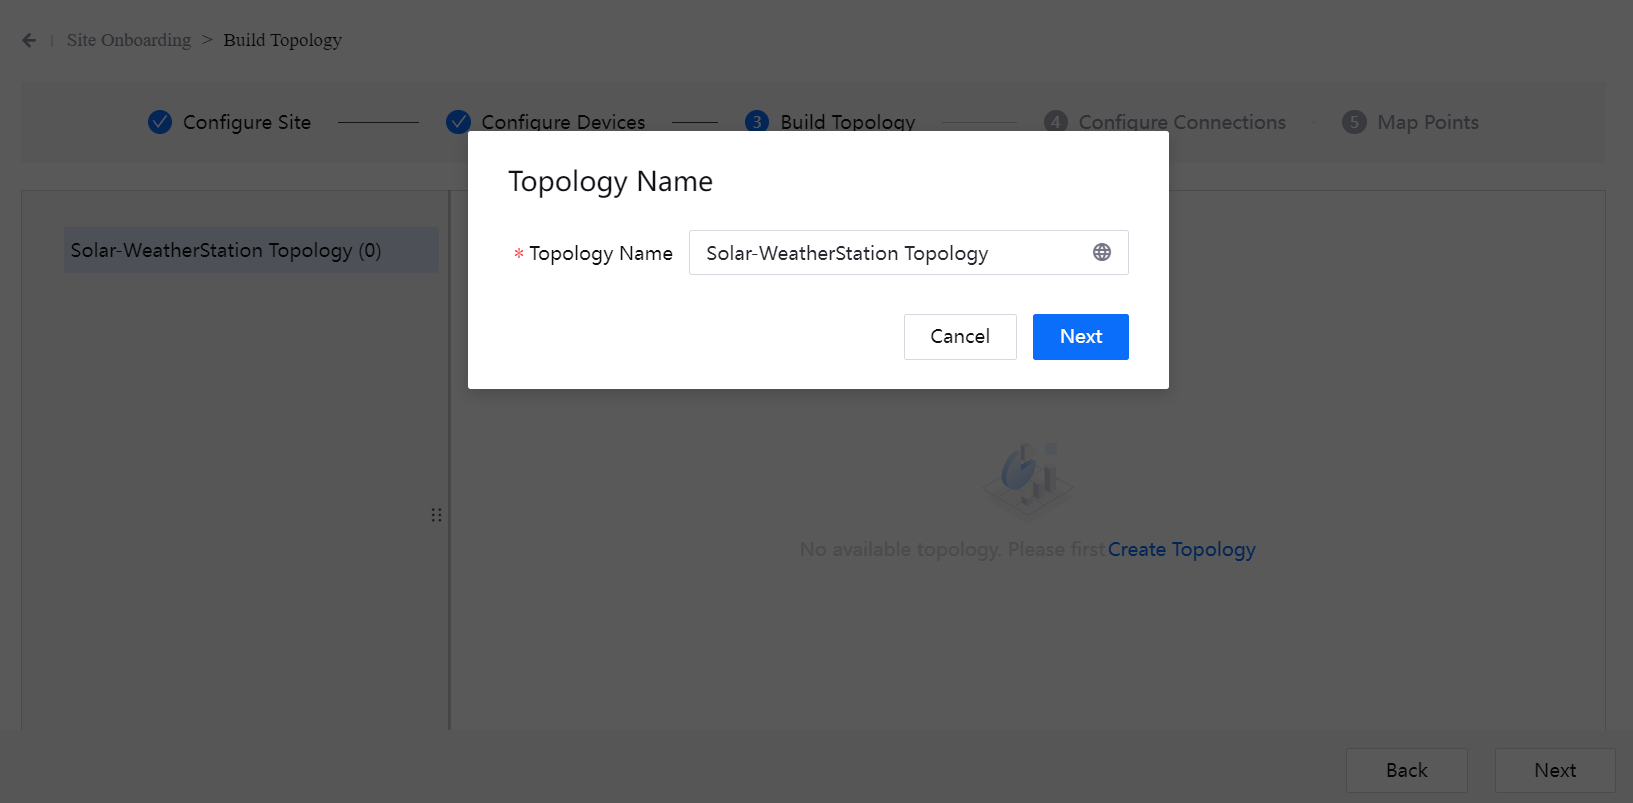
Click Next to select
Solar-Siteto assign to the root node.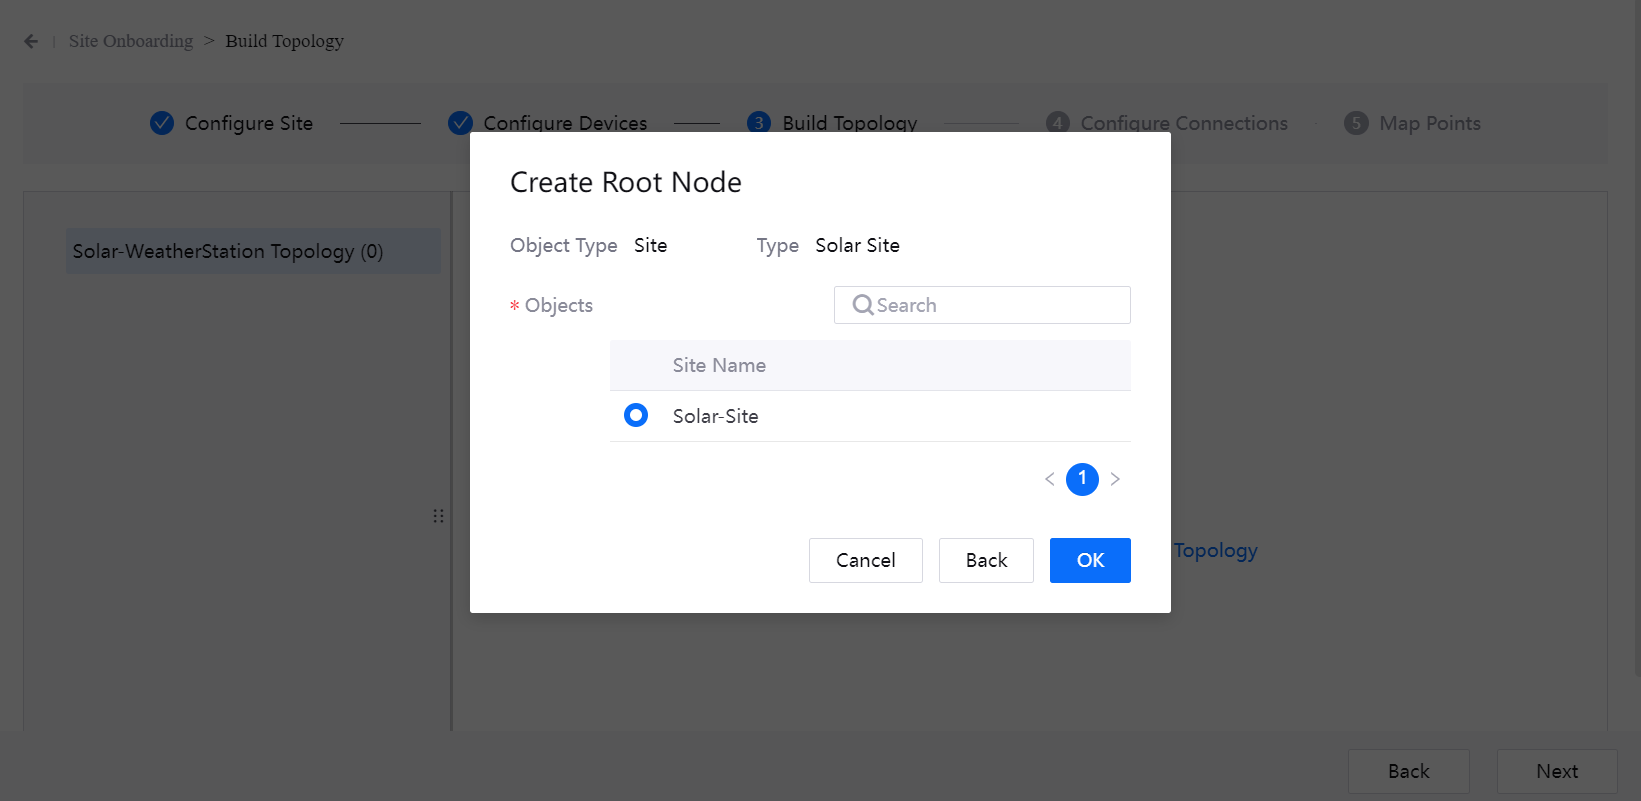
Click OK to complete the creation.
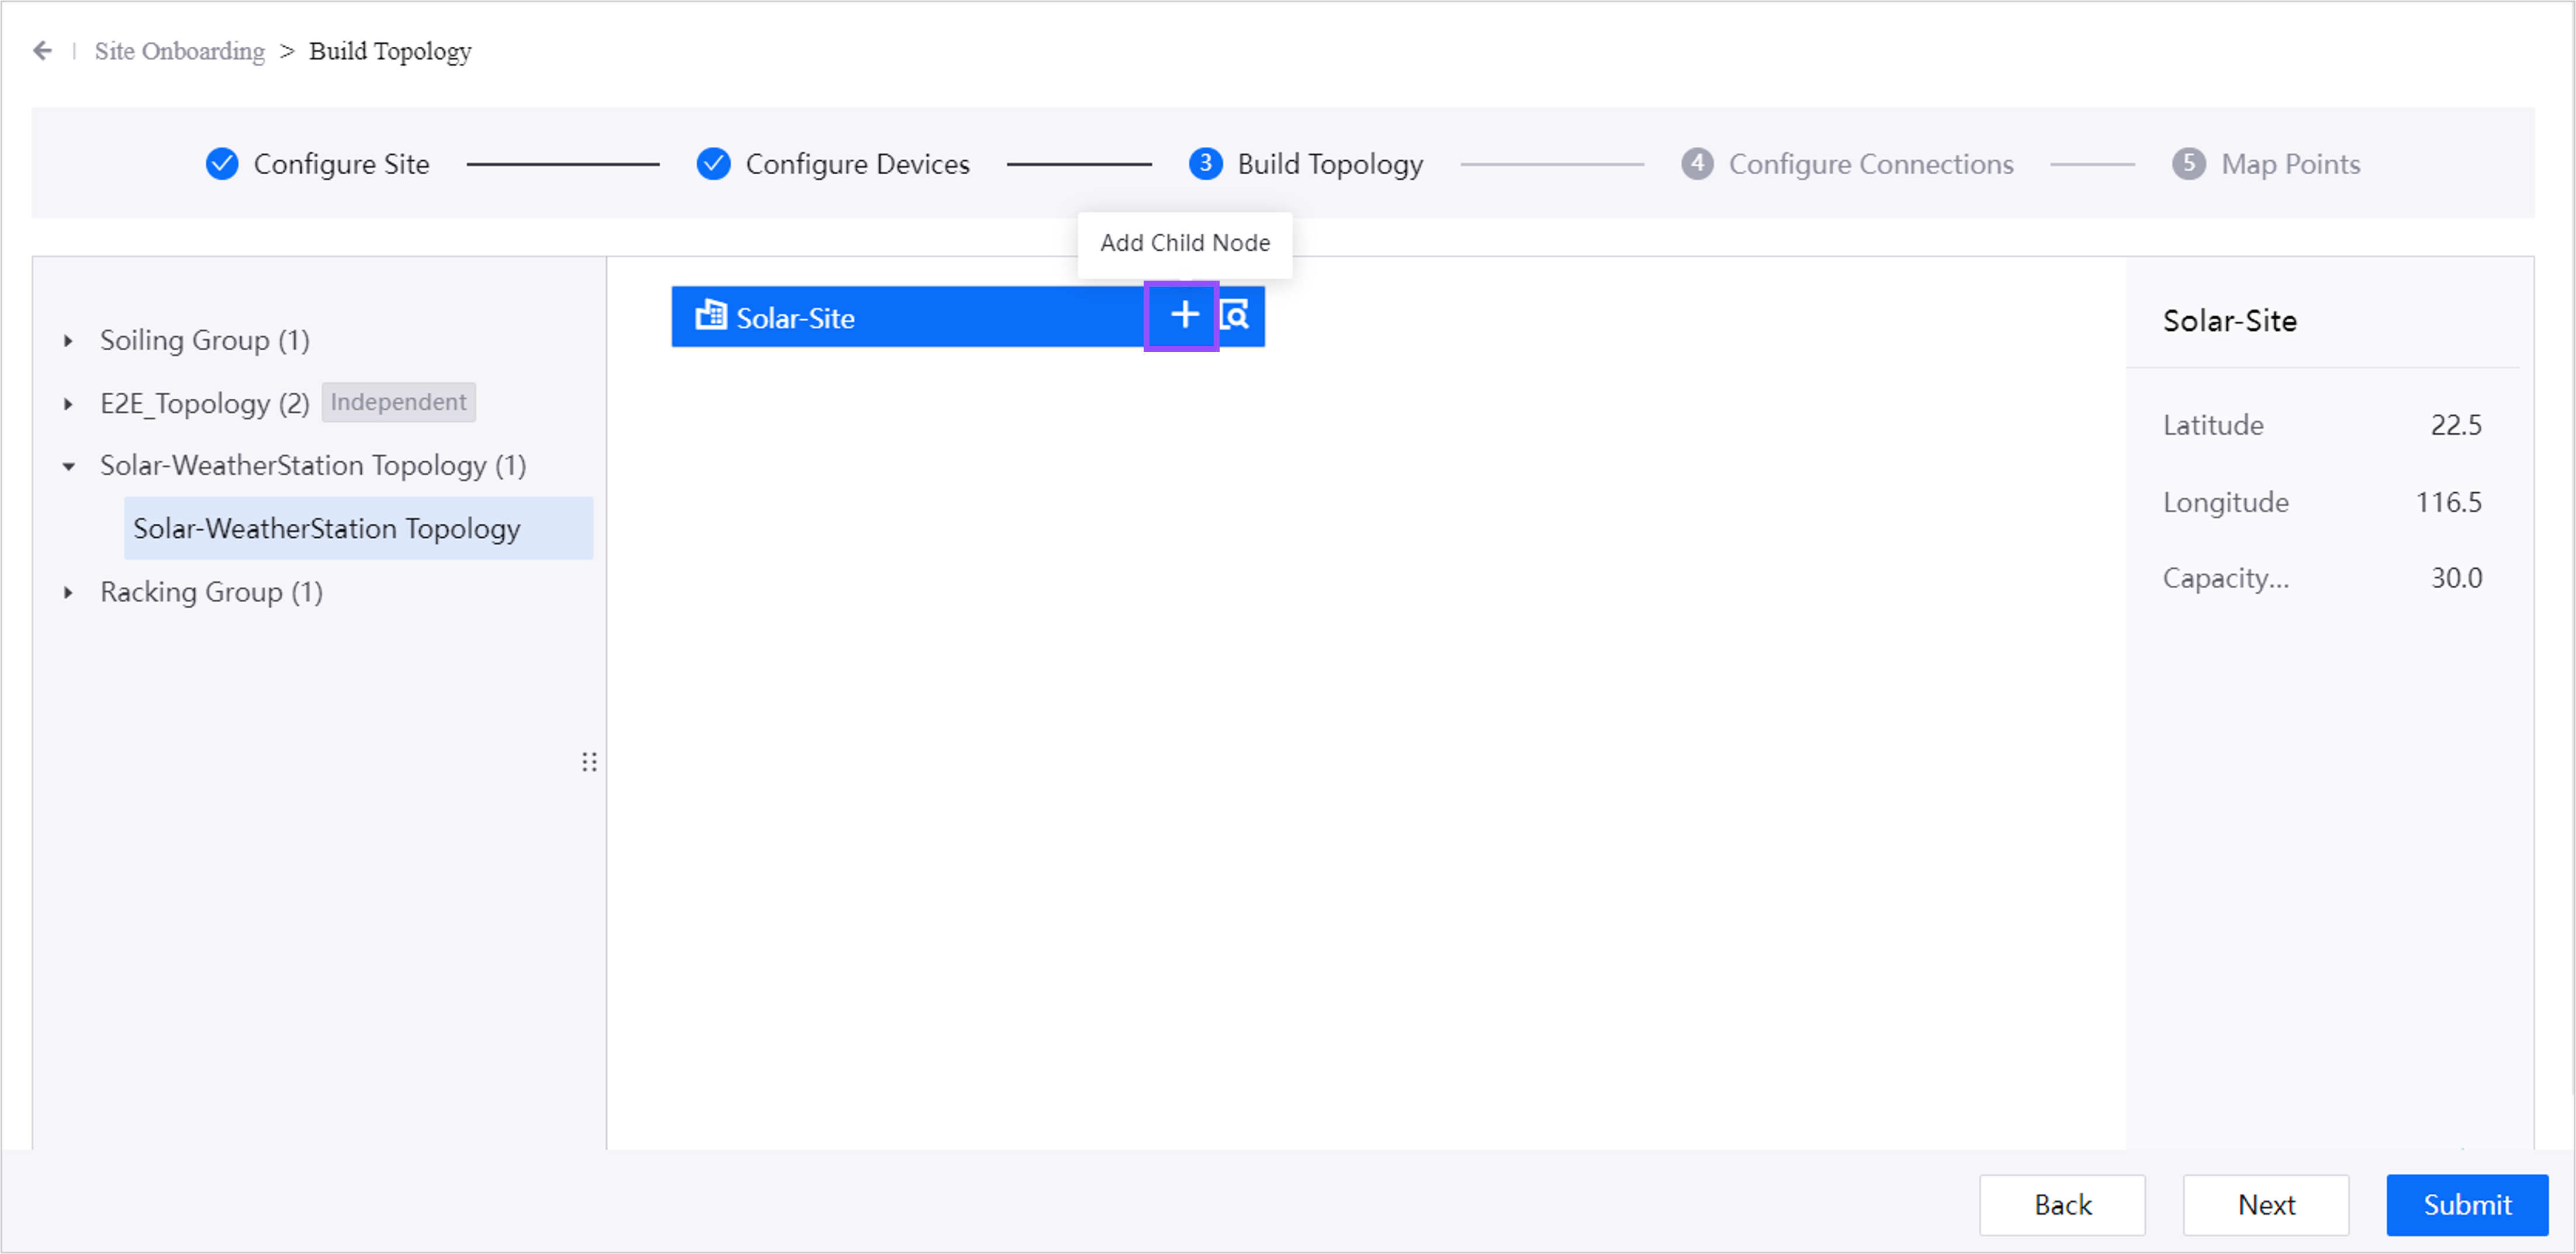
Select Add Child Node on the root node.
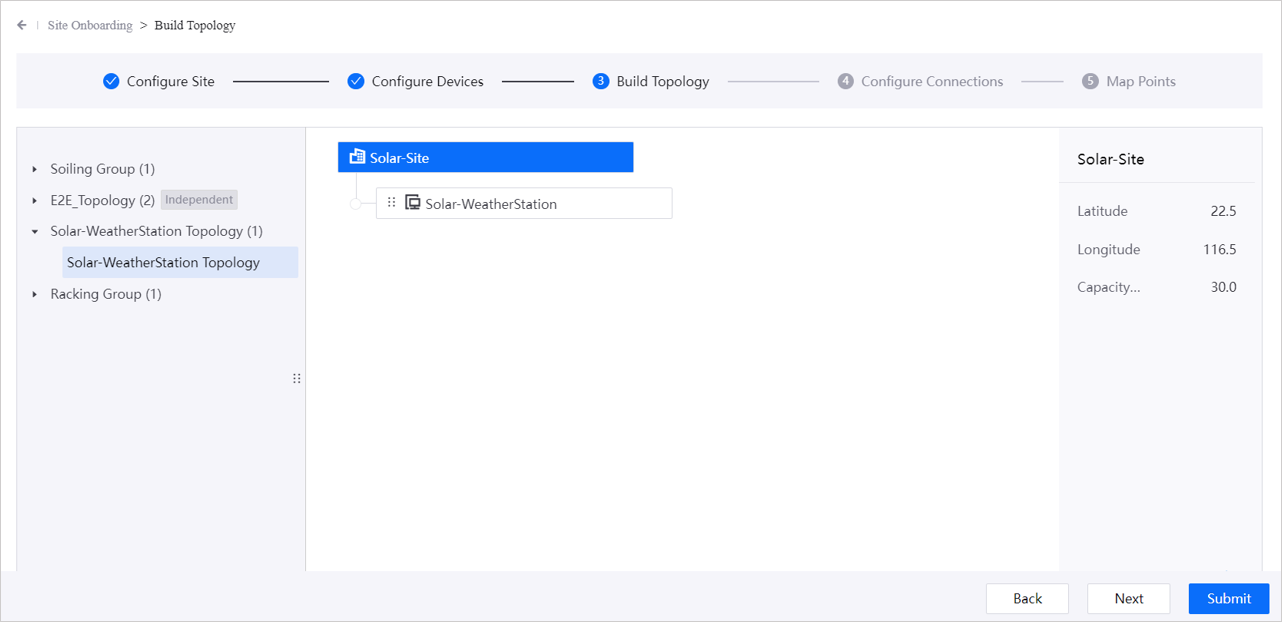
In the pop-up, select in the following information:
Object Type:
DeviceType:
Weather StationObject:
Solar-WeatherStation
Select OK to complete the addition of the weather station child node.
Select Next in the lower right corner to go to Configure Connections step.
Step 4: Configuring Connections
Configuring connections means establishing a connection through the EnOS Edge gateway device, assigning devices to the connection, and then connecting the EnOS Edge gateway device to EnOS Cloud. Once connected, the device’s data will be uploaded to EnOS Cloud through the EnOS Edge gateway device. For more information, see Configuring Connections.
Follow the steps below to connect the weather station device to EnOS Cloud through the EnOS Edge gateway device.
Creating an EnOS Edge Connection
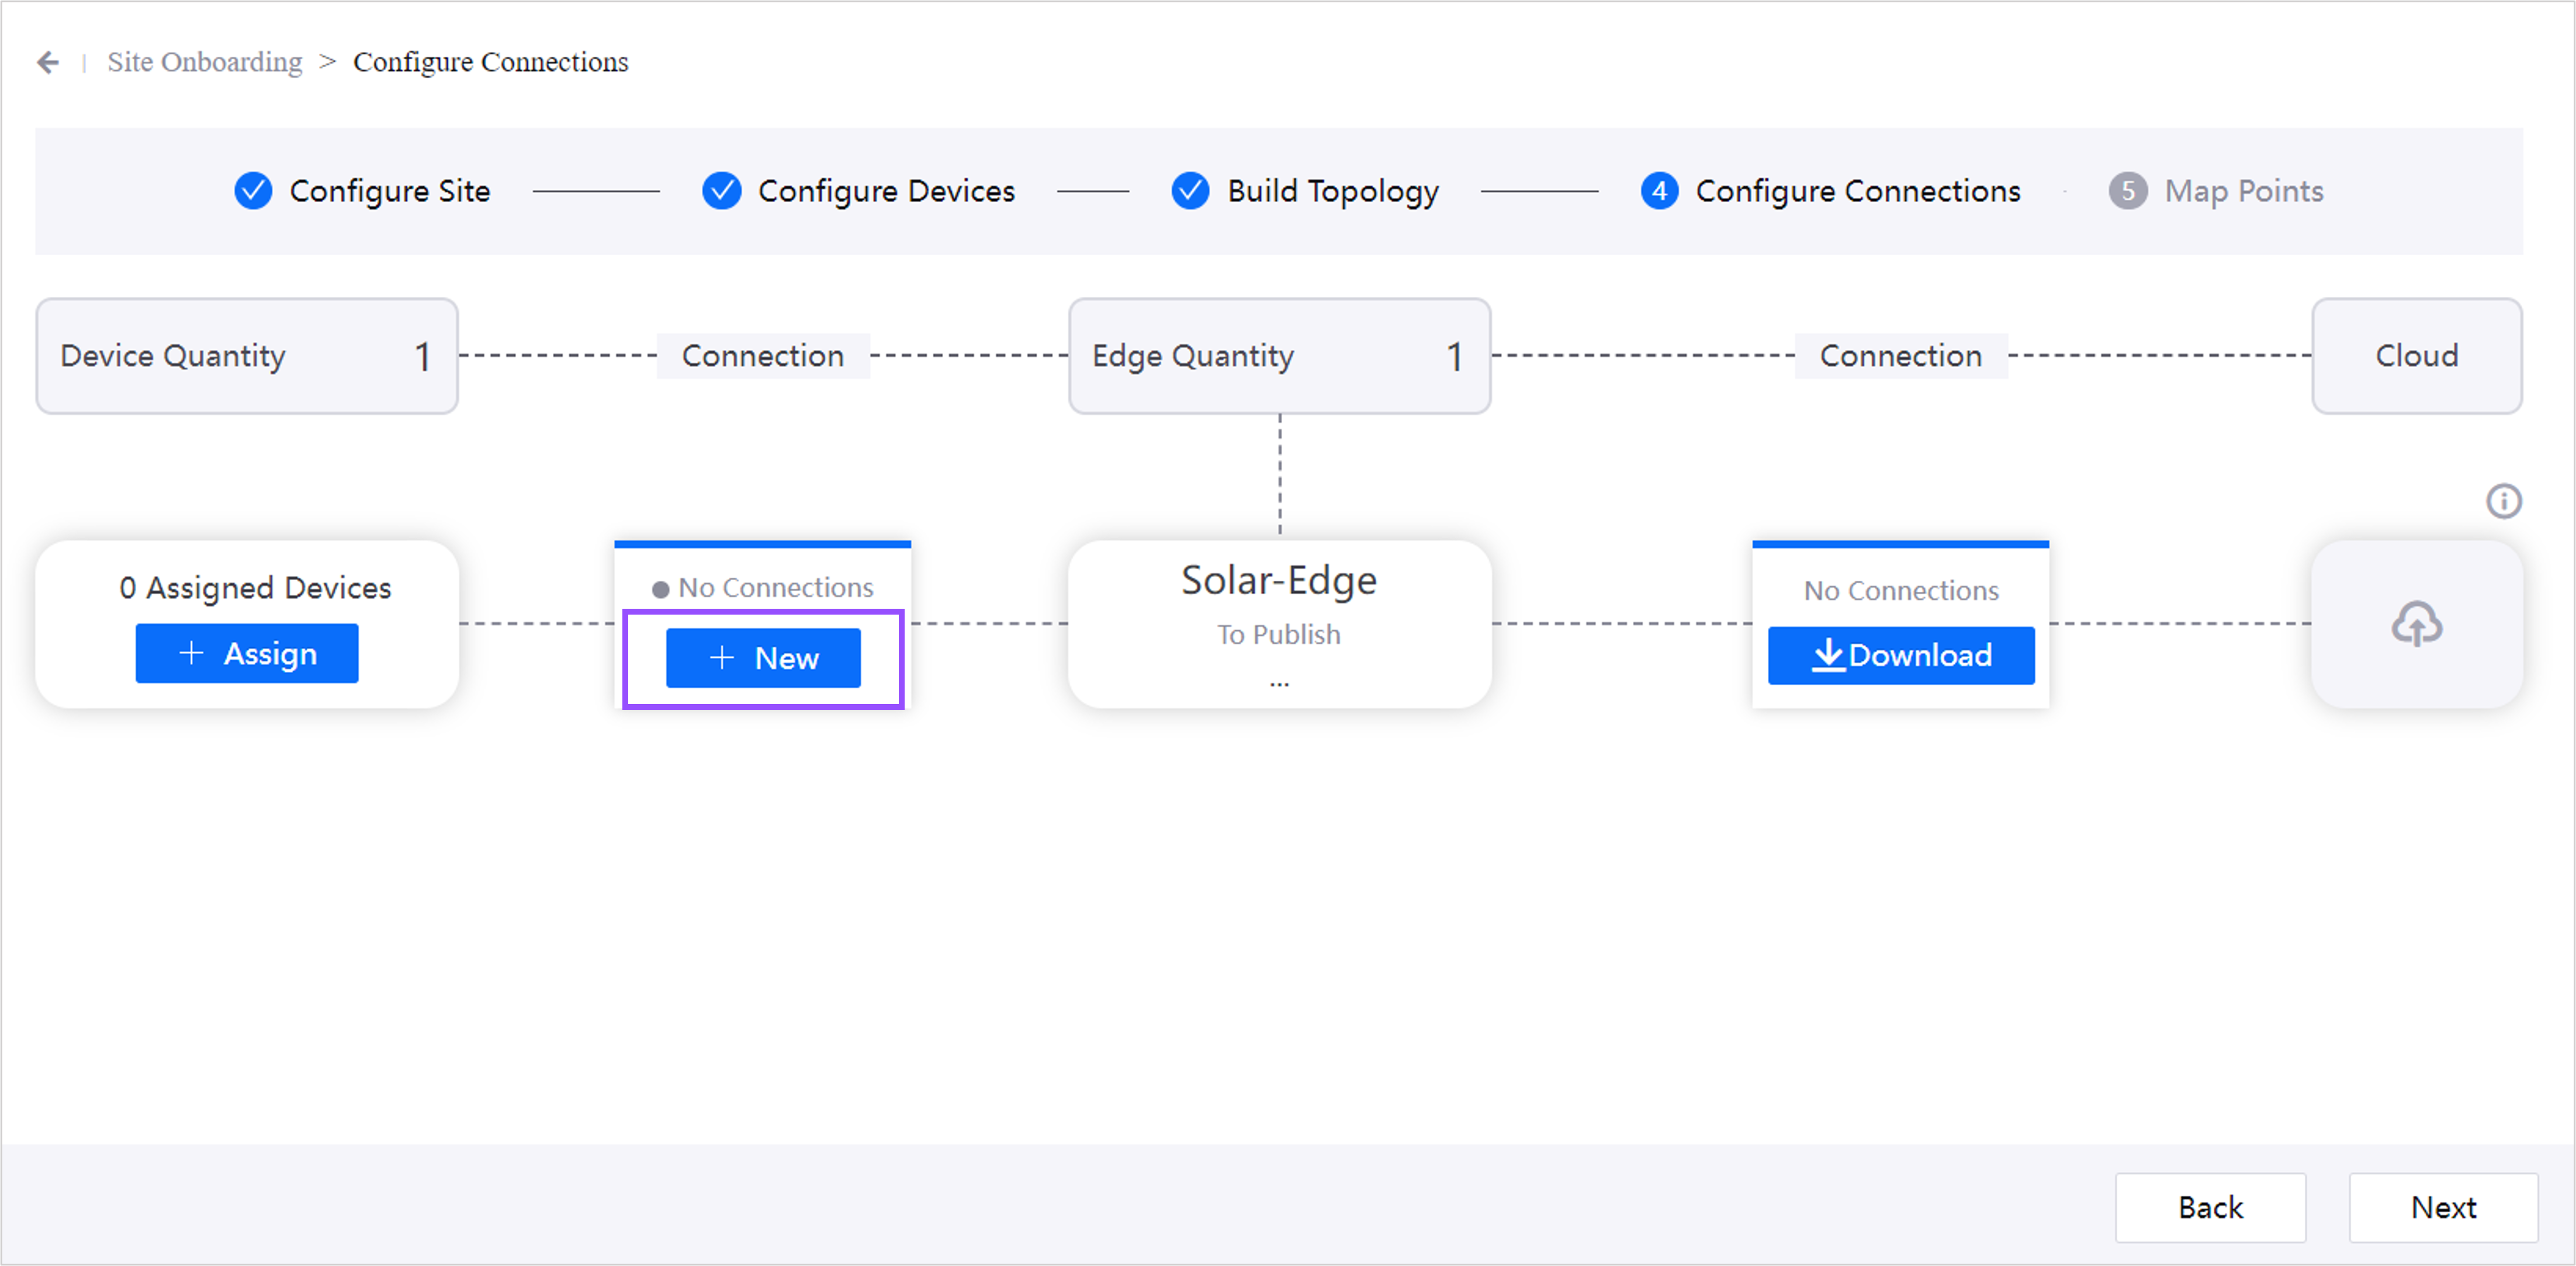
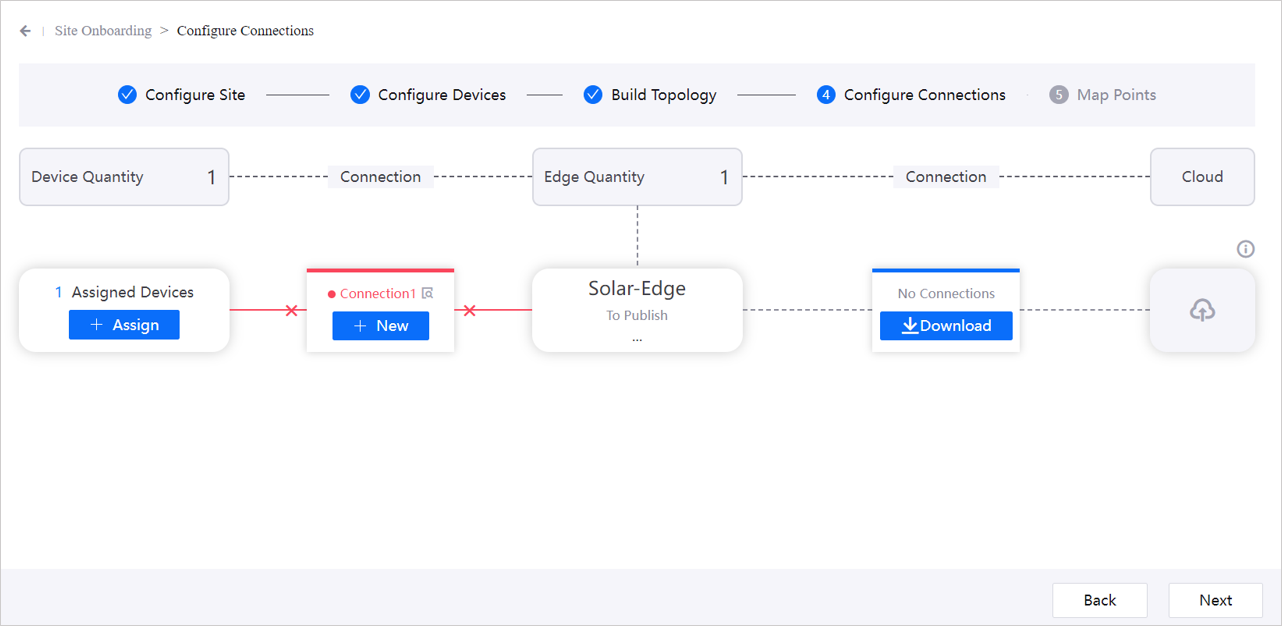
Configure Connection page shows 1 device and 1 Edge.
Select + New to create an EnOS Edge connection.
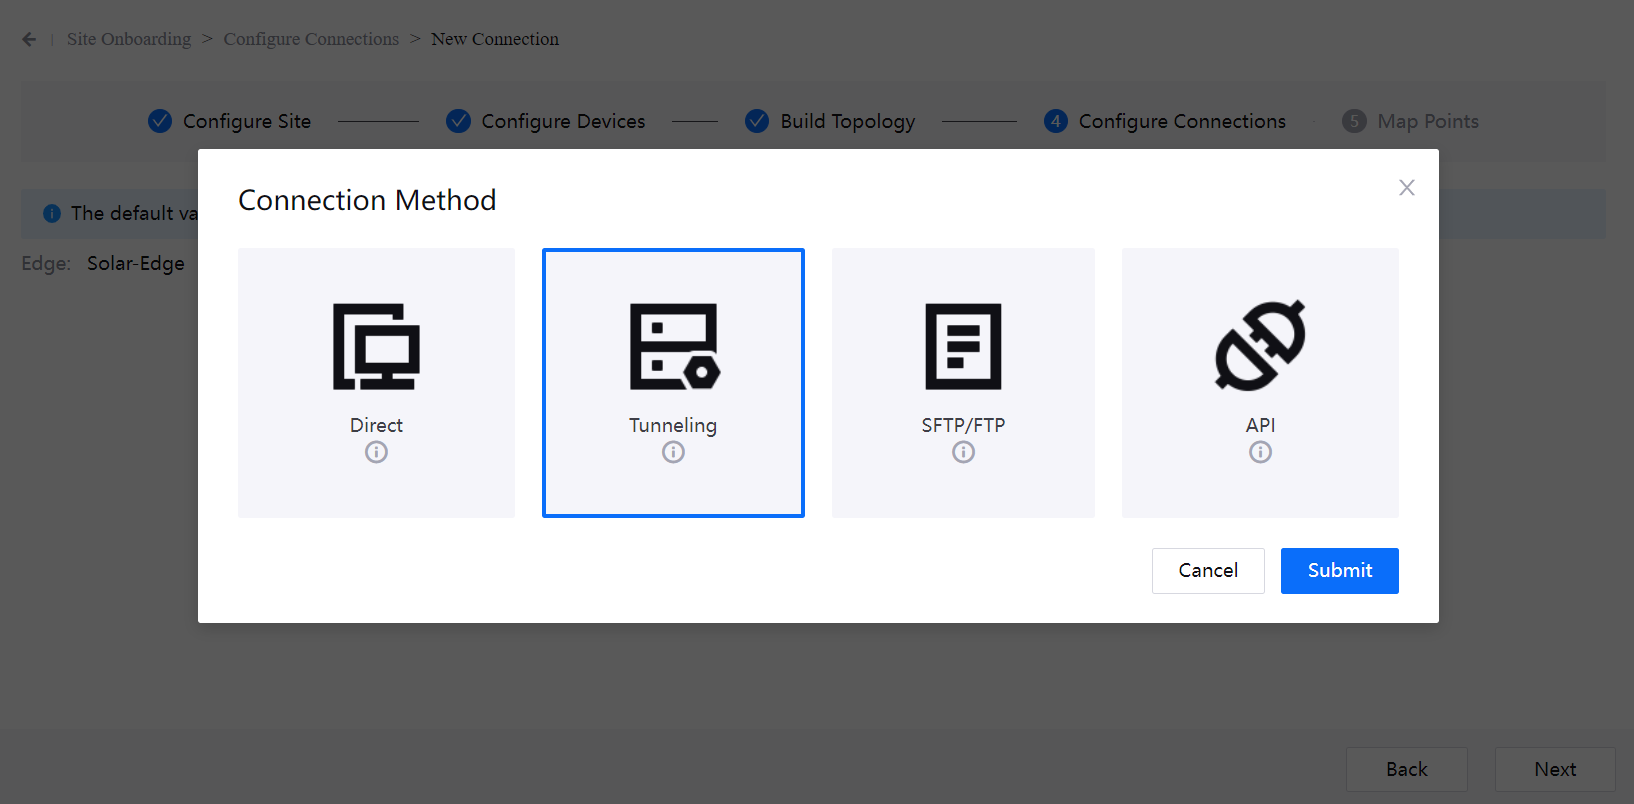
Available connection methods include Direct, Tunneling, SFTP/FTP, and API. Select Tunneling and select Submit.
Enter the following information:
Connection Name:
Connection 1Interface:
EthernetMethod:
TCP/IPOperation Mode:
ClientIP Address:
255.255.255.255: 443Protocol Type:
IEC104
After selection, the protocol column will display Protocol recommended by the system. Select Edit to modify the recommended value. This tutorial uses the
IEC104-Client-IEC104protocol.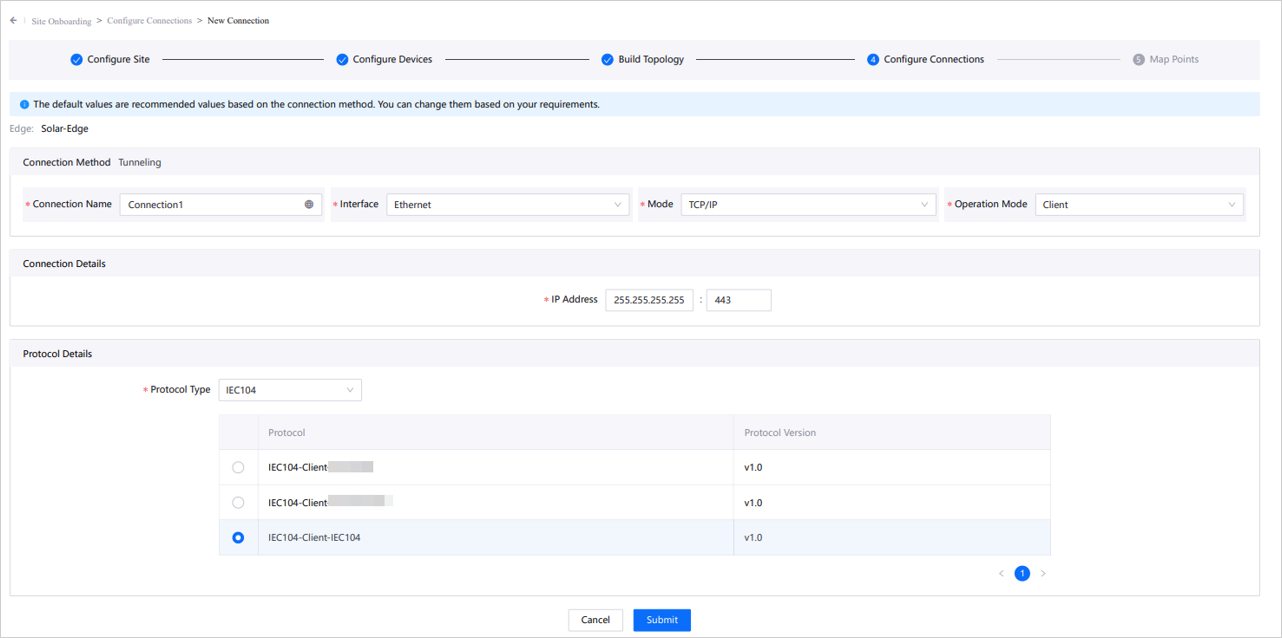
Select Submit to finish configuring the EnOS Edge connection.
Allocating Devices to the Connection
After selecting Submit, in Assign Devices pop-up that appears, select
Solar-WeatherStationdevice.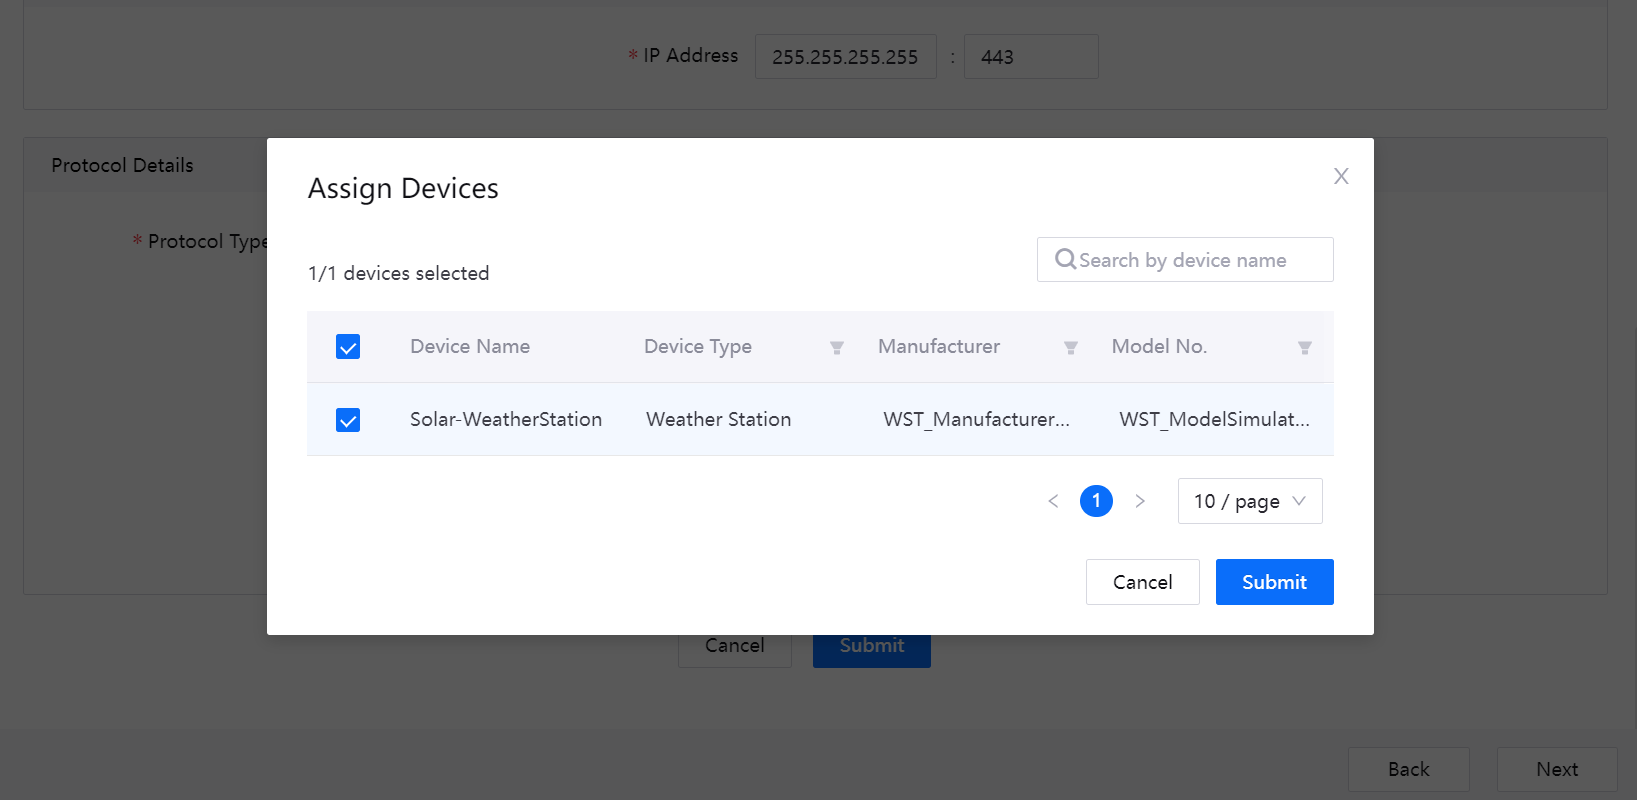
Select Submit to finish assigning the weather station device to
Connection 1.
The page now displays Connection 1 and 1 Assigned Devices.
Connecting EnOS Edge with EnOS Cloud
On Configure Connection page, for Connection 1, select Download option, and then select Download Configuration File, and give the configuration file to EnOS system administrator for offline deployment.
You can view the status of the EnOS Edge device and its connection with EnOS Cloud on the current page. At present, the EnOS Edge device is in To Publish state, and is in Unconnected status.
Select Next in the lower right corner to enter Mapping Points step.
Step 5: Mapping Points
Mapping measurement points means to map the source measurement points of the weather station device to the measuring points of EnOS Cloud models. By importing the source point table and configuring the logical addresses and offsets, the measurement point mapping is realized. After mapping, EnOS Cloud will be able to produce accurate analysis, real-time alarms, and forecasts fsrom the data uploaded by the device. For more information, see Mapping Points.
Importing a Point List
When importing a point table, you can select one of two import methods: All-Models Point List and Single-Models Point List. Follow the steps below to import the device source points using the single-models point list.
On Mapping Points step, and then under the Single-Models Point List, select Import Point List.
Click + to add a list. In the pop-up, select in the following information:
Device Type:
Weather StationModel:
WST_ModelSimulationProtocol:
IEC104-Client-IEC104Measurement Point Type:
AIandDI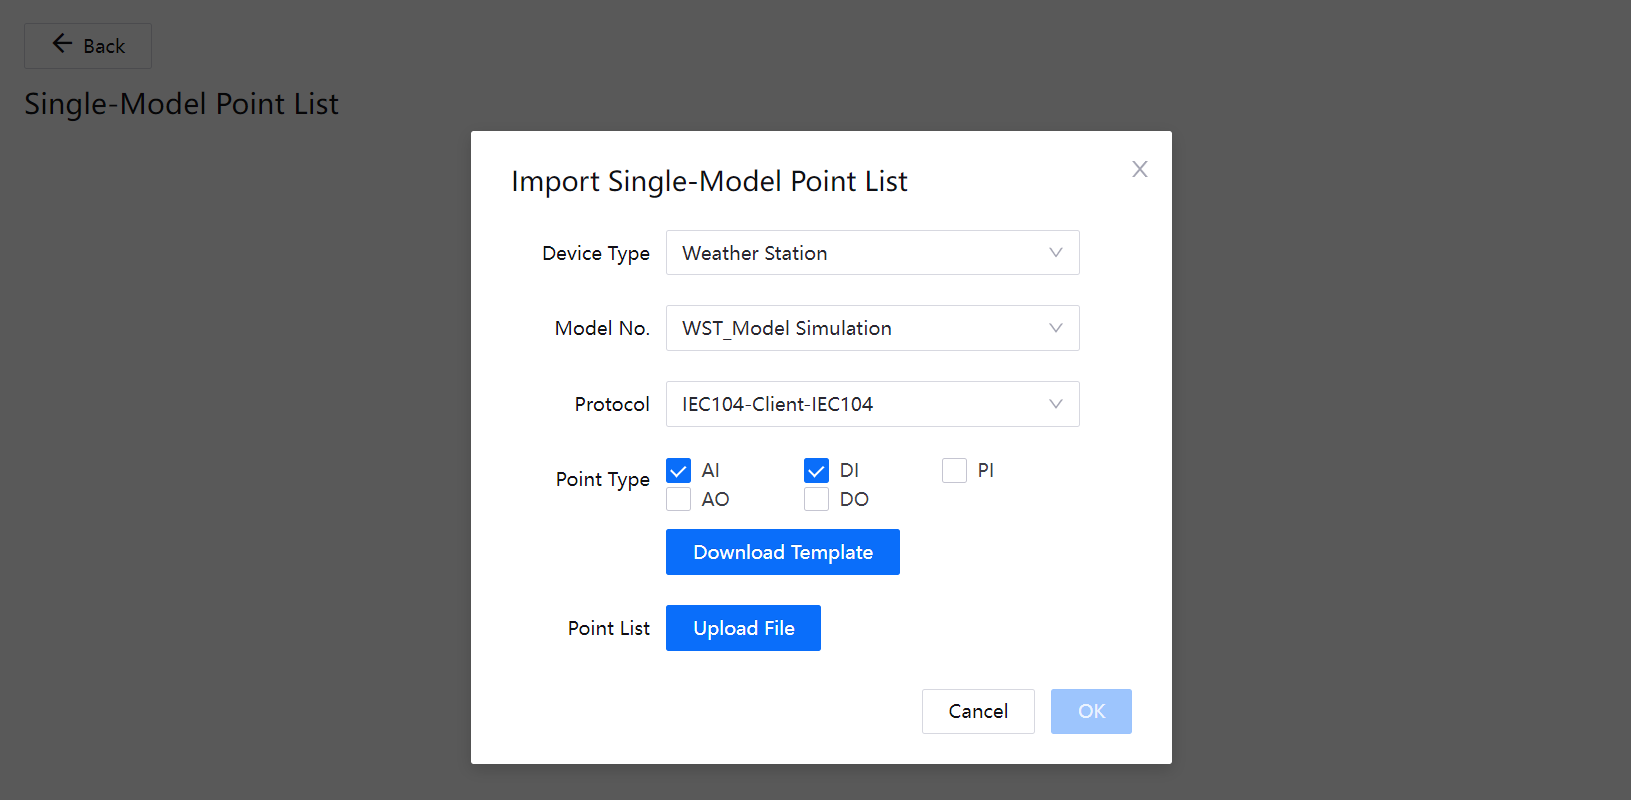
Select Download Template to download the single-models point list template, enter the following source point data in the template, upload the point list, and select OK.
Source Point Name |
Source Point Number |
Value Type |
Point Type |
Model Point Identifier |
|---|---|---|---|---|
Environment Temperature |
1 |
DOUBLE |
AI |
WST.Temperature |
Environment Humidity |
2 |
DOUBLE |
AI |
WST.Humidity |
Wind Speed |
3 |
DOUBLE |
AI |
WST.WindSpeed |
Wind Direction |
4 |
DOUBLE |
AI |
WST.WindDirection |
Cumulative Rainfall |
5 |
DOUBLE |
AI |
WST.Rainfall |
Atmospheric Pressure |
6 |
DOUBLE |
AI |
WST.Pressure |
POA |
7 |
DOUBLE |
AI |
WST.Radiation |
Weather Station State |
8 |
INT |
DI |
WST.State |
After importing the point table, click Submit and you will see the imported point table on Mapping Points page.
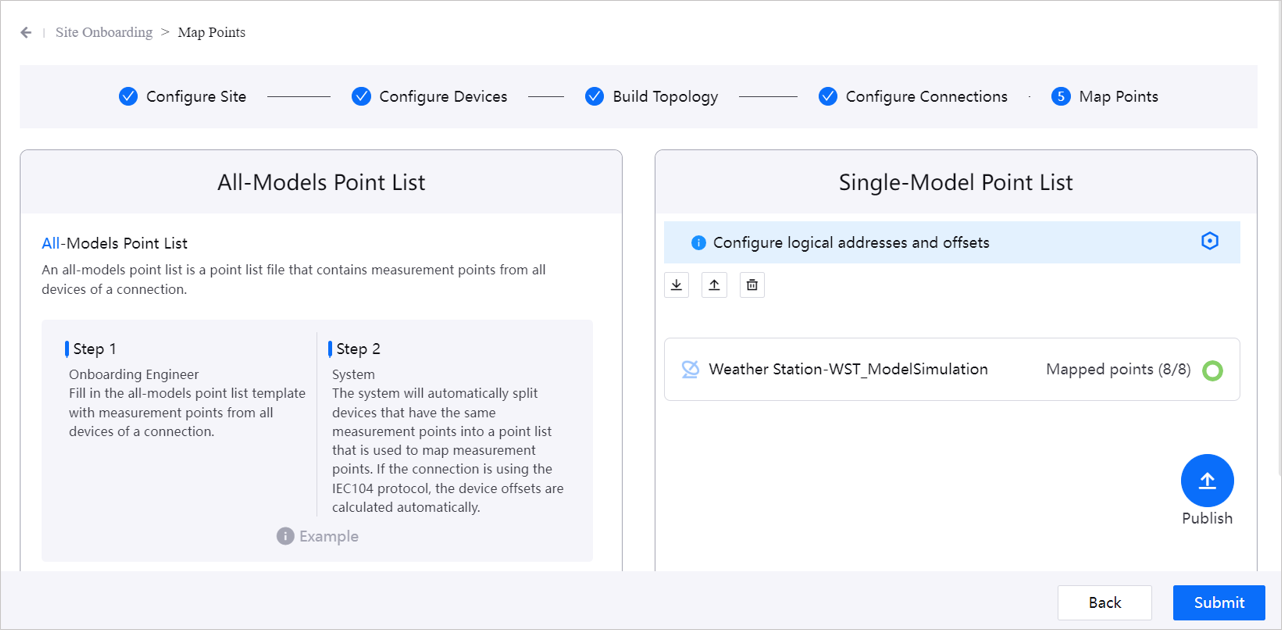
Since the source measurement points of the device imported in this tutorial correspond perfectly to the measurement points of the model, there is no need to configure logical addresses and offsets. If required, click Configure  . For more information, see Configuring Logical Addresses and Offsets.
Mapping Points Automatically
There are three methods to map measurement points, Auto Map, Formula Mapping and Manual Map, You can choose the appropriate mapping method based on your needs. Through the steps below, you will complete measurement point mapping through automatic mapping.
Select the imported point table on Map Points step page to enter the measurement point details page.
Select Auto Mapping to start automatic mapping of measurement points. The source measurement points of the device imported in this tutorial correspond perfectly to the measurement points of the model, so the system automatically completes the mapping.
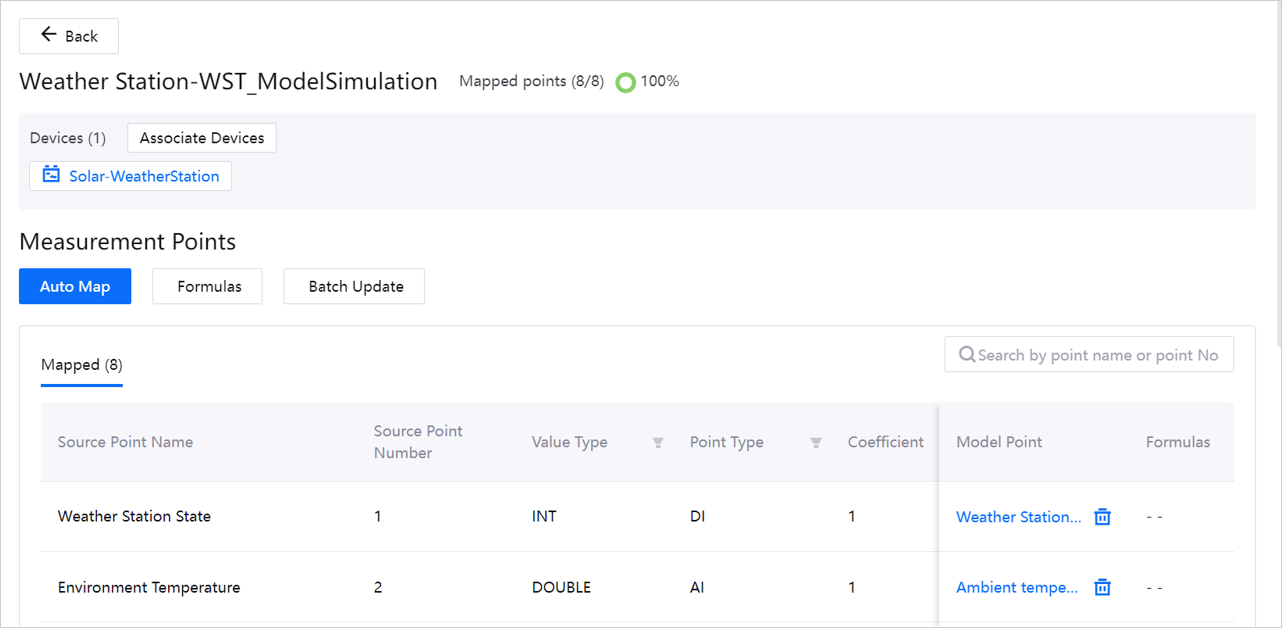
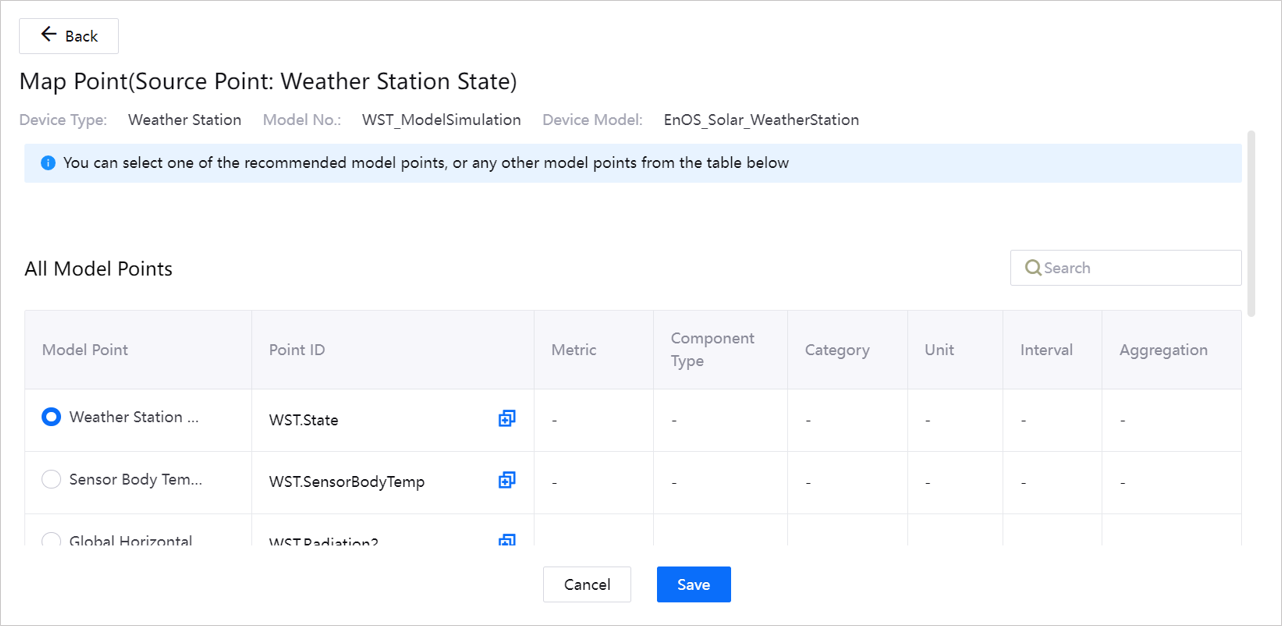
On Mapped tab, a list of mapped measurement points is displayed. If required, click the measurement point name in Model Measurement Points column in the list to enter the manual mapping page and select other model measurement points for the source measurement points.
Publishing Points
On Map Points page, select Publish to complete the mapping of measuring points.
Step 6: Submitting the Site
On Map Points page, select Submit.
If you need to notify other users, you can enter the email address to be notified in the pop-up. If not needed, continue to select Submit in the pop-up to complete site onboarding.
The status of the solar site is updated to Released. For more information, see Submitting Sites.
Note
After the status of the site is updated to Released, users will not be able to edit any information on the site. Only super administrators can edit onboarded sites.
Results
In the site list on Onboarding Tool > Site Onboarding page, you can view detailed information about
Solar-Site.On Onboarding Tool > Device Setting page, all created devices are displayed in the list, and you can add other business information for the device. For more information, see Setting Device Business Information.