Building Topologies
Topologies show the hierarchical relationships of sites, devices, components, and groups. You can build topologies by creating nodes for topologies and assigning assets to the nodes. A topology consists of a root node and some child nodes, building based on a topology rule. An asset can be assigned only once in a topology tree, but it can be assigned simultaneously in multiple topologies.
In Site Onboarding, you can build site topology on Build Topology step page. The figure below shows the extent of a topology within a site.
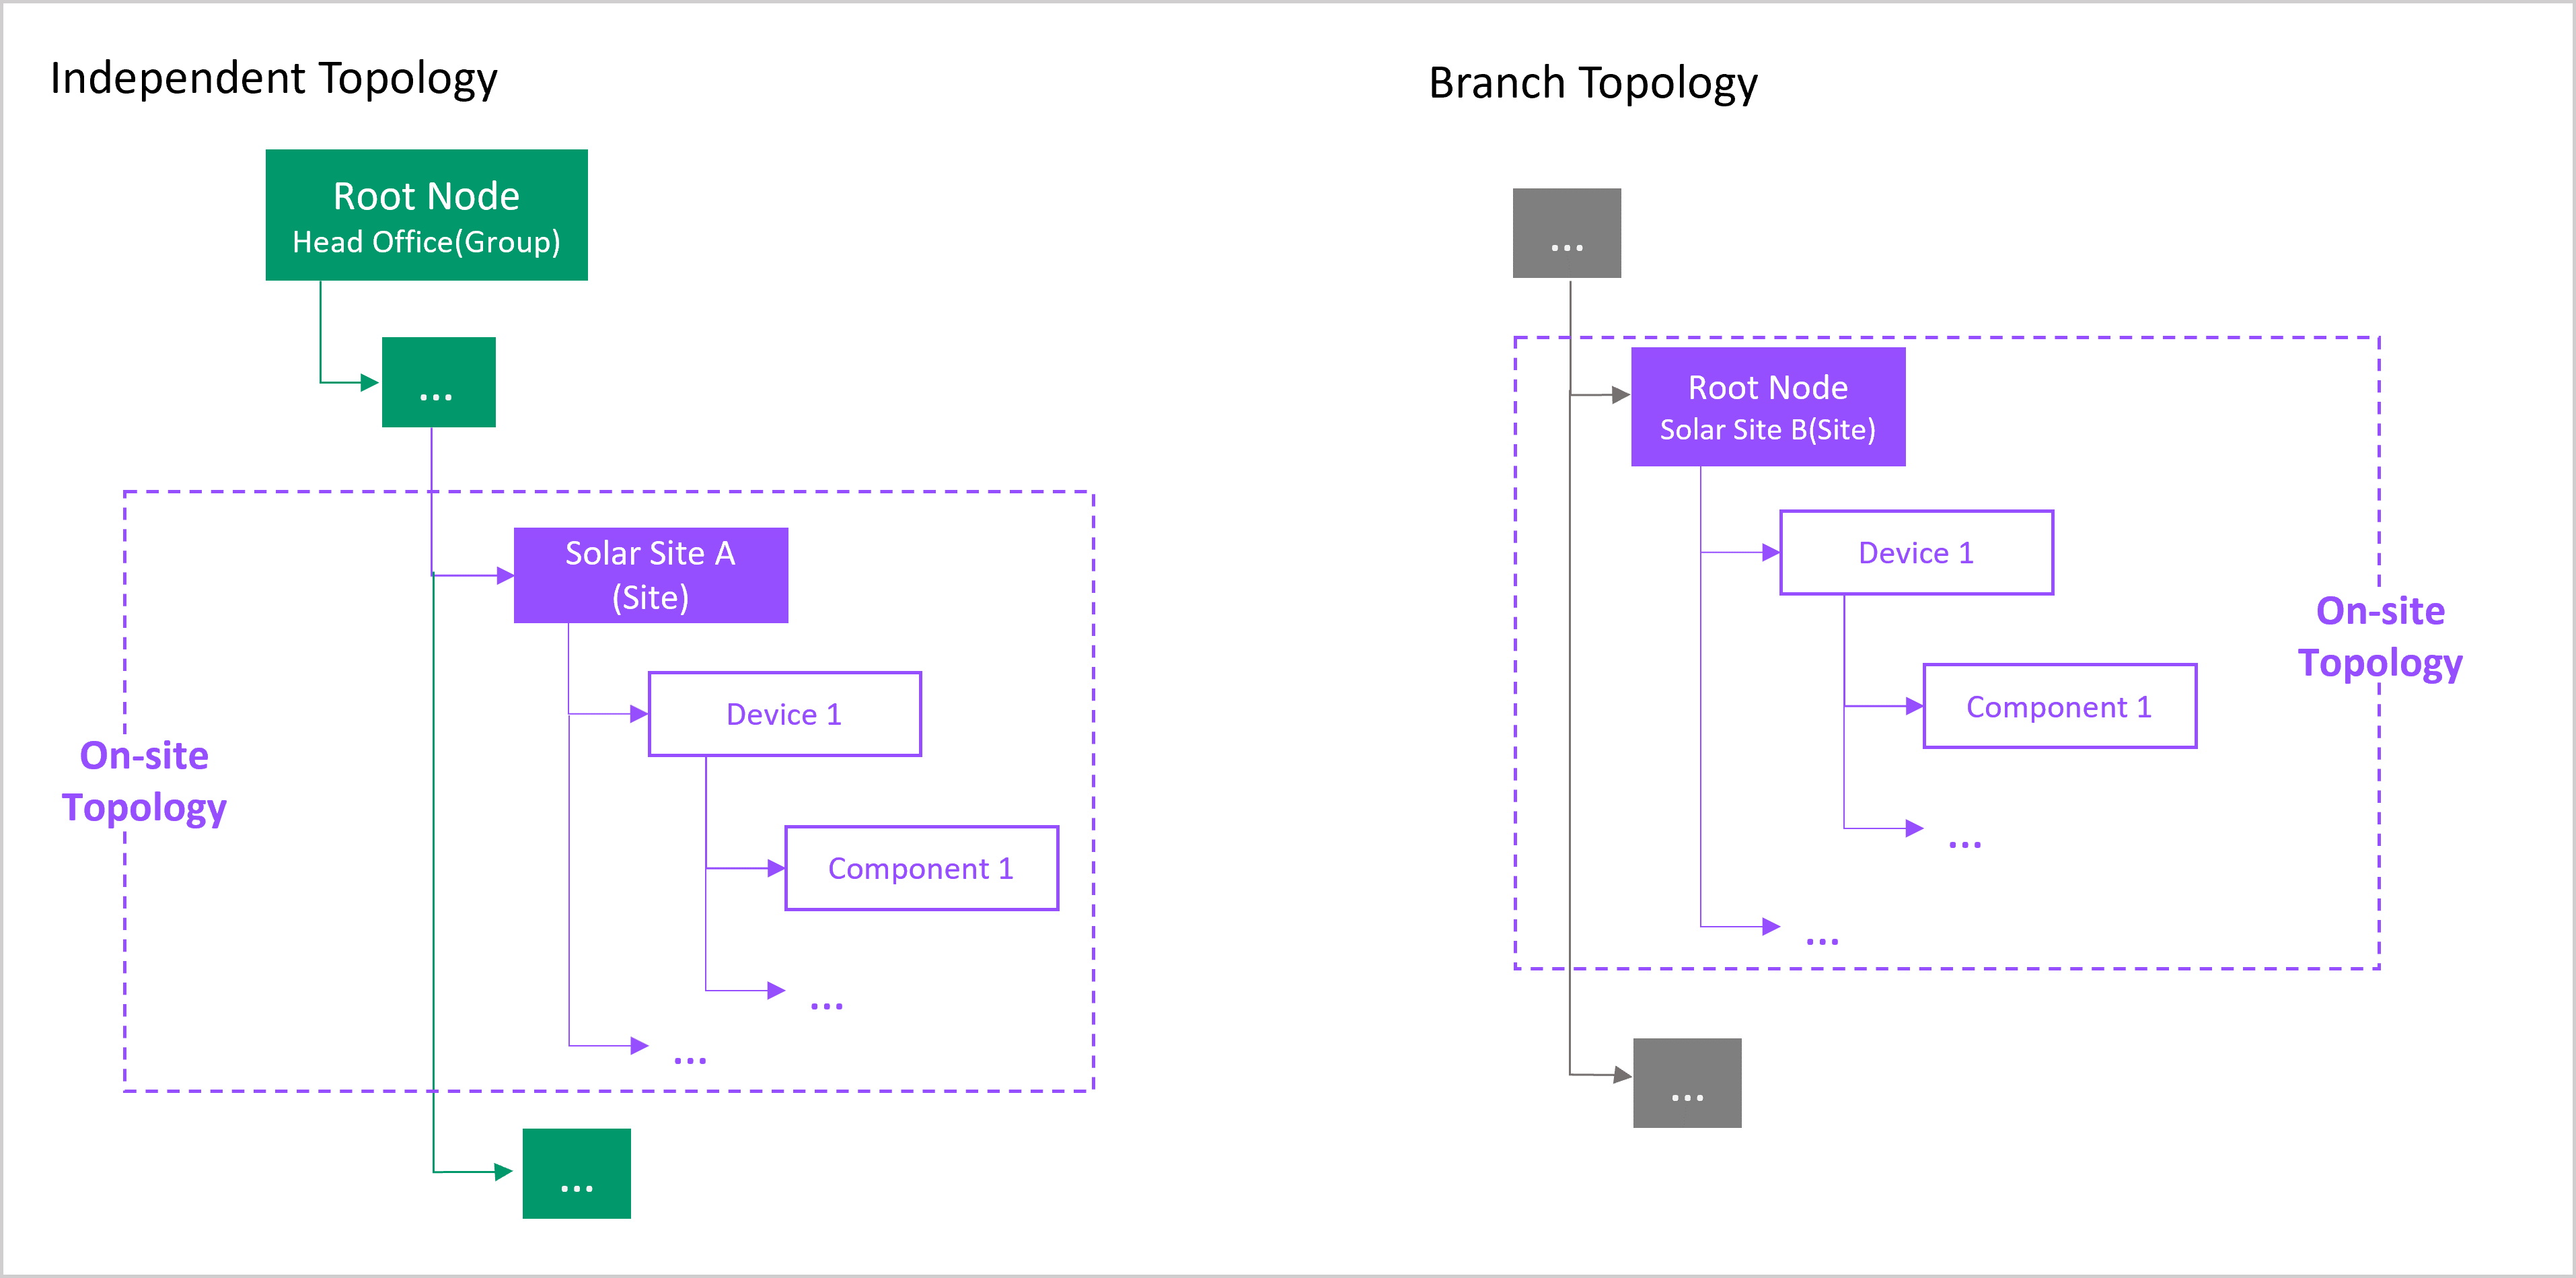
In Build Topology step, if you select Independent topology rule, an on-site portion of a independent topology will be created and synchronized with Topology menu page. Otherwise, if you select a topology rule without an Independent tag, a branch topology will be created. For more information on independent and branch topologies, see Topology.
Note
If the current site and its devices, components, and groups have been configured with independent topology auto-mounting, the auto-assigned topology will be displayed under the corresponding topology rules. You can proceed with the building of other topology trees if desired. For more information, see Configuring auto-assign.
Prerequisites
The current account has access to Site Onboarding menuand permission points for managing assets and topologies. Contact the application administrator if necessary.
The current account has the permissions for Build Topology step. Contact the application administrator if necessary. For more information, see Assigning Onboarding Processes.
Ensure that the required topology rules exist in the topology rule list on the left side of Build Topology page. The topology rules available in the current OU are determined by the OU template. Contact the system administrator if you want to update the rules.
Step 1: Creating Top Nodes
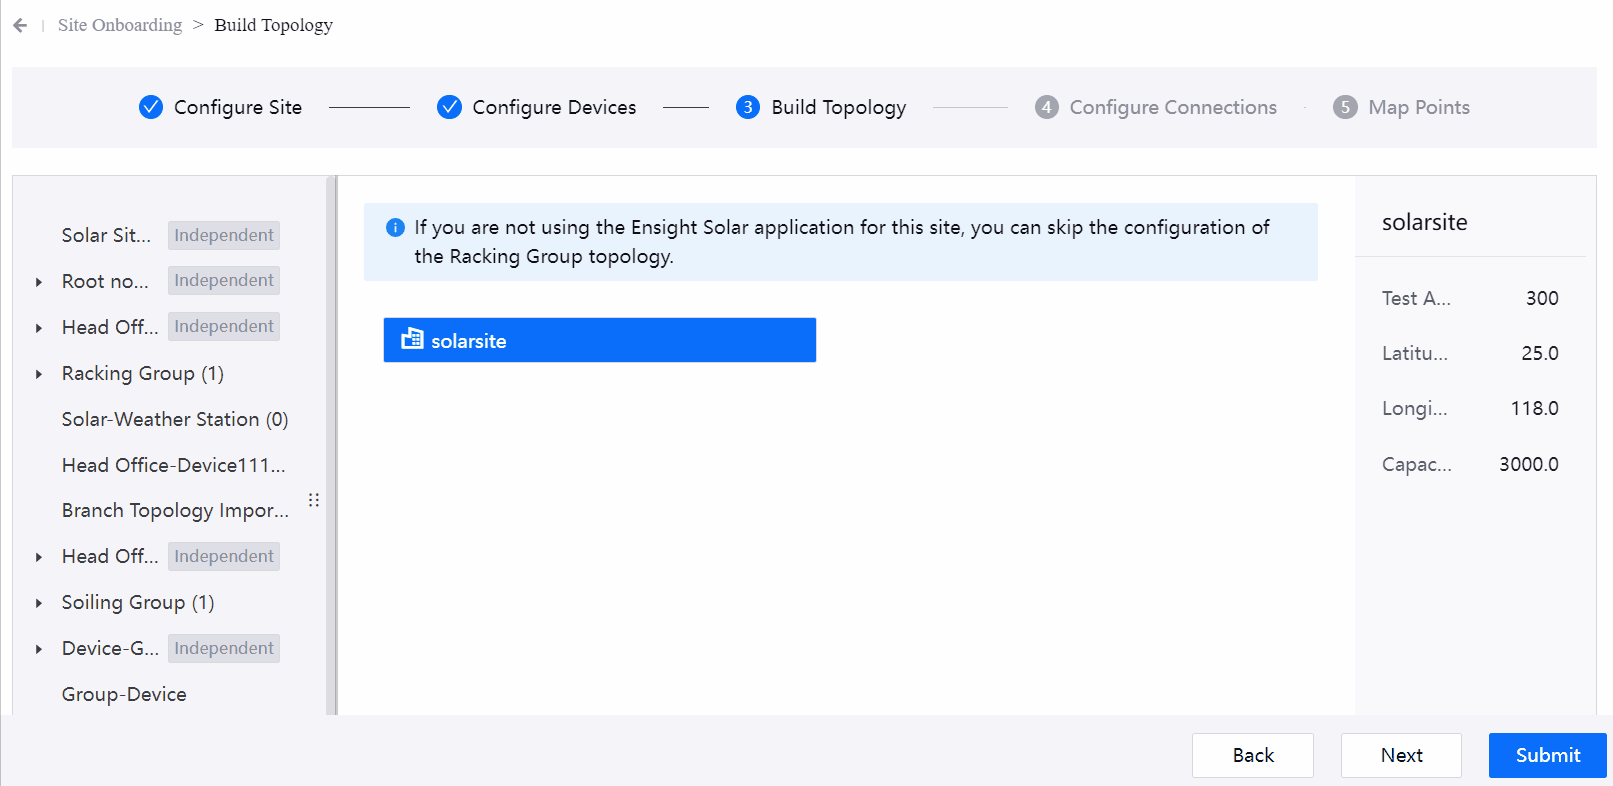
In the left navigation bar, select Site Onboarding menu, go to the site where you want to build a topology, and select Build Topology step.
The available topology rules for this site are listed on the left. Select a Topology Rule.
Topology rules with an Independent tag: The on-site part of the Independent Topology will be built and synchronized with Topology menu page.
Topology rules without an Independent tag: A Branch Topology will be created.
Click Create Topology
 on the topology rule. If the prompt
 This topology rule doesn't allow creating new instancesappears, it means that only one topology can be created under this rule and this topology already exists. See below for the possible reasons why there is an existing topology:Rules without Independent tags: when the site matches the object assigned on the top node, a topology instance will be automatically created under common circumstances. Expand the rule to view and edit the topology.
Rules with Independent tags: if there is an independent topology under the rule and the current site satisfies the topology rule, a topology for which the root node is the site will be automatically created under the independent topology. You can expand the rule to view the name of the individual tree and edit the on-site part. If the devices, components, or groups match the auto-assign configuration of the independent topology, they will also be auto-assigned under the site node.

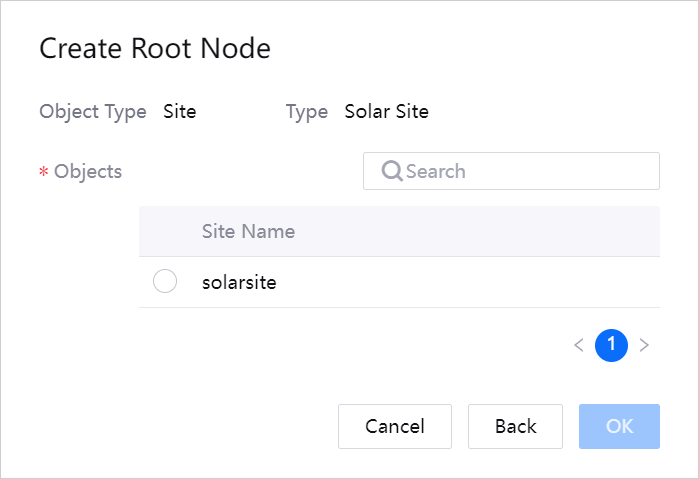
Enter a topology name in Topology Name pop-up, then select Next.
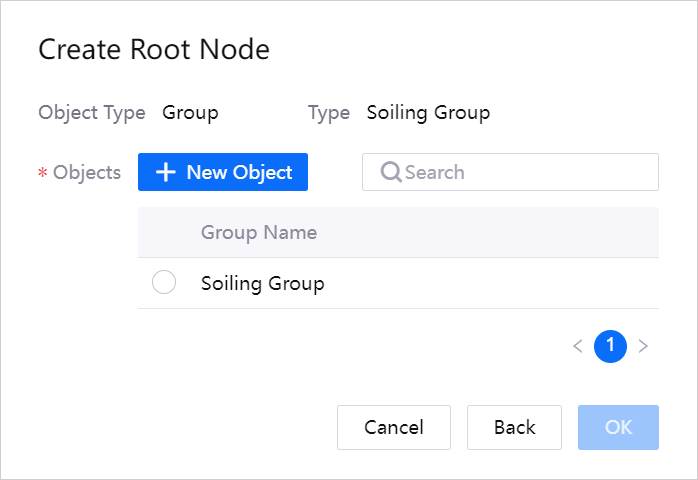
In Create Root Node pop-up, select or create an asset to assign to the root node based on the root node’s Category and Type.
When Category is Site, only the current site is supported.
When Category is Device/Component/Group, you can select an existing asset in the current OU, or create a new asset. The newly created asset will appear on Configure Devices step page in Device/Component or Group list. This process is equivalent to creating a device/component/group in the Configure Devices step.
Select New Object, and fill in the blanks such as Name of the root node in the pop-up. Different types of devices/components/groups require different attributes.
After finishing, select Submit to create a root node for the current topology. New devices/components/groups will also be created for the current site.
After created successfully, the top node will be displayed on the top of the topology canvas.
Step 2: Adding Child Nodes
You can add child nodes in the following ways: add one by one, duplicate from existing nodes, or import files to batch create child nodes.
Adding Nodes One by One
Select Site Onboarding in the left navigation bar to go to Build Topology step for the site.
On the node for which to add a child node, select Add Child Node
 .
.In the pop-up, select Category and Type of assets assigned on this node. Category and Type settings available here depend on topology rules.
If Site type is selected for the child node, only the current site is supported.
If Device/Component/Group type is selected for the child node, you can select an existing asset in the current OU or create a new asset.
Select New Object, and enter Name and Device/Component/Group Type of the child node in the pop-up, as well as other information. Different types of assets require different attributes.
Select Submit, a child node will be created for the current topology, and a new device/component/group will be created for the current site.

After added successfully, the child node will be displayed under the parent node. Repeat the steps to add more child nodes if required. Topologies exceeding 3 levels will be folded. Click Expand  to expand the next levels of the current node.
Note
The maximum number of levels from top to bottom is 6, and the maximum number of nodes to add for each level is 10,000.
Duplicating from Existing Nodes
Select Site Onboarding in the left navigation bar to go to Build Topology step for the target site.
On the child node to be duplicated, select Duplicate
 .
.
After duplication, a node of the same type will be created directly at the same level of the current topology, named OriginalName_Duplicate_Number. At the same time, a device/component/group will be created for the current site, which is equivalent to creating a device/component/group by duplicating it on Configure Devices step page. For more information, see Duplicating from Existing Device/Component and Duplicating from Existing Group.
Importing Nodes in Batches
Importing nodes can be only used to create new nodes, not to overwrite the existing topologies.
You need the asset IDs to assign the assets and specify their parent assets if required.
The asset IDs of Sites can be found in EnOS Management Console. Contact the system administrator if required.
The asset ID of a Device/Component/Group can be obtained by going to Onboarding Tool > Site Onboarding page, and then going to Configure Devices step page for the target site.
Follow the steps below to import nodes:
Select Site Onboarding in the left navigation bar.
Go to Build Topology step page for the site, find the topology tree for which to import nodes, and select Import Topology
 .
.Select Download here to download a file template, enter the information of the new node and its parent node in the template, and select Import.
Asset ID: the assigned asset ID, used as the unique identifier of the node. Existing asset IDs on the current topology is not supported.
Asset Name: the name of the asset assigned to the new node.
Parent Asset ID: If you need to specify a parent node for the new node, enter the asset ID assigned to the parent node. If left blank, the new node will be a child node of the top node.
Parent Asset Name: the name of the parent node specified for the new node.
Noted the following restrictions:
Only one Excel file can be imported under a topology rule at one time.
The max file size is 10MB, and the max number of nodes in one file is 30,000.
Can not assign nodes under the 6th level of a branch topology and the 7th level of an independent topology.
The max number of nodes in the same level is 10,000. The exceeded nodes can not be imported successfully.
The topology needs to meet the constraints of the current topology rule. For more information, see Topology Rule.
After imported successfully, the assets will be assigned under the parent nodes or the top node.
If import fails, you can select Download Error Log to view the cause of the error. After modifying the file based on the cause of the error, upload it again. If a node in the file fails to be imported, all node imports in the file will fail.