(Optional) Mapping Points
Mapping measurement points means extracting a device’s data information into a pre-defined format in the model for subsequent precision analysis and prediction. After configuring the device connections, you can map the device measurement points under each connection to the predefined EnOS model measurement points.
Note
If EnOS Edge is not required in the current onboarding step, you can skip the Configure Connections and Map Points steps and directly submit the site. For more information, see Submitting Sites.
To map device measurement points, you need to select a point list import method, and then import the corresponding point list for the template. Then, link devices with the point list and configure logical addresses and offsets for device measurement points if necessary. Then, map measurement points by mapping the source measurement points in the point list to the model measurement points. Finally, publish the measurement points and synchronize the measurement points to EnOS Cloud.
Prerequisites
The current account has access to Site Onboarding. Contact the application administrator if necessary.
Ensure that there is no limit to Configure Connections and Map Points step, or you cannot enter the two steps. Contact the application administrator if necessary.
Ensure that the current account role has operation permissions for the measurement point mapping step. If you need to obtain the permission, contact the application administrator. For more information, see Assigning Onboarding Processes.
Ensure that the current site has completed configuration connection. For more information, see Configuring Connections.
Step 1: Importing a Point List
Import measurement points in one of the following two ways:
All-Models Point List: Import the measurement points through an Excel file, and the system will automatically distinguish the types of measurement points and perform measurement point mapping. Applies to SCADA systems, or, in Configure Connections step, devices connected using Tunneling.
Single-Models Point List: Formulate multiple Excel file templates based on the device model, import the Excel file after inputting the measurement points, and perform measurement point mapping. If you need to complete the measurement point mapping of all devices using single-models point lists, you will need to import different types of device point lists multiple times.
All-Models Point List
Note
Before using the all-models point list, ensure that Device Source Number has been entered for all required devices in the device configuration step. In addition, Source Device Number entered in the all-models point list must be consistent, to realize the subsequent automatic linking of devices.
In the navigation bar on the left, select Site Onboarding, and select the site for which the measurement points need to be mapped.
Enter Mapping Points step page, then under All-Models Point List, select Import Point List or
 .
.Download the point list template and enter the data required by the template. For the description of each measurement point attribute in the template, see Point Attributes.
Select Edge device and Connection, meaning the connection created in Configure Connections step.
Select Choose File to upload the point list.
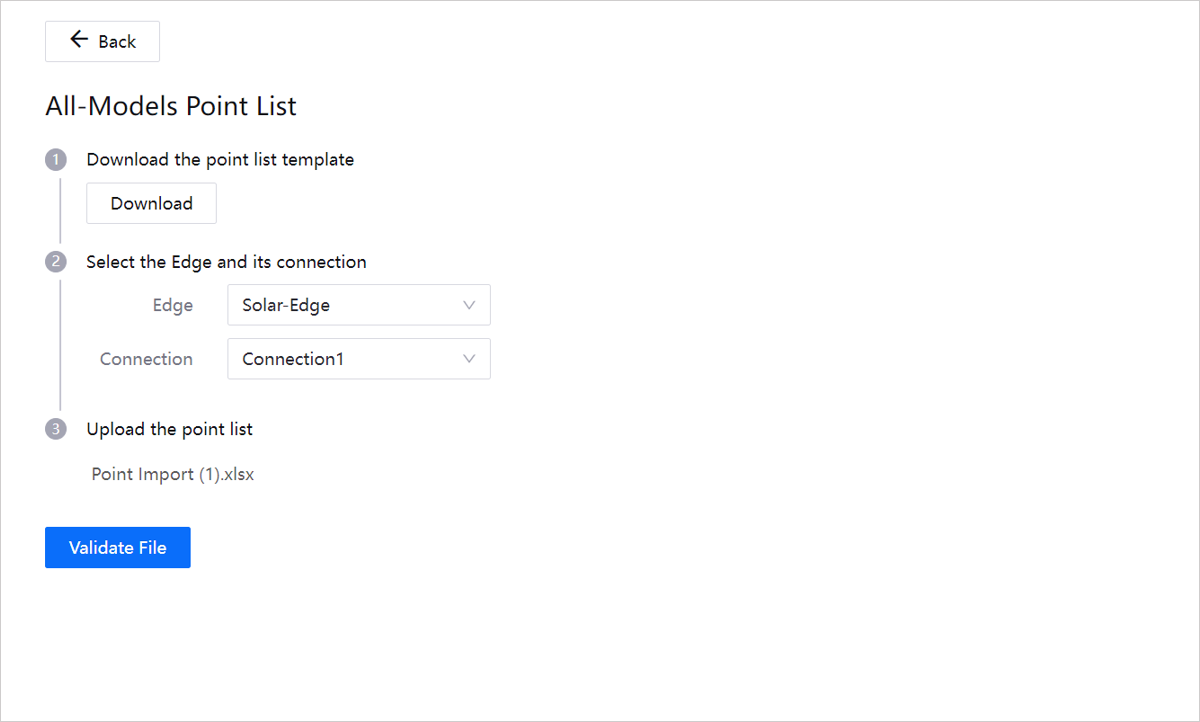
Select Validate File, and the system will verify the relationships between the source measurement points and the mapped measurement points of each device in the point list. If a prompt appears stating that the source measurement points do not exactly match the mapped measurement points, please re-edit the all-models point list and upload the point list file again.
After verification is successful, select Submit to complete the point list import.
The successfully imported point list will appear in the all-models point list column, which is separated by device. Select the corresponding point list row to view the point list information of each device. For the description of each attribute in the point list, see Point Attributes.
At this point, the number of mapped measurement points is 0.
Single-Models Point List
In the navigation bar on the left, select Site Onboarding, and select the site for which the measurement points need to be mapped.
Go to Mapping Points step, under Single-Models Point List, select Import Point List or
.Select + to open the pop-up, then select the following information in the pop-up.
Device Type: The type of device to import. The selection range is determined by the device types that have been assigned to the connection during Configure Connections step.
Model: The device model to import.
Protocol: The protocol used when configuring the connection for this device.
Measurement Point Type: Depending on the different types of input data, this can be divided into the following 5 categories. Multiple selection is supported.
AI (Analogous Input): Analog input, can import any type of data, usually numerical data.
DI (Digital Input): Digital input, usually imports device status data.
PI (Pulse Input): Pulse input, usually imports power calculation data, so that the system can perform aggregated processing when reading data.
AO (Analogous Output): Analog output, can import any type of data, usually numerical data.
DO (Digital Output): Digital output, usually imports integer data representing device status.
Select Download Template, and enter the corresponding information as required by the template. For the description of each measurement point attribute in the template, see Point Attributes.
Select Upload File, and after uploading the file, select OK.
If necessary, continue to use + and repeat the steps above until all device measurement points are successfully imported.
Before submitting, you can Edit and Delete imported point lists. After importing all point lists, select Submit to complete point list import.

The successfully imported point list will appear in the single-models point list column. Select the corresponding point list row to view the point list information. For the description of the attributes of the measurement point, see Point Attributes.
At this point the mapped quantity is 0.
Step 2: Associate Devices
Note
If you import using the all-models point list, the system will automatically link the devices based on the identical device number in the point list. There is no need to manually link devices, and you can skip this step.
For measurement points imported from a single-models point list, the following steps are required to link a device.
Select Site Onboarding in the left navigation bar.
Select the target site to go to Mapping Points step page.
Select the point list to link with the device in Single-Models Point List to go to the point list details page.
Select Associate Device, select the device to link with the point list in the pop-up, and select OK to complete the linking. The list of devices to link is the number of devices of the same model under the same connection.
After linking is successful, the name of the device will appear at the top of the point list details page.
Step 3: (Optional) Configuring Logical Addresses and Offsets
After linking a device, you can configure logical addresses and offsets for the device’s measurement points as required. In general mode, the logical address is the address of the device, which is used to find and locate the device. The offset is used for the system to identify the starting position and range of each measurement point in the source point list and collect data at the corresponding position.
The methods to configure logical addresses and offsets vary according to different protocols. Offsets are not supported under some protocols.
If you import a all-models point list, the system will automatically generate the offsets with a default starting value is 0. If required, you can customize the starting value by following the steps below.
If you import a single-models point list, you can either generate the offsets of all devices at once and manually modify the results, or manually configure the offsets of each device.
Select Site Onboarding in the left navigation bar.
Select the site for which to update the point list, and then go to the site’s Mapping Points step.
Under All-Models Point List or Single-Models Point List, select Configure
 to go to Configure Logical Addresses and Offsets page.
Select Auto Offset, and then select Edge, Connection, and Start Value in the pop-up. You can choose 0 or 1 for Start Value, which, respectively, means counting from the 0th or 1st data.
For example, 100 AI measurement points and 100 DI measurement points from
Device 1, and 100 DI measurement points and 100 DO measurement points fromDevice 2are imported through the point list. When the starting value is set as 0, the AI point offset ofDevice 1is 0-99 and the DI point offset is 0-99. The DI point offset ofDevice 2is 100-199, and the DO point offset ofDevice 2is 0-99. When the starting value is set as 1, the AI point offset ofDevice 1is 1-100 and the DI point offset is 1-100. The DI point offset ofDevice 2is 101-200, and the DO point offset ofDevice 2is 1-100. If the measurement points fromDevice 2are in front ofDevice 1in the DI point list, you can edit the start values and end values of the offsets based on the actual position.If you select OK, the system starts to calculate the offset and automatically enters it into the list on Configure Logical Addresses and Offsets page.
- Select Edit
 , then select Edit Offset to manually edit Start Value and End Value of each device offset.
 For discontinuous measurement points, you can manually set the discontinuous offsets. The format is
Offset1#Offset2. For example,1-100#1001-1050indicates that the measurement points of the device are located at 1-100 and 1001-1050, a total of 150 measurement points.
- Select Edit
Select Edit
, then select Edit Logical Address to edit the logical address of each device.
Once complete, the offset and logical address will be listed in the list on Configure Logical Addresses and Offsets page.
Step 4: Mapping Points
There are 3 ways to map measurement points: automatic mapping, manual mapping, and formula mapping.
Select Site Onboarding in the left navigation bar.
Select the site for which to update the point list, and then go to the site’s Mapping Points step.
Under All-Models Point List or Single-Models Point List, select the point list to be updated to enter the point list details page.
Select the way you would like to perform measurement point mapping.
Auto Mapping: Select Auto Mapping to automatically map the source measurement points to the model measurement points. Successfully mapped items will appear on Mapped tab.
Manual Mapping: On Unmapped tab, select Mapping Points for the measurement point to enter the Mapping Points page. Based on the source measurement point, select a model measurement point, select Save, and complete the mapping. Items that are successfully mapped will appear on Mapped tab.
Formula Mapping: Configure the calculation relationship between multiple source measurement points and model measurement points.
Select Formula to go to the new formula page.
Select New Formula, select a Formula in the pop-up, select the corresponding number of source measurement points according to the formula requirements, and select model measurement points.
After pressing OK, the selected source measurement points will be mapped to the model measurement points according to the set formula.
Step 5: Publishing Points
After point mapping is complete, on Mapping Points step page, select Publish. Once published successfully, the configured mapping data will be synchronized to EnOS Cloud.
Managing Point Lists
You can edit measurement points, edit mapping formulas, remove mappings, update data in point lists, and export or delete point lists on the Mapping Points step page.
Editing Points
Select Site Onboarding in the left navigation bar.
Select the site for which to update the point list, and then go to the site’s Mapping Points step.
Under All-Models Point List or Single-Models Point List, select the point list to be updated to enter the point list details page.
Select Mapped tab page, then select the model measurement point name corresponding to the measurement point to go to the Edit Mapping page. Reselect a model measurement point and select Save to finish editing the mapping.
Editing Mapping Formulas
Select Site Onboarding in the left navigation bar.
Select the site for which to update the point list, and then go to the site’s Mapping Points step.
Under All-Models Point List or Single-Models Point List, select the point list to be updated to enter the point list details page.
Select Mapped tab, then select View for the measurement point formula to go to the formula details page. Select Edit
for the corresponding formula, re-edit the formula based on the steps above, and select Save to finish editing the formula.
Removing Mappings
Select Site Onboarding in the left navigation bar.
Select the site for which to update the point list, and then go to the site’s Mapping Points step.
Under All-Models Point List or Single-Models Point List, select the point list to be updated to enter the point list details page.
Select Mapped tab, select Remove for the measurement point, and remove the mapping. Source survey points that are removed from the map will appear in Unmapped tab, where you can remap the measurement points.
Updating Point Lists
Select Site Onboarding in the left navigation bar.
Select the site for which to update the point list, and then go to the site’s Mapping Points step.
Under All-Models Point List or Single-Models Point List, select the point list to be updated to enter the point list details page.
Select Batch Update, and then as shown in the pop-up window, select Export File to export the previously imported point list content.
After editing, select Upload File to complete point list update.
Exporting Point Lists
Select Site Onboarding in the left navigation bar.
Select the site for which to update the point list, and then go to the site’s Mapping Points step.
Under All-Models Point List or Single-Models Point List, select
 .
.Check the corresponding connection in the pop-up, then select Export to complete point list export.
Deleting Point Lists
Select Site Onboarding in the left navigation bar.
Select the site for which to update the point list, and then go to the site’s Mapping Points step.
Under All-Models Point List or Single-Models Point List, select
 .
.Check the corresponding connection in the pop-up and select Delete to complete the point list deletion.