Create a cascading edge
The edge cascading configuration feature provided by the EnOS Management Console allows users to create cascading relationships for tow edge devices.
Edge cascading currently supports two modes:
Direct connection mode (i.e., smooth network between parent and child edge devices)
Net-gap mode (i.e., there is a network isolation device between the parent and child edge devices)
Note
The create and management processes for the two modes are basically the same, requiring only a different protocol to be selected. Choose EdgeCascading when the network between edges is smooth, or else choose CrossNetGapCascading when there is network-isolated device between edges
Description
This article describes how to create a new edge cascading through cascading management function.
Get ready before you start
Edge administrative action authority is needed. if you don’t have it, need to contact the organization administrator to add the authority for you. For user rights within EnOS, see Policies, Roles, and Permissions。
Complete the creation of Edge models, products, and devices. See Device Management. The model name of the Edge model must be EnOS_Edge_Standard_Model,and the product name of the Edge product must be EnOS_Edge_Standard_Product.
Create a new cascading connection
Select Edge Management > Access Management > Cascading, click Add Connection.

Follow the interface prompts to fill in the fields.

Select the “Parent Edge Access Connection” tab, fill out the form, and create an access to the child edge connection for the current edge.
Field
Description
The child Edge name
Select an edge as the child edge
The name of the connection
The default automatically generates a connection name based on the selected child-edge and parent edge names. And the name can be defined by users.
Mode
TCP/IP server mode (default)
The child Edge address (primary)
The IP address and port number exposed by the child-edge. In the net-gap mode, the IP address is the external IP of the Zone 3 net gap.
The child Edge address (standby)
The IP address and port number exposed by the child-edge. In the net-gap mode, the IP address is the external IP of the Zone 3 net gap.
Protocol Type
Select a cascading protocol type. Select EdgeCascading when the network between edges is smooth, and CrossNetGapCascading when there are network isolated devices between edges.
Protocol
Select the cascading protocol. It is recommended to use the latest version.
Configuration profile
The specific configuration profile corresponding to the protocols, which does not need to be modified by default. And the name can be defined by advanced users.
Select the “Child Edge Forwarding Connections” tab, fill out the form, and create a connection for the child-edge to forward to the parent edge.
Field
Description
The parent Edge name
The name of the parent Edge which the child edge based on
The name of the connection
The default automatically generates a connection name based on the selected child-edge and parent edge names. And the name can be defined by users.
Mode
TCP/IP server mode (default)
The parent Edge address (primary)
TThe IP address and port number exposed by the child-edge. In the net-gap mode, the IP address is the external IP of the Zone 1 net gap.
The parent Edge address (standby)
The IP address and port number exposed by the child-edge. In the net-gap mode, the IP address is the external IP of the Zone 1 net gap.
Protocol Type
Select a cascading protocol type. Select EdgeCascading when the network between edges is smooth, and CrossNetGapCascading when there are network isolated devices between edges.
Protocol
Select the cascading protocol. It is recommended to use the latest version.
Configuration profile
The specific configuration profile corresponding to the protocols, which does not need to be modified by default. And the name can be defined by advanced users.
Click the “Confirm” button to create a cascading connection between the current and child-edges.
A cascading access connection will be created under the current edge’s access connection. Users can view connection details, and for advanced users, you can edit connections to modify connection parameters.
A cascading forwarding connection will be created under the forwarding connection of the child-edge. User can view the connection details, and for advanced users, you can edit connections to modify connection parameters.
Expand the cascading connection to see the cascaded edge device, and the user can switch between the current and child edges by click View button.
Configure cascading forwarding points
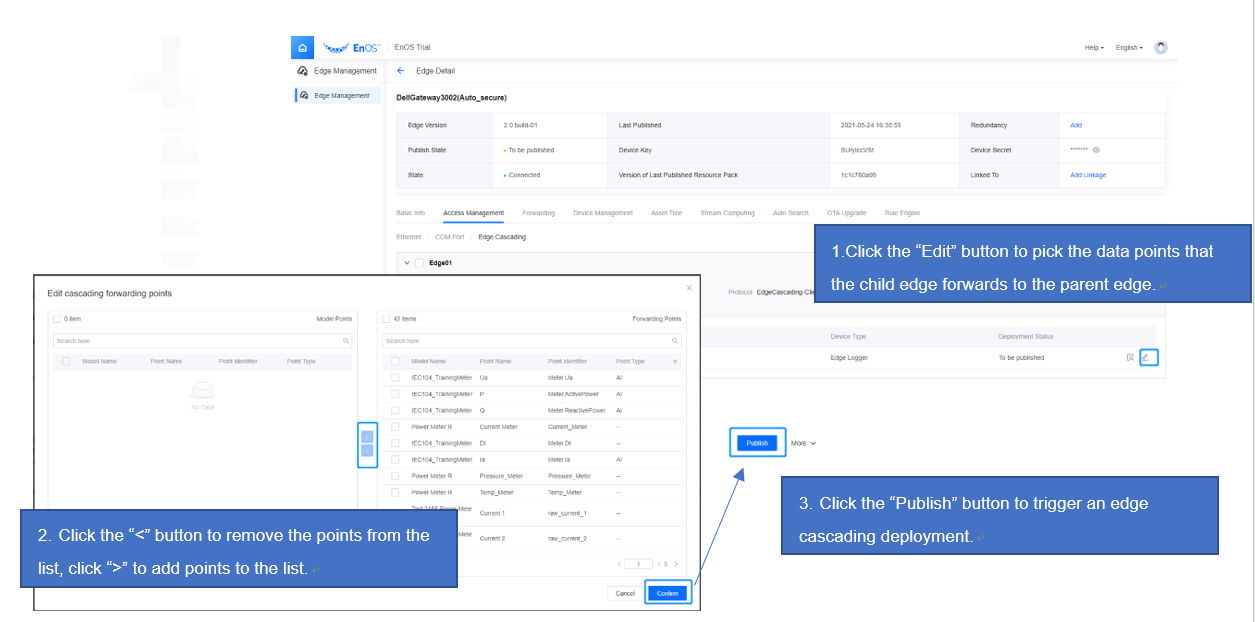
When the cascading connection is created, by default, all the points of the child edge will be uploaded to the parent edge. Users can click the Edit button of the child edge devices under cascade connection to pick the data points that the child-edge forwards to the parent edge.
Click the “Edit” button to pick the data points that the child edge forwards to the parent edge.
Click the “<” button to remove the points from the list, click “>” to add points to the list
Click the “Publish” button to trigger an edge cascading deployment.
Note
Publishing takes a few minutes, and the automatic publish of the child edge will be triggered when the parent edge is published.
Results
After a successful publish, users can see the two edges with cascading relationships on the Edge Managed Edge list page, as shown in the following illustration.

The next step
Users can manage new edge cascades, see Manage edge cascades.