Getting Started: Processing Multi-Point Data
This guide will help you learn how to process multiple measurement points data with the Multi-Point Merging template.
Prerequisites
You are able to access the Stream Data Processing module
The device is connected and is sending data to the cloud.
Procedure
Design and create a multiple point data processing job.
Save and release the data processing job.
Start the data processing job.
Monitor the running status and results of the data processing job.
Goal and Data Preparation
Goal
The goal of this guide is to get the sum of the ingested raw data points testA_raw and testB_raw, and output the sum to point testC.
Data Preparation
Model configuration: The model used in this guide (testModel) is configured as follows.
Feature Type |
Name |
Identifier |
Point Type |
Data Type |
|---|---|---|---|---|
Measurement Point |
testA_raw |
testA_raw |
AI |
double |
Measurement Point |
testB_raw |
testB_raw |
AI |
double |
Measurement Point |
testC |
testC |
AI |
double |
Storage configuration: Configure the data storage policy for the 3 points (as either AI raw data or AI normalized data). For more information, see Configuring TSDB Storage.
Data ingestion: For information about data ingestion of input points testA_raw and testB_raw, see Device Connection.
Step 1. Create a Multi-Point Data Processing Job
Log in to the EnOS Management Console and click Stream Data Processing > Stream Development to view all the data processing jobs created within the organization. You can double-click a job to view and edit its configuration.
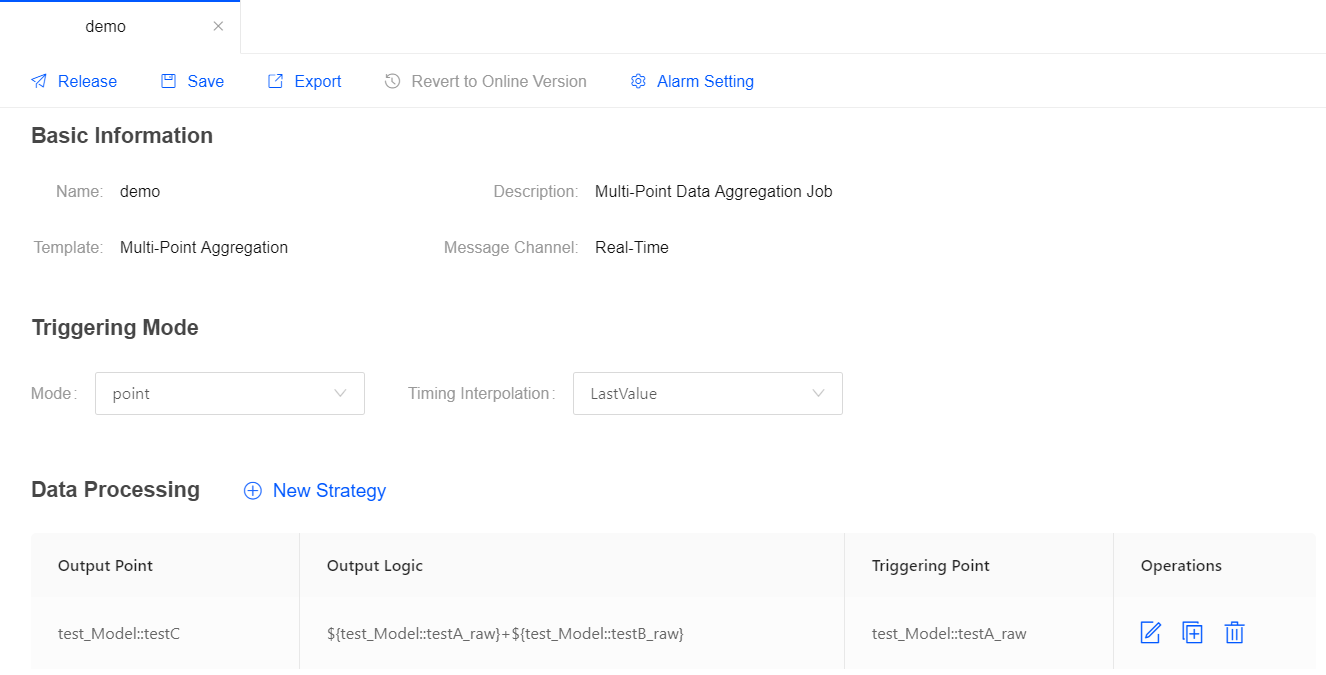
Click the + icon above the job list to create a job. Enter the name and description of the job and select Multi-Point Merging as the template. Alternatively, you can also choose to import the configuration file of an existing job to create a new job. For more details, see Creating a Stream Processing Job.
Triggering Mode: Select point as the triggering mode, and select LastValue as the timing interpolation.
Data Processing: Click New Strategy to add a data processing strategy.
Output Point: Select the testC point to receive the output value of the data processing expression.
Triggering Point: Select either testA_raw or testB_raw as the triggering point. If the data of testA_raw arrives later than that of testB_raw, select testA_raw as the triggering point. The system will trigger the output logic when the data of testA_raw arrives.
Output Logic: For this guide, enter the data processing expression below. Click Check Syntax to verify the expression.
${testModel::testA_raw}+${testModel::testB_raw}
Step 2. Save and Publish the Job
When the job configuration is completed, you can save and publish the multi-point data processing job online.
Step 3. Start the Job
On the Stream Operation page, find the published job in the table, and click the Start icon ![]() for the job in the Operations column to start running the data processing job.
for the job in the Operations column to start running the data processing job.
Step 4. View the Running Results of the Job
On the Stream Operation page, find the running job in the table, and click the job name to open the Stream Details page. You can view the following information about the job.
Summary: View the summary of the running job, such as the overall data processing records and the data aggregation records for a specific period.
Log: Click the View Logs icon on the upper right corner to check the running log of the job.
Results: Call the Get Asset Raw Data by Time Range API to get the data of point testC. For more information about data service APIs, go to EnOS Management Console > EnOS API.