Associating with Tags
Associating tags with objects facilitates better data classification and definition, aids data management, and helps users quickly and easily find the data they need in the future.
Data Catalog service allows single or batch marking of data objects.
Single Object Tag Association
- Use the Data Asset Explorer function to find the data object for which to associate tags. For retrieving data objects, see Exploring Data Asset.
- In the search result list, click View
 or the specific object ID to enter the object details page.
 - At the top of the object details page, click Associate Tags to make the Associate Tags window pop up.
- Select a tag group in the tag drop-down.
- Expand the tag group, then select the tags to associate (multiple terms in different glossaries can be selected).
- Expand the selected tag to view its attribute information. If the tag has attributes, fill in the tag attribute value in the
Valuecolumn. - Click Confirm to complete tag association.
Note
At the top of the object details page, click the small cross ![]() behind the associated tag, then click OK to disassociate the tag.
behind the associated tag, then click OK to disassociate the tag.
Tag Association for Multiple Objects
Manual Batch Association
Use the Data Asset Explorer function to find the data object for which to associate tags. For retrieving data objects, see Exploring Data Asset.
In the search result list, tick the data objects that need to be associated with tags (multiple selections are allowed).
Note
Tick the header of the first row to select the entire page of data.
Click Associate Tag/Term > Associate Tags to make the Associate Tags window pop up.
Select a tag group in the tag drop-down.
Expand the tag group, then select the tags to associate (multiple tags in different tag groups can be selected).
Expand the selected tag to view its attribute information. If the tag has attributes, fill in the tag attribute value in the
Valuecolumn.Click OK to complete tag association.
Automatic Batch Association
The Data Catalog allows users to automatically associate tags for data in batches by creating and configuring tag rules, which makes tag association faster and more efficient.
Creating Tag Rules
In the left navigation bar of the Data Catalog, click Tag Management to go to the Tag Management function homepage.
Click the Tag Rule tab at the top to go to the Tag Rule function homepage.
Click New Rule.
On the Create Rule page, enter the basic information:
Name: enter the tag rule name, which must be unique in the current OU
Description: enter a description of the tag rule, no more than 200 characters
Object Type: select a metadata or master data type
Note
The metadata type Metric does not support associated tags and terms. The metadata type Business Term does not support associated terms.
Click Save to save the basic information.
Click Add a rule.
Set Attribute Filter, Tag filter, or Term filter to narrow the scope of the selected data type. For more on filter setting, see Filtering Mechanism.
Configuring tags to be automatically associated:
- Click Select Tag to make the Associate Tags window pop up.
- Select a tag group in the tag drop-down.
- Expand the tag group, then select the tags to associate (multiple tags in different tag groups can be selected).
- Click OK to finish tag selection.
- Expand the selected tag to view its attribute information. If the tag has attributes, fill in the tag attribute value in the
Valuecolumn.
Configuring terms to be automatically associated:
- Click Select Term.
- Select a glossary in the Associate Terms drop-down.
- Expand the glossary and select the terms to associate (multiple selections are allowed).
- Click OK to finish tag selection.
Click Save to save the rule configuration.
Click OK to finish tag rule creation.
After the tag rule is created, the new tag rule will appear on the Tag Rules function homepage.
Note
You need to manually start the tag rule before it is applied to the data object. For how to start tag rules, see Managing Tag Rule Status.
Configuring Tag Rules
When creating a tag rule, the Data Catalog service is set by default to open running configuration for tag rule, and alerts are turned off by default. Users can change the running configuration and alert configuration as needed.
Running Configuration
For running configuration, you can configure the execution type and resource usage of tag rules.
In the tag rule task list on the Tag Rules function homepage, click the ellipsis icon
 at the end of the tag rule row to Start running configuration.
Click Configure Resource to enter the tag rule’s running configuration page.
- Type: tick a tag rule type
- Interval: when Type is ticked as
Scheduled Executionan execution cycle needs to be selected - Resource: enter the resource utilization value (cannot exceed the remaining resource size stated in the text), the unit is
CU.
Note
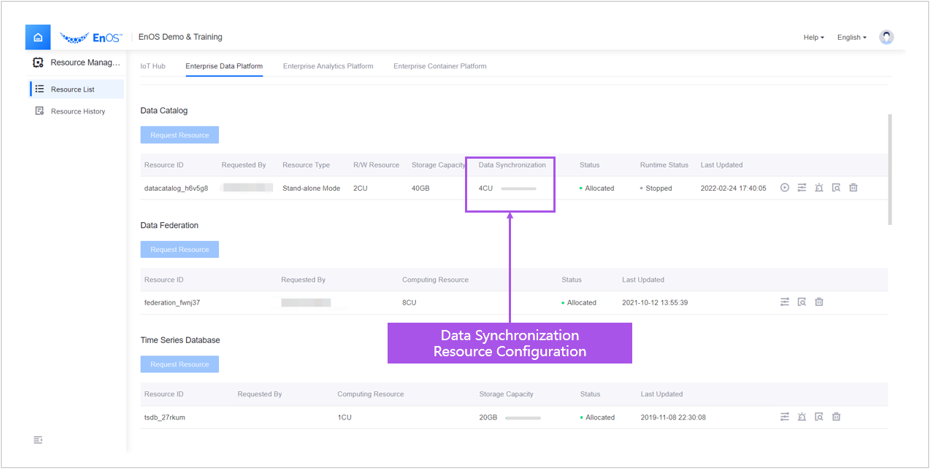
The total running resources for all running tag rules and sync tasks cannot exceed the total amount of resources configured for Data Sync. Under the Data Catalog service, the resources configured for Data Sync can be viewed in the Resource Management service, as shown in the following figure:
For more on resource configuration of tag rules, see Synchronization Tasks Running Configuration.
For more on data catalog resources, see Data Catalog Resource Specification.
Click OK to complete running configuration.
Alarm Configuration
Alarm configuration allows you to monitor the running status of the tag rule. If an abnormality occurs during a tag rule, the relevant users will be notified by email and SMS.
- In the data sync task list on the Tag Rules function homepage, click the ellipsis icon at the end of the tag rule row to enter alert configuration.
- Click Alert Configuration to go to the tag rule’s alert configuration page.
- Set Alarm: click the switch icon
 to set it to enabled
  .
. - Alarm Mode:
Mailis ticked by default and cannot be changed, but can be modified by tickingSMS. - Receiver: select the alert receiver (more than one can be selected). Click the small cross
 next to the selected receiver’s name or click the receiver’s name again in the receiver drop-down option to untick the receiver.
 - Status Alarm: select the sync task status for which you need alerts (more than one can be selected). Click the small cross next to the selected task status or click the task status again in the task status drop-down options to untick the task status.
- Message Push:
- To APP: Select a push application, which can be configured under Message Push Management > Quota. For more information on quota management, see Quota Management.
- Email Template: click on the name of the email template to go to the corresponding template
- SMS Template: click on the name of the SMS template to go to the corresponding template
- Set Alarm: click the switch icon
- Click OK to complete alert configuration.
Tag Rule Management
For the tag rules tasks in the tag rule task list, users can manage their running status, as well as view, edit, and delete them.
Managing Tag Rule Status
- Starting a Tag Rule: In the tag rule list on the Tag Rules function homepage, click Start
 at the end of the tag rule line to start applying the rule.
 - Stopping Tag Rule: In the tag rule list on the Tag Rules function homepage, click Stop
 at the end of the tag rule line to stop applying the rule.
Viewing Tag Rules
In the tag rule list on the Tag Rules function homepage, you can view details about the tag rule name, object type, rule type, execution type, and running status.
Click the name of a specific tag rule to view its basic information and rule configuration.
Editing Tag Rules
In the tag rule list on the Tag Rules function homepage, click Edit
 of the tag rule you want to edit to go to its editing page.
Note
When you are in View Tag Rules, under Basic Information and Rule Configuration headers, click Edit
to edit tag rules.In the tag rule editing page, Rule Name and Object Type cannot be edited, but the rule description and rule configuration can be edited and modified.
Under the Basic Information and Rule Configuration headers, click Save.
Click OK to complete tag rule editing.
Deleting Tag Rules
Note
Only tag rules with a running status of Not Started and Stopped can be deleted.
- In the tag rule task list on the Tag Rules function homepage, click the ellipsis icon at the end of the tag rule row to delete it.
- Click Delete to delete the sync task.