Managing Solution Templates
The solution template enables easy and flexible creation of EnOS Industry Application Common Building Blocks menu to form reusable application templates. Based on the application template, you can complete application creation, purchase, and configuration with one click, improving the efficiency of application configuration.
Solution Template includes the following types of templates:
Application Template, the template used to create applications based on Industry Application Common Building Blocks.
Global Data Template: the template used to import global data to other environments.
Prerequisites
Ensure that the application category
Common Application Common Building Blocksin EnOS Management Console and EnOS Application Portal of your environment has been configured. Contact the system administrator if necessary.Ensure that the
Application Registration AdministratorandAdministratorpolicy for the current OU have been configured in EnOS Management Console of Configuration Center. For more information, see Policies, Roles, and Permissions.Ensure that Configuration Center has granted the following accesses in EnOS Application Portal:
To access the IDs, usernames, emails, and phone numbers of all users in this OU
To access the IDs and names of all assets in this OU
To access the IDs and names of all roles in this OU
To edit all the roles in this OU
To edit all the menu groups in this OU
For more information, see Authorizing API Permissions.
Managing Application Templates
Application Templates can be used to create applications based on Industry Application Common Building Blocks.
Creating Application Templates
Step 1: Creating a New Template
Select Solution Template from the left navigation pane.
On the All Industries tab, or the tab of the desired template type, select + Add Template > New Template.
In the Basic Information step, enter the basic information of the template:
Template Name: the name of the template.
Template Type: the type of the template. Select Application Template here.
Industry Category: the industry that the template is applicable to.
Description: the supplementary description of the template.
After entering the basic information, select Next to go to the Configure Function step.
Step 2: Configuring Function
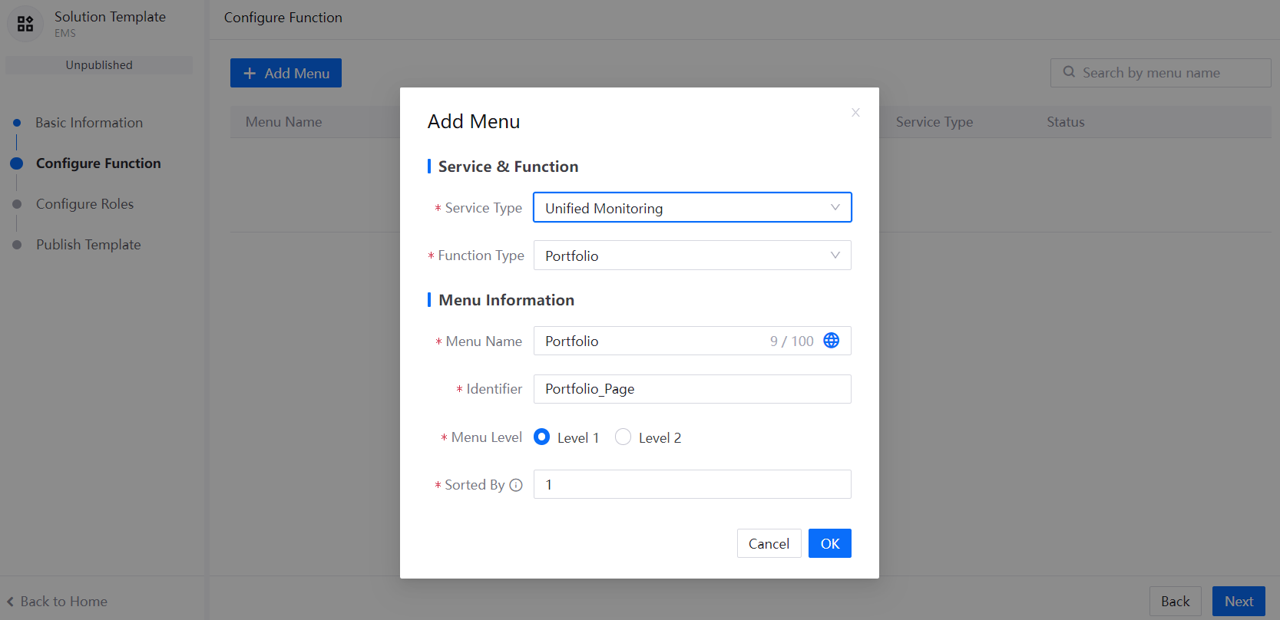
In the Configuring Functions section, select + Add Menu.
In the pop-up window, select menus that you want to add to the template from the Selectable List. The items in the Selectable List are the menus provided by pre-registered EnOS Industry Application Common Building Blocks.
(Optional) If you want to configure a two-layer menu structure, select Add Level 1 Menu, and enter the following information:
Menu Name: customize the name of the level-1 menu.
Identifier:customize the menu identifier.
Sorted By: sequence number of the menu in the current level. For menus of the same level, those with a smaller number will be arranged at the top. Only integrals between 1 and 9999 can be entered.
(Optional) If you want to edit the details of an added menu, hover over the edit icon
 of the menu, select Edit Menu and configure the following information in the pop-up window then select OK.
Menu Name: customize the name of the function menu.
Identifier: customize the menu identifier.
Menu Level: define a level for the menu. Only two levels are supported. Level 2 must be under Level 1.
Sort By: sequence number of the menu in the current level. For menus of the same level, those with a smaller number will be arranged at the top. Only integrals between 1 and 9999 can be entered.
(Optional) If you add menus provided by Digital Twin Visualization or Unified Monitoring, configure the menus by the following steps:
Digital Twin Visualization
Select Configure
> Select Template to select a page template. After selection, the configuration status of the menu will be updated to Completed.If necessary, select Configure
> Configure Template to open the configuration page. For more information about how to configure, seeLearning About Digital Twin Dashboard.After the configuration, select Save in the upper right corner.
Unified Monitoring
Select Configure
> Configure Template to open the configuration page.After the configuration, select Publish in the upper right corner. The configuration status of the menu will be updated to Completed.
Various pages of the Unified Monitoring can be exported and imported, enabling quick reuse of existing pages in different environment/OU. For more information about how to configure, see:
After function configuration, select Next in the lower right corner to go to the configuring roles step.
Note
Before generating the application, ensure that the configuration status of all functions are “completed” or “not required”; otherwise, you may not be able to publish the template or generate the application.
Step 3: Configuring Metadata
In the Configure Metadata section, select the required type of metadata on the metadata list.
Select + Add, select the metadata you want to add to the template.
Select OK.
Repeat the steps above to add other required metadata to the template.
Note
When building an application with an application template, the data in the template will be assigned to the current OU. If the data do not exist in the current environment, contact the system administrator.
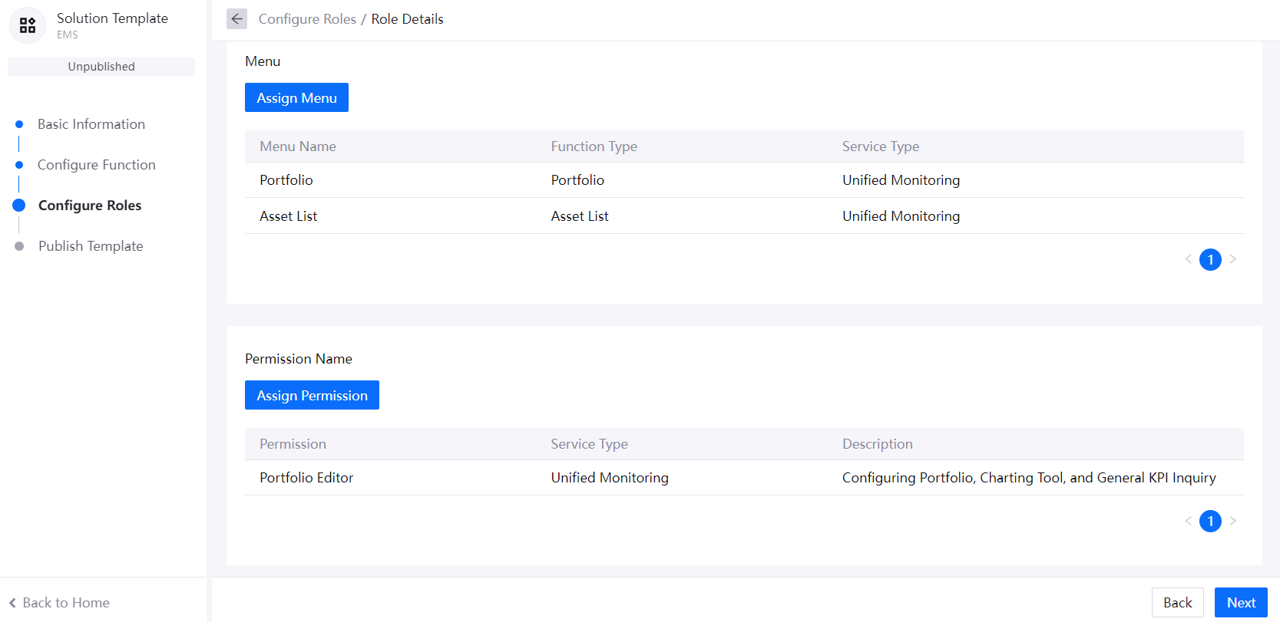
Step 4: Configuring Roles
In the Configure Roles section, select New Role.
Enter role name and description in the popup window, and selectOK.
In the role list, select the edit
 button corresponding to the role to open the configuring roles page.
Select Assign Menu to assign the menu configured in step 2 to the role. Once assigned, the role will have access to the selected menu.
Select Assign Permission Point to assign permission point to the role. Once assigned, the role will have access to all operations corresponding to the permission point.
After role configuration, select Next in the lower right corner to go to the publishing step.
Step 5: Publishing the Template
In the Publish Template section, select Publish Template and select Publish in the pop-up window.
Building Applications
Select Solution Template from the left navigation pane. On the corresponding industry type tab, select a published application template.
Select Application Information to access the Application Information tab, and select Build App.
Customize the application name in the pop-up window, and select Build.
After an application is built, you need to perform the following tasks to ensure users can access to application menus and functions:
In Application Portal, assign the roles you added to the template to users. For more information, see Assigning Roles to a User.
In Application Portal, assign the menus you added to the template to users’ roles. For more information, see Assigning Menu Groups.
Updating Applications
For a template that has generated the application, after editing the template, the template content must be updated to the application.
Select Solution Template from the left navigation pane. On the corresponding industry type tab, find the desired template and select it to open the editing page.
Select Publish on the left to open the Publish step page.
Select Update App.
Managing Global Data Templates
Global Data Template can be used to import global data to other environments.
Creating Global Data Templates
Step 1: Creating a New Template
Select Solution Template from the left navigation pane.
On the All Industries tab, or the tab of the desired template type, select + Add Template > New Template.
In the Basic Information step, enter the basic information of the template:
Template Name: the name of the template.
Template Type: the type of the template. Select Global Data Template here.
Industry Category: the industry that the template is applicable to.
Description: the supplementary description of the template.
After entering the basic information, select Next to go to the Configure Metadata step.
Step 2: Configuring Metadata
In the Configure Metadata section, select the required type of metadata on the metadata list.
Select + Add, select the metadata you want to add to the template.
Select OK.
Repeat the steps above to add other required metadata to the template.
Note
When building an application with an application template, the data in the template will be assigned to the current OU. If the data do not exist in the current environment, contact the system administrator.
Step 3: Publishing the Template
In the Publish Template section, select Publish Template and select Publish in the pop-up window.
Importing Data
After publishing a global data template, you need to import the data of the added metadata from your OU to the template by the following steps:
Select Solution Template from the left navigation pane. On the corresponding industry type tab, select a published global data template.
Select Operation Information to access the Operation Information tab, and select Import Data.
Updating Data
For a template to which you have imported data, after editing the template, you need to update the data in the template by the following steps:
Select Solution Template from the left navigation pane. On the corresponding industry type tab, select a published global data template.
Select Operation Information to access the Operation Information tab, and select Update Data.
Editing Templates
Select Solution Template from the left navigation pane. On the corresponding industry type tab, find the template to be edited and select it to open the editing page.
Note
A published template is locked and must be unlocked in the template list before editing. Hover over the template card, and select … > Unlock Template in the upper right corner of the card. Once unlocked, the template can be re-edited.
Editing Basic Information
You can edit all basic information except the identifier in the Basic Information step. After editing, select Next to save the modifications.
Editing Functions
Note
You can only edit the functions of an application template.
In the Configuring Functions step page, you can perform the following operations:
Add a new menu: select Add Menu, and add a new menu by referring to the Configuring Functions step.
Edit existing menu: select the Configure
> Edit Menu button corresponding to the existing menu to edit the menu Name, Level and Sort By.Change menu template: you can change the selected template in the Digital Twin Visualization > Metrics Page. Select the Configure
> Select Template button corresponding to the existing menu, and then select a new menu template. After the configuration, you can reconfigure the menu template.Reconfigure menu template: select the Configure
> Configure Template button corresponding to the existing menu, and configure the template by referring to the Configuring Functions step. After the configuration, select Save/Publish in the upper right corner.Delete a menu: select Delete
 corresponding to the existing menu to delete the menu.
Editing Metadata
On the Configuring Metadata step page, you can perform the following operations:
Add a new metadata: Select + Add and select the metadata you want to add to the template from the metadata list.
Delete a metadata: select Delete
corresponding to the existing metadata to delete the metadata.
Editing Roles
Note
You can only edit the roles of an application template.
On the Configuring Roles step page, you can perform the following operations:
Add a new role: select New Role to create a new role by referring to the Configuring Roles step.
Edit basic information of the role: select the Edit
button corresponding to the existing role to open the role details page. Select Edit Role in the upper right corner to edit role name and description.Edit menu and permission point of the role: select the Edit
button corresponding to the existing role to open the role details page. Select Assign Menu and Assign Permission Point respectively. After rechecking in the popup window, select OK.Delete role: select Delete
corresponding to the existing role to delete the role. After a role is deleted, the permission point assigned to the role will be removed simultaneously.
Note
For a published template, you need to select Update Template in the Publish step page for the modifications to take effect. The updated template will be relocked at the same time.
Exporting and Importing Templates
Exporting Templates
A published template can be exported.
Select Solution Template from the left navigation pane, and find the desired template on the corresponding industry type tab.
Hover over the template card, and select … > Export Package in the upper right corner of the card.
Download the ZIP file.
Importing Templates
By importing a file, you can create a new template or import to update an existing template.
Importing a New Template
Select Solution Template from the left navigation pane, and select Add Template > Import Template.
Upload the local ZIP file.
After the template is imported successfully, it will appear on the All Industries tab as well as the corresponding industry type tab.
Note
After a new template is imported to the new environment/OU, you can only import to update the template. Editing the template on the page is not currently supported.
Importing to Update an Existing Template
Select Solution Template from the left navigation pane, and find the desired template on the corresponding industry type tab.
Hover over the template card, and select … > Import to Update in the upper right corner of the card.
Upload the local ZIP file.
Note
When importing to update a template, you must:
Ensure that the imported file has the same template identifier as the existing template on the page, and the existing menu has the same menu type, function type, and menu identifier as the existing template on the page.
At the same time you update the ZIP file, update the template version, i.e. the
versionparameter value in thetemplatefile; otherwise, the import may fail because the file has not been updated.