Managing Onboarding Templates
Templates are the basis for initializing each OU. Data required by the OU is selected from the global business data, such as asset types, modelling rules, topology rules, asset elements, and Excel models, and assigned to the onboarding template. The template is then bound to the OU so that the business data in the template can be used within the OU.
Before configuring the onboarding template, note the following:
Once a template is created, it cannot be deleted.
A template can be bound to multiple OUs, but an OU can only be bound to one template. Once bound, the binding cannot be changed.
Prerequisites
Ensure that the required Object Types have been created in the Global Business Objects menu, and that the required device and component types have been assigned to the desired station type. For more information, see Configure Global Business Objects.
Ensure that the required Topology Rules and Modelling Rules have been created in the Global Business Rules menu. For more information, see Configure Business Rules.
Ensure that the required Public Elements have been created in the Global Asset Elements menu. For more information, see Manage Global Asset Elements.
Ensure that the required public Excel Models have been created in the Tools > Excel Model menu. For more information, see Manage Global Excel Models.
Configuring Onboarding Templates
Follow these steps to configure the onboarding template. After completing any step, you can choose Finish at the bottom of the page to allow other users to continue editing the template.
Step 1: Creating a Template
In the left navigation pane, select Template.
Choose New Template and enter the basic information for the template.
Template Name: The unique identifier of the template, which cannot be duplicated.
Category: The category of the template. If you need to customize it, go to Global Business Objects > Dimensions and edit the records of the
TemplateCategorydimension identifier.Description: A description of the template.
After completing the basic information, select Next. The template is successfully created, and you can move on to the next step of asset access.
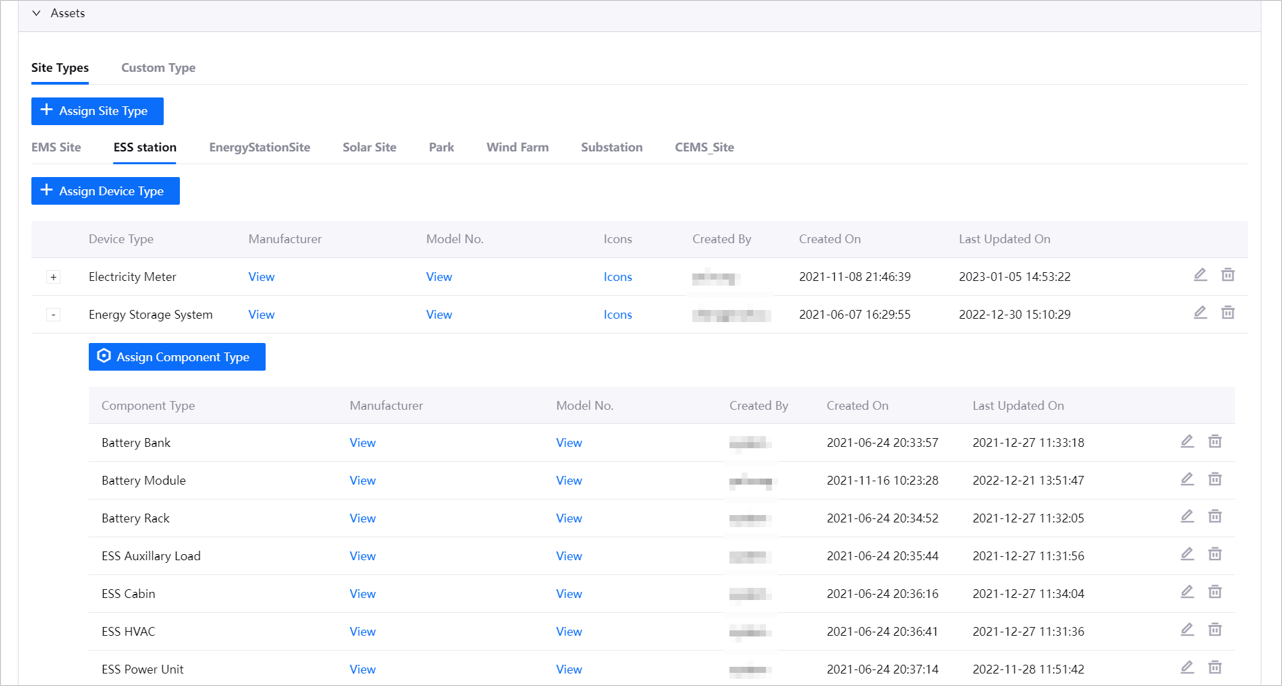
Step 2: Assigning Business Objects
After Business Objects are assigned to the onboarding template, the OU can access assets of this type, and process and display asset data based on the model associated with this business object.
In the Asset Onboarding step, expand the Asset section.
Select Assign Station Type and choose the desired station type, then select Save. Multiple selections are supported.
Under the corresponding station tab, select Assign Device Type. After selecting the Device System, select the Device Type, Manufacturer, and Model, then select Save. After the assignment, only devices/components of this type can be accessed and displayed within the current OU under this station type.
(Optional) Select the
 button for the corresponding device type, then select Assign Component Type. Select the Component Type, Manufacturer, and Model according to the device type, then select Save. The component type will then be assigned to the corresponding device type.
(Optional) Under the Custom Type tab, select Add Custom Type. In the pop-up, select the Custom Type, and make multiple selections if necessary.
(Optional) To assign a custom type to a specific station type, continue to select “Station Type,” and then select “Save.” The range of station types that can be selected is determined by the station types assigned on the “Station Type” tab. Once assigned, assets of this custom type will only be available for creation within that station type. Otherwise, the custom type asset can be created outside of the station.
Step 3: Assigning Topology Rules
After assigning the topology rules to the onboarding template, independent or branched trees can be constructed within the OU based on the assigned topology rules. For more information on independent and branched trees, see Topology Trees.
In the Asset Onboarding step, expand the Topology Rules section.
Select + Assign Topology Rules and choose the topology rules in the pop-up window.
If the topology rule does not support creating an independent asset tree, or supports creating an independent asset tree and is used for site access, the site type needs to be specified. After selection, the topology rule will only support topology construction within that type of site.
If the topology rule does not support specifying the site type, topology can be constructed within the current OU range.
After selecting Save, other topology rules can be assigned.
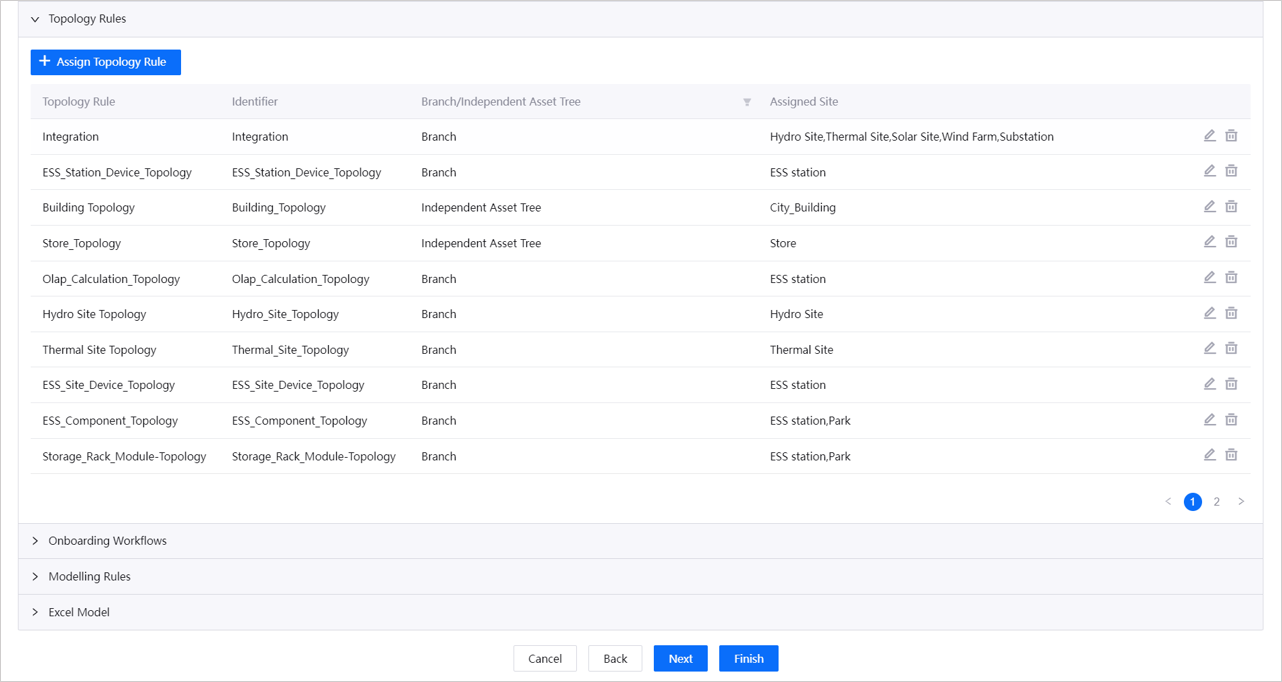
Note
After assigning the topology rules in the template, select the topology rule at the OU level to add it to the current OU. After adding it, the topology rule can be used within the OU. For more information, see Adding Topology Rules.
Step 4: (Optional) Assigning Modelling Rules
After assigning the modelling rules to the onboarding template, private models can be associated with the business objects added in Step 2: Assigning Business Objects within the OU, and private models can be used to access assets in Onboarding Tool. If not assigned, public models associated with global business objects will be used to access assets.
In the Asset Onboarding step, expand the Modelling Rules section.
Select + Assign Modelling Rules, and select the desired modelling rules in the pop-up window.
After selecting the desired modelling rules, select Save.
Step 5: (Optional) Assigning Excel Models
After assigning the Excel Models created in the global layer to the onboarding template, only assigned public Excel models can be viewed within the OU, and private Excel Models can be created based on the public Excel models to be used as file templates for accessing assets in Onboarding Tool. If not assigned, file templates can be selected from all Excel Models in Onboarding Tool.
In the Asset Onboarding step, expand the Excel Models section.
Select + Assign Excel Models, and select the desired Excel models in the pop-up window. The type of the asset tracking template is jointly determined by the Import Mode and Site Type, and only one asset tracking template can be selected per type. It is recommended to add Excel models based on the site types added in Step 2: Assigning Business Objects, otherwise the added Excel models will not work.
After selecting the desired Excel models, select Save.
Step 6: (Optional) Assigning Asset Elements
After allocating the global asset elements to the onboarding template, the public elements that have been allocated can be viewed within the OU Asset Elements menu. Otherwise, all elements created at the global level can be viewed within the OU.
Select Next to proceed to the Asset Elements step.
Select + Add Element and choose Station Type, Device Type, and Custom Type in the pop-up. The selection will affect the range of elements that can be selected in the next step. The available range is determined by the objects added in Step 2: Assign Business Objects.
Select Next to display the elements associated with the previously selected business objects in a list. Check the required elements and select Add.
After adding, the selected elements will appear in the element list. Select Finish below the list to complete the template configuration.
After creating the template, refer to Binding Onboarding Template to bind the template to the OU and complete the OU initialization. After binding the template, the objects, topology rules, modelling rules, capitalization table, and asset elements in the template can be viewed or used within the OU.
Editing Onboarding Templates
All created onboarding templates can be edited.
Select Templates from the left navigation pane.
Find the template to be edited, and click to enter its details page.
Click the Edit
 button for the corresponding step to enter edit mode.
Business Objects:
Station Type: Select + Assign Station Type to add or remove other types. Before removal, make sure that no device, components, or custom types are assigned under this station type.
Device Type: Select + Assign Device Type to add or remove types in the pop-up window. Select the Edit
button corresponding to the device type to edit the manufacturer model range of the existing device type.Component Type: Select the expand
button to expand the device type, select Assign Component Type to add or remove types in the pop-up window. Select the Edit button corresponding to the component type to edit the manufacturer model range of the existing component type.
Topology Rules:
Select + Assign Topology Rules to add other topology rules.
Select Edit
for the existing rule to edit the Assigned Station Type of the rule. Topology rules that support independent topology trees do not support editing.Select Delete
 for the existing rule to remove it from the template. After removal, the topology under this rule will not be deleted.
Note
After assigning topology rules in the template, you need to select the topology rule at the OU level to add it to the current OU. After addition, the topology rule can be used in the OU. For more information, see Add Topology Rules.
Modelling Rules:
Select + Assign Modelling Rules to add other modelling rules.
Select Delete
for the existing rule to remove it from the template. After removal, the business objects and assets that were previously associated with the private model are not affected.
Acquisition Table:
Select + Assign Acquisition Tables to add other acquisition tables.
Select Delete
for the existing acquisition table to remove it from the template.
Asset Elements:
Select + Add Elements to add other asset elements corresponding to existing asset types.
Select Delete
for the existing element, or select Batch Delete after selecting, to remove it from the template.
Select Complete. After the template is updated, the OU bound to the template will update its data.