Setting up EnOS Common Data Service
This page describes how to set up EnOS Common Data Service for the first time.
Prerequisites
Common Data Service needs to be obtained, authorized, and enabled in the current OU and the target asset tree needs to be tagged with
EnosCDS:true.Common Data Service needs to be authorized to perform the following operations through APIs in the current OU:
Obtain the ID, username, email, and phone number of all users in the OU.
Obtain all user permissions in the OU.
For more information about how to assign API permissions, see Authorizing API Permissions.
You need to be assigned the required asset permission and operation permission, and a menu group containing all menus of Common Data Service. If not assigned, contact the application administrator.
Workflow
The workflow to set up Common Data Service is as below.
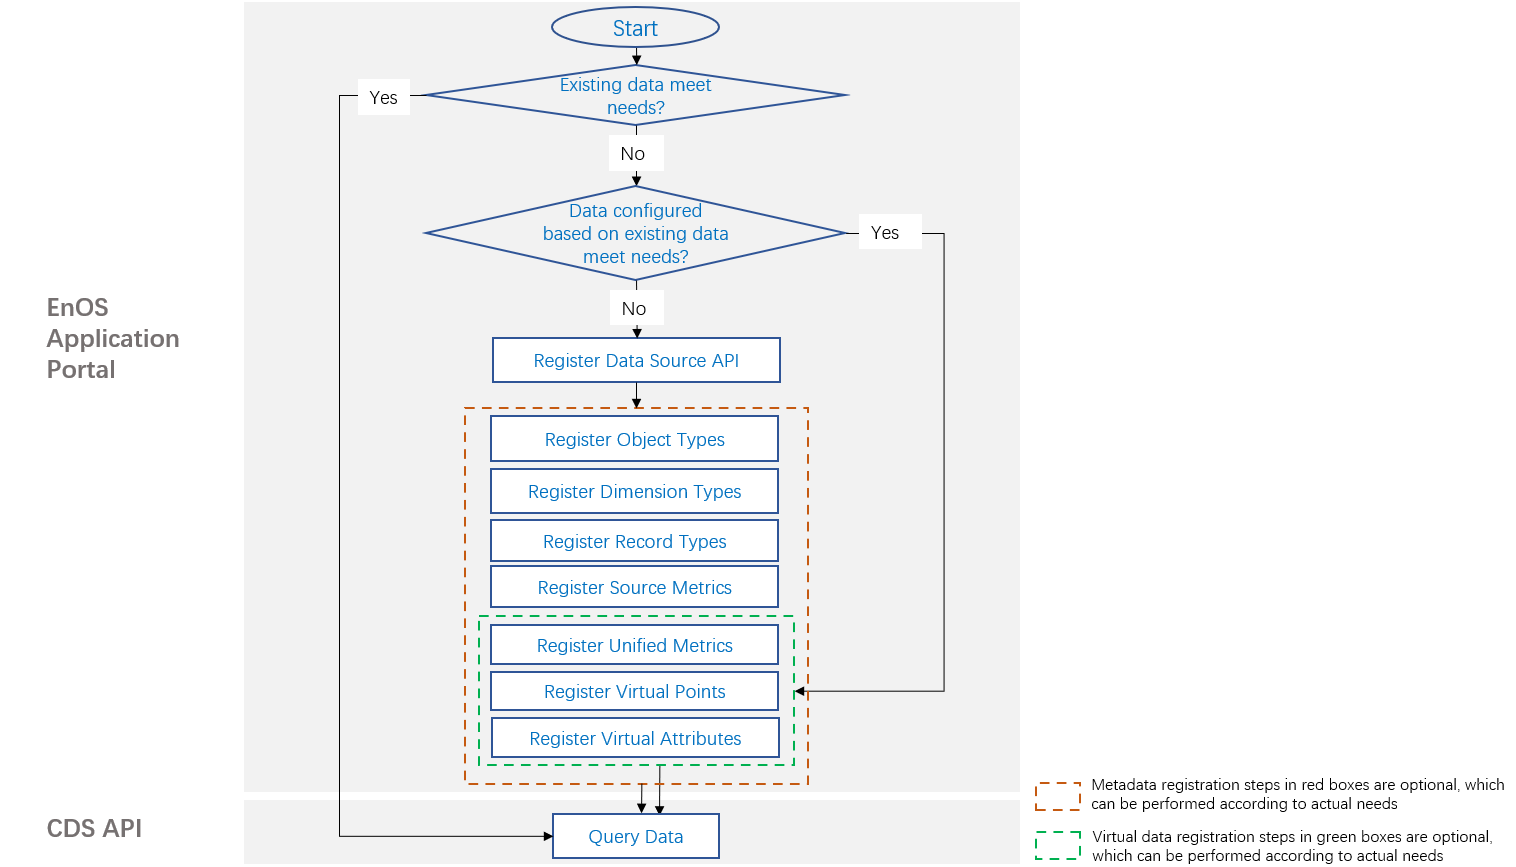
Decide if the existing datasets can meet your needs:
If so, get the data through Common Data Service APIs.
If not, go to the next step. This page assumes that the existing datasets cannot meet the needs.
Decide if configuring virtual data based on the existing data can meet your needs:
If so, configure virtual data and get the data through Common Data Service APIs.
If not, go to the next step. This page assumes that configuring virtual data based on the existing data cannot meet the needs.
Prepare the required data sets and standardize the data source API according to specifications, and then register the data source API in Common Data Service.
After the data source is registered, register the meta data in Common Data Service to declare the data content that the data source can provide.
After the meta data is registered, query data using Common Data Service APIs to verify data configurations.
Step 1: Registering Data Source API
Performed By |
Performed In |
|---|---|
Application Creator |
EnOS Application Portal |
Log in to EnOS Application Portal and select Common Data Service from the application list.
Select Data Sources from the left navigation pane.
Select the Public or Private tab according to the effective scope of the target data source and click New.
Fill in the basic information and configuration details of the data source as required on the opened page and click Submit.
For more information, see Registering a Data Source.
Step 2: Registering Meta Data
Performed By |
Performed In |
|---|---|
Application Creator |
EnOS Application Portal |
Common Data Services can be used to register multiple types of data, including record types, dimension types, object types, source metrics, unified metrics, virtual measurement points, and virtual attributes. The steps to register different types of meta data are described below, and you can register on demand based on the data types that the data source can provide.
Registering Object Types
Select Meta Data > Object Types from the left navigation pane.
Select the Public or Private tab according to the effective scope of the target object types, and click Import.
Click Download in the pop-up window and choose to download an Excel and a JSON template file.
Fill in the template file with the object type details to be registered.
Click Upload in the pop-up window. Select the filled template file and click OK.
For more information, see Registering an Object Type.
Registering Dimension Types
Select Meta Data > Dimension Types from the left navigation pane.
Select the Public or Private tab according to the effective scope of the target dimension types, and click Import.
Click Download in the pop-up window and choose to download an Excel and a JSON template file.
Fill in the template file with the dimension type details to be registered.
Click Upload in the pop-up window. Select the filled template file and click OK.
For more information, see Registering a Dimension Type.
Registering Record Types
Select Meta Data > Record Types from the left navigation pane.
Select the Public or Private tab according to the effective scope of the target record types, and click Import.
Click Download in the pop-up window and choose to download an Excel and a JSON template file.
Fill in the template file with the record type details to be registered.
Click Upload in the pop-up window. Select the filled template file and click OK.
For more information, see Registering a Record Type.
Registering Source Metrics
Select Meta Data > Source Metrics from the left navigation pane.
Select the Public or Private tab according to the effective scope of the target source metrics, and click Import.
Click Download in the pop-up window and choose to download an Excel and a JSON template file.
Fill in the template file with the metric details to be registered.
Click Upload in the pop-up window. Select the filled template file and click OK.
For more information, see Registering a Source Metric.
Registering Unified Metrics
Select Meta Data > Unified Metrics from the left navigation pane.
Select the Public or Private tab according to the effective scope of the target unified metrics, and click Import.
Click Download in the pop-up window and choose to download an Excel and a JSON template file.
Fill in the template file with the metric details to be registered.
Click Upload in the pop-up window. Select the filled template file and click OK.
For more information, see Registering a Unified Metric.
Registering Virtual Measurement Points
Select Meta Data > Virtual Points from the left navigation pane.
Select the Public or Private tab according to the effective scope of the target points, and click Import.
Click Download in the pop-up window and choose to download an Excel and a JSON template file.
Fill in the template file with the point details to be registered.
Click Upload in the pop-up window. Select the filled template file and click OK.
For more information, see Registering a Virtual Measurement Point.
Registering Virtual Attributes
Select Meta Data > Virtual Attributes from the left navigation pane.
Select the Public or Private tab according to the effective scope of the target attributes, and click Import.
Click Download in the pop-up window and choose to download an Excel and a JSON template file.
Fill in the template file with the attribute details to be registered.
Click Upload in the pop-up window. Select the filled template file and click OK.
For more information, see Registering a Virtual Attribute.
Step 3: Verifying Configuration Results
Performed By |
Performed In |
|---|---|
Application Creator |
Common Data Service API |
After all configuration tasks are completed, you can query various types of data through Common Data Service APIs, including asset data, real-time and historical data of measurement points and metrics, and third-party records. For how to query data using Common Data Service API, see Common Data Service API.