Managing Products


For products, you can perform operations such as viewing and editing products, viewing device logs, exporting and importing products in batch, and debugging devices.

Prerequisite


  • Ensure that you have the corresponding permissions for Product service. If you do not have the access, contact your OU administrator.
  • Ensure that you have read the limitations for products. See Limitations.

Viewing Product Information


Before you start, ensure that your account has been authorized the policy that includes the following service(s) and action permission(s). If not, contact your OU administrator.


Operation Required Service Required Operation Permission
Viewing the product details Product Read (default)
Viewing the product’ model Model Read (default)
Viewing the product secret Product Create or Update
Viewing the devices under the product Device Management Service Read (default)


On the Product Details page, you can view the information of the product.

  1. In EnOS Management Console, select Device Management > Products.
  2. In the list of products, click View btn_view to open the Product Details page of the target product.
  3. The page displays the details of the product:
    • Model: The model of the product. Click View btn_view to view the model details.
    • Product key and Product secret: The key-pair of credentials uniquely identifies the product.
    • Devices: Click Manage btn_config to view the devices under the product.

Editing Product Information and Tags


Before you start, ensure that your account has been authorized the policy that includes the following service(s) and action permission(s). If not, contact your OU administrator.


Required Service Required Operation Permission
Product Update


On the Product Details page, you can edit the information and the tags of the product.

  1. In EnOS Management Console, select Device Management > Products.
  2. In the list of products, click View btn_view to open the Product Details page of the target product.
  3. Select Basic Information tab and click btn_edit to edit the following:
    • Basin Information: you can edit Product Name, Description, and Certificate-Based Authentication.
    • Tags: click New Tag in the pop-up, enter the Key:Value, and click OK.

Viewing Logs


On the Product Details page, you can view the logs of important behaviors of all the devices under the product.

  1. In EnOS Management Console, select Device Management > Products.
  2. In the list of products, click View btn_view to open the Product Details page of the target product and click the Logs tab.
  3. Click Click Here to go to the “Logs” page. For more information about viewing logs, see Viewing Logs.

Exporting Products


This function enables you to export products across different models to an Excel file.

  1. In EnOS Management Console, select Device Management > Products, and click Batch Export.
  2. You can either export all of the products listed by clicking Export All, or export specific products by selecting the products you wish to export and click Export Selected.
  3. Save the Excel file to your local directory.

Importing Products


Before you start, ensure that your account has been authorized the policy that includes the following service(s) and action permission(s). If not, contact your OU administrator.


Required Service Required Operation Permission
Product Create


This function enables you to batch create new products or batch update existing products across different models using an Excel file. Batch importing of existing products will update the existing information. If there are no existing products, new products will be created.

  1. In EnOS Management Console, select Device Management > Products.

  2. Click the Import button.

  3. Upload an Excel file. For file size limitations, refer to the pop-up window.


    If you require a template, click Download Blank Template to download a blank template in Excel format. Fill in the template once it’s downloaded and upload the file.
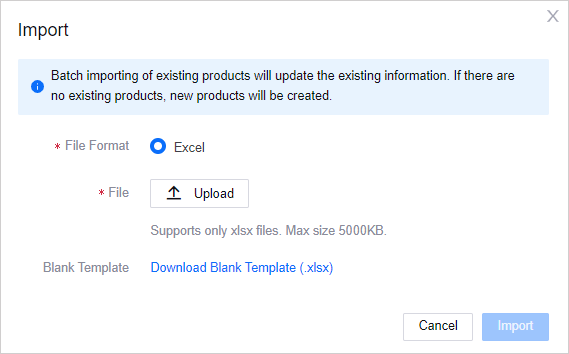

Excel Template Parameters
Name Mandatory/Optional Description
Product Key

Depends on creating new or updating products.

See description for more information.

The product key.

  • For creating new products, leave this blank. The system will generate a product key when the product is successfully created.
  • For updating products, the Product Key must match the product’s product key that you are updating. If it cannot be found, it will be an invalid record.
Product Name (Default) Mandatory The name of the product, unique within the same OU. 1 - 64 characters. Does not support <>;@*%&\ characters.
Product Name (Internationalization) Optional The internationalization name of the product, e.g. English(en_US) and Simplified Chinese(zh_CN). If not given, the default product name will be used. 1 - 64 characters.
Product Description Optional The description of the product. Max 512 characters.
Asset Type Mandatory if creating new product, and optional when updating product The asset type of the product. Available values are Device (there are no sub-devices that needs to be connected) and Gateway (needs to connect to sub-devices).
Onboarding Method Mandatory if creating new product, and optional when updating product The method by which devices onboard to EnOS. Available values are Json (via EnOS standard JSON data) and Custom (via custom data format or via third-party device protocols that can be converted to EnOS standard protocol using protocol gateways).
Model ID Mandatory if creating new product, and optional when updating product The ID of the model that the product will be under.
Protocol Gateway

Depends on Onboarding Method.

See description for more information.

  • Leave blank if Json is given for Onboarding Method. The default protocol gateway used in EnOS will be automatically assigned.
  • Leave blank if Custom is given for Onboarding Method and the method is via custom data.
  • Enter the protocol gateway ID if Custom is given for Onboarding Method and the method is via third-party device protocol. The ID can be found at EnOS Management Console > Device Onboarding > Protocol Gateways.
Certificate-Based Authentication Mandatory
  • true: Enables the certificate-based bi-directional authentication method for this product.
  • false: Disables certificate-based bi-directional authentication method for this product.
Default Validity Period Mandatory if Certificate-Based Authentication is true When the device/gateway applies for a certificate but does not specify the validity period, this parameter will be used as the certificate validity period. This value must be less than Max Validity Period. Range: 1 - 3650
Max Validity Period Mandatory if Certificate-Based Authentication is true The maximum certificate validity period of a device/gateway when a device/gateway under this product applies for a certificate. If the validity period is exceeded, an error will be reported and the certificate application will fail. Range: 1 - 3650


Note

Do not leave blank rows between the rows as the file may fail to import.


../../_images/product_batch_import_upload.png


4. Click Import.

5. If invalid records exist, a pop-up window will show an error message and a Download Error File link. Click to download the file, check the cause of the error, rectify it, and upload the file again.

6. Once the products are successfully imported, the new products will appear in the list of products in Device Management > Products.

Debugging Online Devices


Before you start, ensure that your account has been authorized the policy that includes the following service(s) and action permission(s). If not, contact your OU administrator.


Required Service Required Operation Permission
Product Update


On the Product Details page, you can debug devices under the product, simulate a real device to connect to the cloud, report defined attributes, and handle events. Based on the data of the simulated device, the cloud can complete application development and debugging. Once the real device is online, the virtual device will automatically go offline.

  1. In EnOS Management Console, select Device Management > Products.
  2. In the list of products, click btn_view to open the Product Details page of the target product. and click the Debugging tab.
  3. Click Click Here to go to the “Online Debugging” page. For more information about debugging, see Online Debugging.