Creating a Device Collection (Product)
This secion shows how to create a device collection, a.k.a. product. Any device that connects to the EnOS Cloud must have an identity on the platform to perform data interaction with the cloud normally. The device can be registered in the cloud in dynamic mode or static mode. Both of these modes require the device to have the productKey issued by the cloud.
Before You Start
To create a product, you must have write access to the Asset Management service. If you do not have the access, contact your OU administrator. For more information about user access in EnOS, see Policies, Roles, and Permissions.
Ensure that the model corresponding to this product has been created. For information on how to create a model, see Creating a Model.
Step 1: Creating a Product
In the EnOS Management Console, select Device Management > Products.
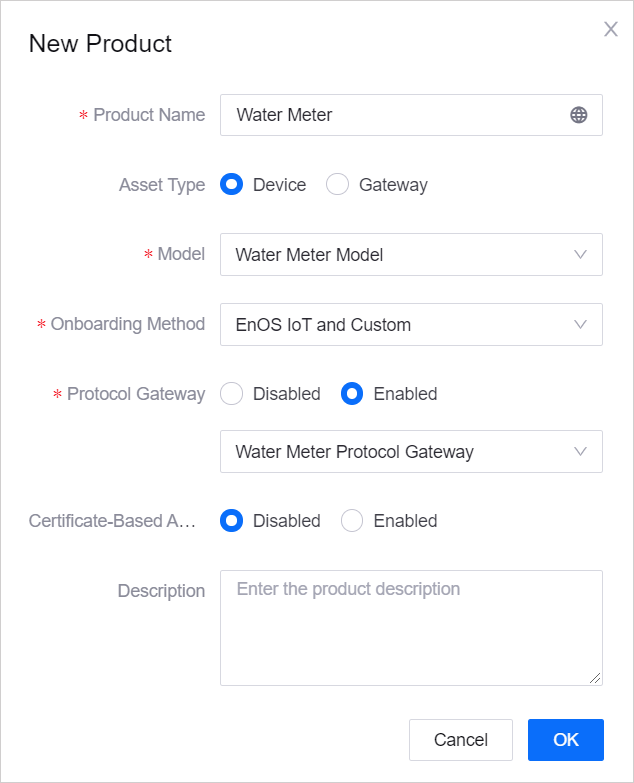
Click the New Product button and complete the following on the New Product pop-up window.
Product Name: The name of the product, unique within the same organization. Supports Chinese characters, uppercase alphabets (A-Z), lowercase alphabets (a-z), numbers (0-9) and underline.
Asset Type: Defines the asset type of the product.
Device: There are no sub-devices that needs to be connected.
Gateway: Needs to connect to sub-devices.
Model: The model used by the product.
Onboarding Method: The method by which devices onboard to EnOS.
Only EnOS IoT: Via the EnOS standard JSON data.
EnOS IoT and Custom: Via custom data format such as binary data that can be parsed in EnOS using data parsing scripts to encode/decode upstream/downstream data, or via third-party device protocols that can be converted to the EnOS standard protocol using protocol gateways.
Protocol Gateway
If Only EnOS IoT is chosen for Onboarding Method: EnOS IoT protocol gateway, the default protocol gateway used in EnOS, will be automatically assigned.
If EnOS IoT and Custom is chosen for Onboarding Method, select an option as per the below.
Disabled: You need to create a custom data parsing script in the product to encode and decode the uplink and downlink data. For more information, see Parsing Custom Format Data.
Enabled: Select a protocol gateway from the drop-down list. The protocol gateways in the list are the protocol gateways from Private Gateways in Device Onboarding > Protocol Gateways, which can be created from scratch or based on a template in Public Gateways. If the protocol gateway has not been created, select None (to be created) first. You can update the it later when you have created the protocol gateway. For more information, see Protocol Gateways.
Certificate-based Authentication: Choose whether to enable the Certificate-based bi-directional authentication method for this product. If enabled, data will be encrypted and decrypted through the CA certificate for a more secure communication between the device and the cloud
Description: The description of the product.
Click OK to create the product.

Step 2: (Optional) Adding a Tag
A tag describes the common information shared by products of the same type.
From the list of created products, find the target product and click
 .
.Under the Basic Information tab, click Edit in the Tags section.
On the pop-up window, click New tag, and enter the key-value pair (key:value) for the new tag.
Click OK to save the tag.
Results
When the product is created, you will get a pair of credentials: the product key (productKey) and product secret (productSecret). This pair of credentials uniquely identifies the product and is the key to the device registration and product information modification for this product. The product secret credentials will be used for activating the device. For more information, see Device and Cloud Security.
Follow-up Operations
If you select Custom for the Data Type field, you will need to upload the data parsing script. For more information, see Creating Data Parsing Script.