Managing Global Business Objects
Global business objects contain global business data that can be used in multiple OUs and industry applications within the same environment. The following can be configured at the global level:
Site type: The site types that can be created in the current environment, such as a photovoltaic site, which may include multiple devices, components, and custom types.
Device type: Types further divided under the device system, such as inverters, which need to be associated with a site type.
Component type: Component types on devices, such as battery packs, which need to be created based on the device type.
Custom type: Other object types besides site, device, and component types that can be assigned to sites or outside of them.
Manufacturer: The manufacturer of the device and component, which can further create different model Nos.. Model Nos need to be associated with a device type and can be used as a division dimension for devices and components.
Dimension: Define the semantic dimension of the data. Different business semantics can be assigned to data by defining dimensions. For example, the
DeviceCategorydimension defines measurement instruments, power generation device, metering device, communication device, and other records used to divide different types of device systems.Alarm metadata: Configure alarm level groups and alarm type groups to create different level alarm rules.
Based on the relationship between each type, it is recommended to first configure dimensions, then configure device and component types, followed by site types and custom types, and finally manufacturers and models.
Configuring Dimensions
The dimension list contains multiple types of pre-configured dimensions, which have been used in various functions. For example, the DeviceCategory dimension defines the device system and will determine the device system that can be selected when configuring device types. If an existing dimension needs to be edited, consult a domain expert for the corresponding identifier. If a custom dimension is needed for use in an application or function, consult a domain expert to create it.
In the left navigation pane, select Global Business Objects > Dimensions.
Find the required dimension in the list, or select Create New Dimension to create a new dimension in the pop-up window. Note: Once created, dimensions cannot be deleted.
Hover over the … on the dimension card and select Configure Fields to configure the required fields for the dimension record.
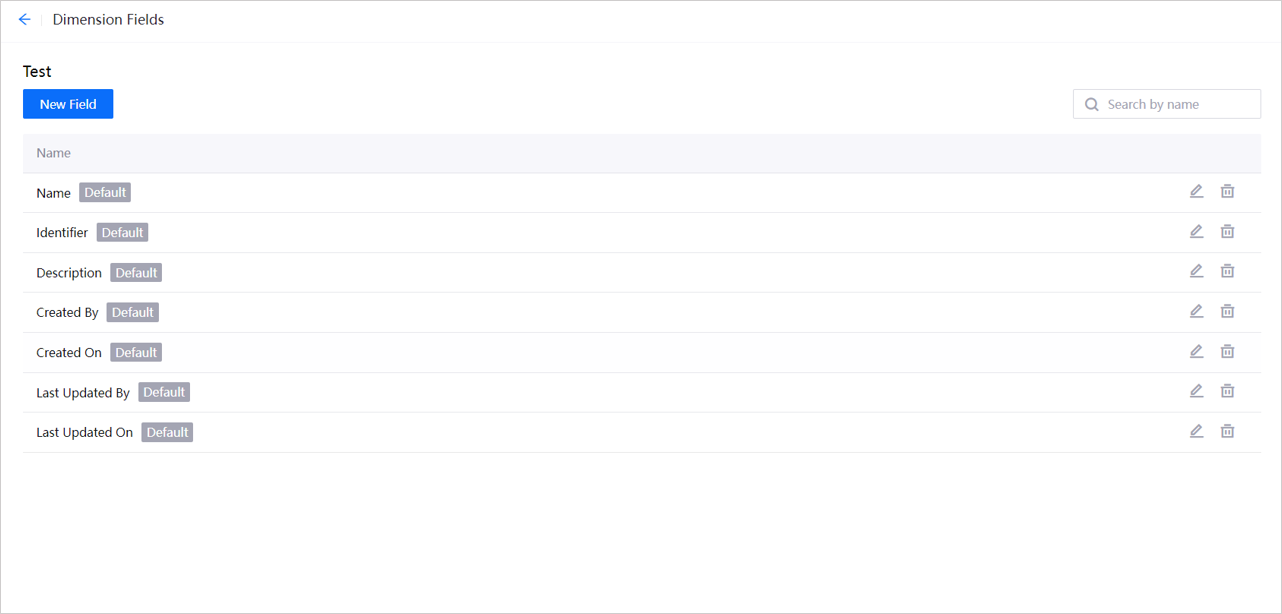
Select Configure Fields to enter the field list. The list displays default fields provided by the system that cannot be edited or deleted. If necessary, select Create New Field to create other fields.
Return to the dimension card list. Hover over the … on the dimension card and select Configure Record. The table headers of the dimension record list are the fields created in the previous step.
Select Create New Record. In the pop-up window, enter the name, identifier, and custom fields of the record, and then select Confirm.```
Configuring Site/Device/Component/Custom Types
Step 1: Creating Device Types
In the left navigation pane, select Global Business Object > Device Types, and choose New Device Type.
In the pop-up window, enter a name and identifier, and select a Device System. The optional range is defined by the records in the
DeviceCategorydimension.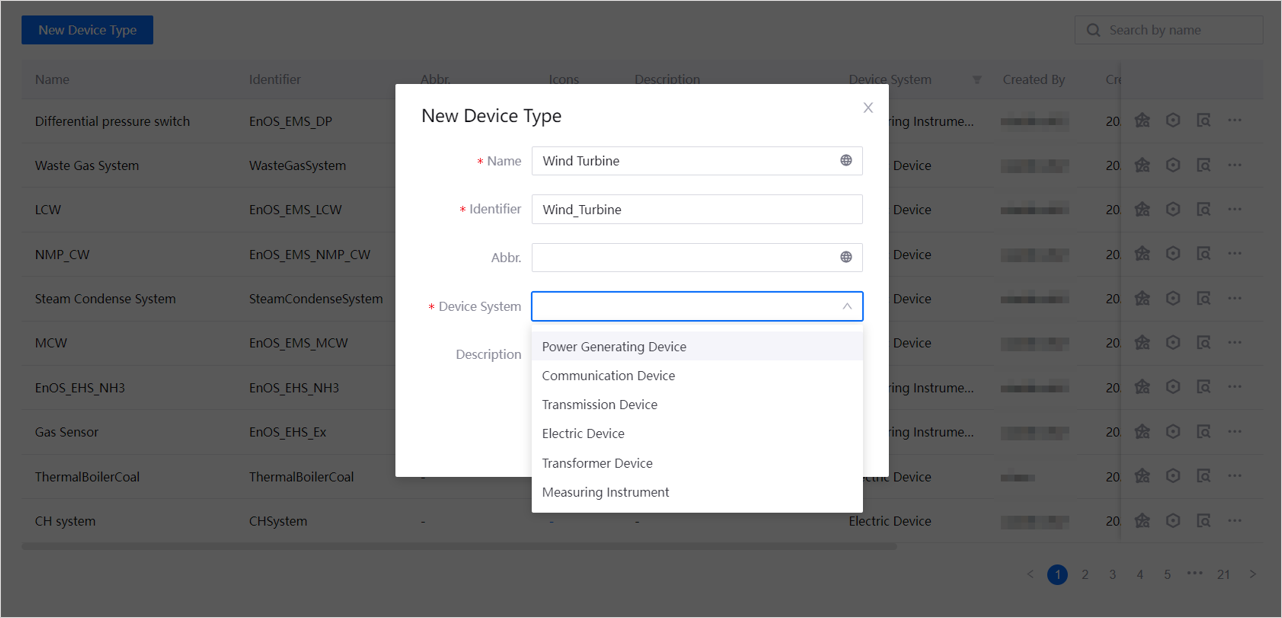
After entering the information, select Confirm.
Step 2: Associating Models
In the list of device types, select the Associate Model
 for the corresponding type.
In the pop-up window, select a Model. The optional range is all public models in the current OU.
After selection, choose OK.
Once completed, the attributes, datapoints, events, and services of this public model will be assigned to all assets under this type.
Step 3: (Optional) Adding Properties
By default, the business object will have the properties of the associated model. If the model properties cannot meet the business needs of the features, you can customize other features for the business object according to the needs.
In the list of device types, select the Properties
 for the corresponding type.
On the Configure Feature page, select New Property.
In the pop-up window, enter a name, identifier, select a data type, and configure different items according to the data type.
After configuration, select Save. Repeat creating other features as needed.
Upon completion, when configuring the display fields for business objects at the OU level, selecting features as fields will be supported. For more information, see Configuring Display Fields.
After connecting this type of asset in Onboarding Tool, configuring business features of the asset will be supported. For more information, see Configuring Asset Properties.
By default, configured features will be stored in Configuration Center along with assets as business tags. For more information on viewing and updating asset tags, refer to Managing Asset Business Tags.
If you need to synchronize asset features as tags to EnOS Management Console, you can consult domain experts to find the corresponding object table in Object Manager > Object and refer to Managing Global Objects and Object Instances to update object instances.
Step 4: (Optional) Configuring Icons
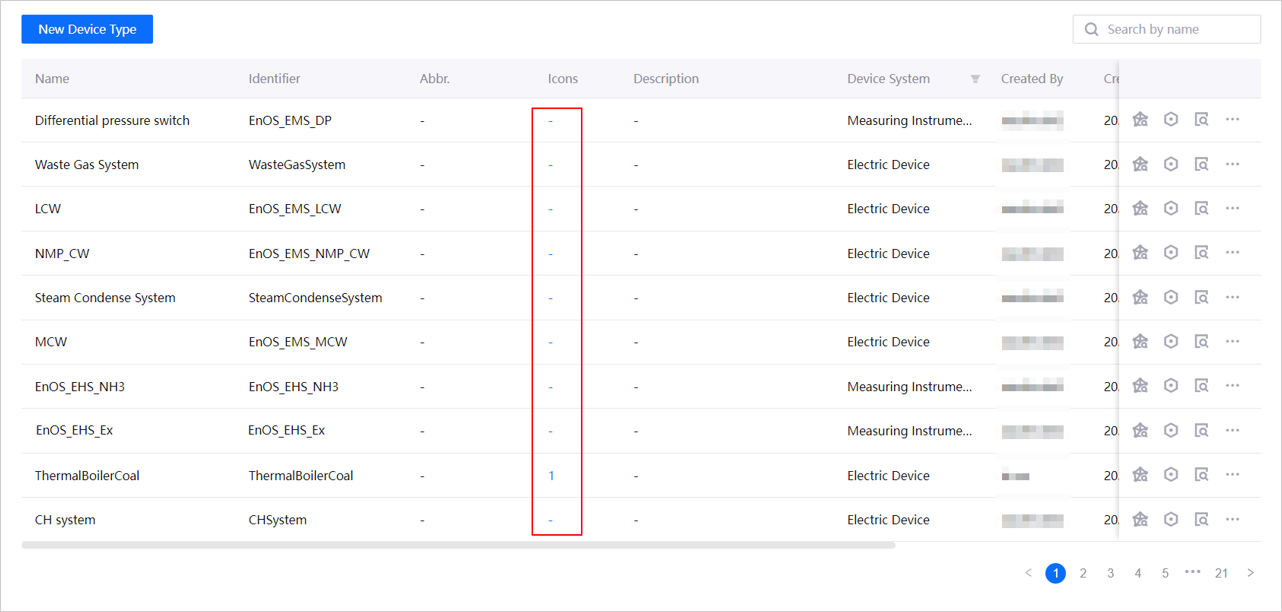
In the device type list, select the hyphen or number in the Icon column corresponding to the type.
In the pop-up window, select Add Image and upload an image that meets the requirements. Then select an icon style.
Multiple styles of icons can be added. When finished, select OK.
After completion, the icon will be displayed in different positions according to the specified style. For example, the display icon when selecting a device type in Onboarding Tool.
Step 5: (Optional) Creating Device Subtypes
Some device types require creating subtypes. For example, under the EnOS Edge device type, you can create PhysicalEdge and CloudEdge subtypes.
In the device type list, select “View Details” for the corresponding type.
Select …> Create Device Subtype for the device type, enter the name and identifier of the subtype in the pop-up window, and select Confirm.
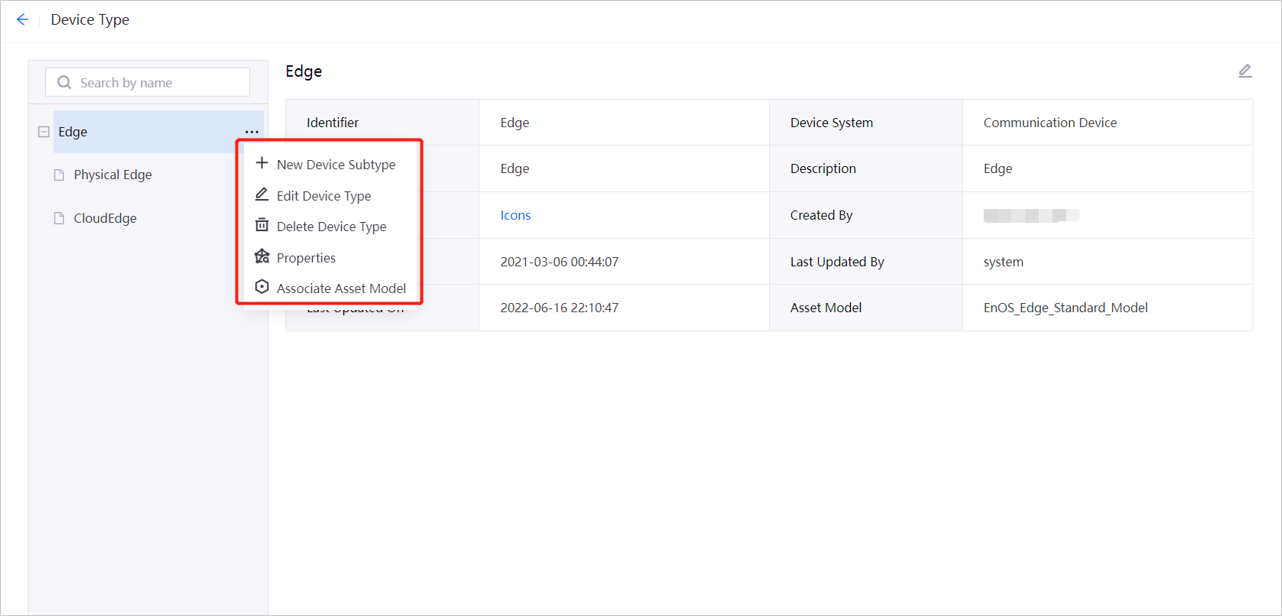
The subtype will appear below the parent type. You can select “…> Associate Model/Feature” to associate models or add features to the subtype.
If necessary, you can continue to create subtypes under this type.
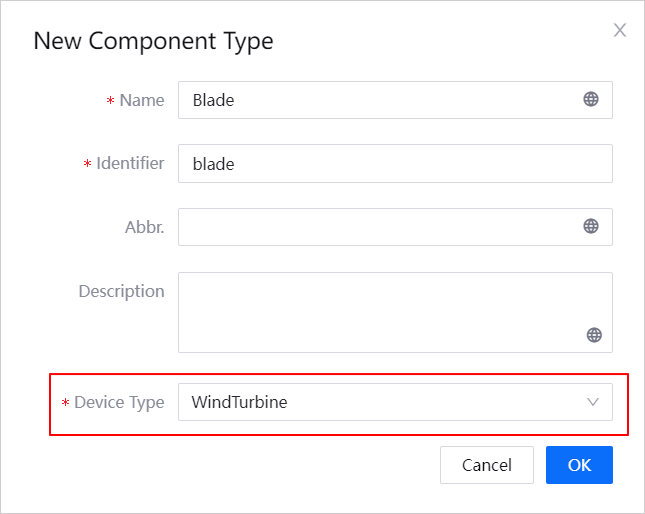
Step 6: (Optional) Creating Component Types
Repeat Steps 1-4, select Global Business Objects > Component Types in the left navigation pane to create a component type. When creating a component type, you need to select a device type.
Step 7: Creating Site Types
Repeat Steps 1-4, select Global Business Objects > Site Types in the left navigation pane to create a site type.
After creating the site type, select the expand
 button for the corresponding site in the list, select the add
  button, and add the Device Type that has been created under this site.
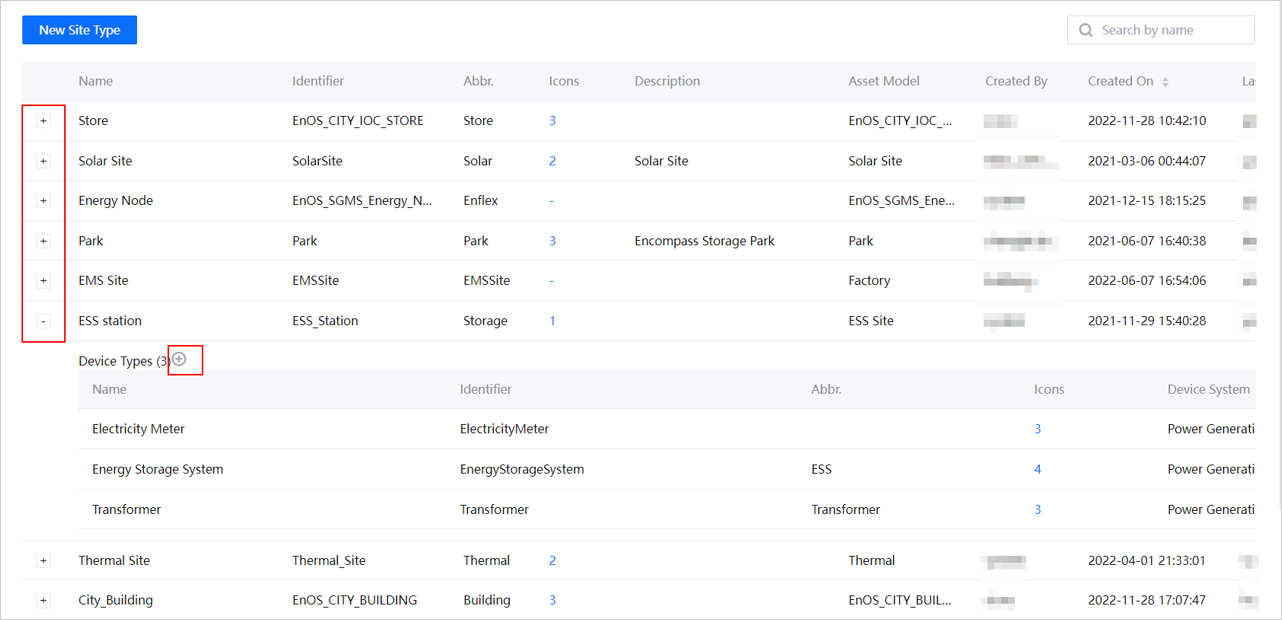
After adding, the devices (and components) of this type can only be created under this site type.
Step 8: (Optional) Creating Custom Types
Repeat Steps 1-4, select Global Business Objects > Custom Types in the left navigation pane to configure a custom type.
Configuring Manufacturers and Model Nos.
Step 1: Creating a Manufacturer
Select Global Business Objects > Manufacturers in the left navigation pane, and select New Manufacturer.
Enter the name and identifier of the manufacturer in the pop-up window, and select OK.
Step 2: Creating a Model No.
In the manufacturer list, select View Details
 for the corresponding manufacturer, and enter the model No. list.
Select New Model No., enter the name and identifier of the model No. in the pop-up window, and select Device System, Device Type. A model No. can only be associated with one device type, and multiple model Nos. can be created under one device type. If you need to associate it with a component, you can further select Component Type.
After entering the information, select OK. The newly created model No. will appear in the list.
Step 3: Associating a Model No. with a Model
In the list of model Nos., select the Associate Model
for the corresponding model No..After selecting a model, select OK. The available options are all public models within the current OU.
After association, this model:
will be the onboarding model for the device type/component type selected in Step 2: Creating a Model No., for more information, see Configuring Devices.
will determine the standard control services and parameters that can be selected when configuring control rules based on the model No. in Configuring Control Rules.
Configuring Alarm Metadata
Alarm metadata includes alarm level groups and alarm type groups. To configure alarm trigger rules using Alarm Management, you need to create an alarm group first. After creating it, you can select the corresponding group in Alarm Management > Alarm Rules.
See Configuring Alarm Groups to complete the configuration.