Managing Alarm Response Rules
Alarm responses define how alarms are handled. In EnOS Alarm Management, the following two response methods can be configured for alarms:
Acknowledgment Response: After the alarm is triggered, the alarm can be acknowledged to ensure that the alarm has been received.
Ticket Response: Work orders or service requests can be created for alarms under the OU that has obtained Work Management to ensure that on-site O&M personnel repair and maintain alarm assets promptly on time.
Prerequisites
Before starting, make sure you have the following ready:
The current account has been assigned the asset permissions and a menu group, including Alarm Response. If not assigned, contact the application administrator.
To create a ticket response rule, please ensure that the current OU is obtained and authorized Work Management. If not available, contact the application creator.
Creating an Acknowledgment Response Rule
Select Alarm Response in the left navigation bar to access the Alarm Response page.
Select New Response > Alarm Ack Response, and then on the New Response page, enter the following information in General Information:
Response Name: Enter the name of the alarm response rule.
Response Type: Alarm Ack Response is displayed by default.
Enabled: Enabled by default. If disabled, the alarm response rule will not take effect.
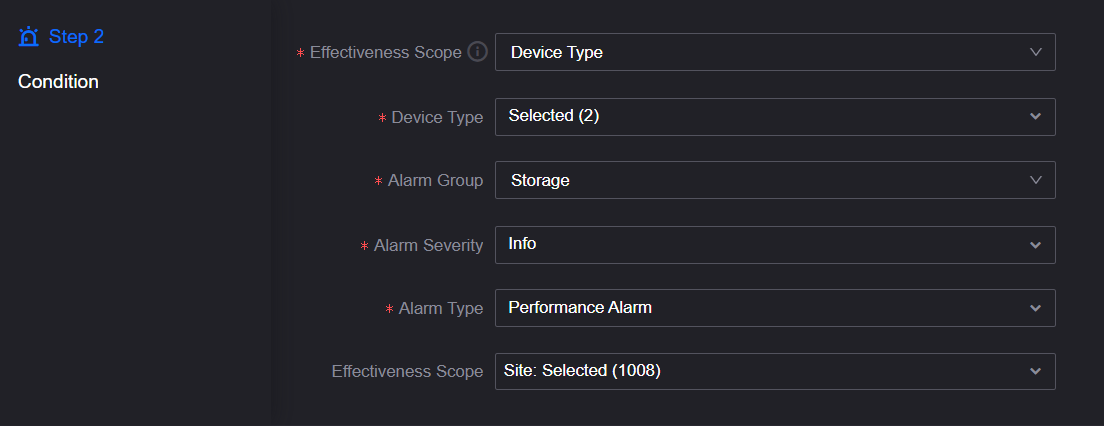
Enter the following information in Condition:
Effectiveness Scope: Select the valid range and objects for which the alarm response rule should apply.
OU: The response rule is in effect under the current OU.
Site Type/Device Type: The response rule is in effect under the selected site type and device type.
Alarm Rule: The response rule is in effect under the selected alarm rules.
Site Type/Device Type: Select the site/device type to which the alarms are to be responded to belong.
Alarm Group: Select the group to which the alarm severities and alarm types belong.
Alarm Severity: Select the severities of alarms to be responded to.
Alarm Type: Select the types of alarms to be responded to.
Effectiveness Scope: Select the sites to which the alarms are to be responded to and specify the valid range of response rules. Otherwise, the default applies to all sites within the permission.
Enable Acknowledge so that the alarm record that triggers the alarm response rule can be manually acknowledged.
Select Save.
Note
To add more site types, device types, component types, alarm groups, alarm severities, and alarm types, contact your system administrator.
If you need to add more sites, devices, or component instances, contact the asset administrator.
After creating an alarm response rule, you can view it in the list on the Alarm Response page.
Creating a Ticket Response Rule
Select Alarm Response in the left navigation bar to access the Alarm Response page.
Select New Response > Work Management Response, and then on the New Response page, enter the following information in the General Information column:
Response Name: Enter the name of the alarm response rule.
Response Type: Alarm Ack Response is displayed by default.
Enabled: Enabled by default. If this button is disabled, the alarm response rule will not take effect.
Enter the following information in Condition:
Effectiveness Scope: Select the valid range and objects for which the alarm response rule should apply.
OU: The response rule is in effect under the current OU.
Site Type/Device Type: The response rule is in effect under the selected site type and device type.
Alarm Rule: The response rule is in effect under the selected alarm rules.
Site Type/Device Type: Select the site/device type to which the alarms are to be responded to belong.
Alarm Group: Select the group to which the alarm severities and alarm types belong.
Alarm Severity: Select the severities of alarms to be responded to.
Alarm Type: Select the types of alarms to be responded to.
Effectiveness Scope: Select the sites to which the alarms are to be responded to and specify the valid range of response rules. Otherwise, the default applies to all sites within the permission.
Enter the following information in Work Management Response:
Work Type: Select
Work OrderorService Request.Work Order: To directly create a ticket and dispatch it to on-site O&M personnel, select
Work Orderas the ticket type.Service Request: To report a problem or submit an O&M requirement, select
Service Requestas the ticket type and wait for review.
Creation Method: Select
ManualorAutomatic.Manual: After an alarm is triggered, the ticket is created manually and displayed in Work Management.
Automatic: After an alarm is triggered, the ticket is automatically created and displayed in Work Management.
Note
For more information on creating tickets, see Creating Work Orders in Work Management.
Select Save.
Note
To add more site types, device types, component types, alarm groups, alarm severities, and alarm types, contact your system administrator.
If you need to add more sites, devices, or component instances, contact the asset administrator.
After creating an alarm response rule, you can view it in the list on the Alarm Response page.
Editing an Alarm Response Rule
Select Alarm Response in the left navigation bar to access the Alarm Response page.
Select Edit on the alarm response rule row to edit configuration information.
Select Save.
Deleting an Alarm Response Rule
Select Alarm Response in the left navigation bar to access the Alarm Response page.
Select Delete in the row of the alarm response rule. Deleted alarm response rules cannot be restored once deleted.