Unit 4. Designing a Pipeline
In this tutorial, you can predict the temperature rises of wind turbine engines according to the following logic.
This unit describes how to design a pipeline to predict the temperature rises of wind turbine engines. You can choose one of the following options to design a pipeline:
Option 1: design a pipeline based on a sample pipeline to get started quickly.
Option 2: design a pipeline from scratch to get familiar with the overall functions of AI Pipelines.
For more information on operators used in this tutorial, see Operator Reference.
Option 1. Designing a Pipeline Based on a Sample Pipeline
If you want to get a quick start on performing predicting tasks with operators in AI Pipelines, you can design a pipeline by importing the built-in sample pipeline for predicting the temperature rises of wind turbine engines.
Step 1. Exporting the Sample Pipeline
To design your own pipeline based on a sample pipeline, export the sample pipeline first by the following steps:
Log in to EnOS Management Console and select AI Studio > AI Pipelines from the left navigation pane.
On the Sample Pipeline tab, select the Pipeline View button of the wind-engine-temperature-predicting sample pipeline.
Select Export
 to export the sample pipeline configuration in a JSON file.
Step 2. Importing the Sample Pipeline
To reuse the sample pipeline information such as pipeline structure, operator, and global parameters, import the exported JSON files by the following steps:
Select AI Studio > AI Pipelines from the left navigation pane.
Select New Experiment on the Custom Pipeline tab.
Enter
temp-riseas the name of the experiment in the pop-up window.Select OK to create the experiment, and you can see the canvas for designing a pipeline.
Select Import
 to import the exported sample pipeline configuration.
Step 3. Configuring Global Parameters
For a more efficient and simpler pipeline design process, you can set globally applicable parameters as global parameters to avoid repetitive configuration. The global parameters used in this tutorial are included in the sample pipeline configuration file, select Workflow setting  to configure the global parameters.
Number |
Parameter |
Description |
|---|---|---|
1 |
tasktype |
|
2 |
model |
Specify the model name to specify the model for the training or predicting task. |
3 |
instance |
Specify the instance name of the model specified in model. |
4 |
resourcepool |
Select the resource pool used for model deployment. |
5 |
enable_alert_email |
|
6 |
mysql_source |
Specify the MySQL data source to store the predicting results. |
7 |
Threshold |
Specify the temperature rise threshold. If the temperature rise exceeds the threshold, an alert email will be sent. |
8 |
prediction_model |
Specify the model to perform predicting tasks. |
9 |
prediction_instance |
Specify the instance of the model specified in prediction_model to perform predicting tasks. |
10 |
dataset_name |
Specify the name of the dataset for predicting and training tasks. |
11 |
sample_ratio |
Specify the ratio to split the dataset specified in dataset_name into a training set and a predicting set. |
12 |
receivers |
Select the user to receive alert notification email. |
13 |
copyto |
Select the user to send the copied alert notification email. |
14 |
locale |
|
15 |
incident |
Enter the texts for the alert notification email. |
16 |
priority |
Enter the priority of the alert notification email. |
Step 4. Viewing Operators in the Main Canvas
You can find 2 Condition operators in the main canvas:
Do Train performs training tasks when the tasktype parameter is
train.Do Predict performs predicting tasks when the tasktype parameter is
perdict.
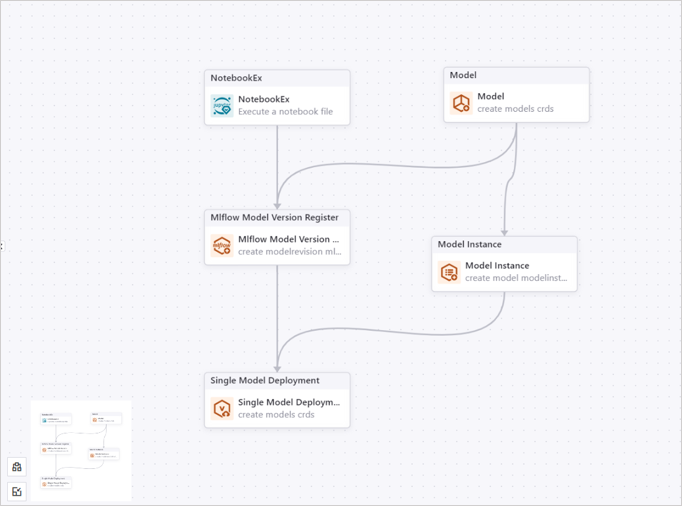
Step 5. Viewing Operators for Training Tasks
Select the Expand  icon of the Do Train operator to open its sub-canvas. You can find the following operators.
Operator Name |
Description |
|---|---|
NotebookEx |
|
Model |
This Model operator is used to create a model. |
Mlflow Model Version Register |
This Mlflow Model Version Register operator is used to register an Mlflow model version for a specified model. |
Model Instance |
This Model Instance operator is used to create a model deployment instance. |
Single Model Deployment |
This Single Model Deployment operator is used to deploy a single model version based on the model version registered in the Mlflow Model Version Register operator. |
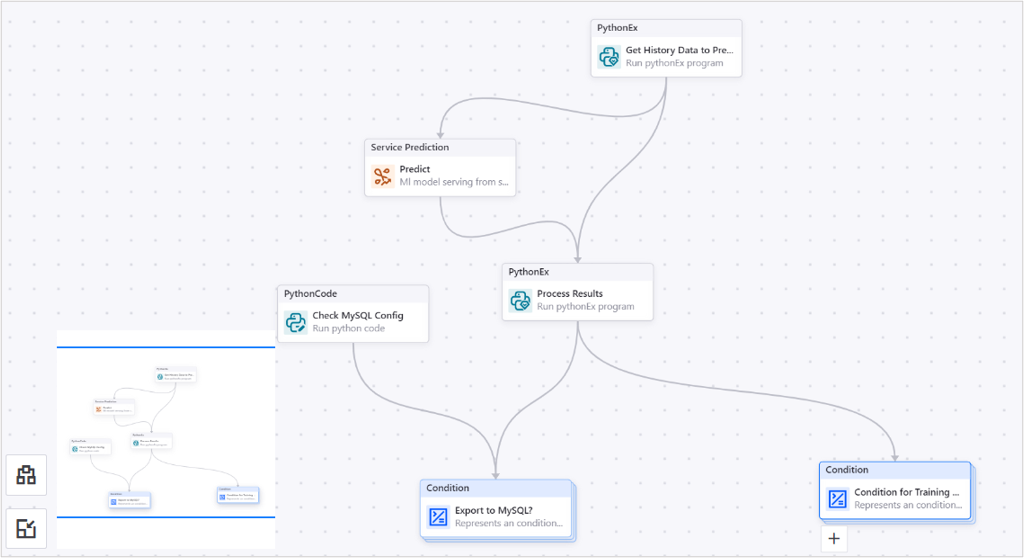
Step 6. Viewing Operators for Predicting Tasks
Select the Expand of the Do Predict operator to open its sub-canvas. You can find the following operators.
Operator Name |
Description |
|---|---|
Get History Data to Predict the Future |
|
Predict |
This Service Prediction operator is used to perform predicting tasks with the trained model and deliver predicting results as an output. |
Process Results |
|
Check MySQL Config |
This PythonCode operator is used to check if a MySQL data source is available in the current OU to save the predicting results. |
Condition for Training Alert |
This Condition operator is used to send alert notification emails to the specified users if the enable_alert_email global parameter is true. Its sub-canvas includes an EnOS Mail operator to send alert notification emails to the specified users. |
Export to MySQL? |
|
Option 2. Designing a Pipeline from Scratch
You can also design a low-code pipeline with operators from scratch to predict the temperature rises of wind turbine engines and upload the prediction results into MySQL data source. For more information about the operators you use, see Operator Reference.
Step 1. Creating an Experiment
Select AI Studio > AI Pipelines from the left navigation pane.
Select New Experiment on the Custom Pipeline tab.
Enter
temp-riseas the name of the experiment in the popup window.Select OK to create the experiment, and you can see the canvas for designing a pipeline.
Step 2. Adding Global Parameters
For a more efficient and simpler pipeline design process, you can set globally applicable parameters as global parameters to avoid repetitive configuration by the following steps:
On the power-loss pipeline canvas, select Workflow Setting
to open the Workflow Setting panel.Select Add Parameter to add the following global parameters in the Configuration Parameters section.
Number |
Parameter |
Type |
Description |
|---|---|---|---|
1 |
tasktype |
string |
Specify the tasks type of the pipeline. Enter predict to run predicting tasks or train to run training tasks. |
2 |
model |
string |
Specify the model name to specify the model for the training or predicting task. |
3 |
instance |
string |
Specify the instance name of the model specified in model. |
4 |
resourcepool |
resourcepool |
Select the resource pool used for model deployment. |
5 |
enable_alert_email |
boolean |
Select whether to send alert notification by email. Enter true to send alert notification by email or False not to send the email. |
6 |
mysql_source |
mysql_source |
Specify the MySQL data source to store the predicting results. |
7 |
Threshold |
number |
Specify the temperature rise threshold. If the temperature rise exceeds the threshold, an alert email will be sent. |
8 |
prediction_model |
model_name |
Specify the model to perform predicting tasks. |
9 |
prediction_instance |
model_instance |
Specify the instance of the model specified in prediction_model to perform predicting tasks. |
10 |
dataset_name |
string |
Specify the name of the dataset for predicting and training tasks. |
11 |
sample_ratio |
number |
Specify the ratio to split the dataset specified in dataset_name into a training set and a predicting set. |
12 |
receivers |
user_contact_list |
Select the user to receive alert notification email. |
13 |
copyto |
user_contact_list |
Select the user to send the copied alert notification email. |
14 |
locale |
locale |
Select the language of the alert notification email. Select en-US for English or zh_CN for simplified Chinese. |
15 |
incident |
string |
Enter the texts for the alert notification email. |
16 |
priority |
string |
Enter the priority of the alert notification email. |
Step 3. Configuring Operators in Main Canvas
You need to add two Condition operators in the main canvas:
A Condition operator performing the training tasks when the tasktype parameter is
train.A Condition operator performing the predicting tasks when the tasktype parameter is
perdict.
Adding a Condition Operator for Training Tasks
Drag a Condition operator to the canvas from the operator list on the left.
Select the operator to configure the following operator information on the right panel:
Enter
Do Trainas Name in the Basic Info section.Configure
Reference|tasktype|==|Declaration|trainas Expression in the Configuration Parameter section.
Adding a Condition Operator for Predicting Tasks
Drag a Condition operator to the canvas from the operator list on the left.
Select the operator to configure the following operator information on the right panel:
Enter
Do Predictas Name in the Basic Info section.Configure
Reference|tasktype|==|Declaration|predictas Expression in the Configuration Parameter section.
Step 4. Configuring Operators for Training Tasks
The training process in this tutorial includes creating a model, training the model, creating a model instance, creating a model version, and deploying the model version. Double-select the Do Train operator to open its sub-canvas. You need to add the following 5 operators in the Do Train sub-canvas:
A NotebookEx operator to train the model based on the sample dataset and export the trained model.
A Model operator to create a model.
An Mlflow Model Version Register operator to register an Mlflow model version and export the model version.
A Model Instance operator to create a model deployment instance.
A Single Model Deployment operator to deploy a single model version based on a published model version.
Configuring a NotebookEx Operator for Model Training
On the Do Train sub-canvas, drag a NotebookEx operator from the operator list on the left.
Select this NotebookEx operator and configure the following operator parameters in the Input Parameter section on the right panel.
Parameter
Reference/Declaration
Description
workspace
Declaration
Select the Notebook instance folder you created in Unit3. Preparing Codes to specify the directory of the files required in the entrypoint and requirement parameters.
entrypoint
Declaration
Select
Train.ipynbto specify the code file for model training.requirement
Declaration
Select
requirements_train.txtto declare the required packages for model training.Select Add Parameter in the Input Parameter section for 3 times to add 3 input parameters and configure the following information.
Name
Type
Reference/Declaration
Value
Description
epochs
number
Declaration
10
Train the model with the training dataset and repeat by 10 times.
dataset
string
Reference
dataset_name
Configure the training dataset as the dataset specified in the dataset_name global parameter.
ratio
number
Reference
sample_ratio
Configure the ratio specified in the sample_ratio global parameter to split the dataset into a training set and a predicting set.
Configuring a Model Operator to Create a Model
On the Do Train sub-canvas, drag a Model operator from the operator list on the left.
Select this Model operator and configure the following operator parameters in the Input Parameter section on the right panel.
Parameter
Reference/Declaration
Description
category
Declaration
Select
Predictorto create a model for predicting tasks.model_name
Reference
Select
modelto configure the model name as the value specified in the model global parameter.input_data_type
Declaration
Select
Tabularas the input data type for the model.scope
Declaration
Select
Publicto make the model available for all AI Studio users in the current OU.technique
Declaration
Select
Regressionas the technique of the model.usecase
Declaration
Select
Windto explain that the model is suitable for wind-related scenarios.input_format
Declaration
Enter the codes in Model Input Format to specify the input format of the model.
interface
Declaration
Select
RESTas the API type of the model.output_format
Declaration
Enter the codes in Model Output Format to specify the output format of the model.
error_on_exist
Declaration
Select
falseto skip without reporting an error when the model name exists.
Model Input Format
The input format of the model you created in the Model operator should be as below.
[
    {
      "annotations": "",
      "defaultValue": null,
      "dtype": "float",
      "ftype": "continuous",
      "name": "gen_active_pw",
      "range": [],
      "repeat": 0
    },
    {
      "annotations": "",
      "defaultValue": null,
      "dtype": "float",
      "ftype": "continuous",
      "name": "gen_speed",
      "range": [],
      "repeat": 0
    },
    {
      "annotations": "",
      "defaultValue": null,
      "dtype": "float",
      "ftype": "continuous",
      "name": "torque",
      "range": [],
      "repeat": 0
    },
    {
      "annotations": "",
      "defaultValue": null,
      "dtype": "float",
      "ftype": "continuous",
      "name": "tem_in",
      "range": [],
      "repeat": 0
    },
    {
      "annotations": "",
      "defaultValue": null,
      "dtype": "float",
      "ftype": "continuous",
      "name": "tem_out",
      "range": [],
      "repeat": 0
    },
    {
      "annotations": "",
      "defaultValue": null,
      "dtype": "float",
      "ftype": "continuous",
      "name": "wind_speed",
      "range": [],
      "repeat": 0
    },
    {
      "annotations": "",
      "defaultValue": null,
      "dtype": "float",
      "ftype": "continuous",
      "name": "rotor_speed",
      "range": [],
      "repeat": 0
    },
    {
      "annotations": "",
      "defaultValue": null,
      "dtype": "float",
      "ftype": "continuous",
      "name": "tem_var",
      "range": [],
      "repeat": 0
    }
  ]
Model Output Format
The output format of the model you created in the Model operator should be as below.
[
    {
      "annotations": "",
      "defaultValue": null,
      "dtype": "float",
      "ftype": "continuous",
      "name": "tem_var",
      "range": [],
      "repeat": 0
    }
  ]
Configuring an Mlflow Model Version Register Operator to Register a Model Version
On the Do Train sub-canvas, drag an Mlflow Model Version Register operator from the operator list on the left.
Connect the output ports of the Model operator and the NotebookEx operator to the input port of this Mlflow Model Version Register operator.
Select this Mlflow Model Version Register operator and configure the following operator parameters in the Input Parameter section on the right panel.
Parameter
Reference/Declaration
Description
input_data
Declaration
Enter the codes in Model Version Input Data to specify the input data of the model version.
version_rule
Declaration
Select
timeto name the model version according to the time when the operator runs.architecture
Declaration
Select
x86as the basic hardware for running the model version.framework
Declaration
Select
tensorflowas the calculation framework for running the model version.language
Declaration
Select
python3as the development language of the model version.model_reference
Reference
Select
model.model_name_output, the output of the Model operator, to specify the model that the model version belongs to.minio_paths
Reference
Select
NotebookEx.mlflow_model_file_paths, the output of the NotebookEx operator, to specify the minio path of the model version.
Model Version Input Data
The input data of the model version you created in the Mlflow Model Version Register operator should be as below.
{
  "data": {
    "names": [
      "gen_active_pw",
      "gen_speed",
      "torque",
      "tem_in",
      "tem_out",
      "wind_speed",
      "rotor_speed",
      "tem_var"
    ],
    "ndarray": [
      [
        19.646925,
        963.533899,
        9311.739885,
        19.948558,
        6.743743,
        6.990860,
        13.066677,
        932.398765
      ],
      [
        20.020045,
        1010.172848,
        10268.291071,
        19.698487,
        6.722673,
        7.189325,
        13.955926,
        1070.147035
      ]
    ]
  }
}
Configuring a Model Instance operator to Create a Model Deployment Instance
On the Do Train sub-canvas, drag a Model Instance operator from the operator list on the left.
Connect the output port of the Model operator to the input port of this Model Instance operator.
Select this Model Instance operator and configure the following operator parameters in the Input Parameter section on the right panel.
Parameter
Reference/Declaration
Description
name
Reference
Select
instanceto name the model instance as the value of the instance global parameter.resource_pool
Reference
Select
resource_poolto use the resource pool specified in the resource_pool global parameter for model instance deployment.model_name
Reference
Select
Model.model_name_output, the output of the Model operator, to specify the model that the deployed instance belongs to.deploy_mode
Declaration
Select
ONLINEas the deployment mode.error_on_exist
Declaration
Select
falseto skip without reporting an error when the model name exists.
Configuring a Single Model Deployment Operator to Deploy the Model Version
On the Do Train sub-canvas, drag a Single Model Deployment operator from the operator list on the left.
Connect the output ports of the Model Instance operator and the Mlflow Model Version Register operator to the input port of this Single Model Deployment operator.
Select this Single Model Deployment operator and configure the following operator parameters in the Input Parameter section on the right panel.
Parameter
Reference/Declaration
Description
model_version
Reference
Select
Mlflow Model Version Register.model_revision_name, the output of the Mlflow Model Version Register operator, to specify the model version to deploy.instance_name
Reference
Select
Model Instance.instance_name_output, the output of the Model Instance operator, to specify to deployment instance for model version deployment.request_CPU
Declaration
Enter
0.1to specify the CPU resource required for the model version deployment.limit_CPU
Declaration
Enter
0.5to specify the maximum CPU resource for the model version deployment.request_memory
Declaration
Enter
1.0to specify the memory resource required for the model version deployment.limit_memory
Declaration
Enter
1.0to specify the maximum memory resource for the model version deployment.
The Do Train sub-canvas should look as below.
Step 5. Configuring Operators for Predicting Tasks
The training process in this tutorial includes preparing data, predicting, processing results, storing results, and configuring alert notification. On the main canvas, double-select the Do Predict operator to open its sub-canvas. You need to add the following 6 operators on the Do Train sub-canvas:
A PythonEx operator to prepare data for predicting tasks.
A Service Prediction operator to perform predicting tasks.
A PythonEx operator to collect and process predicting results.
A PythonCode operator to check whether the MySQL data source is available to store predicting results.
A Condition operator to store the predicting results to MySQL data source if the MySQL data source is available.
A Condition operator to send alert notification.
Configuring a PythonEx operator to Prepare Predicting Data
On the Do Predict sub-canvas, drag a PythonEx operator from the operator list on the left.
Select this PythonEx operator and configure the following operator parameters in the Input Parameter section on the right panel.
Parameter
Reference/Declaration
Description
workspace
Declaration
Select the Notebook instance folder you created in Unit3. Preparing Codes to specify the directory of the files required in the entrypoint and requirement parameters.
entrypoint
Declaration
Select
prepare_predict_history_data.pyto specify the code file for model training.requirement
Declaration
Select
requirements_predict.txtto declare the required packages for model training.Select Add Parameter in the Input Parameter section for 2 times to add 2 input parameters and configure the following information.
Name
Type
Reference/Declaration
Value
Description
dataset
string
Reference
dataset_name
Configure the predicting dataset as the dataset specified in the dataset_name global parameter.
ratio
number
Reference
sample_ratio
Refer to the ratio specified in the sample_ratio global parameter to split the dataset into a training set and a predicting set.
Select Add Parameter in the Output Parameter section for 2 times to add 2 output parameters and configure the following information.
Name
Type
data
file
predict_data
file
Configuring a Service Prediction Operator for Predicting Tasks
On the Do Predict sub-canvas, drag a Service Prediction operator from the operator list on the left.
Connect the output port of the PythonEx operator to the input port of this Service Prediction operator.
Select this Service Prediction operator and configure the following operator parameters in the Input Parameter section on the right panel.
Parameter
Reference/Declaration
Description
model
Reference
Select
prediction_modelto use the model specified in the prediction_model global parameter for predicting tasks.instance
Reference
Select
prediction_instanceto use the model instance specified in the prediction_instance global parameter for predicting tasks.namespace
Reference
Select
resourcepoolto use the resource pool specified in the resource_pool global parameter for predicting tasks.data_type
Declaration
Select
csvas the type of the predicting data.data
Reference
Select
PythonEx.predict_data, the output of the PythonEx operator, to use the data for predicting tasks.
Configuring a PythonEx Operator to Process Predicting Results
On the Do Predict sub-canvas, drag a PythonEx operator from the operator list on the left.
Connect the output ports of the first PythonEx operator and the Service Prediction operator to the input port of this PythonEx operator.
Select the PythonEx operator and configure the following operator parameters in the Input Parameter section on the right panel.
Parameter
Reference/Declaration
Description
workspace
Declaration
Select the Notebook instance folder you created in Unit3. Preparing Codes to specify the directory of the files required in the entrypoint and requirement parameters.
entrypoint
Declaration
Select
process_results.pyto specify the code file for model training.requirement
Declaration
Select
requirements_predict.txtto declare the required packages for model training.Select Add Parameter in the Input Parameter section for 4 times to add 4 input parameters and configure the following information.
Name
Type
Reference/Declaration
Value
Description
predictions
file
Reference
Service Prediction.predictions
Get the predicting results from the Service Prediction operator.
data
file
Reference
PythonEx.data
Get the original temperature data of wind turbine engines.
threshold
number
Reference
threshold
Specify the temperature rise threshold. If the temperature rise exceeds the threshold, an alert email will be sent.
enable_alert
boolean
Reference
enable_alert_email
Enable or disable the alert notification function according to the value of the enable_alert_email global parameter.
Select Add Parameter in the Output Parameter section for 3 times to add 3 output parameters and configure the following information.
Name
Type
result
file
alert
boolean
content
string
Configuring a PythonCode Operator to Check MySQL Configuration
On the Do Predict sub-canvas, drag a PythonCode operator from the operator list on the left.
Select this PythonCode operator and configure the following operator parameters in the Input Parameter section on the right panel.
Parameter
Reference/Declaration
Description
code
Declaration
Enter the codes in MySQL Checking Codes to check MySQL configuration.
Select Add Parameter in the Input Parameter section to add an input parameter and configure the following information.
Name
Type
Reference/Declaration
Value
Description
mysql_source
mysql_source
Reference
mysql_source
Specify the MySQL data source to check whether it is available to store the predicting results.
Select Add Parameter in the Output Parameter section to add an output parameter and configure the following information.
Name
Type
export_to_mysql
boolean
MySQL Checking Codes
The codes to check whether MySQL data source is available to store predicting results should be as below.
# Sample imports
import json
import argparse
from pathlib import Path

# Define an ArgumentParser
parser = argparse.ArgumentParser()
parser.add_argument("--mysql_source", type=str, required=True)
parser.add_argument("--export_to_mysql", type=str, required=True)

# Parse arguments from command
args = parser.parse_args()

Path(args.export_to_mysql).parent.mkdir(parents=True, exist_ok=True)
with open(args.export_to_mysql, 'w') as f:
  f.write('True' if args.mysql_source else 'False')
Configuring a Condition Operator to Store Results to MySQL Data Source
On the Do Predict sub-canvas, drag a Condition operator from the operator list on the left.
Connect the output ports of the second PythonEx operator and the PythonCode operator to the input port of this Condition operator.
Select the operator and configure the following expression for the Condition operator on the right panel.
Reference | PythonCode.export_to_mysql | == | Declaration | True
After configuring this Condition operator as above, you need to double-select the operator to open its sub-canvas and add the following 2 oeprators:
A Mysql operator to create a data table.
A Mysql Writer operator to write the forecast results to the data table created by the Mysql operator.
Configuring a Mysql Operator to Create a Data Table
On the Condition sub-canvas, drag a Mysql operator from the operator list on the left.
Select this Mysql operator and configure the following operator parameters in the Input Parameter section on the right panel.
Parameter
Reference/Declaration
Description
data_source_name
Reference
Select
mysql_sourceto create a table in the MySQL data source specified in the mysql_source global parameter.sqls
Declaration
Enter the codes in Codes to Create a Data Table to create a data table.
Codes to Create a Data Table
The codes to create data table should be as below.
"CREATE TABLE if not exists predicted_demo (data_time_utc timestamp DEFAULT CURRENT_TIMESTAMP, predicted float, actual float, threshold float, is_abnormal TINYINT(1));"
Configuring a Mysql Writer Operator to Write Results into the Data Table
On the Condition sub-canvas, drag a Mysql Writer operator from the operator list on the left.
Select this Mysql Writer operator and configure the following operator parameters in the Input Parameter section on the right panel.
Parameter
Reference/Declaration
Description
data_source_name
Reference
Select
mysql_sourceto write predicting results to the MySQL data source specified in the mysql_source global parameter.statement
Declaration
Enter the codes in MySQL Statement Codes to write resulting data into the data table created by the Mysql operator.
data
Reference
Select
PythonEX(1).result, the output of the PythonEx operator to process results, as the data to write into the data table.
MySQL Statement Codes
The codes to write predicting results data into the data table should be as below.
INSERT IGNORE INTO `predicted_demo` (`data_time_utc`, `predicted`, `threshold`, `is_abnormal`) VALUES (%s, %s, %s, %s);
Configuring a Condition Operator to Determine Whether to Send Alert Emails
On the Do Predict sub-canvas, drag a Condition operator from the operator list on the left.
Connect the output port of the second PythonEx operator to the input port of this Condition operator on the right panel.
Select the Condition operator and configure the following expression.
Reference | PythonEx(1).alert | == | Declaration | True
After configuring this Condition operator as above, you need to double-select the operator to open its sub-canvas and add an EnOS Mail oeprator to send alert notification to EnOS users by email.
Configuring an EnOS Mail Operator to Send Alert Email
On the Condition(1) sub-canvas, drag an EnOS Mail operator from the operator list on the left.
Select this EnOS Mail operator and configure the following parameter information in the Input Parameter section on the right panel.
Parameter
Reference/Declaration
Description
receivers
Reference
Select
receiversto send the alert notification mail to the emails of the users in the receivers global parameter.copyto
Reference
Select
copytoto copy the alert notification mail to the emails of the users in the copyto global parameter.locale
Reference
Select
localeto send the alert notification mail in the language in the locale global parameter.module
Declaration
Select
Model Hubto explain that the alert is related to the AI Hub module.target
Reference
Select
modelto configure the object of the alert as the model in the model global parameter.incident
Reference
Select
incidentto configure the incident related to the alert as the contents in the incident global parameter.detail
Reference
Select
PythonEx(2).content, the output of the PythonEx operator to process results, as the detailed content for the alert.priority
Reference
Select
priorityto configure the priority of the alert as the value of the priority global parameter.
After configuring the operators above, select Do Predict from breadcrumb navigation to go back to the Do Predict sub-canvas. The configured Do Predict sub-canvas should look as below.