Unit 4. Design a Pipeline
This section describes how to design the pipeline.
You can choose one of the following options to design a pipeline:
Option 1: design a pipeline based on a sample pipeline to quickly get started
Option 2: design a pipeline from scratch to be familiar with the overall functions of MI Pipelines
See Operator Reference for more information about operators used in the pipelines.
Option 1: Design a Pipeline Based on a Sample Pipeline
Export Sample Pipeline
Export a sample pipeline configuration by the following steps:
Select Enterprise Analytics Platform > Machine Intelligence Studio > MI Pipelines from the left navigation bar to open the Experiment List homepage.
Go to the Sample Pipeline tab, locate wind-power-forecast pipeline and click Pipeline View. Note that the sample pipeline used in this tutorial is updated in 2.3 CU1.
Click the Export icon
 to export the sample pipeline configuration file.
Create an Experiment
Create an experiment by the following steps:
Select Enterprise Analytics Platform > Machine Intelligence Studio > MI Pipelines from the left navigation bar to open the Experiment List homepage.
Under the Custom Pipeline tab, click New Experiment and enter the name (winddemo) and description of the experiment.
Click OK to create the experiment, the canvas for designing and developing the pipeline opens.
Click the Import icon
 to import the sample pipeline configuration file.
Update Global Parameters
For higher efficiency and easier management, it is recommended to set the parameters that are globally applicable and may need to be changed often as global parameters. The global parameters used in this tutorial are included in the sample pipeline configuration file, click the Workflow setting icon  to view the global parameters. The following table includes the descriptions for each parameter.
Number |
Parameter |
Description |
|---|---|---|
1 |
resourcepool |
Update the value to specify the resource pool used for the model deployment. |
2 |
datasetname |
Specify the dataset. |
3 |
tasktype |
|
4 |
predictiontype |
|
5 |
lenoflist |
Specify the length of looplist generated. This value is a simulation of the number of wind turbines. |
6 |
modelinstnacename |
Name of the model deployment instance. |
7 |
prediction_dataset_name |
Name of the dataset. |
8 |
sample_split_ratio |
A ratio to split the dataset into a training set and a prediction set. |
9 |
hdfs_source |
Select a HDFS data source which is configured in Data Source Connection to upload the model files. |
10 |
hive_source |
Select a Hive data source which is configured in Data Source Connection to upload the prediction data. |
11 |
ouid |
ID of the current OU. |
12 |
prediction_instance |
Name of the prediction instance. It should be the same as modelinstnacename to make predictions using the trained model. |
Main Canvas
You can find 2 condition operators in the main canvas:
Condition for Training: perform the tasks under Training when task type is training.
Condition for Prediction: perform the tasks under Prediction when task type is prediction.
Checking Training Tasks
Double-click the Condition for Training operator to open its sub-canvas, you can find 3 operators:
Recursion for Event Trigger, a recursion operator that generates a random number between 1-10 and export via result_number parameter. It can determine whether the condition result_number < 5 is met.
Generate Loop List, a PythonEx operator that generates a loop list for ParallelFor operator follows. Make sure the
workspaceis wind_power_forecasting andentrypointis generate_model_list.py.Loop For Model Training, a ParallelFor operator that performs the training tasks. Double-click this operator and you can find operators as follows.
Operator Name |
Description |
|---|---|
Prepare Training Data |
This PythonEx operator is used to prepare the training data and export the data files. Make sure the workspace is wind_power_forecasting, entrypoint is prepare_train_data.py, and requirements is requirements1.txt. |
Model Training |
This PythonEx operator is used to train the model based on the input data and export the training model through the output parameter. Make sure the workspace is wind_power_forecasting, entrypoint is train_model.py, and requirements is requirements2.txt. |
Create a Model |
This Model operator is used to create a model. |
Create a Model Revision |
This Mlflow Model Version Register operator is used to register an Mlflow model version for a specified model. |
Create a Model Instance |
This Model Instance operator is used to create a model deployment instance. |
Create a Model Test Operator |
This Model Test operator is used to test whether the model version can be published as a valid model. |
Deploy the Model Revision |
This Single Model Deployment operator is used to deploy a single model version based on a published model version. |
Checking Prediction Tasks
Double-click the Condition for Prediction to open its sub-canvas, you can find 2 operators:
Generate Target List for Prediction, a PythonEx operator that generates a loop list for ParallelFor operator follows. Make sure the
workspaceis wind_power_forecasting andentrypointis generate_model_list.Loop For prediction, a ParallelFor operator that performs the prediction tasks. Double-click this operator and you can find operators as follows.
Condition for Service Prediction Type Operator
This operator is used to make predictions based on the published model service. Double-click the Condition for Service Prediction Type to open its sub-canvas and check 5 operators as follows.
Operator Name |
Description |
|---|---|
Prepare Prediction Data |
This PythonEx operator is used to prepare the prediction data. Make sure the workspace is wind_power_forecasting, entrypoint is prepare_predict_data.py, and requirements is requirements1.txt. |
Predict from Service |
This Service Prediction operator is used to predict based on the model services and deliver prediction results as an output. |
Write results |
This PythonEx operator is used to write the prediction results to the output file. Make sure the workspace is wind_power_forecasting and entrypoint is write_results.py. |
Check Hive Config |
This PythonEx operator is used to check if EnOS Hive is available in the current OU to save the prediction results. Make sure the workspace is wind_power_forecasting and entrypoint is check_hive_config.py. |
Export to Hive? |
|
Condition for Model File Prediction Operator
This operator is used to make predictions based on the Mlflow model files. Double-click the Condition for Model File Prediction to open its sub-canvas and check 6 operators as follows.
Operator Name |
Description |
|---|---|
Get Latest Model Version |
This PythonEx operator is used to get the latest model version of a specific model. Make sure the workspace is wind_power_forecasting and entrypoint is get_latest_model_version.py. |
Prepare Prediction Data 2 |
This PythonEx operator is used to prepare the prediction data. Make sure the workspace is wind_power_forecasting, entrypoint is prepare_predict_data.py, and requirements is requirements1.txt. |
Predict from Mlflow Model File |
This Mlflow Model Version Prediction operator is used to make predictions based on the internal Mlflow model files and deliver the prediction results as an output. |
Write results 2 |
This PythonEx operator is used to write the prediction results to the output file. Make sure the workspace is wind_power_forecasting and entrypoint is write_results.py. |
Check Hive Config 2 |
This PythonEx operator is used to check if EnOS Hive is available in the current OU to save the prediction results. Make sure the workspace is wind_power_forecasting and entrypoint is check_hive_config.py. |
Export to Hive 2? |
|
Option 2: Design a Pipeline from Scratch
Create an Experiment
Create an experiment by the following steps:
Select Enterprise Analytics Platform > Machine Intelligence Studio > MI Pipelines from the left navigation bar to open the Experiment List homepage.
Under the Custom Pipeline tab, click New Experiment.
In the popup window, enter the name (winddemo) and description of the experiment.
Click OK to create the experiment, and the canvas for designing and developing the pipeline opens.
Add Global Parameters
For higher efficiency and easier management, it is recommended to set the parameters that are globally applicable and may need to be changed often as global parameters.
To configure global parameters:
Click Workflow setting icon
to open the Workflow setting page.Click Add Parameter to add the following global parameters:
Number |
Name |
Type |
Value |
|---|---|---|---|
1 |
resourcepool |
resource_pool |
The value specifies the resource pool used for the model deployment. Select the main resource pool from the dropdown list here. |
2 |
dataset_name |
string |
The value specifies the dataset used in the pipeline. Enter sample-power-forecast to use the sample dataset. |
3 |
tasktype |
string |
The value defines the task type: training for training tasks and prediction for prediction tasks. Enter training as the task type here. |
4 |
predictiontype |
string |
The value defines the prediction type: file for Mlflow model file prediction and service for model service prediction. Enter service as the prediction type here. |
5 |
lenoflist |
number |
The value simulates the number of wind turbines. Enter 1 here. |
6 |
modelinstancename |
string |
The value defines the name of the model deployment instance. Enter kmmldsdeployinstance1 as the model instance name. |
7 |
prediction_dataset_name |
string |
The value specifies the dataset used for prediction. Enter sample-power-forecast to use the dataset for prediction. |
8 |
sample_split_ratio |
number |
The value specifies the ratio to split the dataset into a training set and a prediction set. Enter 0.75 to put 75% of the data in the training set and 25% of the data in the prediction set. |
9 |
hdfs_source |
hdfs_source |
The value specifies an HDFS data source to upload the model files. Select an HDFS data source from the dropdown list here. |
10 |
hive_source |
hive_source |
The value specifies a Hive data source to upload the prediction data. Select a Hive data source from the dropdown list here. |
11 |
ouid |
string |
The value specifies the current OU. Enter the current OU ID. |
12 |
prediction_instance |
model_instance |
The value specifies the name of the prediction instance. It should be the same as modelinstnacename to make predictions using the trained model. Enter kmmldsdeploymentinstance1 as the name of the prediction instance. |
Main Canvas
You need to add two Condition operators in the main canvas:
Condition operator 1: perform the training tasks when the tasktype global parameter is
training.Condition operator 2: perform the prediction tasks when the tasktype global parameter is
prediction.
To create Condition operator 1:
Drag a Condition operator to the canvas from the operator list on the left.
Click the operator to configure the following operator information:
Enter
Condition for Trainingas Name in the Basic Info section.Configure
Reference|tasktype|==|Declaration|trainingas Expression in the Configuration Parameter section.
To create Condition operator 2:
Drag a Condition operator to the canvas from the operator list on the left.
Click the operator to configure the following operator information:
Enter
Condition for Predictionas Name in the Basic Info section.Configure
Reference|tasktype|==|Declaration|predictionas Expression in the Configuration Parameter section.
Configure Training Tasks
The training process in this tutorial includes data preparation, model training, model version test, model deployment and so on. Double-click the Condition for Training operator to open its sub-canvas. You need to add 3 operators in the Condition for Training sub-canvas:
A Recursion operator that determines when the raw data is ready for feature engineering and model training. In this tutorial, the data is ready when the random number generated is smaller than 5.
A PythonEx operator that generates a loop list for a ParallelFor operator.
A ParallelFor operator that performs the model training.
Configure a Recursion Operator as a Trigger
To create a Recursion operator:
In the Condition for Training sub-canvas, drag a Recursion operator from the operator list on the left.
Double-click the Recursion operator to open its sub-canvas.
In the sub-canvas, drag a PythonEx operator from the operator list on the left.
Click the PythonEx operator to configure the following operator information:
Enter
Generate a Number between 1-10as Name in the Basic Info section.Select
wind_power_forecastingas workspace in the Input Parameter section.Select
generate_random_int.pyas entrypoint in the Input Parameter section.Click Output Parameter > Add Parameter to add an output parameter, and configure
result_number|numberin the Output Parameter section.
Click the Condition for Training tab on the navigation bar to return to the Condition operator sub-canvas.
Click the Recursion operator to configure the following operator information:
Enter
Recursion for Event Triggeras Name in the Basic Info section.Configure
Reference|Generate a Number between 1-10.result_number|<|Declaration|5as Expression in the Configuration Parameter section.
Click the save icon
 on the top toolbar to save your changes.
Configure a PythonEx Operator to Generate a Target List
To create a PythonEx operator:
In the Condition for Training sub-canvas, drag a PythonEx operator` from the operator list on the left.
Connect the output port of the Recursion for Event Trigger operator to the input port of this PythonEx operator.
Click the PythonEx operator to configure the following information:
Enter
Generate Target Listas Name in the Basic Info section.Select
wind_power_forecastingas workspace in the Input Parameter section.Select
generate_model_list.pyas entrypoint in the Input Parameter section.Click Input Parameter > Add Parameter to add an input parameter, and configure
lenoflist|number|Reference|lenoflistin the Input Parameter section.Click Output Parameter > Add Parameter to add an output parameter, and configure
result_list|listin the Output Parameter section.
Click the save icon
on the top toolbar to save your changes.
Configure a ParallelFor Operator for Model Training Loop
To create a ParallelFor operator:
In the Condition for Training sub-canvas, drag a ParallelFor operator from the operator list on the left.
Connect the output port of the Generate Target List operator to the input port of this ParallelFor operator.
Click the ParallelFor operator to configure the following information:
Enter
Loop For Model Trainingas Name in the Basic Info section.Configure
Reference|Generate Target List.result_list|itemas Input Parameter in the Configuration Parameter section.
The Loop For Model Training operator trains a model with model training data, and deploys the model version. You need to add 7 operators in the Loop For Model Training sub-canvas:
A PythonEx operator that prepares the training data and exports the data files.
A PythonEx operator that trains the model based on the input data and exports the model.
A Model operator that creates a model.
An Mlflow Model Version Register operator that registers an Mlflow model version and exports the model version as files.
A Model Instance operator that creates a model deployment instance.
A Model Test operator that checks whether the model version can be published as a valid model.
A Single Model Deployment operator that deploys a single model version based on a published model version.
To create PythonEx operator 1:
In the Loop For Model Training sub-canvas, drag a PythonEx operator from the operator list on the left.
Click the operator to configure the following operator information:
Enter
Prepare Training Dataas Name in the Basic Info section.Select
wind_power_forecastingas workspace in the Input Parameter section.Select
prepare_training_data.pyas entrypoint in the Input Parameter section.Select
requirements1.txtas requirements in the Input Parameter section.Click Input Parameter > Add Parameter to add an input parameter, and configure
datasetname|string|Reference|dataset_namein the Input Parameter section.Click Input Parameter > Add Parameter to add another input parameter, and configure
ratio|number|Reference|sample_split_ratioin the Input Parameter section.Click Output Parameter > Add Parameter to add an output parameter, and configure
result_datafile|filein the Output Parameter section.
To create PythonEx operator 2:
In the Loop For Model Training sub-canvas, drag a PythonEx operator from the operator list on the left.
Connect the output port of the Prepare Training Data operator to the input port of this PythonEx operator.
Click the operator to configure the following operator information:
Enter
Model Trainingas Name in the Basic Info section.Select
wind_power_forecastingas workspace in the Input Parameter section.Select
train_model.pyas entrypoint in the Input Parameter section.Select
requirements2.txtas requirements in the Input Parameter section.Click Input Parameter > Add parameter to add an input parameter, and configure
result_datafile|file|Reference|Prepare Training Data.result_datafilein the Input Parameter section.
To create a Model operator:
In the Loop For Model Training sub-canvas, drag a Model operator from the operator list on the left.
Click the operator to configure the following operator information:
Enter
Create a Modelas Name in the Basic Info section.Select
model-predictoras category in the Input Parameter section.Refer to
itemas model_name in the Input Parameter section.Select
Textas input_data_type in the Input Parameter section.Select
privateas scope in the Input Parameter section.Select
matchingas technique in the Input Parameter section.Select
Light fieldas usecase in the Input Parameter section.Select
systemas publisher in the Input Parameter section.Enter the following as input_format in the Input Parameter section:
[ { "annotations": "", "defaultValue": 300, "dtype": "int", "ftype": "continuous", "name": "i.set", "range": [0, 440], "repeat": 0 },{ "annotations": "", "defaultValue": 300, "dtype": "int", "ftype": "continuous", "name": "X_basic.forecast_time", "range": [0, 440], "repeat": 0},{ "annotations": "", "defaultValue": 300, "dtype": "int", "ftype": "continuous", "name": "X_basic.horizon", "range": [0, 440], "repeat": 0},{ "annotations": "", "defaultValue": 8, "dtype": "int", "ftype": "continuous", "name": "X-basic.time", "range": [0, 49], "repeat": 0},{ "annotations": "", "defaultValue": 10, "dtype": "int", "ftype": "continuous", "name": "X-basic.hour", "range": [0, 23], "repeat": 0},{ "annotations": "", "defaultValue": 10, "dtype": "int", "ftype": "continuous", "name": "EC.nwp_time", "range": [0, 23], "repeat": 0},{ "annotations": "", "defaultValue": 1.5, "dtype": "float", "ftype": "continuous", "name": "EC.dist", "range": [1, 2], "repeat": 0},{ "annotations": "", "defaultValue": 1.5, "dtype": "float", "ftype": "continuous", "name": "EC.ws", "range": [1, 2], "repeat": 0},{ "annotations": "", "defaultValue": 250, "dtype": "float", "ftype": "continuous", "name": "EC.wd", "range": [240, 300], "repeat": 0},{ "annotations": "", "defaultValue": 1, "dtype": "float", "ftype": "continuous", "name": "EC.rho", "range": [1, 2], "repeat": 0},{ "annotations": "", "defaultValue": 850, "dtype": "float", "ftype": "continuous", "name": "EC.pres", "range": [820, 900], "repeat": 0},{ "annotations": "", "defaultValue": 20, "dtype": "float", ftype": "continuous", "name": "EC.tmp", "range": [18, 30], "repeat": 0},{ "annotations": "", "defaultValue": 1, "dtype": "float", "ftype": "continuous", "name": "GFS.nwp_time", range": [1, 2], "repeat": 0},{ "annotations": "", "defaultValue": 20, "dtype": "int", "ftype": "continuous", "name": "GFS.dist", "range": [12, 100], "repeat": 0},{ "annotations": "", "defaultValue": 1, "dtype": "float", "ftype": "continuous", "name": "GFS.ws", range": [1, 2], "repeat": 0 },{ "annotations": "", "defaultValue": 50, "dtype": "float", "ftype": "continuous", "name": "GFS.wd", "range": [40, 300], "repeat": 0 },{ "annotations": "", "defaultValue": 1, "dtype": "float", "ftype": "continuous", "name": "GFS.rho", "range": [1, 2], "repeat": 0},{ "annotations": "", "defaultValue": 850, "dtype": "float", "ftype": "continuous", "name": "GFS.pres", "range": [840, 900], "repeat": 0},{ "annotations": "", "defaultValue": 19, "dtype": "float", "ftype": "continuous", "name": "GFS.tmp", "range": [18, 20], "repeat": 0} ]
Enter the following as output_format in the Input Parameter section:
[ { "annotations": "", "defaultValue": 0, "dtype": "float", "ftype": "continuous", "name": "power", "range": [], "repeat": 0}]
Select
RESTas interface in the Input Parameter section.Select
falseas error_on_exit in the Input Parameter section.
To create an Mlflow Model Version Register operator:
In the Loop For Model Training sub-canvas, drag a Mlflow Model Version Register operator from the operator list on the left.
Connect the output ports of the Create a Model and Model Training operators to the input port of this Mlflow Model Version Register operator.
Click the operator to configure the following operator information:
Enter
Create a Model Revisionas Name in the Basic Info section.Enter the following as input data in the Input Parameter section:
{ "data": { "names": [ "i.set", "X_basic.forecast_time", "X_basic.horizon", "X-basic.time", "X-basic.hour", "EC.nwp_time", "EC.dist", "EC.ws", "EC.wd", "EC.rho", "EC.pres", "EC.tmp", "GFS.nwp_time", "GFS.dist", "GFS.ws", "GFS.wd", "GFS.rho", "GFS.pres", "GFS.tmp"], "ndarray": [ [ 300, 300, 300, 8, 10, 10, 1.5, 1.5, 250, 1, 850, 20, 1, 20, 1, 50, 1, 850, 19] ]} }
Select
timeas version_rule in the Input Parameter section.Select
X86as architecture in the Input Parameter section.Select
Noneas coprocessor in the Input Parameter section.Select
sklearnas framework in the Input Parameter section.Select
python3as language in the Input Parameter section.Refer to
Create a Model.model_name_outputas model_reference in the Input Parameter section.Select
systemas publisher in the Input Parameter section.Refer to
Generate Target List.mlflow_model_file_pathsas minio_paths in the Input Parameter section.Select
trueas enforce_register in the Input Parameter section to register a model version even it fails the test.Select
trueas serve_as_file in the Input Parameter section, which saves the model files and allows you to make predictions based on the Mlflow model files.
To create a Model Instance operator:
In the Loop For Model Training sub-canvas, drag a Model Instance operator from the operator list on the left.
Drag the output port of the Create a Model operator to the input port of this Model Instance operator.
Click the operator to configure the following operator information:
Enter
Create a Model Instanceas Name in the Basic Info section.Refer to
modelinstancenameas name in the Input Parameter section.Refer to
resourcepoolas resource_pool in the Input Parameter section.Refer to
Create a Model.model_name_outputas model_name in the Input Parameter section.Select
ONLINEas deploy_mode in the Input Parameter section.
To create a Model Test operator:
In the Loop For Model Training sub-canvas, drag a Model Test operator from the operator list on the left.
Connect the output port of the Create a Model Revision operator to the input port of this Model Test operator.
Click the operator to configure the following operator information:
Enter
Create a Model Testas Name in the Basic Info section.Enter the following as input_dat in the Input Parameter section:
{ "data": { "names": [ "i.set", "X_basic.forecast_time", "X_basic.horizon", "X-basic.time", "X-basic.hour", "EC.nwp_time", "EC.dist", "EC.ws", "EC.wd", "EC.rho", "EC.pres", "EC.tmp", "GFS.nwp_time", "GFS.dist", "GFS.ws", "GFS.wd", "GFS.rho", "GFS.pres", "GFS.tmp"], "ndarray": [ [ 300, 300, 300, 8, 10, 10, 1.5, 1.5, 250, 1, 850, 20, 1, 20, 1, 50, 1, 850, 19 ] ]} }
Refer to
Create a Model Revision.model_builder_nameas model_builder in the Input Parameter section.Enter
300as test_timeout in the Input Parameter section.
To add a Single Model Deployment operator:
In the Loop For Model Training sub-canvas, drag a Single Model Deployment operator from the operator list on the left.
Connect the output ports of the Create a Model Instance, Create a Model Revision, and Create a Model Test operators to the input port of this Single Model Deployment operator.
Click the operator to configure the following operator information:
Enter
Deploy the Model Revisionas Name in the Basic Info section.Refer to
Create a Model Revision.model_revision_nameas model_revision in the Input Parameter section.Refer to
Create a Model Instance.instance_name_outputas instance_name in the Input Parameter section.Enter
0.5for request_cpu in the Input Parameter section.Enter
0.5for request_memory in the Input Parameter section.Enter
0.8for limit_cpu in the Input Parameter section.Enter
0.8for limit_memory in the Input Parameter section.
Click the save icon
on the top toolbar to save your changes.
The Loop for Model Training sub-canvas should look like this:
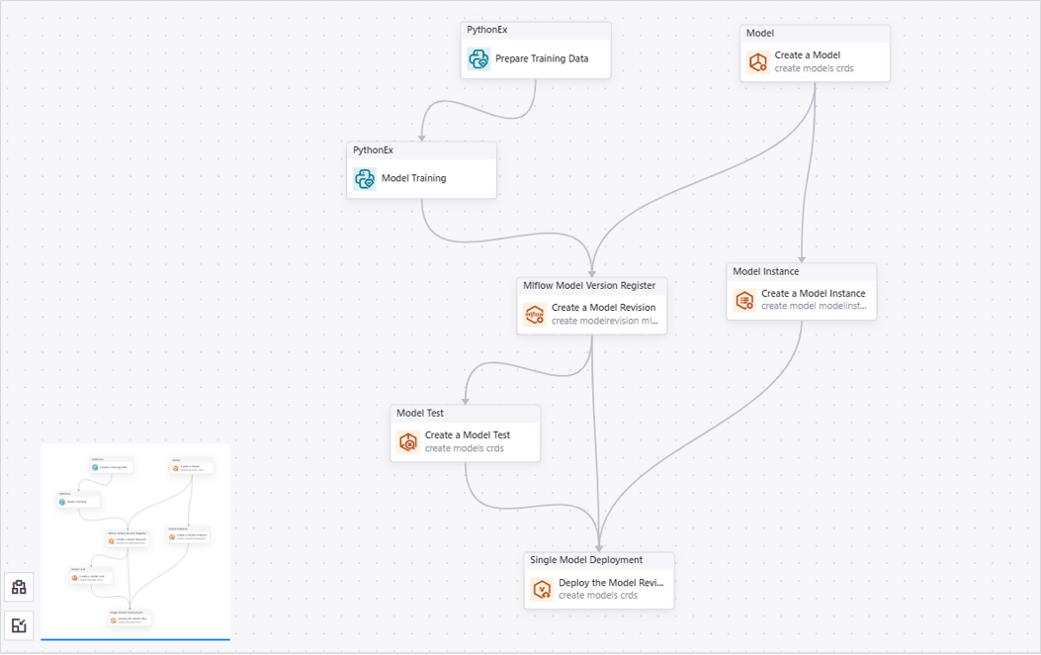
Configure Prediction Tasks
In the main canvas, double-click the Condition for Prediction operator to open its sub-canvas. You need to add 2 operators in the Condition for Prediction sub-canvas:
A PythonEx operator that generates a loop list for a ParallelFor operator.
A ParallelFor operator that performs the model prediction.
Configure a PythonEx Operator to Generate a Target List
To create a PythonEx operator:
In the Condition for Prediction sub-canvas, drag a PythonEx operator from the operator list on the left.
Click the PythonEx operator to configure the following information:
Enter
Generate Target List for Predictionas Name in the Basic Info section.Select
wind_power_forecastingas workspace in the Input Parameter section.Select
generate_model_list.pyas entrypoint in the Input Parameter section.Click Input Parameter > Add Parameter to add an input parameter, and configure
lenoflist|number|Reference|lenoflistin the Input Parameter section.Click Output Parameter > Add Parameter to add an output parameter, and configure
result_list|listin the Output Parameter section.
Click the save icon
on the top toolbar to save your changes.
Configure a ParallelFor Operator for Model Prediction Loop
To create a ParallelFor operator:
In the Condition for prediction sub-canvas, drag a ParallelFor operator from the operator list on the left.
Connect the output port of Generate Target List for Prediction operator to the input port of this ParallelFor operator.
Click the ParallelFor operator to configure the following information:
Enter
Loop For predictionas Name in the Basic Info section.Configure
Reference|Generate Target List.result_list|item1as Input Parameter in the Configuration Parameter section.
Click the save icon
on the top toolbar to save your changes.
You can make predictions based on Mlflow model files or published model services. Both types are included in this tutorial. You need to add 2 Condition operators in the Loop For prediction sub-canvas:
Condition operator 1: make predictions based on the published model service, if you enter
serviceas the predictiontype global parameter when you run the pipeline.Condition operator 2: make predictions based on the internal Mlflow model files, if you enter
fileas the predictiontype global parameter when you run the pipeline.
Configure a Condition Operator for Model Service Prediction
To create a Condition operator for model service prediction:
In the Loop for prediction sub-canvas, drag a Condition operator from the operator list on the left.
Click the Condition operator to configure the following information:
Enter
Condition for Service Prediction Typeas Name in the Basic Info section.Configure
Reference|predictiontype|==|Declaration|serviceas Expression in the Configuration Parameter section.
The Condition for Service Prediction Type operator performs model service prediction, then writes the prediction results and the actual data into a result file. When EnOS Hive is available in the current OU, you can export the result file to EnOS Hive. You need to add 5 operators in the Condition for Service Prediction Type sub-canvas:
A PythonEx operator that prepares the prediction data.
A Service Prediction operator that makes predictions based on the model service and deliver prediction results as an output.
A PythonEx operator that writes the prediction results and the actual data to the output file.
A PythonEx operator that checks if EnOS Hive is available in the current OU to save the prediction results.
A Condition operator that saves the prediction results to the Hive table.
To create PythonEx operator 1:
In the Condition for Service Prediction Type sub-canvas, drag a PythonEx operator from the operator list on the left.
Click the operator to configure the following operator information:
Enter
Prepare Prediction Dataas Name in the Basic Info section.Select
wind_power_forecastingas workspace in the Input Parameter section.Select
prepare_predict_data.pyas entrypoint in the Input Parameter section.Select
requirements1.txtas requirements in the Input Parameter section.Click Input Parameter > Add Parameter to add an input parameter, and configure
datasetname|string|Reference|dataset_namein the Input Parameter section.Click Input Parameter > Add Parameter to add another input parameter, and configure
ratio|number|Reference|sample_split_ratioin the Input Parameter section.Click Output Parameter > Add Parameter to add an output parameter, and configure
features|filein the Output Parameter section.Click Output Parameter > Add Parameter to add another output parameter, and configure
raw_data|filein the Output Parameter section.
To create a Service Prediction operator:
In the Condition for Service Prediction Type sub-canvas, drag a Service Prediction operator from the operator list on the left.
Connect the output port of Prepare Prediction Data operator to the input port of this Service Prediction operator.
Click the operator to configure the following operator information:
Enter
Predict from Serviceas Name in the Basic Info section.Refer to
item1as model in the Input Parameter section.Refer to
modelinstancenameas instance in the Input Parameter section.Refer to
resourcepoolas namespace in the Input Parameter section.Select
csvas data_type in the Input Parameter section.Refer to
Prepare Prediction Data.featuresas data in the Input Parameter section.
To create PythonEx operator 2:
In the Condition for Service Prediction Type sub-canvas, drag a PythonEx operator from the operator list on the left.
Connect the output ports of Prepare Prediction Data and Prediction from Service operators to the input port of this PythonEx operator.
Click the operator to configure the following operator information:
Enter
Write resultsas Name in the Basic Info section.Select
wind_power_forecastingas workspace in the Input Parameter section.Select
write_results.pyas entrypoint in the Input Parameter section.Click Input Parameter > Add Parameter to add an input parameter, and configure
predicted_data|file|Reference|Predict from Service.predictionsin the Input Parameter section.Click Input Parameter > Add Parameter to add another input parameter, and configure
actual_data|file|Reference|Prepare Prediction Data.raw_datain the Input Parameter section.Click Output Parameter > Add Parameter to add an output parameter, and configure
outputfile|filein the Output Parameter section.
To create PythonEx operator 3:
In the Condition for Service Prediction Type sub-canvas, drag a PythonEx operator from the operator list on the left.
Click the operator to configure the following operator information:
Enter
Check Hive Configas Name in the Basic Info sectionSelect
wind_power_forecastingas workspace in the Input Parameter sectionSelect
check_hive_config.pyas entrypoint in the Input Parameter sectionClick Input Parameter > Add Parameter to add an input parameter, and configure
hive_source|hive_source|Reference|hive_sourcein the Input Parameter section.Click Output Parameter > Add Parameter to add an output parameter, and configure
export_to_hive|booleanin the Output Parameter section.
To create a Condition operator:
In the Condition for Service Prediction Type sub-canvas, drag a Condition operator from the operator list on the left.
Connect the output ports of Write results and Check Hive Config operators to the input port of this Condition operator.
Click the operator to configure the following operator information:
Enter
Export to Hive?as Name in the Basic Info section.Configure
Reference|Check Hive Config.export_to_hive|==|Declaration|trueas Expression in the Configuration Parameter section.
The Export to Hive? operator exports the result file of model service prediction to EnOS Hive. You need to add 3 operators in the Export to Hive? sub-canvas:
A PythonEx operator that delivers an HDFS directory path and generates an SQL statement for EnOS Hive.
An HDFS Uploader operator that uploads the prediction results to the HDFS directory.
A Hive operator that saves the prediction results to EnOS Hive.
To create a PythonEx operator:
In the Export to Hive? sub-canvas, drag a PythonEx operator from the operator list on the left.
Click the operator to configure the following operator information:
Enter
Generate variablesas Name in the Basic Info section.Select
wind_power_forecastingas workspace in the Input Parameter section.Select
generate_variables.pyas entrypoint in the Input Parameter section.Click Input Parameter > Add Parameter to add an input parameter, and configure
ouid|string|Reference|ouidin the Input Parameter section.Click Output Parameter > Add Parameter to add an output parameter, and configure
sql_statements|listin the Output Parameter section.Click Output Parameter > Add Parameter to add another output parameter, and configure
hdfs_dest|stringin the Output Parameter section.
To create an HDFS Uploader operator:
In the Export to Hive? sub-canvas, drag an HDFS Uploader operator from the operator list on the left.
Connect the output port of the Generate variables operator to the input port of this HDFS Uploader operator.
Click the operator to configure the following operator information:
Enter
HDFS Uploaderas Name in the Basic Info section.Refer to
hdfs_sourceas data_source in the Input Parameter section.Refer to
Write results.outputfileas file in the Input Parameter section.Refer to
item1as filename in the Input Parameter section.Refer to
Generate variables.hdfs_destas dest in the Input Parameter section.Select
tureas overwrite in the Input Parameter section.
To create a Hive operator:
In the Export to Hive? sub-canvas, drag a Hive operator from the operator list on the left.
Connect the output ports of Generate variables and HDFS Uploader operators to the input port of this Hive operator.
Click the operator to configure the following operator information:
Enter
Hiveas Name in the Basic Info section.Refer to
hive_sourceas data_source in the Input Parameter section.Refer to
Generate variables.sql_statementsas sqls in the Input Parameter section.
Click the save icon
on the top toolbar to save your changes.
The Condition for Service Prediction sub-canvas should look like this:
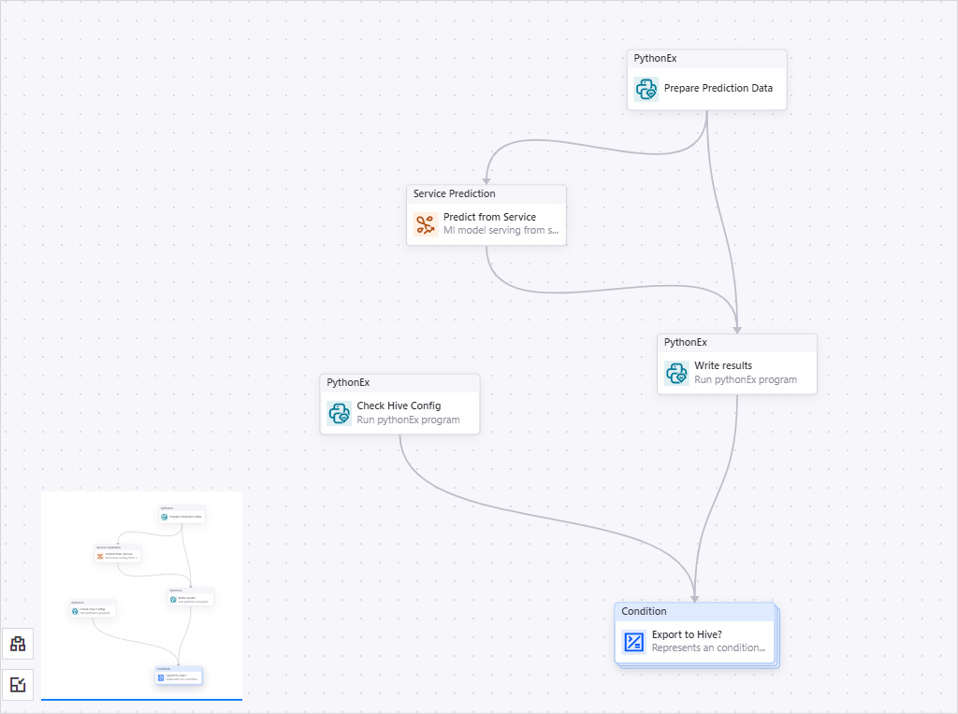
Configure Condition for Model File Prediction
To create a Condition operator for model file prediction:
In the Loop for prediction sub-canvas, drag a Condition operator from the operator list on the left.
Click the Condition operator to configure the following information:
Enter
Condition for Model File Predictionas Name in the Basic Info section.Configure
Reference|predictiontype|==|Declaration|fileas Expression in the Configuration Parameter section.
The Condition for Model File Prediction operator performs Mlflow model file prediction, then writes the prediction results and the actual data into a result file. When EnOS Hive is available in the current OU, you can export the result file to EnOS Hive. You need to add 6 operators in the Condition for Model File Prediction sub-canvas:
A PythonEx operator that gets the latest model version.
A PythonEx operator that prepare the prediction data.
An Mlflow Model Version Prediction operator that makes predictions based on the internal Mlflow model files and deliver the prediction results as an output.
A PythonEx operator that writes the prediction results and the actual data to the output file.
A PythonEx operator that checks if EnOS Hive is available in the current OU to save the prediction results.
A Condition operator that saves the prediction results to the Hive table.
To create PythonEx operator 1:
In the Condition for Model File Prediction sub-canvas, drag a PythonEx operator from the operator list on the left.
Click the operator to configure the following operator information:
Enter
Get Latest Model Versionas Name in the Basic Info section.Select
wind_power_forecastingas workspace in the Input Parameter section.Select
get_latest_model_version.pyas entrypoint in the Input Parameter section.Click Input Parameter > Add Parameter to add an input parameter, and configure
model_name|model_name|Reference|item1in the Input Parameter section.Click Output Parameter > Add Parameter to add an output parameter, and configure
latest_version|model_versionin the Output Parameter section.
To create PythonEx operator 2:
In the Condition for Model File Prediction sub-canvas, drag a PythonEx operator from the operator list on the left.
Click the operator to configure the following operator information:
Enter
Prepare Prediction Data 2as Name in the Basic Info section.Select
wind_power_forecastingas workspace in the Input Parameter section.Select
prepare_predict_data.pyas entrypoint in the Input Parameter section.Select
requirements1.txtas requirements in the Input Parameter section.Click Input Parameter > Add Parameter to add an input parameter, and configure
datasetname|string|Reference|prediction_dataset_namein the Input Parameter section.Click Input Parameter > Add Parameter to add another input parameter, and configure
ratio|number|Reference|sample_split_ratioin the Input Parameter section.Click Output Parameter > Add Parameter to add an output parameter, and configure
features|filein the Output Parameter section.Click Output Parameter > Add Parameter to add another output parameter, and configure
raw_data|filein the Output Parameter section.
To create an Mlflow Model Version Prediction operator:
In the Condition for Model File Prediction sub-canvas, drag an Mlflow Model Version Prediction operator from the operator list on the left.
Connect the output ports of Prepare Prediction Data 2 and Get Latest Model Version operators to the input port of this Mlflow Model Version Prediction operator.
Click the operator to configure the following operator information:
Enter
Predict from Mlflow Model Fileas Name in the Basic Info section.Refer to
item1as model_name in the Input Parameter section.Refer to
Get Latest Model Version.latest_versionas model_version in the Input Parameter section.Refer to
Prepare Prediction Data 2.featuresas data in the Input Parameter section.Select
csvas data_type in the Input Parameter section.
To create PythonEx operator 3:
In the Condition for Model File Prediction sub-canvas, drag a PythonEx operator from the operator list on the left.
Connect the output ports of Prepare Prediction Data 2 and Predict from Mlflow Model File operators to the input port of this PythonEx operator.
Click the operator to configure the following operator information:
Enter
Write results 2as Name in the Basic Info section.Select
wind_power_forecastingas workspace in the Input Parameter section.Select
write_results.pyas entrypoint in the Input Parameter section.Click Input Parameter > Add Parameter to add an input parameter, and configure
predicted_data|file|Reference|Predict from Mlflow Model File.predictionsin the Input Parameter section.Click Input Parameter > Add Parameter to add another input parameter, and configure
actual_data|file|Reference|Prepare Prediction Data 2.raw_datain the Input Parameter section.Click Output Parameter > Add Parameter to add an output parameter, and configure
outputfile|filein the Output Parameter section.
To create PythonEx operator 4:
In the Condition for Model File Prediction sub-canvas, drag a PythonEx operator from the operator list on the left.
Click the operator to configure the following operator information:
Enter
Check Hive Config 2as Name in the Basic Info section.Select
wind_power_forecastingas workspace in the Input Parameter section.Select
check_hive_config.pyas entrypoint in the Input Parameter section.Click Input Parameter > Add Parameter to add an input parameter, and configure
hive_source|hive_source|Reference|hive_sourcein the Input Parameter section.Click Output Parameter > Add Parameter to add an output parameter, and configure
export_to_hive|booleanin the Output Parameter section.
To create a Condition operator:
In the Condition for Model File Prediction sub-canvas, drag a Condition operator to the pipeline canvas from operator list on the left.
Connect the output ports of Write results 2 and Check Hive Config 2 operators to the input port of this Condition operator.
Click the operator to configure the following operator information:
Enter
Export to Hive 2?as Name in the Basic Info section.Configure
Reference|Check Hive Config 2.export_to_hive|==|Declaration|trueas Expression in the Configuration Parameter section.
The Export to Hive 2? operator exports the result file of Mlflow model file prediction to EnOS Hive. You need to add 3 operators in the Export to Hive 2? sub-canvas:
A PythonEx operator that delivers an HDFS directory path and generates an SQL statement for EnOS Hive.
An HDFS Uploader operator that uploads the prediction results to the HDFS directory.
A Hive operator that saves the prediction results to EnOS Hive.
To create a PythonEx operator:
In the Export to Hive 2? sub-canvas, drag a PythonEx operator from the operator list on the left.
Click the operator to configure the following operator information:
Enter
Generate variables 2as Name in the Basic Info section.Select
wind_power_forecastingas workspace in the Input Parameter section.Select
generate_variables.pyas entrypoint in the Input Parameter section.Click Input Parameter > Add Parameter to add an input parameter and configure
ouid|string|Reference|ouidin the Input Parameter section.Click Output Parameter > Add Parameter to add an output parameter, and configure
sql_statements|listin the Output Parameter section.Click Output Parameter > Add Parameter to add another output parameter, and configure
hdfs_dest|stringin the Output Parameter section.
To create a Hive operator:
In the Export to Hive 2? sub-canvas, drag a Hive operator from the operator list on the left.
Connect the output port of the Generate variables operator to the input port of this Hive operator.
Click the operator to configure the following operator information:
Enter
Hive 2as Name in the Basic Info section.Refer to
hive_sourceas data_source in the Input Parameter section.Refer to
Generate variables 2.sql_statementsas sqls in the Input Parameter section.
To create an HDFS Uploader operator:
In the Export to Hive 2? sub-canvas, drag an HDFS Uploader operator from the operator list on the left.
Connect the output ports of Generate variables 2 and Hive 2 operators to the input port of this HDFS Uploader operator.
Click the operator to configure the following operator information:
Enter
HDFS Uploader 2as Name in the Basic Info section.Refer to
hdfs_sourceas data_source in the Input Parameter section.Refer to
Write results 2.outputfileas file in the Input Parameter section.Refer to
item1as filename in the Input Parameter section.Refer to
Generate variables 2.hdfs_destas dest in the Input Parameter section.Select
tureas overwrite in the Input Parameter section.
Click the save icon
on the top toolbar to save your changes.
The Condition for Model File Prediction sub-canvas should look like this:
