Getting Started: Aggregating Numeric Type Data
This section will help you learn how to process numeric type stream data with the Time Window Aggregation template.
Prerequisites
You are able to access the Stream Processing module.
Your OU has requested for the stream processing resources.
You have installed the Time Window Aggregation template through the Streamsets Libs page.
The device is connected and is sending data to the cloud.
Procedure
The procedure of processing numeric type stream data with the Time Window Aggregation template is as follows.
Design and create a stream processing job using the template.
Save and publish the stream processing job.
Configure the running resources for the stream processing job.
Start the stream processing job.
Monitor the running status and results of the job.
Goal and Data Preparation
Goal
The goal of this guide is to get the maximum value of the test_raw input point every 5 minutes and output the calculated value to the output point test_5min.
Data Preparation
Model configuration: The model used in this guide (testModel) is configured as follows.
Feature Type |
Name |
Identifier |
Point Type |
Data Type |
|---|---|---|---|---|
Measurement Point |
test_raw |
test_raw |
AI |
double |
Measurement Point |
test_5min |
test_5min |
AI |
double |
Note
In this example, test_raw is the input point, and test_5min is the output point.
Ensure that both the input point and the output point are of the same type.
Storage configuration: Configure the input point test_raw as AI raw data and the output point test_5min as minute-level normalized AI data. For more information, see Configuring TSDB Storage.
Data ingestion: For information about data ingestion of input point test_raw, see Quick Start: Connecting a Smart Device to EnOS Cloud.
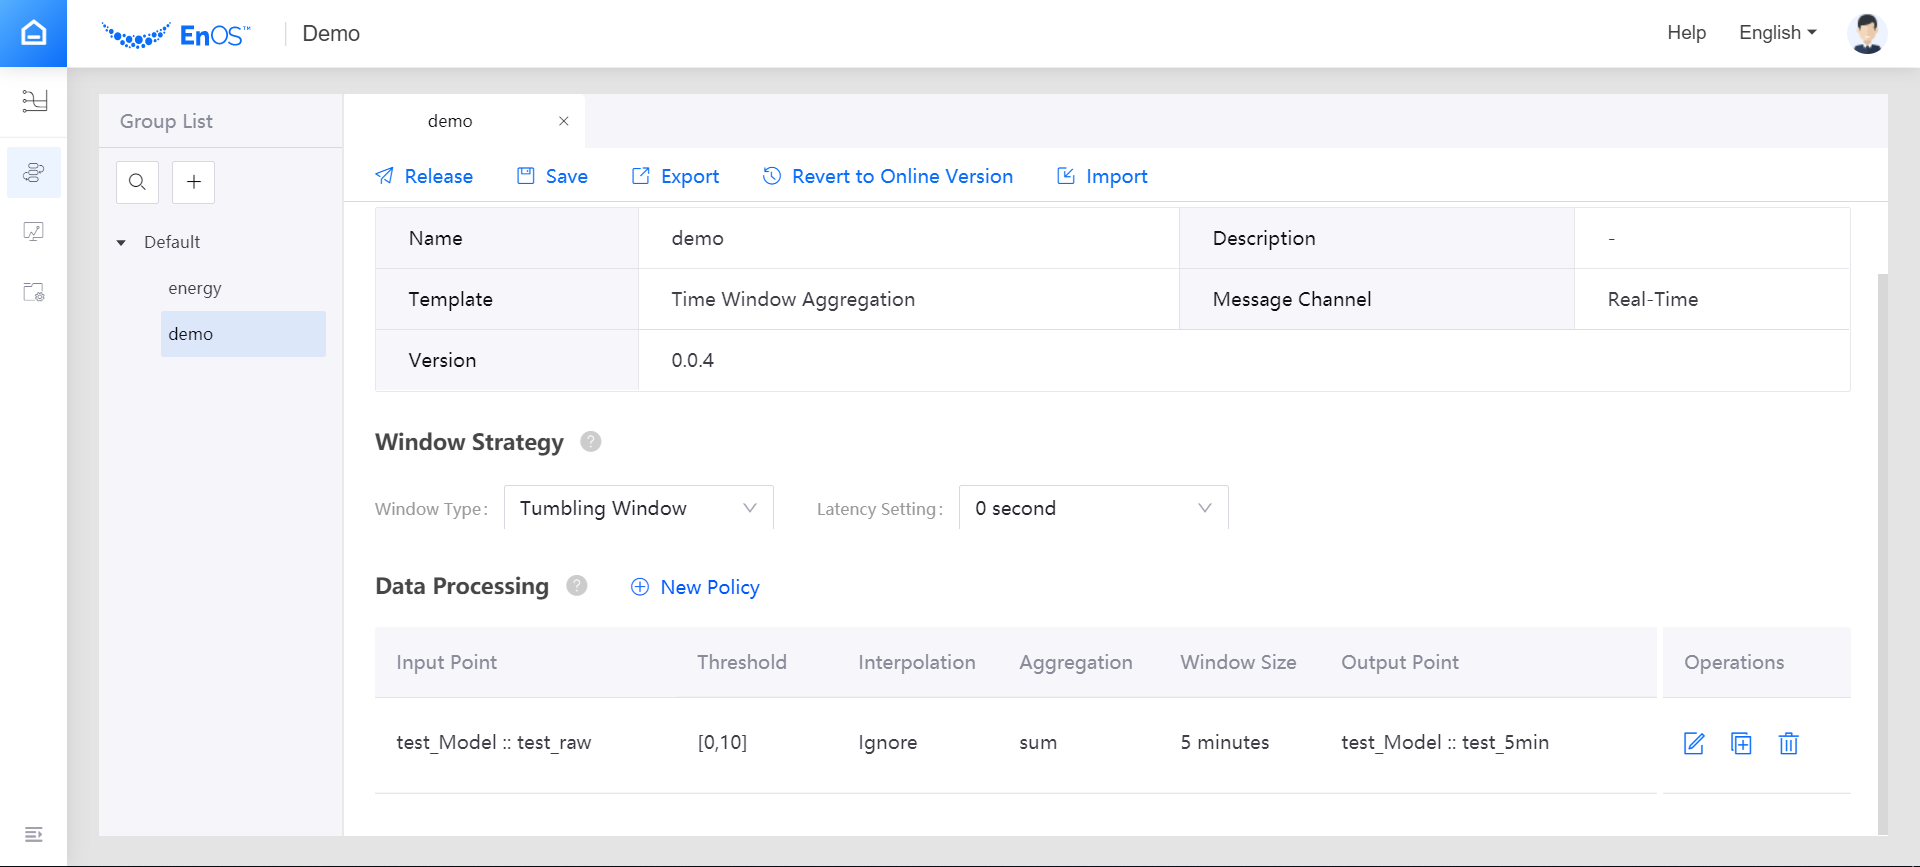
Step 1. Create a Stream Processing Job
Log in the EnOS Management Console and click Stream Processing > Stream Development to view all the stream processing jobs created within the organization. You can double-click a job to view and edit its configuration.
Click the + icon above the job list to create a stream processing job. Select New as the creating method and enter the name and description of the stream data processing job.
From the Template drop down list, select the installed Time Window Aggregation template, and select the version of the template from the Version drop down list.
Select Real-Time as the message channel.
Configure the window strategy of the stream processing job.
Window Type: Select Tumbling Window, which has a fixed size and does not overlap.
Latency Setting: Select the time extension for late-arriving data. If 0 second is selected, the late-arriving data will not be processed.
Data Processing: Click New Policy to add a row of data processing policy.
Input Point: Select the measurement point of the input data. In this example, select the test_raw point of the testModel.
Threshold: Specify the threshold for filtering raw data before processing.
Interpolation: Select the interpolation algorithm that is used to process the input data that exceed the threshold. Currently, the interpolation strategy only supports Ignore.
Aggregation: Select the function to compute the valid data in the window. For this guide, choose max.
Window Size: Select the duration value for the time window, which specifies the amount of data to be computed in a single window. For this guide, choose 5 minutes.
Output Point: Select the point to receive the processed result. In this example, select the test_5min point.
Step 2. Save and Publish the Stream Processing Job
When the stream processing configuration is completed, you can save and publish the data aggregation job online by clicking the Release icon. See the following example:
Step 3. Configure the Running Resources for the Stream Processing Job
Open the Stream Processing > Stream Operation page, and view the published streaming processing job. The default status of the job is PUBLISHED. Before starting the job, you need to configure the running resource that is required by the job with the following steps.
From the Operations column, select … > Configure Resource.
In the pop-up window, select Standalone Mode as the running mode, enter the data reading rate, and enter the required running resource for the job (CUs).
Click OK to save the configuration.
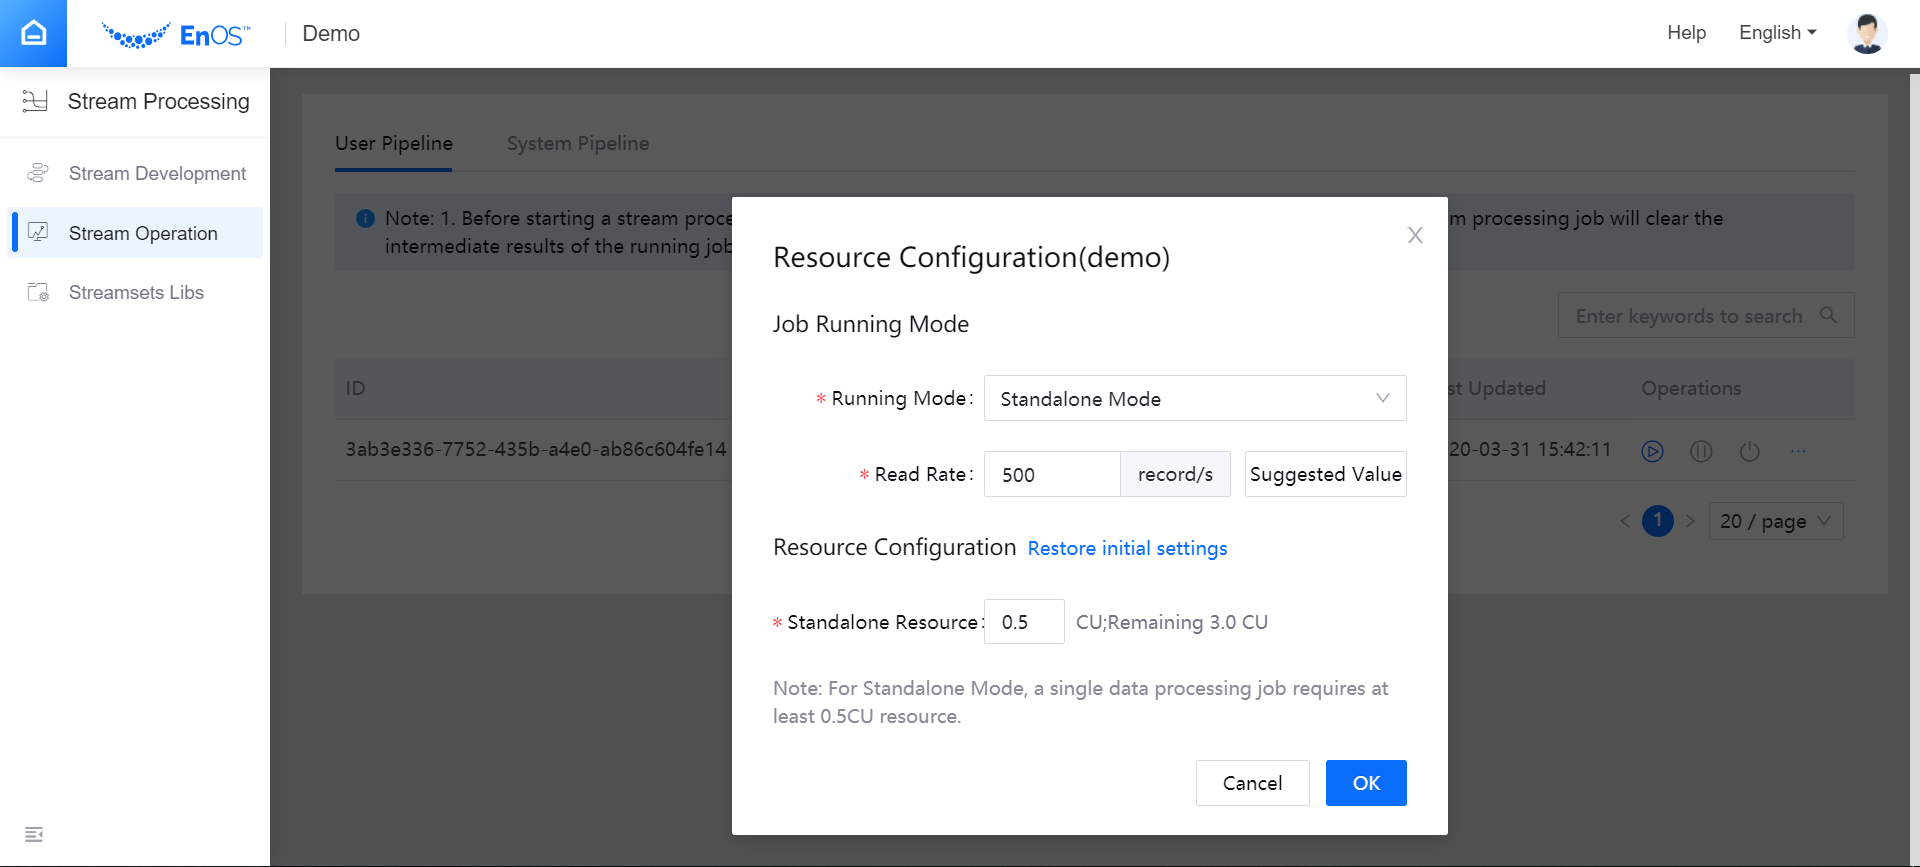
Note
Before configuring the running resources, ensure that your OU has requested for the required stream processing resources. For more information, see Managing Resources
Step 4. Start the Stream Processing Job
System pipelines must be started and running before starting the stream processing jobs. For this guide, you need to start the Data Reader RealTime system pipeline first.
On the Stream Operation page, click the System Pipeline tab, and start the corresponding system pipeline for the stream processing job.
Click the User Pipeline tab, find the published stream processing job, and click the Start icon
 for the job in the Operations column to start running the job.
Step 5. View the Running Results of the Job
On the Stream Operation page, find the running job, and click the job name to open the Stream Details page. You can view the following information about the job.
Summary: View the summary of the running job, such as the overall data processing records and the data aggregation records for a specific period.
Log: Click the View Logs icon on the upper right corner to check the running log of the job.
Results: The processed data will be stored in TSDB according to the configured storage policy. Call the corresponding API to get the stored data. For more information about data service APIs, go to EnOS Management Console > EnOS API.