Device Protocols
Device protocols are used to process device onboarding protocols through JavaScript code or uploading a JAR package. You can create, view, edit, and delete device protocols.
Prerequisite
Ensure that you have registered an application in Application Registration. For more information, contact the system administrator.
Managing Device Protocols
Creating Device Protocols
Select IoT Protocol Connectors > Device Protocols from the left navigation pane, and you will see the list of device protocols that have been created.
Click New Device Protocol.
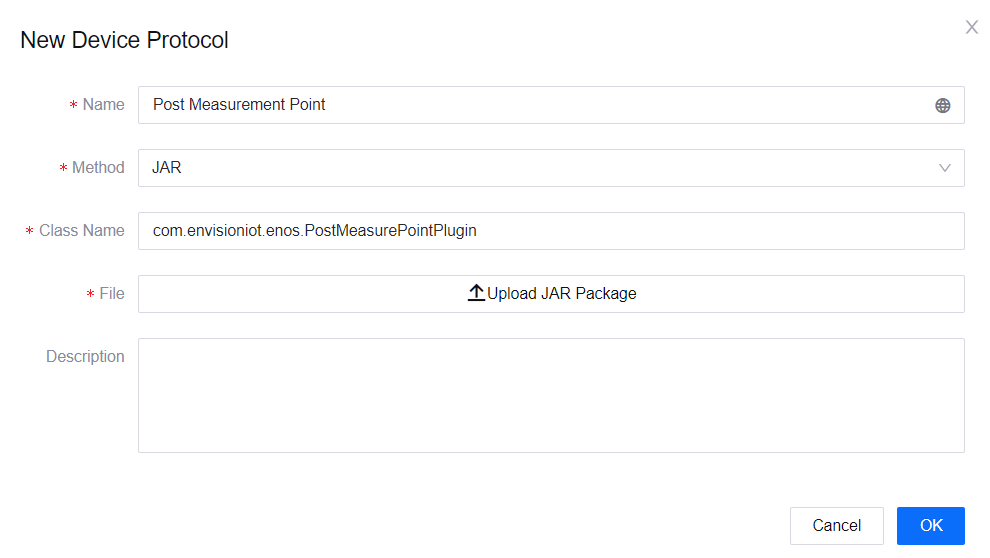
Fill in the information as per the below.
Name: Enter a name for the device protocol. You can click the Internationalization icon
 to enter customized names for different locales.
Method: Select a method for conversion. Available methods include the following.
JAR: Converts using JAR. You would need to specify the Class Name as well as upload the JAR package. For more information, see Using JAR.
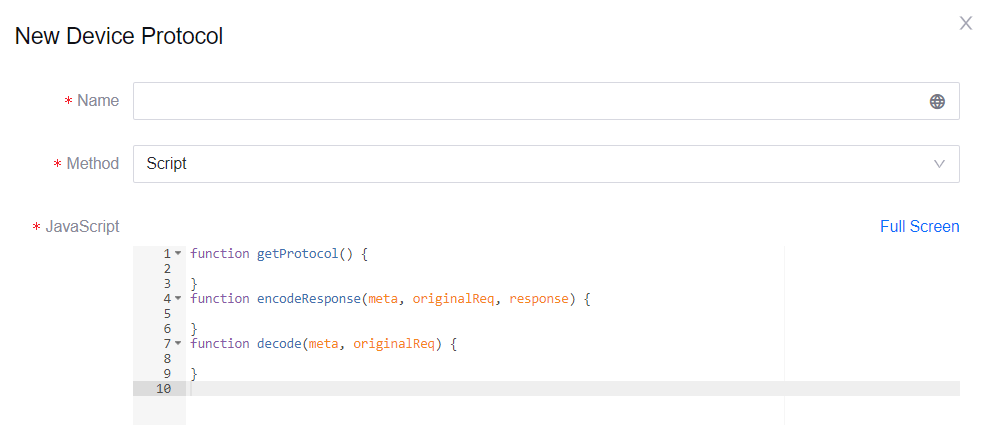
Script: Converts using JavaScript. You would need to write the script in the subsequent script area. For more information, see Using Script.
Description: Enter a description for the device protocol.

Click OK to create the device protocol, and it will appear in the list of device protocols with a system generated ID.
Viewing Device Protocol Details
In IoT Protocol Connectors > Device Protocols, locate the device protocol you wish to view from the list and click the View icon
 .
.The details of the device protocol will be displayed in the pop-up-window.
Editing Device Protocol Details
In IoT Protocol Connectors > Device Protocols, locate the device protocol you wish to edit from the list and click the Edit icon
 .
.All fields can be edited, except for Protocol ID.
After editing, click OK to save the changes.
Deleting Device Protocols
In IoT Protocol Connectors > Device Protocols, locate the device protocol you wish to delete from the list and click the Delete icon
 .
.Deleted device protocols cannot be recovered. To delete the device protocol, click the Delete button in the pop-up window.
Processing Protocols
There are many types of device protocols. Device Connectivity & Management provides two ways of processing device protocols to EnOS standard protocol, through JAR or JavaScript.
Using JAR
Include the core dependency by adding the following code snippet.
<dependency>
 <groupId>com.enos-iot.enos.third_party_protocol</groupId>
 <artifactId>core</artifactId>
 <version>1.0.0</version>
</dependency>
There are 3 methods,
getProtocol(),decode(Map<String, Object> meta, String originalReq), andencodeResponse(Map<String, Object> meta, String originalReq, Response<T> response), in theICodecPlugininterface found in core. When using JAR for conversion, implement theICodecPlugininterface by creating multiple classes with different classes handling different data requests.For more information about the method parameters, see Parameter Descriptions.
Specify the specific class name, for example, com.enosiot.enos.third_party_protocol.haystack.CreateDeviceCodecPlugin.
Upload the JAR package.
Using Script
Write the code in JavaScript to implement the 3 functions,
getProtocol(),encodeResponse(meta, originalReq, response), anddecode(meta, originalReq).
For more information about the function parameters, see Parameter Descriptions.
Test and debug the script to ensure it works by clicking Test.
When debugging, ensure that the code includes all 3 functions.
Choose a method to debug from the drop-down at Script.
Fill in the required parameters for the function at Input Metadata, Input Response, and Input OriginalReq.
Click Test and the results for the chosen method will be displayed in Output.
Parameter Descriptions
There are 3 parameters for the methods/functions used in JAR and Script respectively. Refer to the below for their descriptions.
Meta
The metadata information contains the following:
orgId: The organization ID of the gateway using the protocol.
netCompType: The type of network module used in the protocol gateway.
httpUri: The path received by the network module.
protocolGateway: The ID of the protocol gateway.
When using JAR, the meta information is passed as Map<String, Object> while for Script, the meta is passed as an object.
Response
The response here refers to the response sent by EnOS Cloud, such as the device-related information when creating devices or the success/failed information when updating models or sending measurement points. Refer to the below for a sample.
{
    "mainCode": 200,
    "mainMessage": "OK",
    "items": []
}
OriginalReq
For different business requests, the decode method should convert the input data to the corresponding request format.
JAR: The requested request should belong to a subclass of the BaseRequest class, such as CreateDeviceRequest.
Script: The structure of the request should conform to the format of the request type as per the below, distinguished based on the
messageTypefield. The currently supported types are CreateDevice, UpdateModel, PostMeasurePoint, and LoginDevice.1. CreateDevice Request Format
To create a device, ensure that the application to be used when creating the protocol gateway must have all permissions for Device Management Service.
Creating a device using model and device information
Sample:
{
  "messageType": "CreateDevice",
  "models": [
    {
      "externalDeviceId": "",
      "externalModelId": "model-id-1",
      "name": {
        "defaultValue": "model-name-1",
        "i18nValue": { }
      },
      "measurepoints": {
        "mp001": "TEXT",
        "mp002": "ARRAY:INT"
        },
      "attrs": {
        "location": "TEXT"
        },
      "tags": {
        "someKeys": "tagValue"
      }
    }
  ],
  "devices": [
    {
      "externalDeviceId": "site-1-device-1",
      "externalModelId": "model-id-1",
      "name": {
        "defaultValue": "dev-1",
        "i18nValue": {}
      },
      "timezone": "Asia/Shanghai",
      "attrs": {
        "location": "Shanghai"
      },
      "tags": {
        "devTag": "some tag"
      }
    },
    {
      "externalDeviceId": "site-1-device-2",
      "externalModelId": "model-id-1",
      "name": {
        "defaultValue": "dev-2",
        "i18nValue": {}
      },
      "timezone": "Asia/Shanghai",
      "attrs": {
        "location": "Shanghai"
      },
      "tags": {
        "devTag": "some tag"
      }
    }
  ]
}
The contents inside
modelsanddevicesare the information of the models and devices to be created respectively and are required.2. UpdateModel Request Format
To update a model, ensure that the application to be used when creating the protocol gateway must have all permissions for Device Management Service.
Updating model using externalDeviceId
This request updates the model with the device that corresponds to the specified device ID.
Sample:
{
  "messageType": "UpdateModel",
  "isPartialUpdate": "true",
  "models": [
    {
      "externalDeviceId": "site-1-device-1",
      "measurepoints": {
        "mp001": "TEXT",
        "mp002": "ARRAY:INT"
      },
      "attrs": {
        "location": "TEXT"
      }
    }
  ]
}
Updating model using externalModelId
This request updates the model that corresponds to the specified model ID.
Sample:
{
  "messageType": "UpdateModel",
  "isPartialUpdate": "true",
  "models": [
    {
      "externalModelId": "model-id-1",
      "measurepoints": {
        "mp001": "TEXT",
        "mp002": "ARRAY:INT"
      },
      "attrs": {
        "location": "TEXT"
      }
    }
  ]
}
3. PostMeasurePoint Request Format
Posting measurement points using externalDeviceId
This request posts the measurement points of the device that corresponds to the specified device ID.
Sample:
{
  "messageType": "PostMeasurePoint",
  "ignoreInvalidMeasurePoint": true,
  "isRealtime": true,
  "measurepoints": [
    {
      "externalDeviceId": "site-1-device-1",
      "measurepoints": {
        "mp001": "hello",
        "mp002": [1, 2, 3]
      },
      "time": 123456678
    }
  ]
}
Posting measurement points using assetId
This request posts the measurement points of the device that corresponds to the specified asset ID.
Sample:
{
  "messageType": "PostMeasurePoint",
  "ignoreInvalidMeasurePoint": true,
  "isRealtime": true,
  "measurepoints": [
    {
      "assetId": "7lk3DQL1",
      "measurepoints": {
        "mp001": "hello",
        "mp002": [1, 2, 3]
      },
      "time": 123456678
    }
  ]
}
Posting measurement points using productKey and deviceKey
This request posts the measurement points of the device that corresponds to the specified product key + device key.
Sample:
{
  "messageType": "PostMeasurePoint",
  "ignoreInvalidMeasurePoint": true,
  "isRealtime": true,
  "measurepoints": [
    {
      "productKey": "mWqieraU",
      "deviceKey": "LSwYlj98Za",
      "measurepoints": {
        "mp001": "hello",
        "mp002": [1, 2, 3]
      },
      "time": 123456678
    }
  ]
}
4. LoginDevice Request Format
Log in to a device using externalDeviceId
This request logs in to the device that corresponds to the specified device ID.
Sample:
{
  "messageType": "LoginDevice",
  "devices": [
    {
      "externalDeviceId": "site-1-device-1",
      "sign": "signBySignMethod",
    }
  ],
  "keepOnline": 300,
  "signMethod": "sha256",
  "timestamp": "1564988853275"
}
Log in to a device using assetId
This request logs in to the device that corresponds to the specified asset ID.
Sample:
{
  "messageType": "LoginDevice",
  "devices": [
    {
      "assetId": "7lk3DQL1",
      "sign": "signBySignMethod",
    }
  ],
  "keepOnline": 300,
  "signMethod": "sha256",
  "timestamp": "1564988853275"
}
Log in to a device using productKey and deviceKey
This request logs in to the device that corresponds to the specified product key + device key.
Sample:
{
  "messageType": "LoginDevice",
  "devices": [
    {
      "productKey": "mWqieraU",
      "deviceKey": "LSwYlj98Za",
      "sign": "signBySignMethod",
    }
  ],
  "keepOnline": 300,
  "signMethod": "sha256",
  "timestamp": "1564988853275"
}