Batch Upgrading Firmware
You can create a batch upgrade job for a verified firmware, specify the upgrade strategy and methods, then start to push the upgrade requests. This section shows how to batch upgrade firmware.
Upgrade Methods
Cloud initiated OTA process: EnOS maintains the list of devices to be upgraded according to the upgrade policy, and pushes the upgrade requests to devices as per the upgrade sequence. If the devices are online, they will receive the upgrade request and start upgrading. If the devices are offline, they will receive the upgrade request after they reconnect to EnOS. This is the default method.
Upon device request: EnOS maintains the list of devices to be upgraded, and judge whether a device falls in the scope of upgrade when the device sends an OTA upgrade request. If yes, an available firmware version will be pushed to the device. The upgrade process will start after the device confirms to upgrade to this version.
Before You Start
Ensure you have completed Verifying Firmware.
Ensure that you have the device firmware version and
deviceKeyinformation.
Procedure
Select Device Management > OTA Upgrades > OTA Jobs.
Click New Job and select Upgrade for Type.
Fill in the information for the below.
Job Name: Enter a name for the OTA verification job.
Product: Select the product for the firmware verification from the drop-down.
Firmware Name: Select the firmware from the list of names in the drop-down.
Current Firmware Version: Select the firmware version for upgrading.
Strategy: Select a strategy for the upgrade.
Snapshot: For devices that have reported firmware version and fall into a closed upgrade list. Only the devices on this list will be upgraded. Any devices that meet the upgrade criteria later will not receive new firmware push.
Increment: For devices that have reported firmware version and fall into an open upgrade list. Any devices that meet the upgrade creteria later will be included into the open list. The list of devices to be upgraded changes dynamically.
Scope: Select a scope for the upgrade.
All Devices: Upgrade all the devices of the selected version.
Target Devices: Upgrade only some of the devices.
Filter: Available when Target devices is selected. You can filter the devices to be upgraded by device key, tag, attribute, and asset tree.
Specify Device Key: Select the device key of the devices from the drop-down.
By Device Tag: Click New tag to add the tag and tag value.
By Attribute: Click Add to select attributes.
By Asset Tree: Click Add to select devices based on the root nodes of the OU and the parent nodes under the root nodes. If the root nodes or parent nodes themselves are also devices, they will fall into the upgrade scope. If you want to specify the devices of the underlying child nodes, use their deviceKey. A maximum of 5 asset trees can be selected.
Maximum Task Concurrency: Enter the maximum number of upgrades that can concurrently run. Devices with an “Upgrading” status are not included in this count, while devices with “To be Pushed” and “Pushed” status are included.
Retry Failed Tasks: Select whether to automatically retry failed tasks.
Retry Interval: Select the interval between retries if Retry Failed Tasks is selected. Available options are: 0 min (immediately), 10 min, 30 min, 1 hour, and 24 hours.
Max Retry Attempts: Enter the maximum number of retries if Retry Failed Tasks is selected. Available options are: 1, 2, and 5.
Schedule: Select a start and end date and time for the upgrade. The upgrade is allowed only within the selected schedule, and no upgrade request will be pushed outside the schedule. If the start date/time is earlier than the current date/time, the upgrade will start immediately.
Repeat Every Day: This selection is disabled by default and is enabled only if the start and end date for Schedule falls on the same day. If selected, the OTA job will run every day according to the timing given in Schedule.
Upgrade Timeout: Enter a timeout period for the verification job in minutes. If the device(s) selected above for updating does not return the verification result (successful or failed) within this time period, the job will fail. The default period is 120 minutes.
Enable Upon Device Request Upgrade: If this is enabled, and the current number of concurrent OTA upgrade tasks in the system is lesser than the Maximum Task Concurrency, the OTA job will start immediately. Otherwise, the device will be added to the “To be Pushed” list.
Start Upon Creation: If enabled, the job will start immediately when you click Confirm.
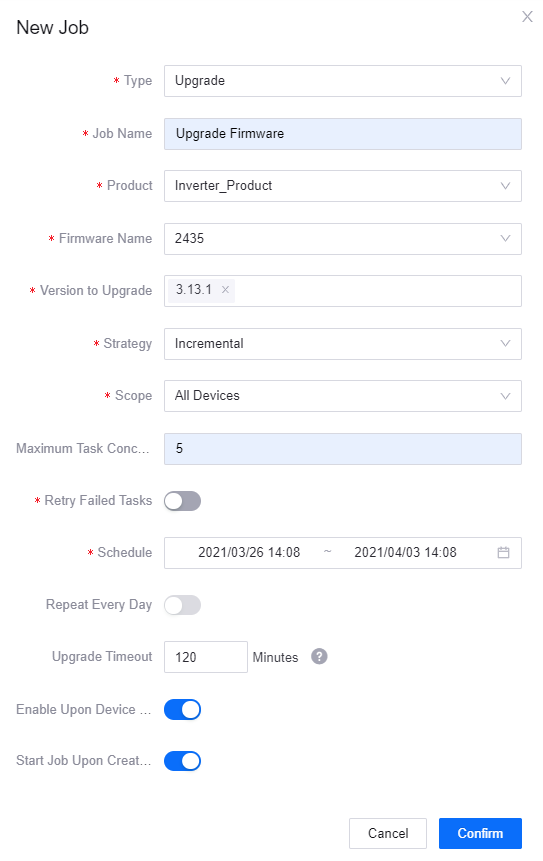
Click Confirm to finish creating the job. If Start Upon Creation was enabled during creation, the job will start immediately.
Results
Once successfully created, the upgrading job will be listed in the list of jobs in the OTA Jobs tab page. If you toggled Start Upon Creation to on, the upgrading job will start immediately. Otherwise, you can go to the OTA Jobs tab page to start the job manually.
In OTA Jobs, select View Details to enter the job details page where you can view the details of the upgrade. For more information, see Viewing OTA Job Details.
Next Step
You can delete the firmware after an upgrade. See Deleting Firmware.