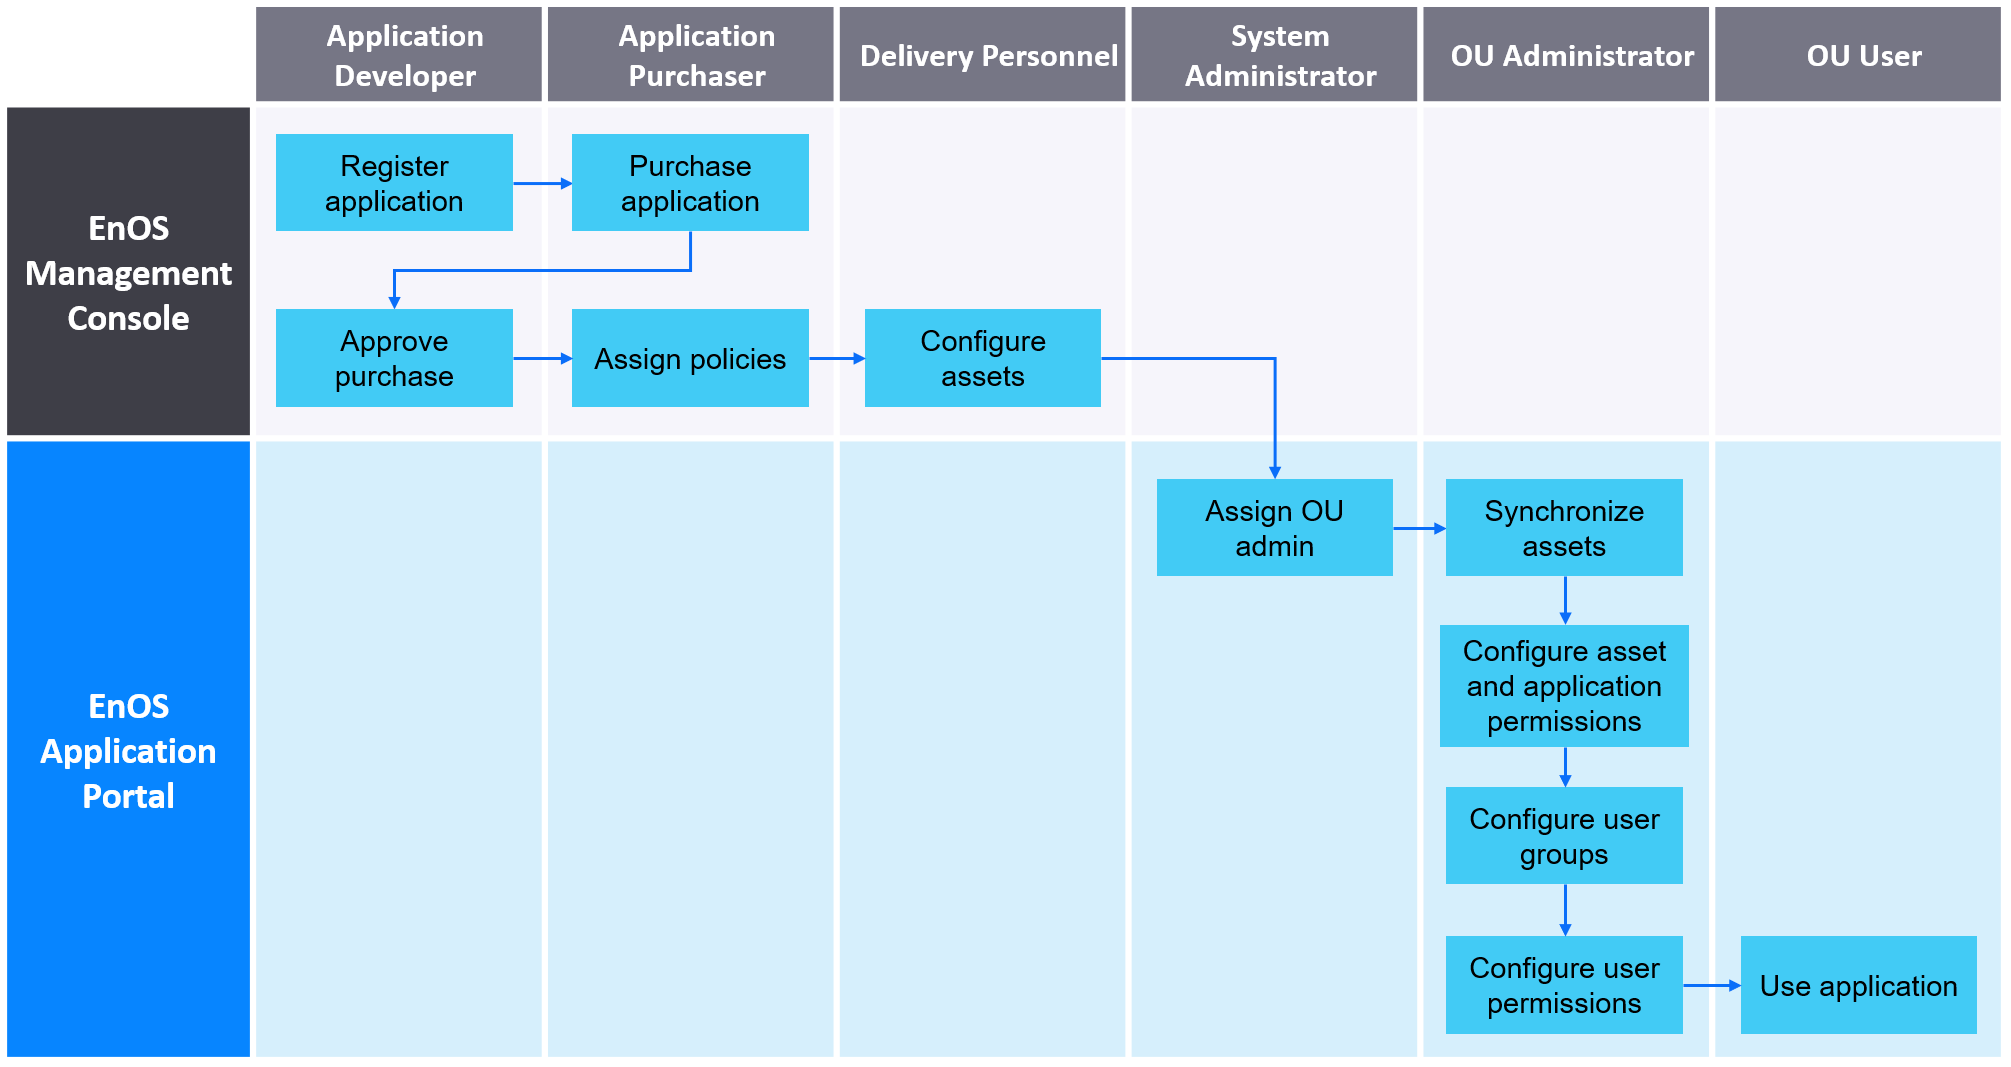
Setting up Application Portal for the First Time
This guide shows the entire workflow for setting up Application Portal for the first time, from registration of an application in the EnOS Management Console by the application developer, to configuration of user permissions in Application Portal by the OU administrator, and finally usage of the application by OU users on Application Portal.
Before You Start
Devices must have been connected to the EnOS cloud.
For more information about connecting devices, see Connecting and Managing Devices in the Cloud.
Step 1. Register an Application
Target user: Application developers
Environment: EnOS Management Console
After developing applications, you must register it on EnOS Management Console to make it available for your organization or for other interested parties.
Log in to EnOS Management Console.
In the navigation pane, select Application Registration.
Click Create App to create your application.
For the purpose of this exercise, we will name the application Data Analyzer.Select the Data Analyzer application and click Menu > Create Menu to create menus for the application.
Note
You must specify a URL for a level 2 menu or a level 1 menu with no submenus to enable it to appear on Application Portal.
If necessary, click Permission > Create Access Point to configure access points for the application.
This setting is not mandatory for the application to work on Application Portal.
For more information, see Registering and Managing Applications.
Step 2. Purchase an Application
Target user: Application purchasers
Environment: EnOS Management Console
EnOS offers ready-to-use applications that are developed internally or by third-party developers for sale. If you are interested in purchasing an application, please get the list of applications from the EnOS support team. After you have decided on the application to purchase, you can contact the EnOS sales representative to obtain the access key, and proceed to purchase the app on EnOS console.
- Log in to EnOS Management Console.
- In the navigation pane, select Application Registration.
- Click Purchased > Purchase Application to purchase the Data Analyzer application by using its access key.
For more information, see Purchasing an Application.
Step 3. Approve the Application Purchase
Target user: Application developers
Environment: EnOS Management Console
You must approve application purchases and configure the requested menus and access points before the application gets released to the purchasers.
Log in to EnOS Management Console.
In the navigation pane, select Application Registration.
Select the Data Analyzer application and click Requests Pending Approval.
Click Purchase to be approved for the OU that the purchaser belongs to.
Select Authorized.
Enter some authorization notes.
Select the menus and access points that you want to grant to the purchaser.
Click Confirm.
Note
If you added new menus or access points after the initial purchase approval, you need to manually grant access for them to the respective purchasers, if necessary.
For more information, see Registering and Managing Applications.
Step 4. Assign Policies to the Application
Target user: Application purchasers
Environment: EnOS Management Console
Newly purchased applications would need access to your resources in EnOS (such as services, functions, and data) to be able to function properly. Therefore, you must assign policies to the service account of the purchased application to grant the necessary permissions. The service account is created automatically when the application purchase is approved.
Log in to EnOS Management Console.
In the navigation pane, select Identity and Access Management > Service Account.
Select the Authorize icon in the Data Analyzer row to assign existing policies to the application.
Note
If the existing policies do not satisfy your requirements, you can create new policies by selecting Policy in the navigation pane.
For more information, see Managing Service Accounts.
Step 5. Configure Assets for Synchronization
Target user: Delivery personnel
Environment: EnOS Management Console
You need to select and configure the assets that the customer (application purchaser) would like to use in the purchased application. Application Portal can only access and display the following types of asset:
- Assets tagged with
auth_unit:true - Assets associated with models that are tagged with
auth_unit:true
Therefore, you must assign the auth_unit:true tag to the required assets to enable them to be synchronized to Application Portal.
Log in to EnOS Management Console.
To assign the tag to a model, perform these steps:
- In the navigation pane, select Models.
- Find the model that you want to configure and click Edit next to Tags.
- Add a new tag, and enter
auth_unitfor the key andtruefor the value.
To assign the tag to an asset, perform these steps:
In the navigation pane, select Device Management > Device Assets, Device Management > Logical Assets, or Asset Trees.
Find the asset that you want to configure and click Edit next to Tags or Asset Tag.
Add a new tag, and enter
auth_unitfor the key andtruefor the value.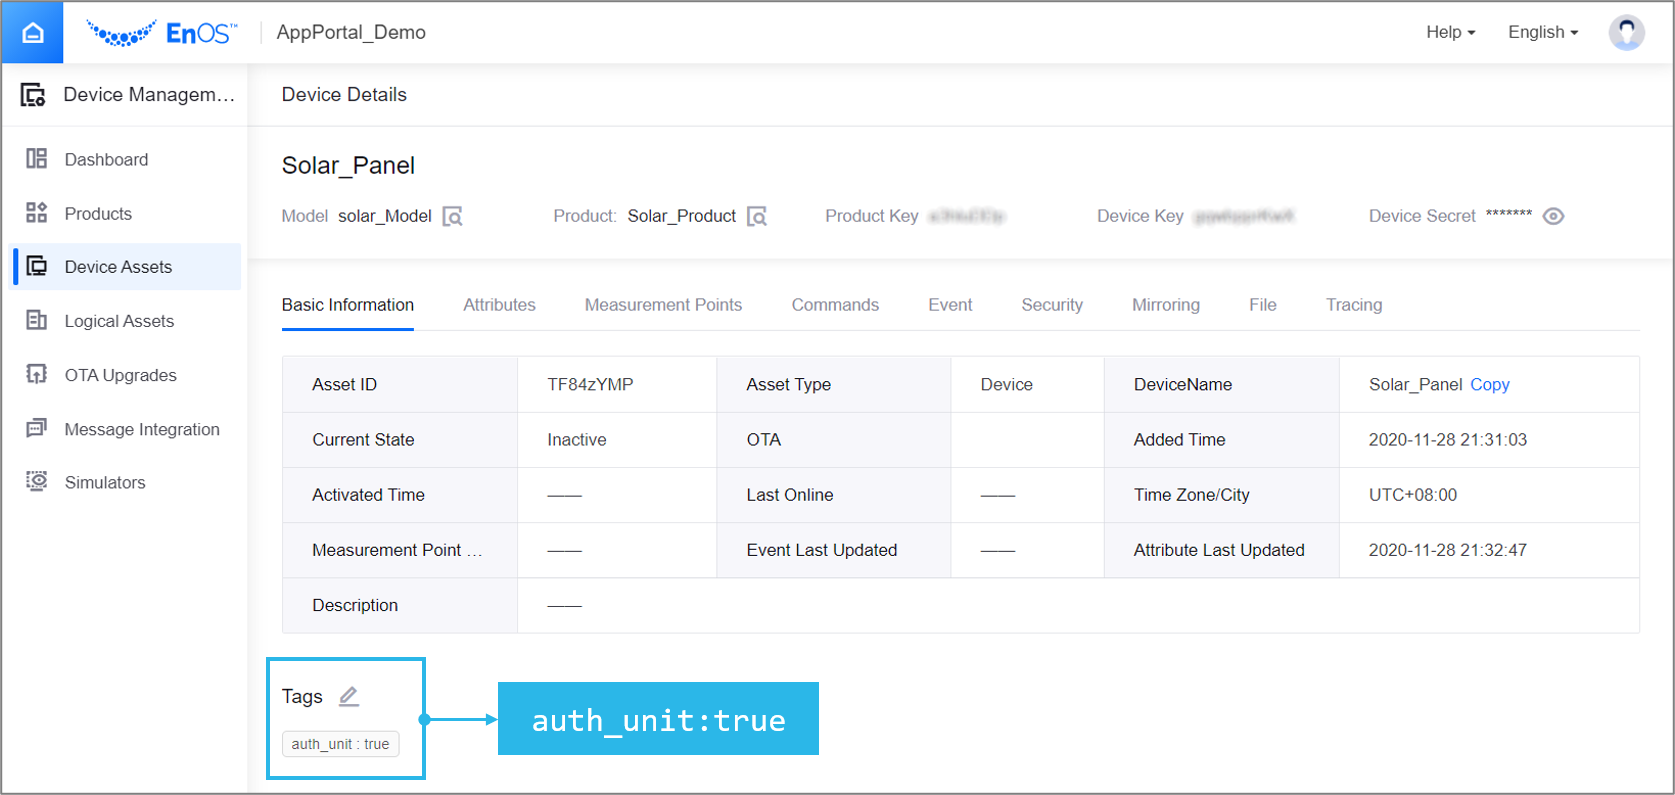
For more information, see:
Step 6. Assign an OU Administrator
Target user: System administrator
Environment: EnOS Application Portal
You must assign an administrator that will oversee all aspects of the OU in Application Portal.
- Log in to Application Portal and click Admin Console.
- In the navigation pane, select OU Administrator.
- Find the target OU and assign an administrator to the OU.
For more information, see Assigning an OU Administrator.
Step 7. Synchronize Assets from EnOS
Target user: OU administrator
Environment: EnOS Application Portal
You must synchronize assets from EnOS before they are displayed in Application Portal.
- Log in to Application Portal and click Admin Console.
- In the navigation pane, select Asset Synchronization.
- Click Synchronize Assets.
Step 8. Configure Asset and Application Permissions
Target user: OU administrator
Environment: EnOS Application Portal
You can first configure the components (organization structures, roles, and menu groups) that are used for controlling asset and application permissions.
- Log in to Application Portal and click Admin Console.
- In the navigation pane, select Organization Structure.
- Create an organization structure and assign assets to the respective nodes.
This enables users of the organization structure to access assets corresponding to the nodes that they belong to. - In the navigation pane, select Application Management.
- Assign the created organization structure to the Data Analyzer application.
This enables users of the organization structure to access to the application. - Assign menus to the default menu group or create new menu groups for the Data Analyzer application.
This enables precise control over the access permissions for different menus. - In the navigation pane, select Role.
- Create roles and assign menu groups and application permissions (access points) to them.
This enables users of the roles to access the assigned menu groups and application permissions.
For more information, see:
Step 9. Configure User Groups
Target user: OU administrator
Environment: EnOS Application Portal
Generally, user access to assets can be managed based on the organization hierarchy defined in the organization structure. However, you may have scenarios that deviate from the organization hierarchy, for example only some users on an organization structure node need to access an asset, or users that need to access an asset belong to different organization structures or organization structure nodes. In these cases, you can use user groups to assign additional asset permissions to these users.
- Log in to Application Portal and click Admin Console.
- In the navigation pane, select User Group.
- Create a user group.
- In the navigation pane, select Asset Permission.
- Assign assets to the user group.
For more information, see:
Step 10. Configure User Permissions
Target user: OU administrator
Environment: EnOS Application Portal
After configuring the components used for controlling asset and application permissions, you can proceed to assign roles, organization structures and/or user groups to users so that they can access the associated assets and application functions.
- Log in to Application Portal and click Admin Console.
- In the navigation pane, select User.
- Create users and assign roles, organization structures and/or user groups to them.
Users will gain access to the following items:- Menu groups and application permissions associated with the assigned roles.
- Assets associated with the assigned organization structures.
- Assets associated with the assigned user groups.
- If any users require access to assets that are not associated with the organization structures or user groups that they belong to, you can also assign assets to each individual user by performing these steps:
- In the navigation pane, select Asset Permission.
- Assign assets to each user as necessary.
For more information, see: