Tutorial: Simulating a Device Connection Using Java SDK
The device simulator enables you to simulate a device that connects to and sends data to EnOS without using EnOS Java SDK.
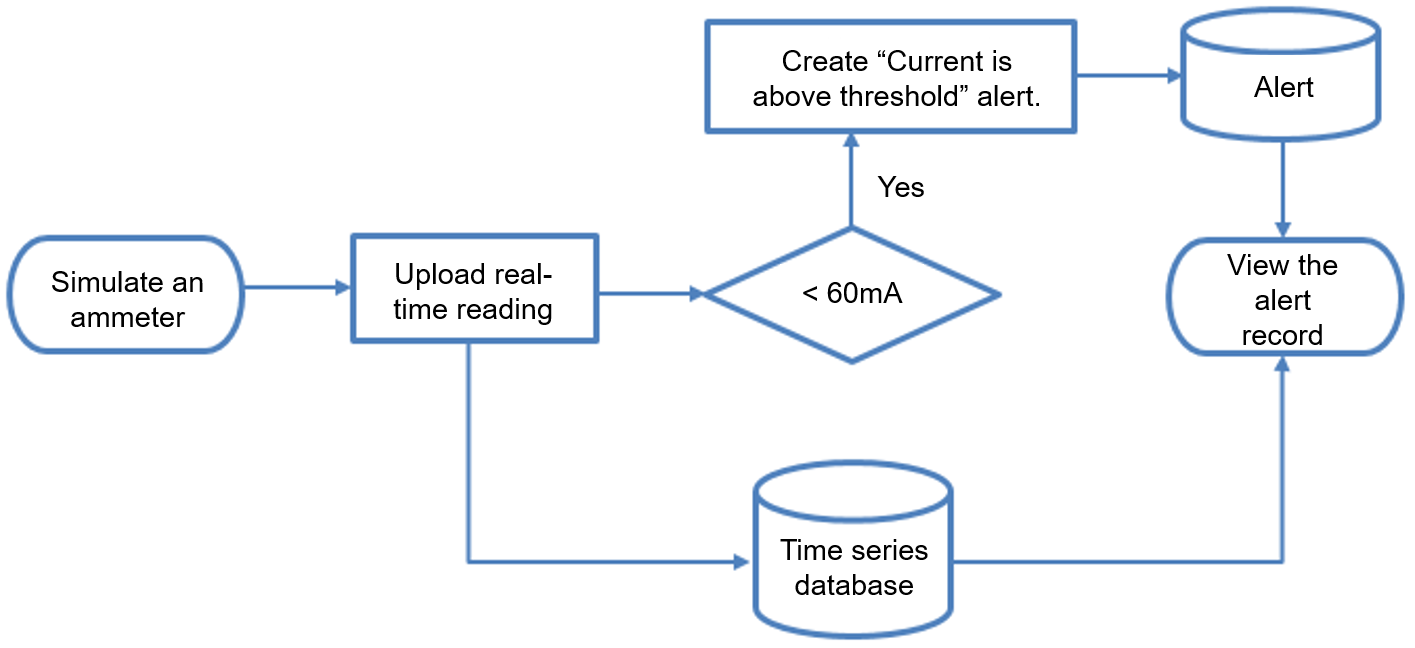
This tutorial is a step-by-step guide on how to use the device simulator to simulate a device to send and view the data sent to EnOS. It will simulate an ammeter to report its reading once every minute, where the data will be stored in the Time Series Database (TSDB). If the current is above 60mA, a “Current is above the threshold” alert will be triggered and sent to EnOS. Both the readings and alert generated (if any) can be viewed in EnOS.
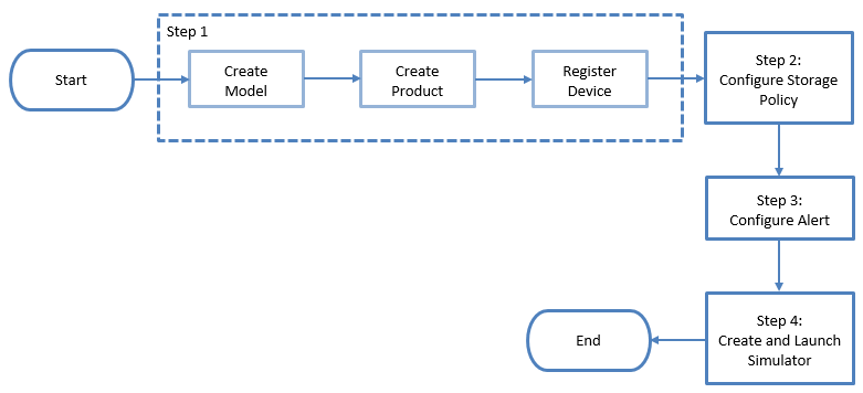
The procedure to simulate the ammeter is as follows.
Prerequisites
Ensure that you have obtained the Developer role to have the access to Application Portal > Developer Console. If not, contact your OU administrator.
Step 1: Creating a Model, Product, and Device
Create a model for the simulated ammeter using the following parameters. For more information, see Creating Models.
Model for Simulated Ammeter¶ Field
Value
Group
Custom(Custom)
Model Name
Simulated Ammeter Model
Business ID
test.ammeter
Model Usage
Device Connection
Description
None
Define the following elements for the model created in the above step.
Elements of Simulated Ammeter¶ Field
Value
Category
Measurement Points
Name
Real-time Current
ID
current
Point Type
AI
Data Type
double
Aggregation
None
Unit
Electric Current: milliampere | mA
Quality Indicator
None
Description
None
Is Writable
Yes
Create a product based on the Simulated Ammeter Model using the following parameters. For information on how to create a product, see Creating Products.
Simulated Ammeter Product¶ Field
Value
Product Name
Simulated Ammeter Product
Node Type
Device
Model
Simulated Ammeter Model
Onboarding Method
Json
Certificate-Based Authentication
Disabled
Description
None
Register a device based on the Simulated Ammeter Product, using the following parameters. For information on how to create a device, see Registering Devices.
Simulated Ammeter Device¶ Field
Value
Product
Simulated Ammeter Product
Device Key
simulatedAmmeter
Device Name
Simulated Ammeter Device
Time Zone/City
UTC+08:00
Step 2: Configuring Alert Rules
For this step, you need to create a rule stipulating that when a reading for the Real-time Current exceeds 60mA, a Current is above threshold alert of Warning severity will be immediately triggered.
In Application Portal > Developer Console > Alert Engine > Alert Rules, create a rule as follows. To create a rule, the corresponding severity, type, and content are required. For information on how to create these, see Getting Started with Alert Engine.
Alert Rule Configuration¶ Field
Value
Rule ID
ammeter_high_alert
Select Model
Simulated Ammeter Model
Measurement Point
Real-time Current
Condition
>
Value
60
Alert Content
Current is above threshold
Alert Severity
Warning Alert
Alert Triggering Delay
0
Alert Masking
Disabled
Enabled
No
Step 3: Launching a Device Simulator
In Application Portal > Developer Console > Device Management > Simulators, create a simulator for the Simulated Ammeter Device. For information on how to create a simulator, see Configuring Device Simulators.
Upload the data sample for the Simulated Ammeter Device. For information on how to upload data sample, see Configuring Device Simulators.
In the sample below, there are two columns of data. Column timeOfDay indicates the time from 0:00:00 to 23:59:00 with intervals of one minute. Column current, the identifier for Real-time Current, indicates the measurement point value reported by the device in milliampere.
When we created the alert rule, the alert threshold was set to 60mA. Therefore, in this sample, the column current needs to have at least one value above 60 in order to trigger the Current is above threshold alert.
It is recommended to set some values above 60 at earlier moments so that the alerts can be triggered early during the simulation. In the example below, abnormal values are set at 0:02:00, 0:07:00, and 0:10:00, so that the alerts will be triggered at the 2nd, 7th, and 10th minute after starting the simulation.

Start the simulator, setting the end time for 24 hours later.
You can actually set the end time to a time of your preference, but setting it much later leaves enough time to absorb enough data to generate a report.
Results
Data Insights
Wait for some time and go to Application Portal > Developer Console > Data Asset Storage Management > Data Insights. Select the device Simulated Ammeter Device and you will be able to view the Real-time Current data report in one minute intervals.

Alert Records
In Application Portal > Developer Console > Alert Engine > Alert Records, and select the model Simulated Ammeter Model to view its historical alerts. You can see that several alerts have been triggered by the abnormal data.