Configuring Asset List
The page describes how application creators configure Asset List pages.
Prerequisites
Before you start, make sure that:
You have the required asset permissions, operational permissions, and access permissions for Asset List pages. Contact the application administrator to get the required permissions.
You have registered the attributes, measurement points, and metrics of target assets in Common Data Service (CDS). For more information, see About EnOS Common Data Service.
Configuring Data Fields
Asset List provides the following style:
List Style: data fields displayed as a list
Card Style: data fields displayed in the cards of each asset
Configuring Data Fields in List View
Select the Asset List from the left navigation pane..
Note
The menu name in your applications might be different from the name in this article, because of the customization on menu names for Unified Monitoring pages. Contact the application administrator for more information.
Select Column Settings
 .
.Select Add Columns from the right panel, select the data fields from the dropdown list and select the checkmark icon
 to add the selected data fields to the asset list.
Select the tags of the added data fields and configure the following information.
Field
Description
Unit
Enter the unit of the data field.
Unit Multiplier
Adjust the digit number of data when the data is too large or too small. The data displayed on the Asset List page is the product of the unit multiplier and the original data.
For example, if the original data is10000 Wh, you can configure the Unit asKWhand the Unit Multiplier as0.001to display the data field as10 KWhon the Asset List page.Style
Select the display style of the data field in the list, supporting
Metricto display the data value, and progress bars to display the progress percentage by a bar chart.Condition
Configure the condition format of this data field.
Select Add to add a new condition format rule and configure the data range and color of the condition format rule.Select Save.
Configuring Data Fields in Card View
Select the Asset List from the left navigation pane..
Select Card Settings
.On the Card Settings tab from the right panel, select Show Data.
Select Add Data, select the data fields from the dropdown list and select the checkmark icon
to add the selected data fields to the asset list.Select the tags of the added data fields and configure the following information.
Field
Description
Unit
Enter the unit of the data field.
Unit Multiplier
Adjust the digit number of data when the data is too large or too small. The data displayed on the Asset List page is the product of the unit multiplier and the original data.
For example, if the original data is10000 Wh, you can configure the Unit asKWhand the Unit Multiplier as0.001to display the data field as10 KWhon the Asset List page.Select Save.
Configuring Metric Cards
Metric Cards contain specified filtering conditions displaying above the list or card area on an Asset page for application users to quickly filter the target assets. Configure the metric cards of the current Asset List page by the following steps:
Select the Asset List from the left navigation pane.
Select Edit Metric Card
 .
.Select Add Metric Card or hover over an existing metric card and select the edit
 icon, then enter the following information in the popup window.
Select OK to add the metric card to the Asset List page.
(Optional) If you want to delete a metric card, hover over the card and select the delete icon
 .
.Select Save.
Configuring Links
Configure the link address for each type of assets on the Asset List page, so that application users can select the names of assets on the list to open corresponding pages:
Select the Asset List from the left navigation pane..
Select List Configuration
 , and select the Link tab.
Enter the following information for each type of assets on the Link tab.
Field
Description
Opening Method
Select the method to open the link specified in Link, supporting
On a New PageandOn the Current Page.Link
Enter the URL address to open when application users select the asset names.
Select OK.
After configuring links for a specified asset type, the name of the assets in that type displays in blue on the Asset List page as shown below.

Configuring Custom Operation Buttons
Configure custom operation buttons for each asset in the Asset List page by the following steps, so that application users can perform certain tasks or open certain pages by selecting the operation buttons:
Select the Asset List from the left navigation pane..
Select List Configuration
.Select the Operation tab.
Select Add Action, and enter the following information on the Operation tab.
Field
Description
Name
Enter the display name of the operation.
Opening Method
Select the method to open the link specified in Link, supporting
On a New PageandOn the Current Page.Link
Enter the URL address to open when application users select the operation button.
Select OK.
You can add up to 3 custom buttons for an Asset List page, which are displayed on the Action column of the page as shown below.

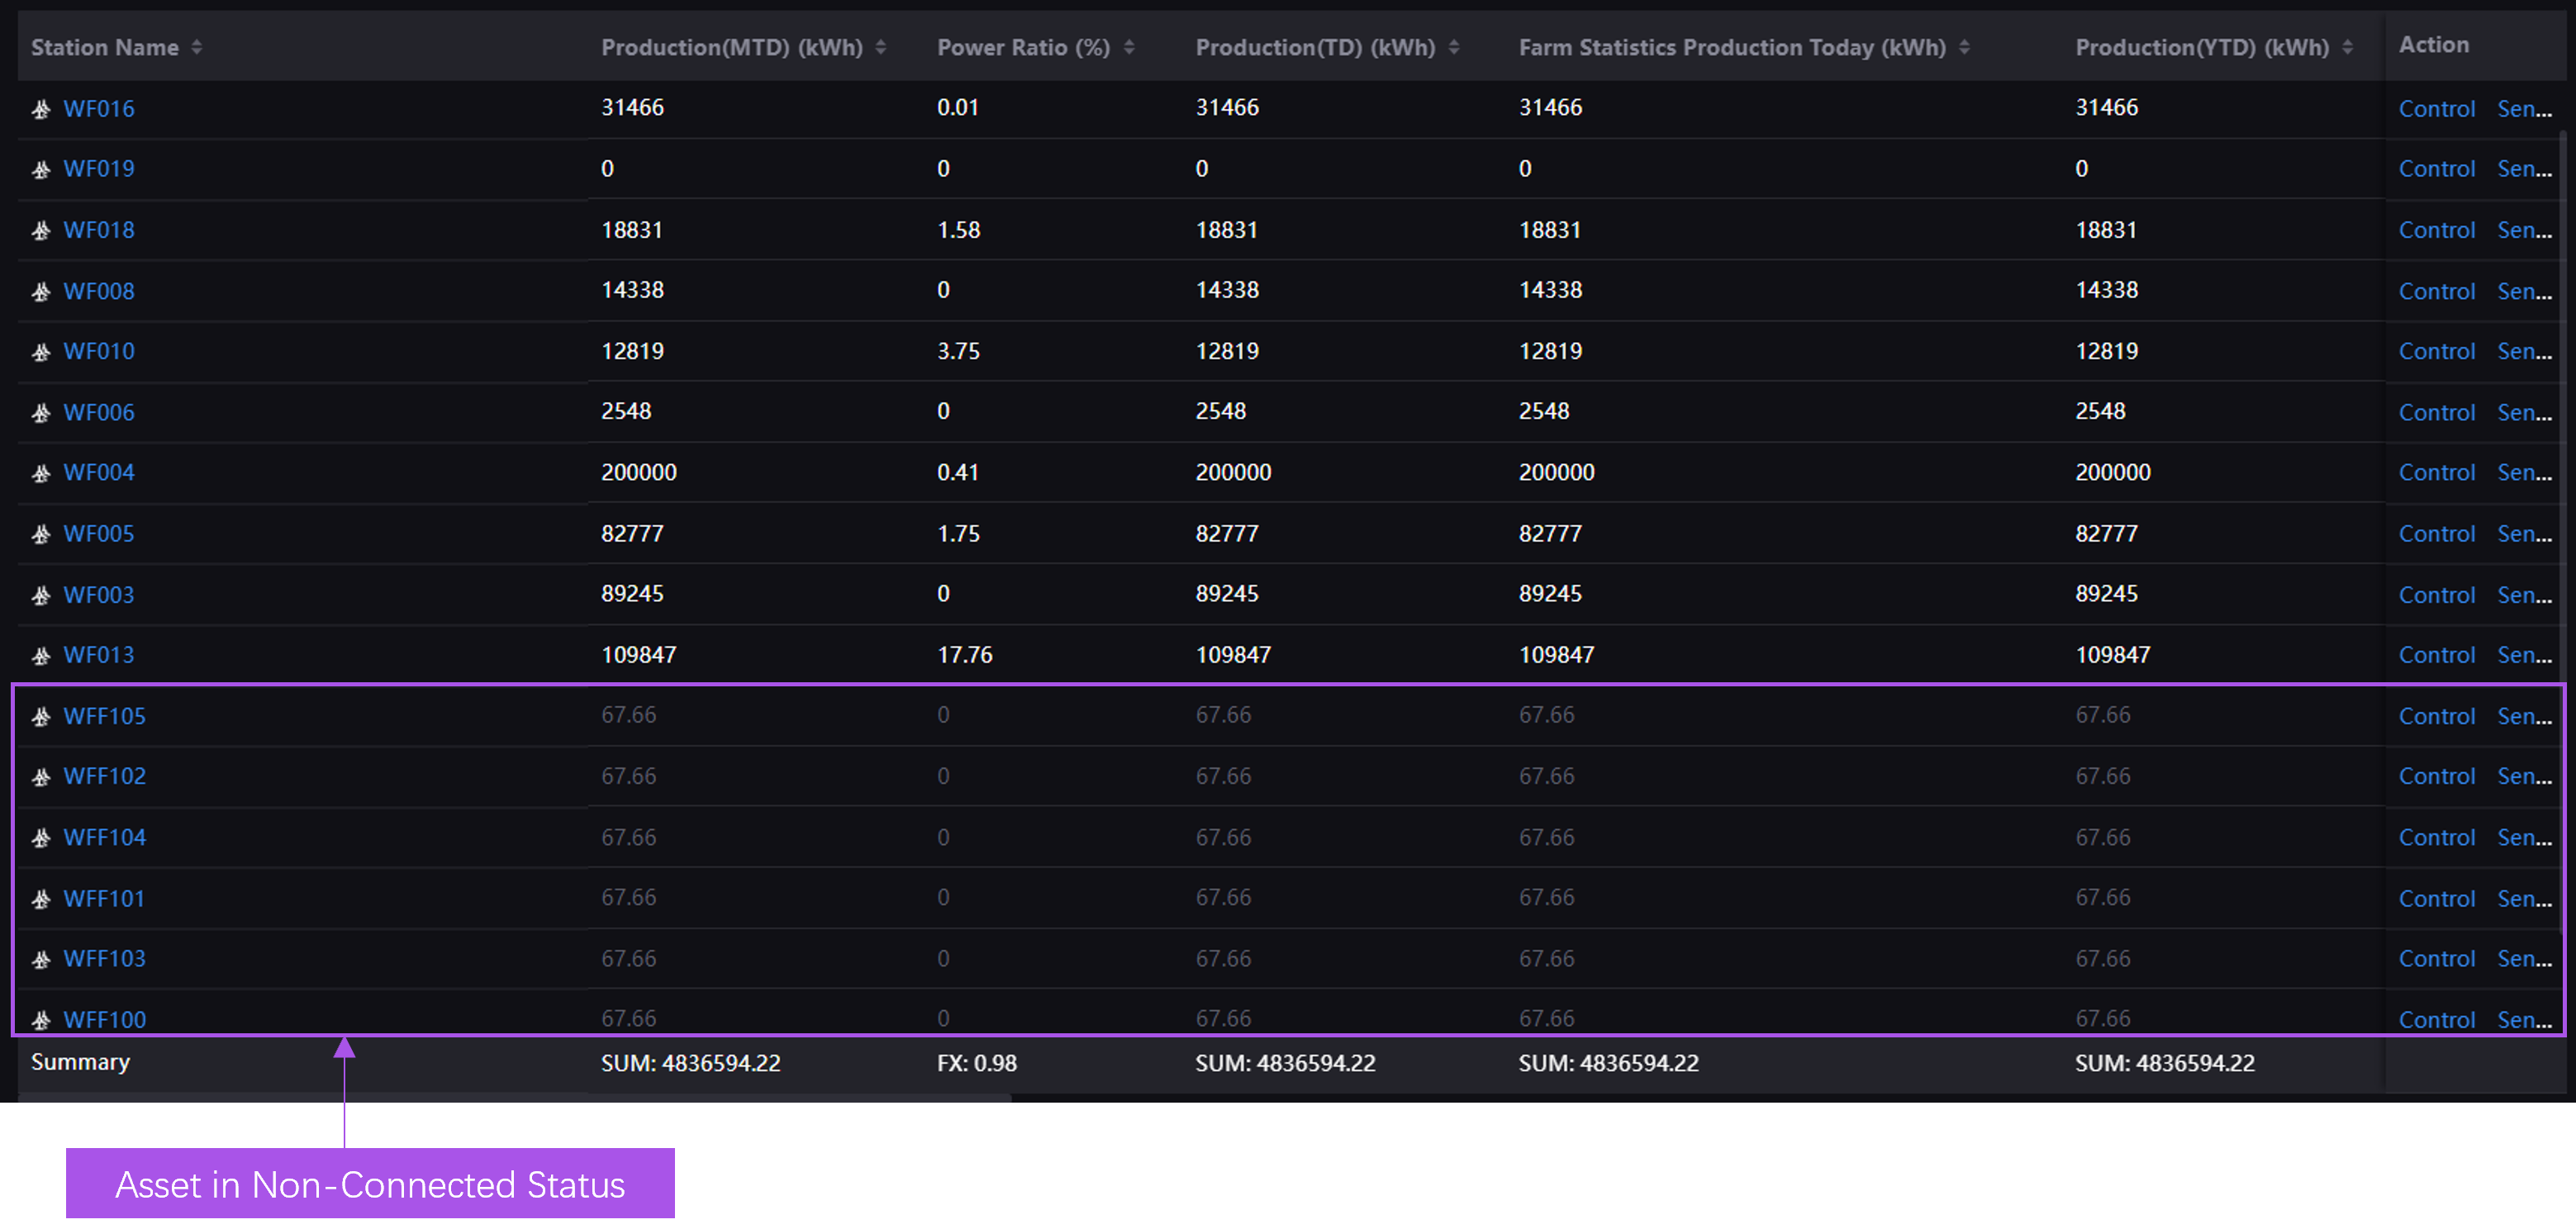
Configuring Non-Connection Status
Non-Connection refers to the status where assets lose the connection to EnOS. For more information, see Non-Connection. Define the non-connection status of assets on the current Asset List page, and select whether to summarize and sort the data of assets in non-connection status by the following steps:
Select the Asset List from the left navigation pane.
Select List Configuration
, and select the Non-Connection tab.Enter the following information on the Non-Connection tab.
Field
Description
Show Non-Connected Status
Turn on the toggle to mark the data of non-connected assets in grey and exclude the non-connected assets from sorting and summarizing.
Turn off the toggle to include the non-connected assets into sorting and summarizing.Non-Connected Asset Type
Select the data field from the dropdown list on the right of the corresponding asst type, and enter a value. If the data of an asset is equal to the value, the asset will be regarded as a non-connected asset.
Select OK.
After turning on Show Non-Connected Status and defining non-connection for asset types, the non-connected assets in the Asset List page displays as below.
Configuring Default View
Default view refers to the view of Asset List displayed when application users of the current OU open the Asset List page. Default view contains the following information:
Style of Asset List
Data fields
Metric Cards
Links
Width of columns
Display order of assets
Save the current list as the default view of the Asset List page for all application users in the current OU by the following steps:
Select the Asset List from the left navigation pane..
Select Save as Default View.
In the Save as Default View? popup window, select OK.
Configuring URL Parameters
Besides the configuration above, application creators can enable or disable more functions by configuring the parameters of the URL. For more information, see URL Parameters.