Advanced Modeling: Dynamic Modeling
Dynamic Modeling allows you to flexibly adjust the business models in EnOS Cloud without reconnecting physical hardware or interrupting existing business operations.
In actual projects, you may encounter the following situations:
Data Sharing Challenges Across Departments: A device has already been connected based on Model A, but another department now needs to use data from that device using Model B. Traditional methods require reconnecting the device, which is costly and complex to manage.
Difficulties in Functional Upgrades After Connection: After a device is connected based on Model C, new device-specific measurement points need to be added without changing the original model. Traditional modeling does not support re-binding, which limits delivery; various domains are forced to perform connections based on private models, leading to complex connection processes and high maintenance costs.
Dynamic Modeling solves pain points such as cross-business data sharing difficulties and fixed device models that cannot be upgraded through the Binding Additional Model and Rebinding Model functions.
This document is intended for model owners and delivery/O&M personnel to introduce how to bind additional models and rebind models to achieve cross-business data sharing and lossless device functional upgrades.
Prerequisites
The model owner has obtained the Developer role permission for EnOS Application Portal and is authorized to create or edit models within the group. If necessary, contact the OU administrator for authorization.
Delivery/O&M personnel have obtained the Developer role permission for EnOS Application Portal and have the permission to access device and data-related menus. If necessary, contact the OU administrator for authorization.
Key information such as source model ID and device asset ID have been prepared.
Scenario 1: Cross-Business Data Sharing — Binding Additional Model
When business department A has already connected a battery device based on model A, business department B expects to use the data of this battery in its own application. The following table shows the differences between the traditional solution and the dynamic modeling solution in this scenario:
Solution |
Implementation |
Limitations & Advantages |
|---|---|---|
Traditional Modeling |
Department B needs to create a new device based on its own model and develop a data forwarding tool to forward data from the battery device to Department B’s device. |
Limitations: |
Dynamic Modeling |
Department B creates Model B, configures feature mapping rules between Model B and Model A, and performs Binding on the battery device. The system automatically creates a new asset based on the energy storage model and converts measurement points according to the rules. |
Advantages: |
The Additional Model Binding function aims to solve the problem where data from one physical device needs to be consumed by multiple business departments from different model perspectives. Through additional model binding, cross-departmental data sharing can be achieved.
Operation Workflow
The figure below introduces the operation workflow for additional model binding:

Define Cross-Model Rule: The model owner configures property rules in the target model to allow the target model to obtain data from the source model.
Bind Additional Model: Establish an association between the physical device and the target model.
Configure Data Flow (Optional): Configure data archiving and subscription tasks for the target model based on business needs.
Verify Data: Check whether real-time data, historical trends, and application calls after binding are normal.
Model Architecture
Assuming the target model is Model B and the source model is Model A, the model architecture after binding is as follows:
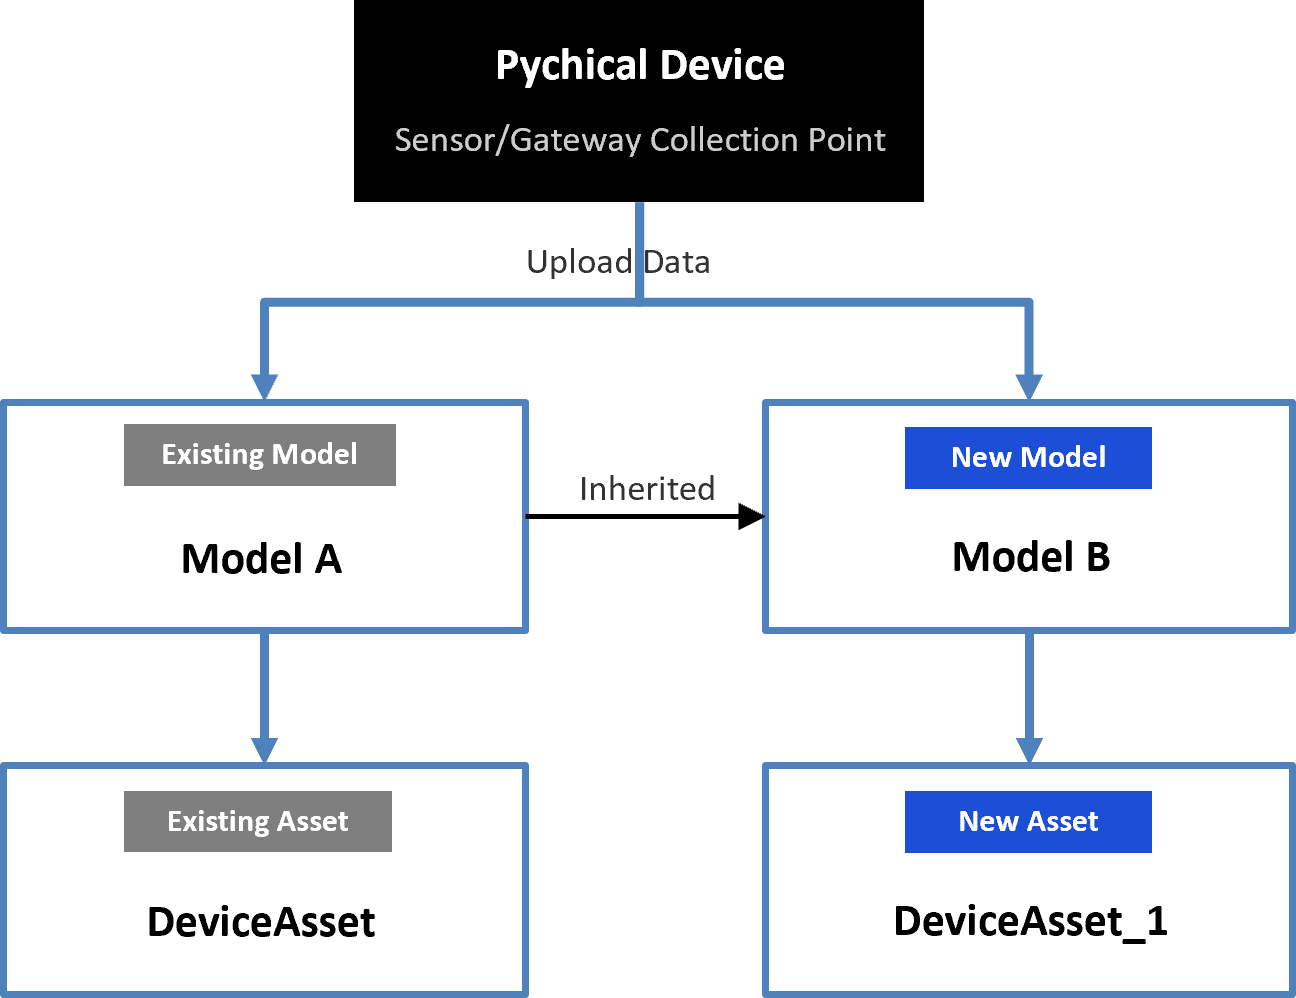
The additional model binding does not affect the original device asset. The newly generated device asset is a logical mirror of the original device and can be independently applied to different business scenarios.
Step 1: Define Cross-Model Rule
Operator |
Location |
|---|---|
Target Model Owner |
Developer Console > Model Management |
Establishing a mapping relationship is a prerequisite for additional model binding. You need to configure property rules in EnOS Model Management to allow the target model (Model B) to obtain data from the source model (Model A).
Check the inheritance relationship of Model B to ensure that Model B and Model A follow the Principles for Creating Cross-Model Rules.
In EnOS Application Portal, go to Developer Console > Data > Model Management > Models, and open the configuration page for Model B.
Select
 Edit in the upper right corner to enter the model editing state.
Go to the Property Rules configuration page and select Create Cross-Model Rule.
In the pop-up window, configure the Name of the rule and select Model A for the Mapping Model.
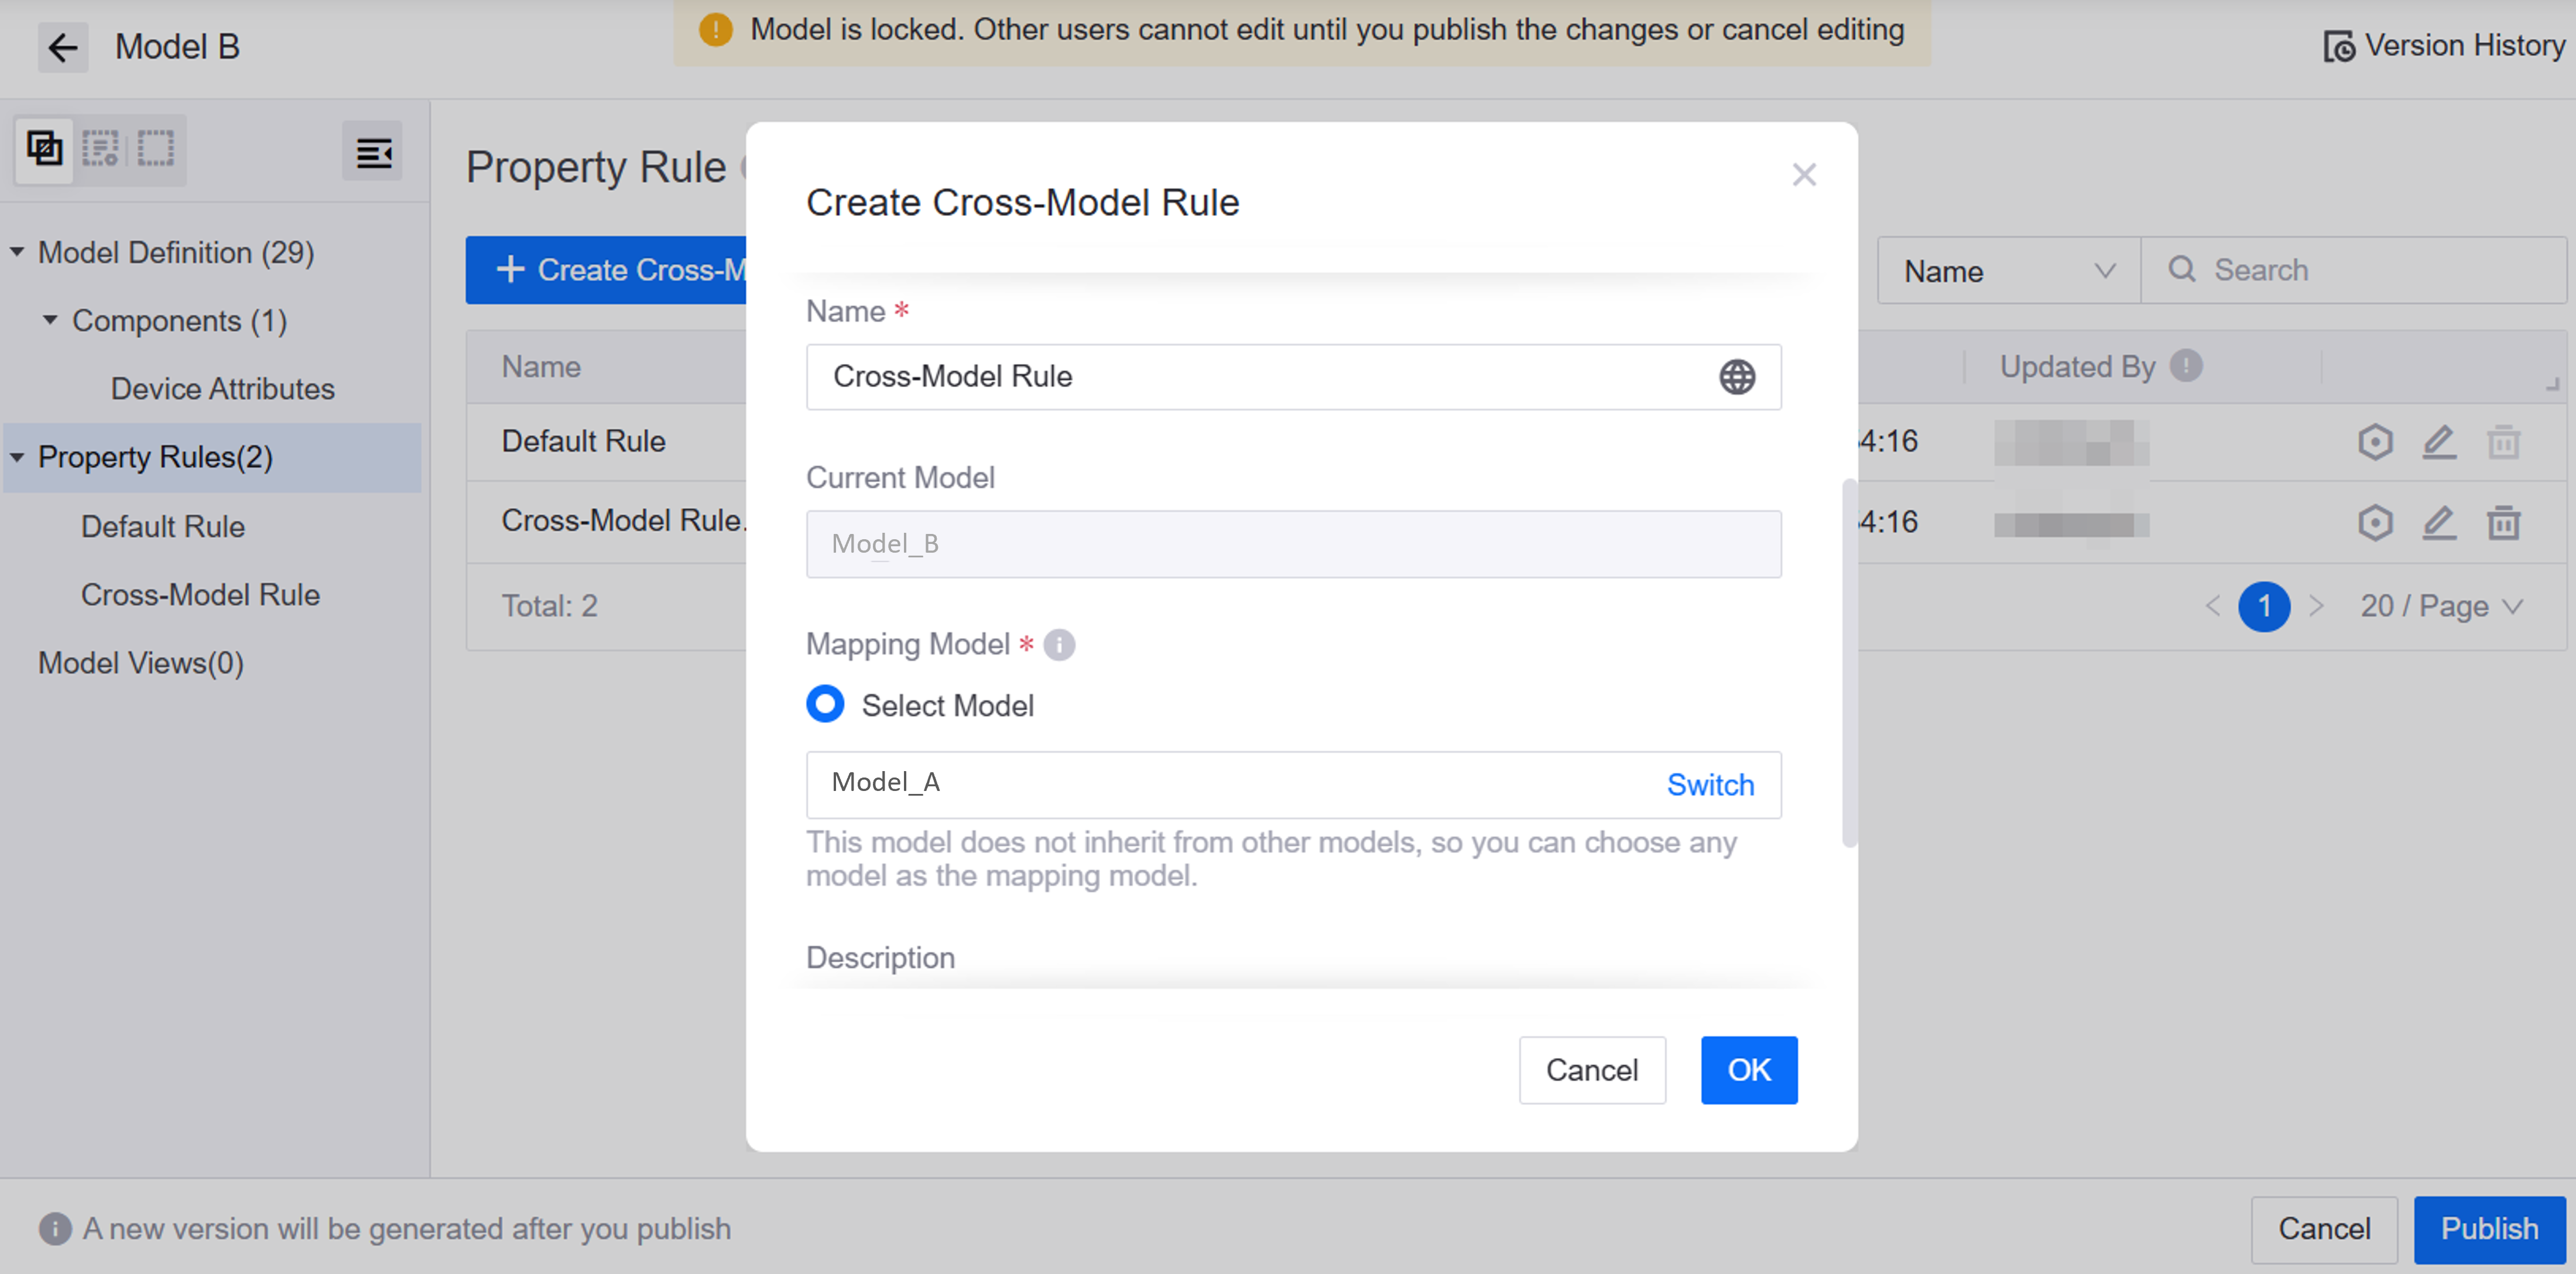
In the property rule list, select
Configure for the rule to enter the rule configuration page.The rule configuration page displays all attributes and measurement points of Model B. Select the corresponding
to configure upstream and downstream expressions for attributes or measurement points. For more information, see Guidelines for Creating Property Rules.Upstream Expression Sample: Model A’s temperature unit is Celsius (
temp_c), while Model B requires Kelvin (temp_k). In this case, you can configure the upstream expression:"model_B"."temp_k" = "model_A"."temp_c" + 273.15.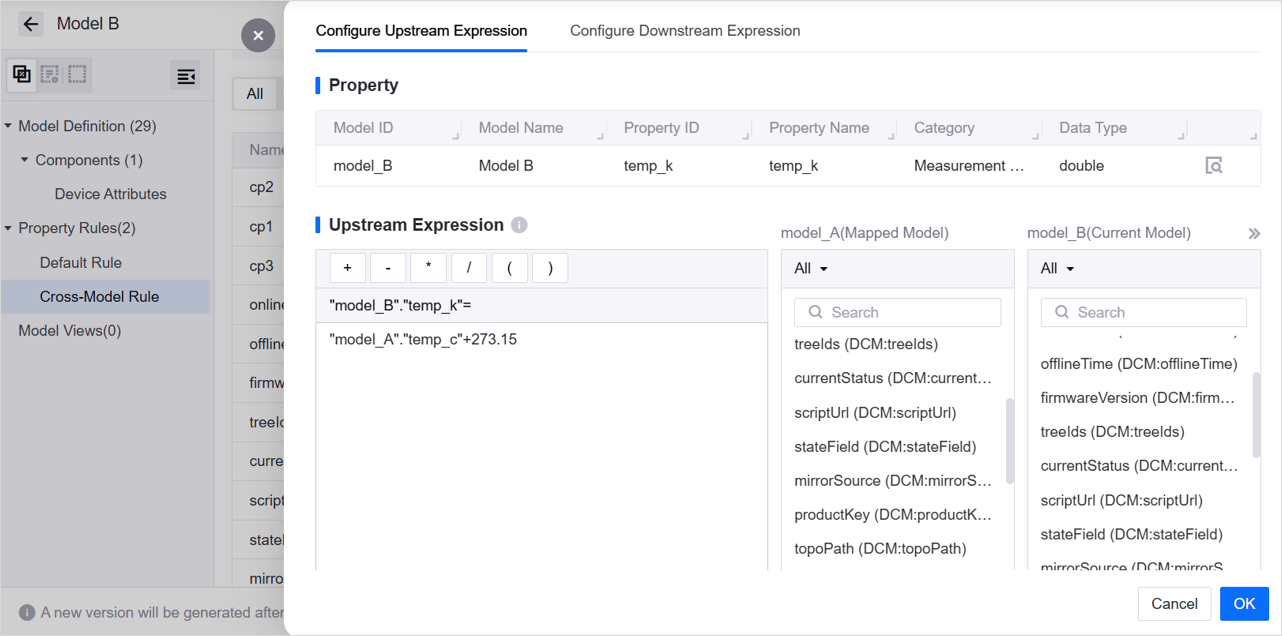
Downstream Expression Sample: You need to send a target temperature control command to the device through Model B which uses Kelvin (
temp_k) for input, while Model A only accepts Celsius (temp_c). In this case, you can configure the downstream expression:"model_A"."temp_c" = "model_B"."temp_k" - 273.15.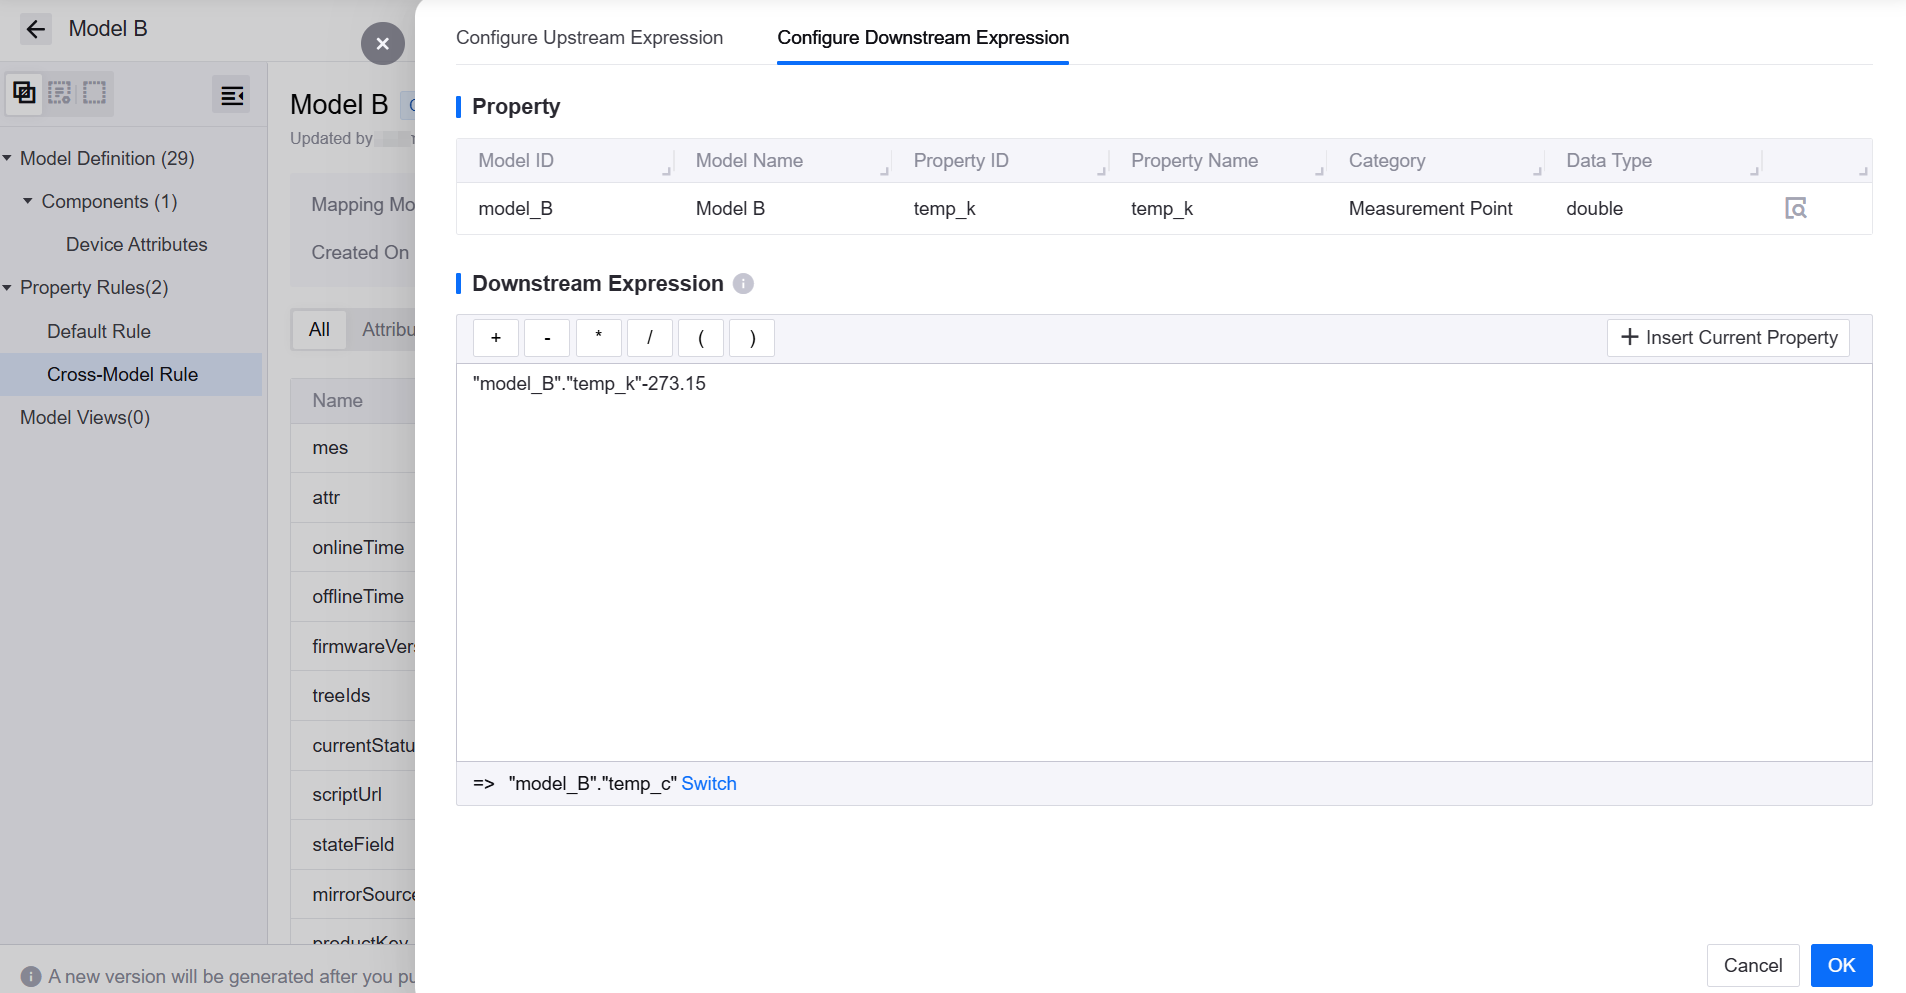
After configuring property rules for all attributes and measurement points, select Publish in the lower right corner to publish the model.
Step 2: Bind Additional Model
Operator |
Location |
|---|---|
Delivery/O&M Personnel |
Developer Console > Device Assets |
After configuring the mapping rules, you need to associate the physical device with Model B.
In EnOS Application Portal, go to Developer Console > Device > Device Management > Device Assets.
Select New Model Modification Task to enter the task page.
Select Add to new model as the Modification Type and configure the task information:
Original Model: Select the model to which the device is already connected (Model A).
Target Model: Select the new model to be bound (Model B). Model B can only be selected if cross-model rules with Model A have been defined in Model B.
Original Product/Target Product: Select according to the product ownership of the device.
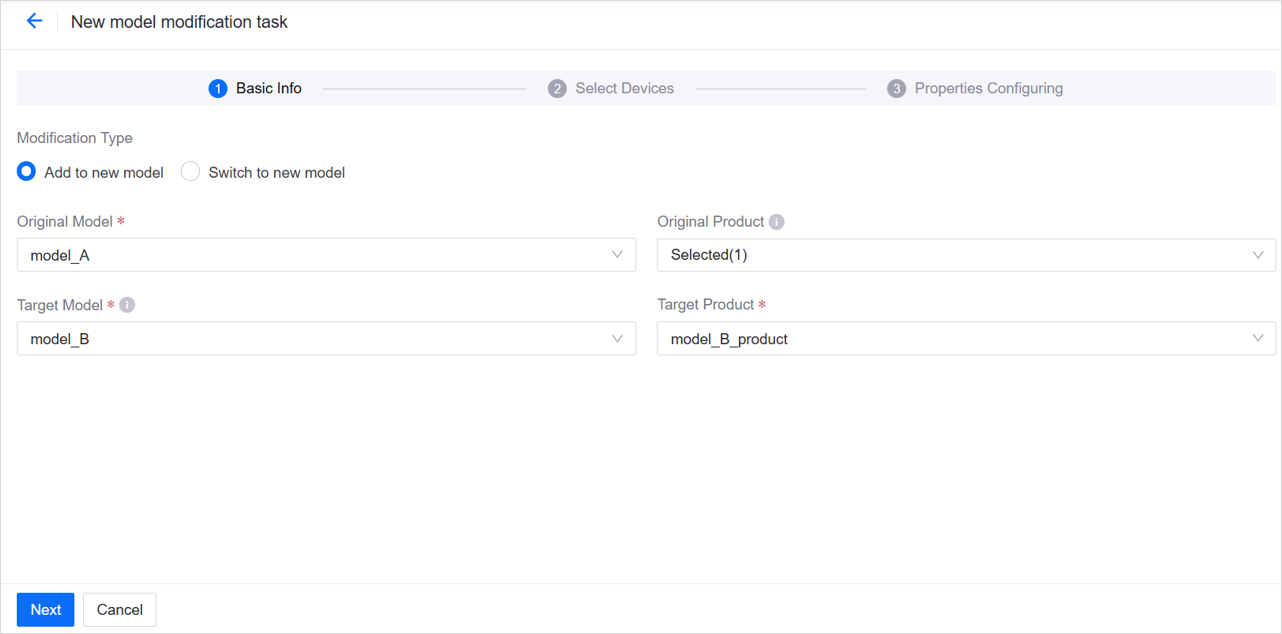
Select Next to enter the Select Devices page and check the devices.
Select Next to enter the Properties Configuring page. The system will generate an attribute configuration file template:
The file template is pre-filled with the attribute values already configured for the device based on Model A.
If Model B has new or updated static attributes, you can add or modify them in this step: select Download Template, update the template, and then upload it.
Select Finish to complete the task.
Upon completion, a new device asset will be automatically generated in the Device Assets list. The default naming is “Original Device Name-1”; you can customize the asset name as needed. This new asset is bound to the original physical device but is associated with Model B. The original device asset remains unchanged and continues to be associated with Model A.
Step 3 (Optional): Configure Data Flow
Operator |
Location |
|---|---|
Delivery/O&M Personnel |
Developer Console > Data Archiving / Data Subscription |
Newly created models do not automatically enable data archiving or subscription by default. You can configure them according to business requirements.
Data Archiving:
Scenario: Data archiving ensures that data is periodically archived to more cost-effective storage, facilitating subsequent trend analysis, fault backtracking, and auditing.
Steps: Create a new archiving task for Model B in Developer Console > Data > Data Archiving to ensure the new asset’s data is stored. For more information, see Configuring Data Archiving Jobs.
Data Subscription:
Scenario: Data subscription allows third-party systems or applications to consume model data in real-time or near real-time, achieving cross-domain sharing and linkage.
Steps: Create a new subscription task for Model B in Developer Console > Data > Data Subscription. For more information, see Developing Data Subscription Jobs.
Step 4: Verify Data
Operator |
Location |
|---|---|
Delivery/O&M Personnel |
Developer Console > Device Assets / Data Insights |
To ensure the data flow is correct and the mapping rules are effective, verify the data according to the following steps:
Compare Real-time Data: In Developer Console > Device > Device Management > Device Assets, open the details pages of the original device asset and the new device asset respectively. Check the latest data values in the Measurement Points tab. If transformation formulas are configured in the mapping rules, differences in values are expected (e.g., 25°C vs 298.15K). For more information, see Viewing Device Data.
Check Historical Trends: On the Developer Console > Data > Data Insights page, select the original device asset and the new device asset, configure the time range and measurement points, and check if the value curves match the mapping rules. Note: The system calculates measurement point values for the new device asset based on mapping rules in reverse chronological order; it may take some time to view the historical data of the new device asset.
Verify Application Calls (Optional): If device data is already being used in an application, go to the application to check if the data for both the original and new devices is normal.
Verify Command Issuance (Optional): Issue a test command to the new device asset and confirm that the command has been forwarded to the physical device and the device has returned a correct receipt. You can choose one of the following methods:
Online Device Debugging: See Online Debugging.
Issuing Commands via API: See Issuing Commands.
Best Practices for Binding Additional Model
Rules First: Complete and test mapping rules and transformation formulas in Model B first.
Small-scale Pilot: Pilot on 1–3 devices first, observe for 1–2 hours before batch operation.
Verification Checklist: First confirm that the required static attributes have been synchronized, and then compare the real-time measurement data to check the continuity of the historical curves.
On-demand Archiving/Subscription: Evaluate storage and bandwidth costs during the pilot period before deciding whether to enable data archiving or subscription.
Business Naming: Adopt a recognizable naming convention for new assets, such as “Original Device Name-Business Suffix”. If necessary, use the Update Device API to modify the device name.
Monitoring & Rollback: Establish monitoring for the bound models and archiving/subscription jobs. Set sensitive alarm thresholds during the pilot period for quick rollback or repair.
Scenario 2: Device Functional Upgrade — Rebinding Model
In the early stages of project delivery, devices are connected using a general public model (Model C). As business develops, some devices are expanded with new measurement points and functions. The table below shows the differences between the traditional solution and the dynamic modeling solution in this scenario:
Solution |
Implementation |
Limitations & Advantages |
|---|---|---|
Traditional Modeling |
Models cannot be changed after device connection. To maintain flexibility for future point expansion, the delivery team is forced to mandate that all devices use private models from the start of the project. |
Limitations: |
Dynamic Modeling |
Devices are initially connected quickly using a Public Model. If point expansion is needed later, use the Rebinding capability to smoothly switch specific devices to a Private Sub-model inherited from the public model. |
Advantages: |
Operation Workflow
The figure below introduces the operation workflow for model rebinding:

Create Child Model: The model owner creates a specialized child model based on a general model.
Rebind Model: Change the model bound to the device to the child model.
Map Measurement Point in Edge (Optional): Configure edge-side measurement point mapping for new points.
Update Data Flow (Optional): Update data archiving and subscription tasks based on business needs.
Verify Data: Check real-time data and historical trends after rebinding.
Model Architecture
Assuming the original associated model is Model C and it now needs to be associated with Model D, the model architecture after rebinding is as follows:
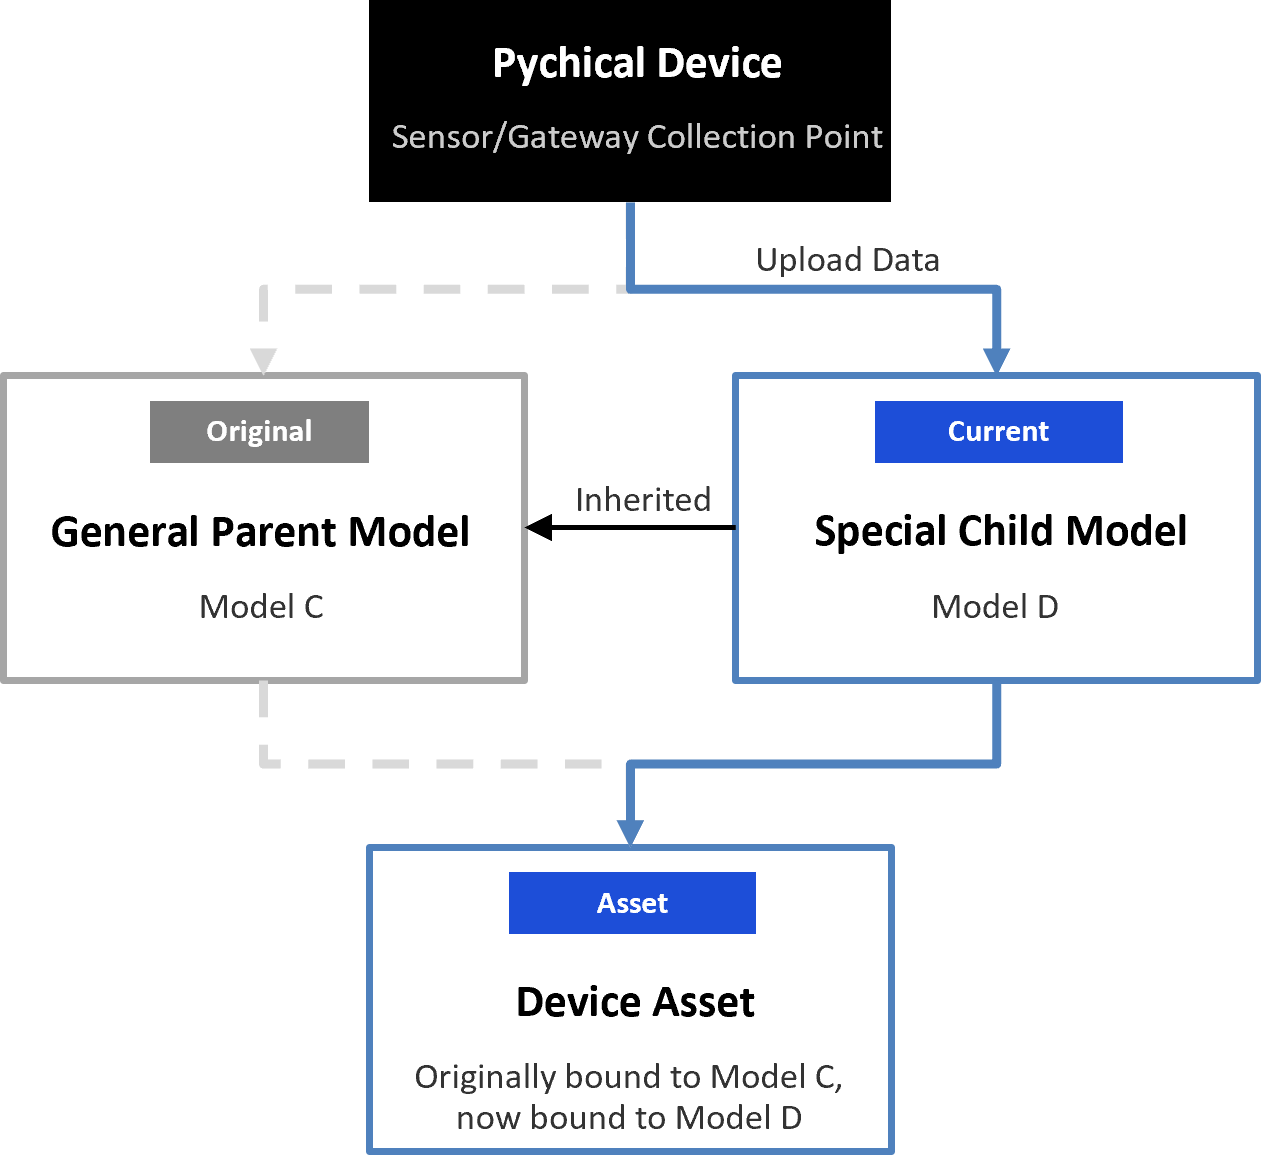
Model rebinding performs a smooth model upgrade based on inheritance relationships, maintaining the stability and differentiated control of the master model without interrupting data continuity.
Step 1: Create Child Model
Operator |
Location |
|---|---|
Model D Owner |
Developer Console > Model Management |
Before rebinding, you need to create a specialized child model (Model D) in EnOS.
In EnOS Application Portal, go to Developer Console > Data > Model Management > Models.
Find Model C in the model list and select … > Inherit for Model C.
The child model will inherit the configuration of the parent model. You can modify the child model’s group, ID, name, and other basic information in the pop-up window as needed.
Select Configure Model and add the required measurement points and attributes to the child model. For more information, see Configuring Model Definitions.
After configuration, select Publish in the lower right corner to publish the child model.
Step 2: Rebind Model
Operator |
Location |
|---|---|
Delivery/O&M Personnel |
Developer Console > Device Connection & Management |
After creating Model D, you need to switch the model associated with the upgraded device from Model C to Model D.
In EnOS Application Portal, go to Developer Console > Device > Device Management > Device Assets.
Select New Model Modification Task to enter the model change task page.
Select Switch to new model as the Modification Type and configure the task information:
Original Model: Select the model to which the device is already connected (Model C).
Target Model: Select the new model to be rebound (Model D). The list only displays child models of the original model.
Original Product/Target Product: Select according to the product ownership of the device.

Select Next to enter the Select Devices page and check the devices that need model rebinding.
Select Next to enter the Properties Configuring page. The system will generate an attribute configuration file template:
The template is pre-filled with the attribute values already configured for the device based on Model C.
If Model D has new or updated static attributes, you can add or modify them in this step: select Download Template, update the template, and then upload it.
Select Finish to complete the task.
Upon completion, the associated model of the device switches from Model C to Model D. Historical data remains accessible, and new measurement points begin receiving data.
Step 3 (Optional): Map Measurement Point in Edge
Operator |
Location |
|---|---|
Delivery/O&M Personnel |
EnOS Edge |
When the new measurement points of Model D need to be collected or converted by an edge gateway, you need to map the edge-side measurement points. If the device is directly connected to the cloud and reports data according to the Model D fields, this step can be skipped.
Typical scenarios requiring edge-side mapping include:
New sensors are connected via a gateway, requiring physical registers or nodes to be mapped to Model D measurement points.
Reported field names, units, or dimensions are inconsistent with the Model D definition, requiring field conversion or calculation at the edge.
If you are using an EnOS Edge gateway, refer to the Configure a Template to Map Data Points step in the Tutorial to complete the mapping between device points and model points.
Step 4 (Optional): Update Data Flow
Operator |
Location |
|---|---|
Delivery/O&M Personnel |
Developer Console > Data Archiving / Data Subscription |
Configure or adjust the data archiving or subscription strategy for Model D based on business requirements.
Data Archiving:
Scenario: Data archiving ensures that data is periodically archived to more cost-effective storage, facilitating subsequent trend analysis, fault backtracking, and auditing.
Steps: Create a new archiving task for Model D in Developer Console > Data > Data Archiving. For more information, see Configuring Data Archiving Jobs.
Data Subscription:
Scenario: Data subscription allows third-party systems or applications to consume model data in real-time or near real-time, achieving cross-domain sharing and linkage.
Steps:
If the subscription task before rebinding was based on the model (Model C), the system will automatically obtain data from the model after rebinding; no configuration is required.
If the subscription task before rebinding was based on measurement points, and subscription for new points is required, you need to manually modify the subscription task to add the points.
For more information, see Developing Data Subscription Jobs.
Step 5: Verify Data
Operator |
Location |
|---|---|
Delivery/O&M Personnel |
Developer Console > Device Assets / Data Insights |
To ensure the data flow after model rebinding is correct and the mapping rules are effective, verify the data according to the following steps:
Check Real-time Data: In Developer Console > Device > Device Management > Device Assets, open the device asset details page and check the Attributes and Measurement Points tabs to ensure the latest data values are reported normally. For more information, see Viewing Device Data.
Check Historical Trends: On the Developer Console > Data > Data Insights page, select the device asset, configure the time range and measurement points, and check if the historical data before rebinding is displayed normally.
Verify Application Calls (Optional): If device data is already being used in an application, go to the application to check if the device data is normal.
Verify Command Issuance (Optional): Issue a test command to the device asset and confirm that the command has been forwarded to the physical device and the device has returned a correct receipt. You can choose one of the following methods:
Online Device Debugging: See Online Debugging.
Issuing Commands via API: See Issuing Commands.
Best Practices for Model Rebinding
Design First: Conduct a child model design review to confirm field consistency before creating the child model.
Small-scale Pilot: Pilot on a small number of devices (1–3) first, observe for 1–2 hours before batch execution.
Edge Synchronization: If new measurement points depend on gateway collection, prepare Edge configurations, templates, and deployment windows in advance to avoid data reporting gaps after the cloud rebinding takes effect.
Data Strategy: Confirm the coverage of archiving, subscription, and flow tasks before rebinding. Evaluate the storage and bandwidth costs brought by new points and adjust as needed.
Handover Checklist: The model owner and O&M/delivery personnel should jointly maintain a To-Do list and confirm items one by one before operation.
Rollback Plan: Record asset attributes and gateway configurations before rebinding so that you can quickly switch back to the parent model or restore old mappings if necessary to reduce pilot failure risks.
FAQ
Q: Does rebinding a model cause device historical data to be lost?
A: No. Model rebinding is a smooth upgrade based on inheritance relationships. The system automatically associates the device’s historical data under the original model. From the user’s perspective, no model change is perceived when querying data; historical data and current data are seamlessly connected.
Q: Does the “new device asset” generated by additional model binding increase billing?
A: No. EnOS treats the original device asset and the “new device asset” generated by additional binding as logical mirrors of the same physical device. This is only to allow different models/businesses to consume the same data link in parallel; it does not occupy additional physical connections, message quotas, or device licenses. Therefore, billing is still calculated based on the original device.
Q: Do the additional binding and rebinding functions support all types of assets?
A: Currently, additional binding and rebinding functions only support device assets (assets directly corresponding to physical devices) and do not yet support logical assets.
Q: What happens if I perform rebinding on a new device generated by additional binding?
A: In very rare scenarios, if an operation chain of “additional binding first (generating a new device), then rebinding the new device” is performed, the real-time data flow of the new device may be interrupted. It is recommended to avoid rebinding devices generated by additional binding. If business requirements necessitate this workflow, please contact the system administrator for assistance.