Unit 2: Defining and Configuring Dimension Tables
Based on the requirements of metrics, this unit defines and configures two dimension tables of Solar_Device_Site_Dimension_Table and Sensor_Site_Dimension_Table to associate solar devices and sensors with sites. The relationships between dimension tables and data tables are as follows.
Dimension Table
Data Table
Solar_Device_Site_Dimension_Table
solar_plant.csv
Sensor_Site_Dimension_Table
weather_sensor.csv
Step 1: Defining the Site Dimension Table of the Solar Device
Log in to EnOS Application Portal and select Metric Management from the application list.
Select Dimensions from the left navigation pane and go to the Dimension Definition page.
In the Dimension Definition tab, select New, go to the New Dimension page, and enter the following information:
Basic Information
Dimension ID: Enter
dim_solarplantDimension Name: Enter
Solar_Device_Site_Dimension_TableData Connection Type: Select
Data Source RegistrationSelect Data Source
Data Source Type: Select
MySQLData Source Name: Select
tutorial_solar
Description: Enter
Associate solar devices with sites
Logic Information
Dimension Attribute 1
Attribute ID: Select
guidDescription: Enter
Device IDData Type: Select
STRINGPrimary Key: Click
Dimension Attribute 2
Attribute ID: Enter
plantidDescription: Enter
Site IDData Type: Select
STRINGNot null: Click
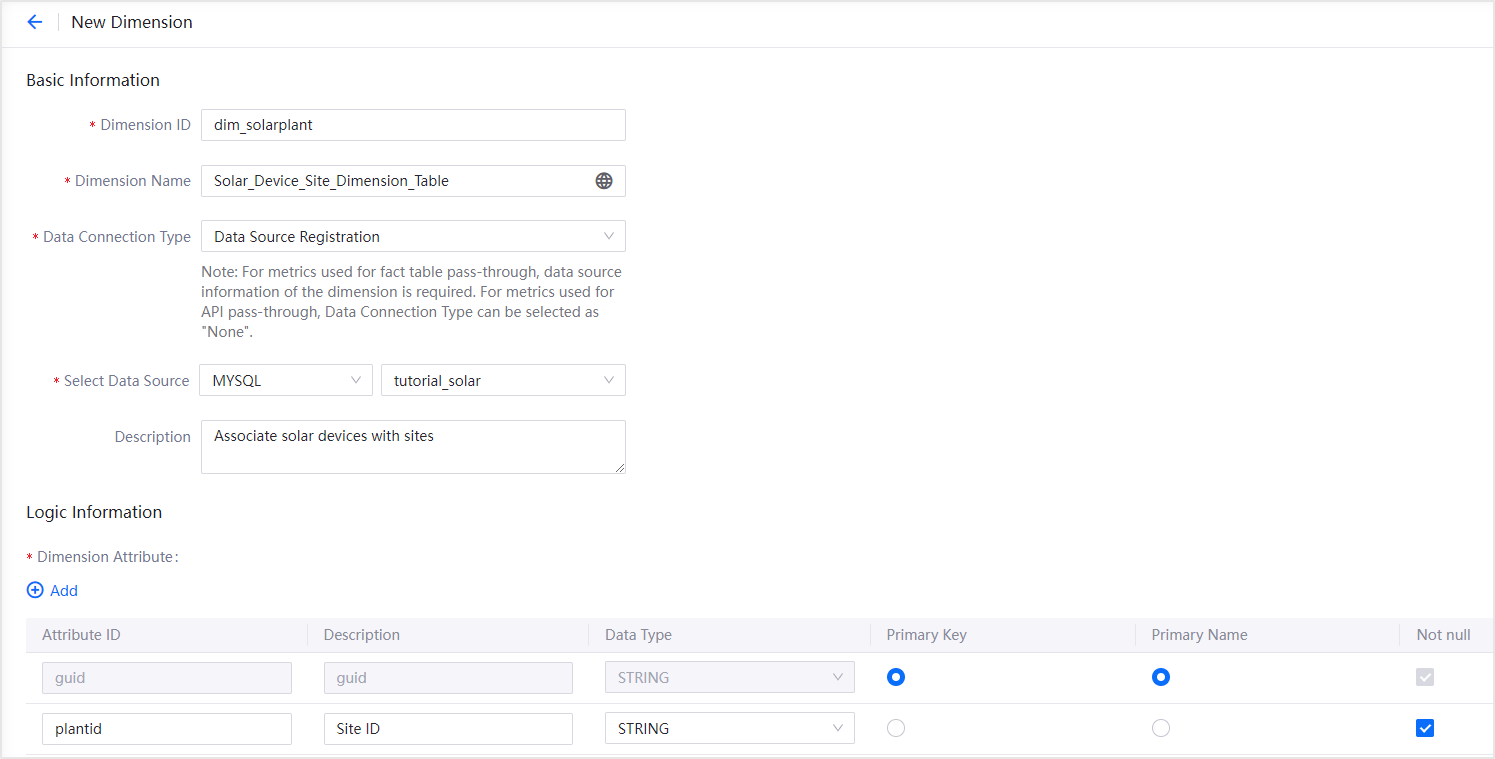
Select Publish to save and publish this dimension table.
Step 2: Configuring the Site Dimension Table of the Solar Device
Select the Dimension Configuration tab, select New, select the dimension of
dim_solarplant, and select the configuration mode ofSync from Data Catalog.Source Table: Select
Data TableTable Name: Select
solar_plantMapping
guid: Select
guid,plantid: Select
plant_id
Sync Period: Select
ManualEffective From: Select today
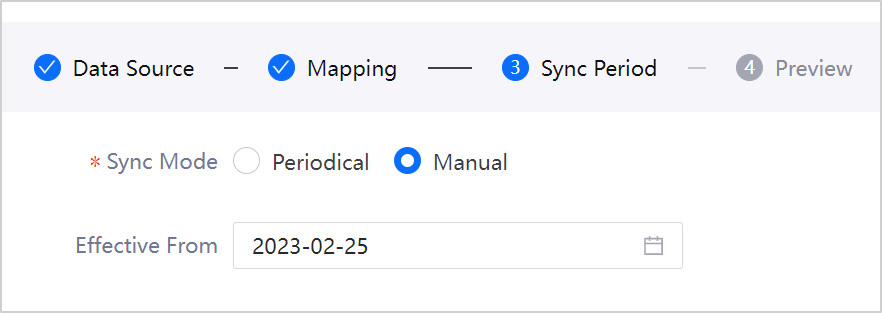
Select Next to preview the configuration.
Select Publish to finish the configuration of this dimension table.
Step 3: Defining the Site Dimension Table of the Sensor
Select the Dimension Definition tab, select New, go to the New Dimension page, and enter the following information:
Basic Information
Dimension ID: Enter
dim_sensorDimension Name: Enter
Sensor_Site_Dimension_TableData Connection Type: Select
Data Source RegistrationSelect Data Source
Data Source Type: Select
MySQLData Source Name: Select
tutorial_solar
Description: Enter
Associate sensors with sites
Logic Information
Dimension Attribute 1
Attribute ID: Select
guidDescription: Enter
Sensor IDData Type: Select
STRINGPrimary Key: Click
Dimension Attribute 2
Attribute ID: Enter
plantidDescription: Enter
Site IDData Type: Select
STRINGNot null: Click
Select Publish to save and publish this dimension table.
Step 4: Configuring the Site Dimension Table of the Sensor
Select the Dimension Configuration tab, select New, select the dimension of
dim_sensor, and select the configuration mode ofSync from Data Catalog.Source Table: Select
Data TableTable Name: Select
weather_sensorMapping
guid: Select
guid,plantid: Select
plant_id
Sync Period: Select
ManualEffective From: Select today
Select Next to preview the configuration.
Select Publish to finish the configuration of this dimension table.