Connecting Devices to EnOS
This topic describes how to connect sub-devices to the EnOS Egde gateway and configure connectivity services.
Before You Start
Contact your OU administrator for permission on the Edge Management service. For more information, see Policies, Roles, and Permissions.
Ensure that device assets are created. For more information, see Pre-Configuring Edge Device Asset.
Ensure that the Edge License is activated before using EnOS Edge. For more information, see License Management.
Step 1: Add Edge Devices to Edge Management
Log in to the EnOS Management Console and select EnOS Edge > Edge List from the left navigation menu.
Click New Edge and select the EnOS Edge devices created in Pre-Configuring Edge Device Asset, and click Confirm.
Step 2: Deploy the Registration Information on Edge Devices
In Edge List, click the View icon of the newly created Edge to go to the Edge Details page.
Click More at the bottom of the page and select Download box.conf to download the configuration file.
Hand the file to the Edge delivery engineers to have the box.conf file configured, so that the Edge device can be connected to the cloud.
Step 3: Configure Connection Information
In the Edge Detail page, click the Access Management tab, and select the Ethernet or COM Port tab according to the connection type to be added. The supported methods of adding & editing connections are as follows:
Add the Connection
Here are two methods to add the connection.
Method 1: Add the Connection One by One
For system docking, centralized control access, and scenarios with few connections, click the Add Connection icon  to add the connection one by one.
Method 2: Add the Connection in Batches
For directly connected devices or scenarios with a huge number of connections:
Click
 to export the connection template (Template_collect.xlsx).
Fill in multiple connection information in the template (Template_collect.xlsx)
Back to the Access page and click
 to import the template file (Template_collect.xlsx).
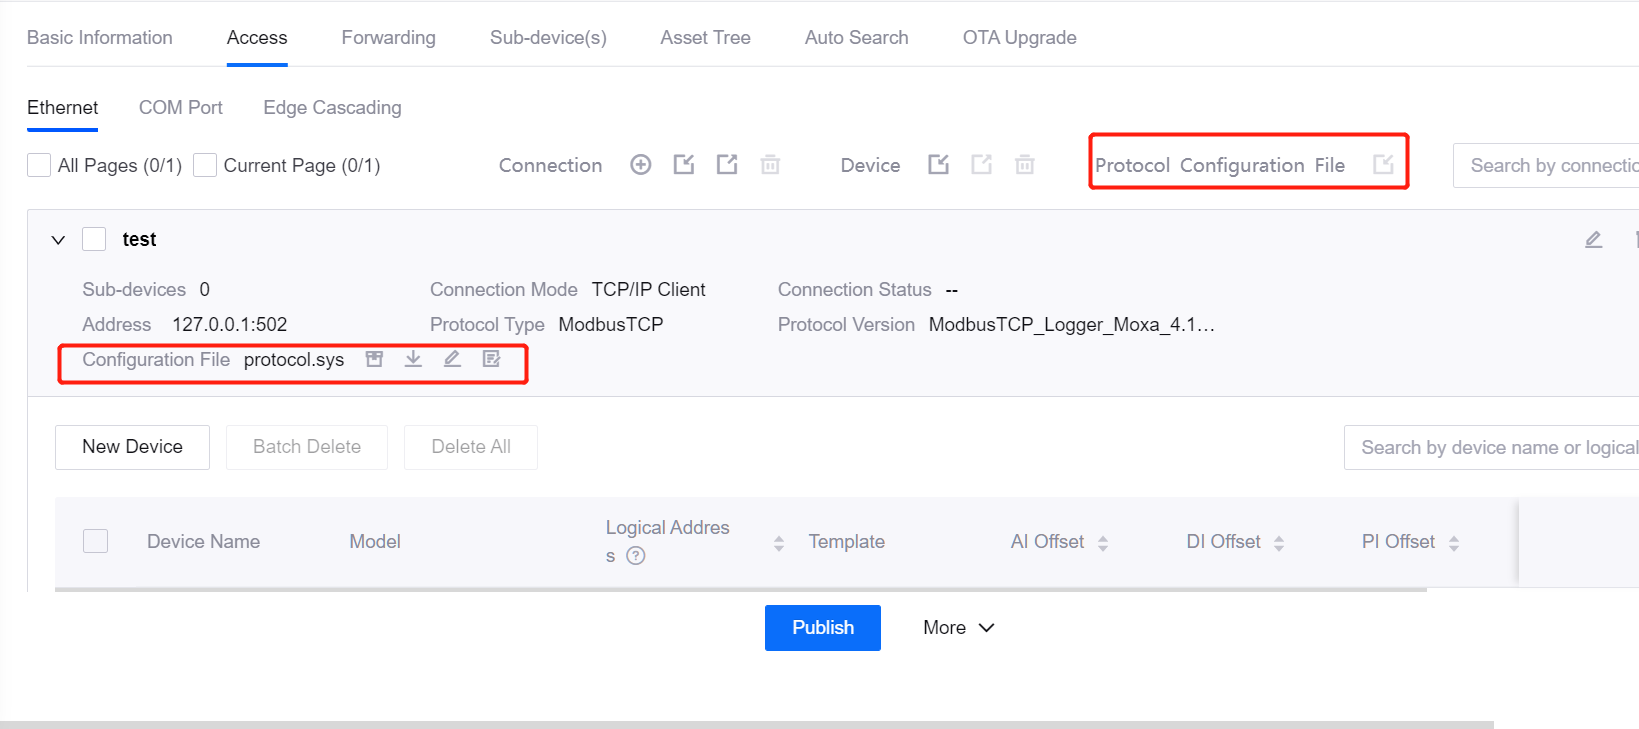
Edit the Protocol Configuration File
Here are two methods to edit the protocol configuration file:
Method 1: Edit Protocol Configuration File Online
Under a single connection, click the  beside the “Configuration File” to set the protocol communication parameters online.
Method 2: Import Protocol Configuration information in Batch
Click
 beside the “Configuration File” of a connection to export the standard protocol configuration file (protocol.sys).
Fill in the connection information in the protocol.sys.
Back to the Access > Ethernet/Com Port page, select the connections to be imported with the same protocol configuration file (protocol.sys).
Click
beside the “Protocol Configuration File” on the operation line above to import the protocol configuration file (protocol.sys).
Step 4: Configure Devices and Templates
Here are two methods to add the sub-devices and access templates.
Method 1: Create Templates and Add Devices One by One
In Templates > Access Templates > Private Template, add and edit a template. You can skip “Step 3 Calculate Model Point” on the “Edit Template” page. For more information, see Create access templates.
Go to Edge Management > Edge Details > Access > Ethernet/Com Port and click the created connection to expand it.
Click New Device. Fill in the required information on the “Add Device” page.
Method 2: Create Templates and Add Devices Automatically
Note
The auto template configuration only supports the connection with the IEC104 or Bacnet IP protocol.
Go to Edge Management > Edge Details > Access > Ethernet/Com Port and click the created connection to expand it.
Click New Device. Fill in the required information on the “Add Device” page. In the “Step 2”, click
 to turn on the auto-configuration function.
Click Save and back to the previous page. Click the connection to expand it.
Click Auto Template Configuration and fill in the required information in the pop-up window.
Step 5: Edit Access Template
Here are two methods to edit the templates:
Method 1: Edit Templates One by One
For scenarios with similar templates:
Go to Templates > Access Templates > Private Template.
Select and edit the target template.
Method 2: Edit Dynamic Templates in Batch
For scenarios with different kinds of templates:
Go to Edge Management > Edge Details > Access > Ethernet/Com Port.
Click … on the right side of the connection and click Edit Dynamic Template.
Fill in the required information in the pop-up window.
Step 6: Edit The Device
In Access > Ethernet/Com Port page, click to expand the connection you just created.
Click
in the device line to edit the device. Fill in the required information in the pop-up window, including:Logical number: It is a string type used to identify different devices under the same connection. For details, go to Protocols in EnOS Management Console and search for the protocol configuration guide.
Offset: It is used to position the collection point with the format like 1-100. The noncontinuous offsets can be connected using “#”, with the format like 1-100#1001-1050. The configuration method varies according to the protocols.
Step 7: Publish and Check the Status
Click the Publish button at the bottom of the page to distribute the configuration information to the EnOS Edge device as a resource package.
After activating Edge License, click Access > Ethernet tab. And click to expand the connection created before.
Click the view button of the sub-device to check connection status. When the connection status of the sub-devices is Connected, the data are connected to the cloud.
Specific Scenario: Multiple Channel Data Collection
When the device collects data from multiple channels, you can follow the above steps to connect data to the cloud.
Notably, you need to pay attention to the following issues in Step 4:
When the measurement point data of a device from multiple connection channels are connected to the cloud, the measurement points in each connection must be unique. So you need to create different access templates for this device asset.
Ensure that the model points to be mapped are unique in different access templates of the same device.
In this scenario, turn on the Enable Multi-channel button in the upper right corner of the “Add Device” page.