单元 5: 控制数据上传间隔
使用计算机模型中定义的 control 服务,你可以控制将 PC 系统数据上传到 EnOS 云端的间隔(频率)。
在本单元中,更新 单元4 中使用的程序以添加服务处理程序。
声明函数
handleServiceInvocation(),以处理服务调用。public static void main(String[] args) throws Exception { connect(); handleServiceInvocation(); updateAttribute(); monitor(); }
编写
handleServiceInvocation()函数,以处理从 EnOS 云端发出的命令。参考以下代码示例:public static void handleServiceInvocation() { IMessageHandler<ServiceInvocationCommand, ServiceInvocationReply> handler = new IMessageHandler<ServiceInvocationCommand, ServiceInvocationReply>() { @Override public ServiceInvocationReply onMessage(ServiceInvocationCommand request, List<String> argList) throws Exception { System.out.println("<<<<< [service command] rcvn async service invocation command: " + request + " topic: " + argList); if (request.getMessageTopic().contains("control")) { Map params=request.getParams(); interval= (int) params.get("interval"); } return ServiceInvocationReply.builder() .addOutputData("result", 0) .build(); } }; client.setArrivedMsgHandler(ServiceInvocationCommand.class, handler); }
编译并运行程序以进行设备连接、数据采集、和服务处理。参考以下程序代码示例:
import java.util.HashMap;
import java.util.List;
import java.util.Map;

import com.enosiot.enos.iot_mqtt_sdk.core.ConnCallback;
import com.enosiot.enos.iot_mqtt_sdk.core.MqttClient;
import com.enosiot.enos.iot_mqtt_sdk.core.msg.IMessageHandler;
import com.enosiot.enos.iot_mqtt_sdk.message.downstream.tsl.ServiceInvocationCommand;
import com.enosiot.enos.iot_mqtt_sdk.message.downstream.tsl.ServiceInvocationReply;
import com.enosiot.enos.iot_mqtt_sdk.message.upstream.tsl.*;
import oshi.hardware.HardwareAbstractionLayer;
import oshi.software.os.OperatingSystem;

public class Sample {

    private static final String uri = "tcp://{host}:{port}";
    private static final String productKey = "product_key";
    private static final String deviceKey = "device_key";
    private static final String deviceSecret = "device_secret";

    private static MqttClient client;
    private static int interval=5; // 10s

    public static void main(String[] args) throws Exception {
        connect();
        handleServiceInvocation();
        updateAttribute();
        monitor();

    }

    // Device connection initialization
    public static void connect() {
        System.out.println("start connect with callback ... ");
        try {
            client = new MqttClient(uri, productKey, deviceKey, deviceSecret);
            client.getProfile().setConnectionTimeout(60).setAutoReconnect(true);
            client.connect(new ConnCallback() {
                @Override
                public void connectComplete(boolean reconnect) {
                    System.out.println("connect success");
                }

                @Override
                public void connectLost(Throwable cause) {
                    System.out.println("onConnectLost");
                }

                @Override
                public void connectFailed(Throwable cause) {
                    System.out.println("onConnectFailed : " + cause);
                }

            });
        } catch (Throwable var1) {
        }
        System.out.println("connect result :" + client.isConnected());
    }

    // Ingesting PC system and hardware data
    public static Map<String, Object> collectDeviceInfo() {
        oshi.SystemInfo si = new oshi.SystemInfo();
        HardwareAbstractionLayer hal = si.getHardware();
        OperatingSystem os = si.getOperatingSystem();

        Map<String, Object> data = new HashMap<String, Object>();
        data.put("system", os.toString());
        data.put("model", hal.getComputerSystem().getManufacturer() + " " + hal.getComputerSystem().getModel());
        data.put("cpu_core", hal.getProcessor().getLogicalProcessorCount());
        data.put("cpu_used", hal.getProcessor().getSystemCpuLoad());
        data.put("mem_total", hal.getMemory().getTotal());
        data.put("mem_used", hal.getMemory().getAvailable());
        data.put("cpu_used_average", hal.getProcessor().getSystemLoadAverage());
        data.put("cpu_temperature", hal.getSensors().getCpuTemperature());

        return data;
    }

    // Updating PC attributes with the ingested system and hardware data
    public static void updateAttribute(){
        Map<String, Object> deviceInfo= collectDeviceInfo();
        System.out.println("Computer info: "+deviceInfo);
        AttributeUpdateRequest request = AttributeUpdateRequest.builder()
                .setQos(1)
                .addAttribute("system", deviceInfo.get("system"))
                .addAttribute("model", deviceInfo.get("model"))
                .addAttribute("cpu_core", deviceInfo.get("cpu_core"))
                .addAttribute("mem_total", deviceInfo.get("mem_total"))
                .build();
        System.out.println(">>> Update Attribute: "+request);

        try {
            AttributeUpdateResponse resp = client.publish(request);
            System.out.println("<-- " + resp);
        } catch (Exception e) {
            e.printStackTrace();
        }
    }

    // Uploading PC system data into EnOS 云端
    public static void postMeasurepoint(Map<String, Object> systemInfo) {
        MeasurepointPostRequest request = MeasurepointPostRequest.builder()
                .setQos(0)
                .addMeasurePoint("cpu_used", Double.parseDouble(systemInfo.get("cpu_used").toString())+0.0)
                .addMeasurePoint("mem_used", systemInfo.get("mem_used"))
                .build();
        System.out.println(">>> Post Measurepoint: "+request);

        try {
            MeasurepointPostResponse resp = client.publish(request);
            System.out.println("<-- " + resp);
        } catch (Exception e) {
            e.printStackTrace();
        }
    }

    // Monitoring the CPU load
    public static void monitor() throws Exception {
        long lastReportTs=0;
        while (true) {
            Map<String, Object> systemInfo= collectDeviceInfo();
            postMeasurepoint(systemInfo);

            double cpu_load= (double) systemInfo.get("cpu_used");
            if (cpu_load>0.2) {
                long ts = System.currentTimeMillis();

                if ((ts-lastReportTs)>(60*1000)) {
                    lastReportTs=ts;
                    reportCPULoadEvent(cpu_load, "[Warning] CPU load: "+ cpu_load);
                }else{
                    System.out.println("[Warning] No reporting required, CPULoadEvent: " + cpu_load);
                }
            }

            Thread.sleep(interval*1000);
        }
    }

    // Reporting CPU load events
    public static void reportCPULoadEvent(double value, String describe) {
        EventPostRequest request=EventPostRequest.builder()
                .setQos(0)
                .setEventIdentifier("cpu_event")
                .addValue("value", value)
                .addValue("message", describe)
                .build();
        System.out.println(">>> Post Event: "+request);

        try {
            EventPostResponse resp = client.publish(request);
            System.out.println("<-- " + resp);
        } catch (Exception e) {
            e.printStackTrace();
        }
    }

    // Handling service invocation
    public static void handleServiceInvocation() {
        IMessageHandler<ServiceInvocationCommand, ServiceInvocationReply> handler = new IMessageHandler<ServiceInvocationCommand, ServiceInvocationReply>() {
            @Override
            public ServiceInvocationReply onMessage(ServiceInvocationCommand request, List<String> argList) throws Exception {
                System.out.println("<<<<< [service command] rcvn async service invocation command: " + request + " topic: " + argList);
                if (request.getMessageTopic().contains("control")) {
                    Map params=request.getParams();
                    interval= (int) params.get("interval");
                }
                return ServiceInvocationReply.builder()
                        .addOutputData("result", 0)
                        .build();
            }

        };

        client.setArrivedMsgHandler(ServiceInvocationCommand.class, handler);
    }
}
登录 EnOS 管理控制台,点击 监控运维 > 在线调试。
在 产品 下拉框中选择 Computer,然后在 设备 下拉框中选择 PC_Win10。
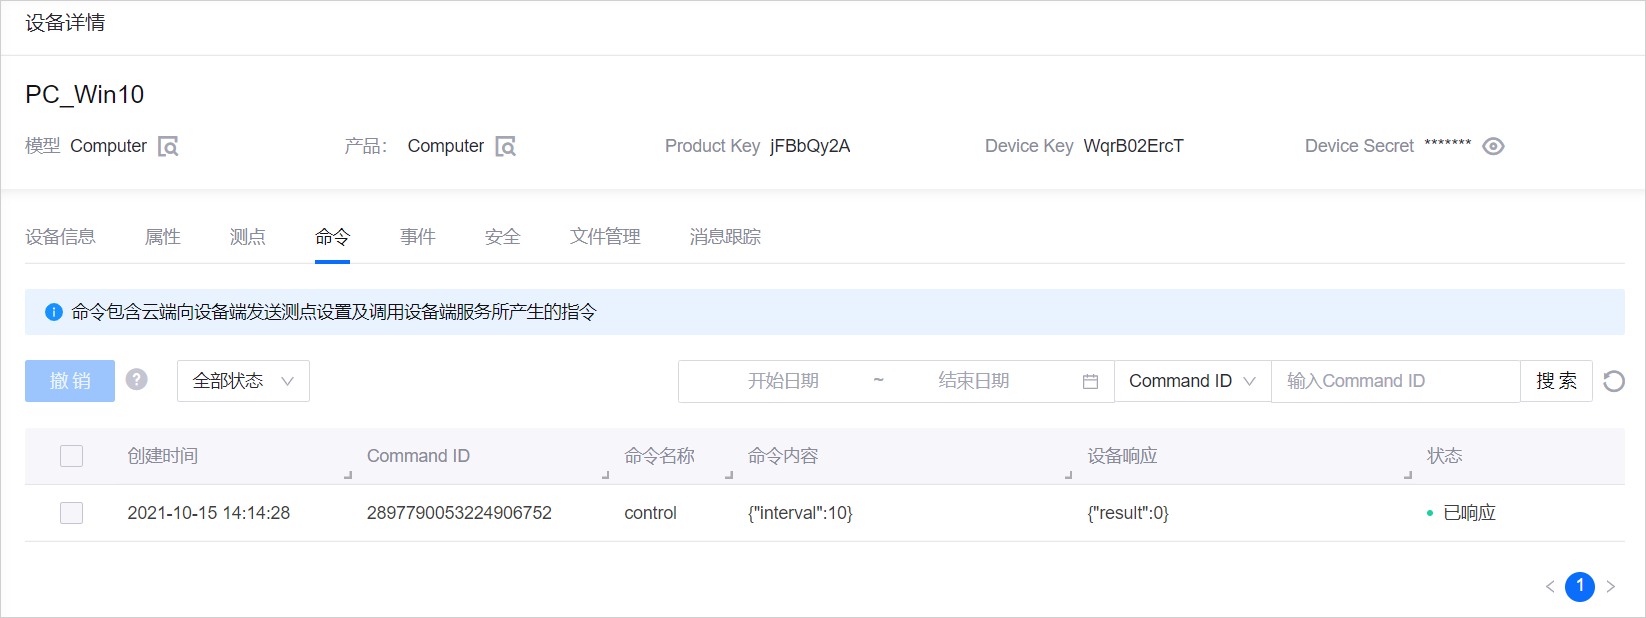
在 调试真实设备 下,点击 服务调用,接着在 调试功能 下拉框选择 contol(control) 并为
interval填写一个值(例如,10)。点击 发送指令。点击进入 设备详情 > 命令 页面,查看命令运行状态。
点击进入 设备详情 > 测点 页面,查看更新后的数据上传间隔(启用 “实时刷新”)。