快速入门:使用 OpenSSL 实现基于证书的双向认证
该文章帮助你快速入门,使用 OpenSSL 实现设备与 EnOS Cloud 之间的基于证书的双向安全连接。
开始前准备:创建模型、产品、设备
本步骤的前提是你已完成 直连设备连接快速入门 和 子设备通过edge连接至EnOS Cloud快速入门 这两个示例。
创建 EnOS Edge 产品
本步骤大部分与上述两个快速入门示例相似,差异点在创建 EnOS Edge 产品时需要创建启用 证书双向认证机制 的产品,默认证书有效期和最长证书有效期使用默认值即可。如下图所示:
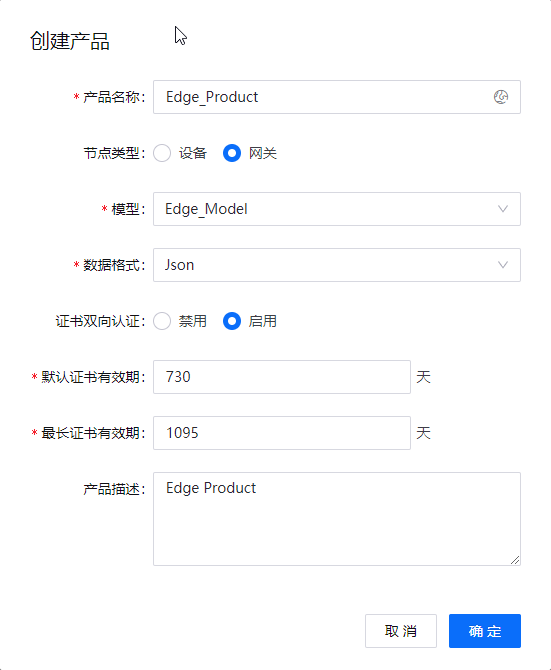
逆变器产品不需要开启 证书双向认证机制,因为逆变器是作为子设备由 EnOS Edge 代理连接 EnOS Cloud,只需要 edge 与 cloud 进行基于证书的双向认证即可。
创建 EnOS Edge 设备
基于以上产品创建网关类型设备 Edge01_Certificate。如下图所示:
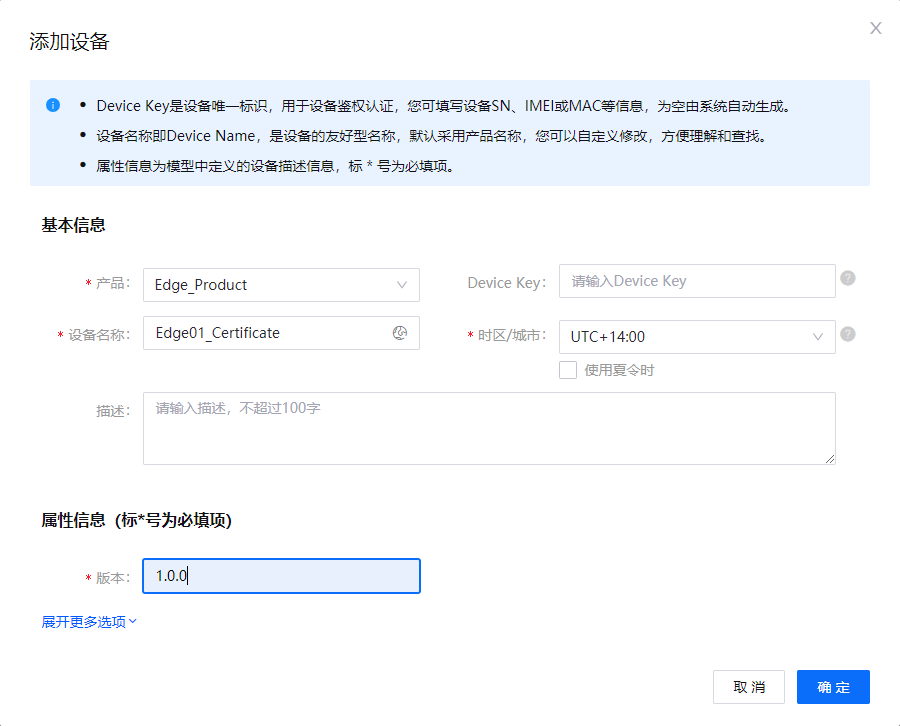
记下 Edge01_Certificate 的设备三元组,将用于创建证书请求文件。以下设备三元组供您参考,您需要使用使用自己的三元组。
Product Key:
Et***YP6Device Key:
UB***rOhJDDevice Secret:
jgWGPE***B7bShf2P5cz
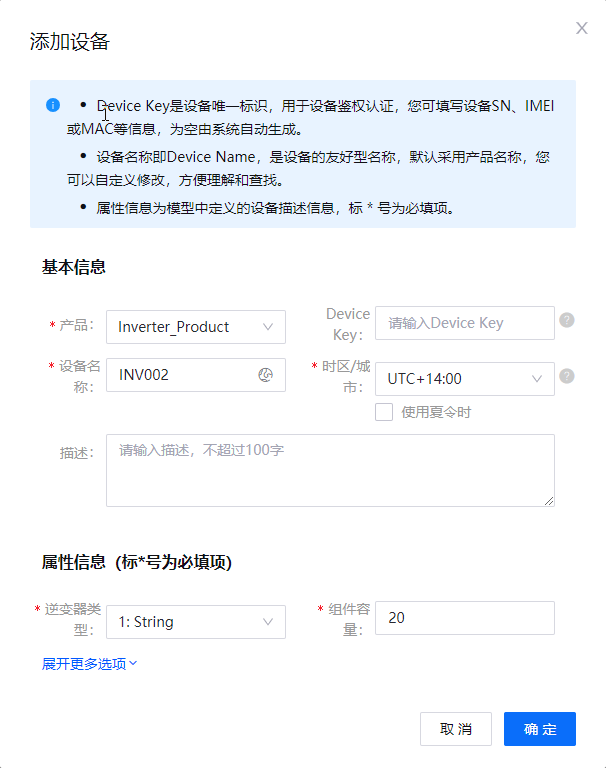
创建子设备
逆变器设备参照 直连设备连接快速入门 进行创建。如下图所示:
步骤 1:创建证书签名请求文件
需要创建的私钥名称为:edge.key。需要创建的CSR文件的文件名为:edge.csr。创建的具体步骤,参考 创建证书签名申请。
步骤 2:调用 REST API 申请证书
在生成 edge.csr 以后,调用 EnOS Cloud 的 REST API 申请证书。
在 POM 中添加如下的 Maven 依赖,以便使用 EnOS API:
<dependency>
 <groupId>com.enos-iot</groupId>
 <artifactId>enos-dm-api-pojo</artifactId>
 <version>0.2.23</version>
</dependency>
使用如下代码调用 EnOS API 申请证书
import com.enosiot.apim.poseidon.config.PConfig;
import com.enosiot.apim.poseidon.core.Poseidon;
import com.enosiot.enos.connect_service.v2_1.cert.ApplyCertificateRequest;
import com.enosiot.enos.connect_service.v2_1.cert.ApplyCertificateResponse;
import com.enosiot.enos.connect_service.vo.DeviceIdentifier;


import java.io.*;
import java.security.*;
import java.security.cert.CertificateException;


public class applyCert {

  // ISSUE_AUTHORITY表示证书类型,可选值有: RSA 和 ECC
   public static final String ISSUE_AUTHORITY = "ECC";
  // VALID_DAY表示证书有效期
   public static final Integer VALID_DAY = 300;

  /**
   * 设备认证所需信息,这些参数依次分别表示EnOS Edge设备的device key, product key
   */
   public static final String DEVICE_KEY = "yourDeviceKey";
   public static final String PRODUCT_KEY = "yourProductKey";

   /**
    * 在EnOS上注册的,用于调用API的应用的Access key和secret key,可以在 “EnOS控制台 > 应用注册” 获取
    */
   public static final String ACCESS_KEY = "yourAccessKey";
   public static final String SECRET_KEY = "yourSecretKey";
  // API网关URL,点击控制台右上角的 帮助 > 环境信息 查询
   public static final String API_GATEWAY_URL = "https://apim-cn5.enos-iot.com";
  /**
   * 组织ID,鼠标悬停在EnOS控制台左上角的OU名称处可以获得
   */
   public static final String ORG_ID = "yourOrgId";

   /**
    * 以下参数用于保存生成的各种文件:
    * SAVE_CSR_FILE_PATH 用于保存生成的CSR文件
    * SAVE_DEVICE_CERT_FILE_PATH 用于保存申请到的设备证书
    * SAVE_ROOT_CERT_FILE_PATH 用于保存根证书
    */
   public static final String SAVE_CSR_FILE_PATH = "edge.csr";
   public static final String SAVE_DEVICE_CERT_FILE_PATH = "edge.pem";
   public static final String SAVE_ROOT_CERT_FILE_PATH = "cacert.pem";

   private static void applyCertToDevice() throws IOException {
      // 读取生成的csr文件
       String certificateRequest = readFile(SAVE_CSR_FILE_PATH);
      // 设置绑定证书设备请求的参数
       ApplyCertificateRequest applyCertificateRequest = createApplyCertParam(certificateRequest);
      // 利用EnOS API发起请求
       ApplyCertificateResponse certRsp =
               Poseidon.config(PConfig.init().appKey(ACCESS_KEY).appSecret(SECRET_KEY).debug())
                       .url(API_GATEWAY_URL)
                       .getResponse(applyCertificateRequest, ApplyCertificateResponse.class);
      // 获得设备的证书和根证书
       if (certRsp.success()) {
          // 保存设备的证书
           saveFile(certRsp.getData().getCert(), SAVE_DEVICE_CERT_FILE_PATH);
          // 保存设备证书的根证书
           saveFile(certRsp.getData().getCaCert(), SAVE_ROOT_CERT_FILE_PATH);
       }
   }
  /**
   * 读取CSR文件
   */
   private static String readFile(String path) {
       try (InputStream inputStream = new FileInputStream(path);
            Reader inputStreamReader = new InputStreamReader(inputStream);
            BufferedReader reader = new BufferedReader(inputStreamReader)) {
           StringBuilder sb = new StringBuilder();
           String line;
           while ((line = reader.readLine()) != null) {
               sb.append(line).append("\n");
           }
           return sb.toString();
       } catch (IOException e) {
           e.printStackTrace();
       }
       return "";
   }


   private static ApplyCertificateRequest createApplyCertParam(String certificateRequest) {
       ApplyCertificateRequest applyCertificateRequest = new ApplyCertificateRequest();
       applyCertificateRequest.setCsr(certificateRequest);
      /*
       * 请确定ISSUE_AUTHORITY和你生成csr对应的颁发方是一致的
       */
       applyCertificateRequest.setIssueAuthority(ISSUE_AUTHORITY);
      /*
       * 请确保证书的有效天数满足小于所属产品规定的最大有效期
       */
       applyCertificateRequest.setValidDay(VALID_DAY);
      /*
       * 设备信息
       */
       DeviceIdentifier deviceIdentifier = new DeviceIdentifier();
      /*
       * 使用以下任意一个参数或参数组合以指定设备:
       * ASSET_ID
       * PRODUCT_KEY + DEVICE_KEY
       * 本示例代码使用了 PRODUCT_KEY + DEVICE_KEY
       */
       deviceIdentifier.setKey(PRODUCT_KEY, DEVICE_KEY);
       applyCertificateRequest.setDevice(deviceIdentifier);
       applyCertificateRequest.setOrgId(ORG_ID);
       return applyCertificateRequest;
   }
   public static void main(String[] args) throws NoSuchAlgorithmException, CertificateException, SignatureException, InvalidKeyException, IOException, KeyStoreException {
      //生成证书
       applyCertToDevice();
  }

  /*
   * 保存申请到的证书
   */
   public static void saveFile(String fileContent, String filePath) throws IOException {
       File fp = new File(filePath);
       try (OutputStream os = new FileOutputStream(fp)) {
           os.write(fileContent.getBytes());
       }
   }
 }
步骤 3:生成设备连接平台的 jks 文件
按照以下步骤使用 keytool 生成 edge.jks 文件。keytool 是 Java 原生 JDK 的工具,其路径为 %JAVA_HOME%\bin\keytool。
a. 查看文件
[root@DemoMachine cert] ll
total 12
-rw-r--r-- 1 root root 1395 Nov 28 19:51 cacert.pem
-rw-r--r-- 1 root root 1858 Nov 28 19:51 edge.key
-rw-r--r-- 1 root root 1416 Nov 28 20:08 edge.pem
b. 将证书与私钥导出为 .p12 文件
[root@DemoMachine cert] openssl pkcs12 -export -in edge.pem -inkey edge.key -out edge.p12 -name edge -CAfile cacert.pem -caname cacert
Enter pass phrase for edge.key:
Enter Export Password:
Verifying - Enter Export Password:
c. 查看生成的 .p12 文件
[root@DemoMachine cert] ll
total 16
-rw-r--r-- 1 root root 1395 Nov 28 19:51 cacert.pem
-rw-r--r-- 1 root root 1858 Nov 28 19:51 edge.key
-rw-r--r-- 1 root root 2654 Nov 28 20:19 edge.p12
-rw-r--r-- 1 root root 1416 Nov 28 20:08 edge.pem
d. 导入 .p12 文件至密钥库
[root@DemoMachine cert] keytool -importkeystore -deststorepass 123456 -destkeypass 123456 -destkeystore edge.jks -srckeystore edge.p12 -srcstoretype PKCS12 -srcstorepass 123456 -alias edge
Importing keystore edge.p12 to edge.jks...

Warning:
The JKS keystore uses a proprietary format. It is recommended to migrate to PKCS12 which is an industry standard format using "keytool -importkeystore -srckeystore edge.jks -destkeystore edge.jks -deststoretype pkcs12".
e. 查看 jks 文件
[root@DemoMachine cert] ll
total 20
-rw-r--r-- 1 root root 1395 Nov 28 19:51 cacert.pem
-rw-r--r-- 1 root root 2356 Nov 28 20:20 edge.jks
-rw-r--r-- 1 root root 1858 Nov 28 19:51 edge.key
-rw-r--r-- 1 root root 2654 Nov 28 20:19 edge.p12
-rw-r--r-- 1 root root 1416 Nov 28 20:08 edge.pem
f. 检查 jks 文件含有一个证书条目(trusted certificate entry)
[root@DemoMachine cert] keytool -list --keystore edge.jks
Enter keystore password:
Keystore type: jks
Keystore provider: SUN

Your keystore contains 1 entry

edge, Nov 28, 2018, PrivateKeyEntry,
Certificate fingerprint (SHA1): 38:16:5A:1F:1D:68:44:44:FE:56:1A:84:36:31:85:CB:14:5B:9C:5E

Warning:
The JKS keystore uses a proprietary format. It is recommended to migrate to PKCS12 which is an industry standard format using "keytool -importkeystore -srckeystore edge.jks -destkeystore edge.jks -deststoretype pkcs12".
g. 导入 cacert 根证书至密钥库
[root@DemoMachine cert]# keytool -import -trustcacerts -alias cacert -file cacert.pem -keystore edge.jks -storepass 123456
Owner: EMAILADDRESS=ca@eniot.io, CN=EnOS CA, OU=EnOS CA, O=EnOS, L=Shanghai, ST=Shanghai, C=CN
Issuer: EMAILADDRESS=ca@eniot.io, CN=EnOS CA, OU=EnOS CA, O=EnOS, L=Shanghai, ST=Shanghai, C=CN
Serial number: 8c54a99157c8ef28
Valid from: Mon Nov 19 18:20:27 CST 2018 until: Thu Nov 16 18:20:27 CST 2028
Certificate fingerprints:
     MD5:  4E:BF:2A:53:85:1E:21:97:70:72:AD:DF:A5:79:51:3F
     SHA1: 96:BC:6B:F0:15:CD:BB:03:52:12:A2:C6:C4:BD:20:69:71:4A:75:C2
     SHA256: 81:B0:E3:01:D3:2B:48:E7:CF:CC:BC:07:9A:AD:49:74:EF:92:97:A1:D4:46:E2:4E:56:94:14:32:A7:09:FA:9F
Signature algorithm name: SHA256withRSA
Subject Public Key Algorithm: 2048-bit RSA key
Version: 3

Extensions:

#1: ObjectId: 2.5.29.35 Criticality=false
AuthorityKeyIdentifier [
KeyIdentifier [
0000: AE 4F F7 AF A7 19 7B 0B   AE 2E 79 0F B4 7B E5 AE  .O........y.....
0010: 8C F4 54 0D                                        ..T.
]
]

#2: ObjectId: 2.5.29.19 Criticality=false
BasicConstraints:[
  CA:true
  PathLen:2147483647
]

#3: ObjectId: 2.5.29.14 Criticality=false
SubjectKeyIdentifier [
KeyIdentifier [
0000: AE 4F F7 AF A7 19 7B 0B   AE 2E 79 0F B4 7B E5 AE  .O........y.....
0010: 8C F4 54 0D                                        ..T.
]
]

Trust this certificate? [no]:  yes
Certificate was added to keystore

Warning:
The JKS keystore uses a proprietary format. It is recommended to migrate to PKCS12 which is an industry standard format using "keytool -importkeystore -srckeystore edge.jks -destkeystore edge.jks -deststoretype pkcs12".
h. 检查 jks 文件含有两个证书条目(trusted certificate entry)
[root@DemoMachine cert]# keytool -list --keystore edge.jks
Enter keystore password:
Keystore type: jks
Keystore provider: SUN

Your keystore contains 2 entries

cacert, Nov 28, 2018, trustedCertEntry,
Certificate fingerprint (SHA1): 96:BC:6B:F0:15:CD:BB:03:52:12:A2:C6:C4:BD:20:69:71:4A:75:C2
edge, Nov 28, 2018, PrivateKeyEntry,
Certificate fingerprint (SHA1): 38:16:5A:1F:1D:68:44:44:FE:56:1A:84:36:31:85:CB:14:5B:9C:5E

Warning:
The JKS keystore uses a proprietary format. It is recommended to migrate to PKCS12 which is an industry standard format using "keytool -importkeystore -srckeystore edge.jks -destkeystore edge.jks -deststoretype pkcs12".
[root@DemoMachine cert]#
步骤 4:使用 SDK 连接 EnOS
你可使用 MQTT SDK 或 HTTP SDK 连接。
MQTT SDK
在 Java 项目的 pom.xml 文件中添加 MQTT SDK 的依赖,版本最低必须为 2.2.5,如下所示:
<dependency>
    <groupId>com.enos-iot</groupId>
    <artifactId>enos-mqtt</artifactId>
    <version>2.2.16</version>
</dependency>
使用 MQTT SDK 连接 EnOS 的示例代码段如下所示,将这段代码替换 快速入门:将非智能设备通过 edge 连接至 EnOS Cloud 步骤 5 中的 “网关上线” 示例代码:
public static boolean IS_ECC_CONNECT = true; //使用RSA证书时,该参数值为false;使用ECC证书时,值为true
public static final String DEVICE_KEY = "yourDeviceKey";
public static final String PRODUCT_KEY = "yourProductKey";
public static final String DEVICE_SECRET = "yourDeviceSecret";
public static final String JKS_PASSWORD = "yourJksPassword";
public static final String JKS_FILE_NAME = "edge.jks";
public static final String SSL_CONNECT_URL = "ssl://MqttBrokerUrl:18883"; // MQTT broker URL,点击控制台右上角的 帮助 > 环境信息 查询


private static void connectEnos() {
    DefaultProfile defaultProfile = new DefaultProfile(SSL_CONNECT_URL, PRODUCT_KEY, DEVICE_KEY,DEVICE_SECRET);
    // 设置连接属性
    defaultProfile.setConnectionTimeout(60).setKeepAlive(180).setAutoReconnect(false)
            .setSSLSecured(true)
            // 设置双向认证,设备的jks文件路径和读取密码
            .setSSLJksPath(JKS_FILE_NAME, JKS_PASSWORD)
            // 设置是否是ECC证书连接平台
            .setEccConnect(IS_ECC_CONNECT);
    final MqttClient mqttClient = new MqttClient(defaultProfile);
    mqttClient.connect(new ConnCallback() {
        @Override
        public void connectComplete(boolean reconnect) {
            System.out.println("connect success");
        }

        @Override
        public void connectLost(Throwable cause) {
            System.out.println("connect lost");
        }

        @Override
        public void connectFailed(Throwable cause) {
            System.out.println("onConnectFailed : " + cause);
        }
    });
}
HTTP SDK
在 Java 项目的 pom.xml 文件中添加 HTTP-SDK 的依赖,版本最低必须为 0.1.9,如下所示:
<dependency>
    <groupId>com.enos-iot</groupId>
    <artifactId>enos-http</artifactId>
    <version>0.2.1</version>
</dependency>
使用 HTTP SDK 连接 EnOS 的示例代码段如下所示,将这段代码替换 快速入门:将非智能设备通过 edge 连接至 EnOS Cloud 步骤 5 中的 “网关上线” 示例代码:
public class HttpBiDirectionalAuthenticate {
    // EnOS HTTP Broker URL, which can be obtained from Environment Information page in EnOS Console
    // ssl port 8443
    static final String BROKER_URL = "https://broker_url:8443/";

    // Device credentials, which can be obtained from Device Details page in EnOS Console
    static final String PRODUCT_KEY = "productKey";
    static final String DEVICE_KEY = "deviceKey";
    static final String DEVICE_SECRET = "deviceSecret";

    private static String jksPath = "jskPath";
    private static String jksPassword = "jskPassword";

    /** Ecc cert flag
     * if use ECC certificate, chose true
     * if use RSA certificate, chose false */
    static final boolean IS_ECC_CONNECT = false;

    public static void main(String[] args) throws EnosException {
        // construct a static device credential via ProductKey, DeviceKey and DeviceSecret
        StaticDeviceCredential credential = new StaticDeviceCredential(
                PRODUCT_KEY, DEVICE_KEY, DEVICE_SECRET);

        // construct a http connection
        SessionConfiguration configuration = SessionConfiguration
                .builder()
                .lifetime(30_000)
                .sslSecured(true)
                .isEccConnect(IS_ECC_CONNECT)
                .jksPath(jksPath)
                .jksPassword(jksPassword)
                .build();

        HttpConnection connection = new HttpConnection.Builder(BROKER_URL, credential)
                .sessionConfiguration(configuration)
                .build();

        MeasurepointPostRequest request = buildMeasurepointPostRequest();

        try
        {
            MeasurepointPostResponse response = connection.publish(request, null);
            System.out.println(new GsonBuilder().setPrettyPrinting().create().toJson(response));
        } catch (EnosException | IOException e)
        {
            e.printStackTrace();
        }
    }

    private static MeasurepointPostRequest buildMeasurepointPostRequest()
    {
        // Measurepoints are defined in ThingModel
        return MeasurepointPostRequest.builder()
                .addMeasurePoint("Int_value", 100)
                .addMeasurePoint("DI_value_01", 5)
                .build();
    }
}
步骤 5:启动示例程序
完成步骤 5 的替换操作后,运行 快速入门:将非智能设备通过 edge 连接至 EnOS Cloud中更新后的示例代码。
步骤 6:检查设备连接状态
在运行示例程序以后,EnOS Edge 上线,并添加子设备作为拓扑,代理子设备连接云端。设备连接状态如下图所示:

步骤 7:查看设备数据
进入控制台,选择 设备管理 > 设备资产,点击  查看 INV001 的 设备详情,打开 测点 标签页,选择 INV.GenActivePW 测点,点击 查看数据,可以查看历史数据记录。