Creating APIs
To publish your APIs to EnOS and make them available for authorized consumers, you need to define your own APIs in the API Management page first.
This section shows how to create an API in APIM.
Before You Start
Ensure that you have an EnOS account and the permissions to create APIs in the EnOS Management Console. For more information, see Policies, Roles and Permissions.
Procedure
Creating API Groups
Log in to the EnOS Management Console and select API Management > My API.
Click New Group and enter the details for the following fields.
Name: Upper and lower case letters, numbers, hyphen (-) are supported and its length is limited to 32 characters
Path: Limited to 255 characters.
Description: Limited to 140 characters
Click Save to create the API group.
Basic Information
Click the API group you created and then click Add API in the Group Overview page.
In the API Basic Information page, enter the details for the following fields and click Next.
API Name
API Type
EnOS API: the internal API that is available to the customers, e.g. EnOS APIs.
APIs developed by EnOS partners: the internal or external APIs in the domain, such as weather service APIs.
Authentication Mode
API Description
Backend Service
Configure the backend service for the API. Use the Get Device API as an example and configurate the parameters according to the API documentation.
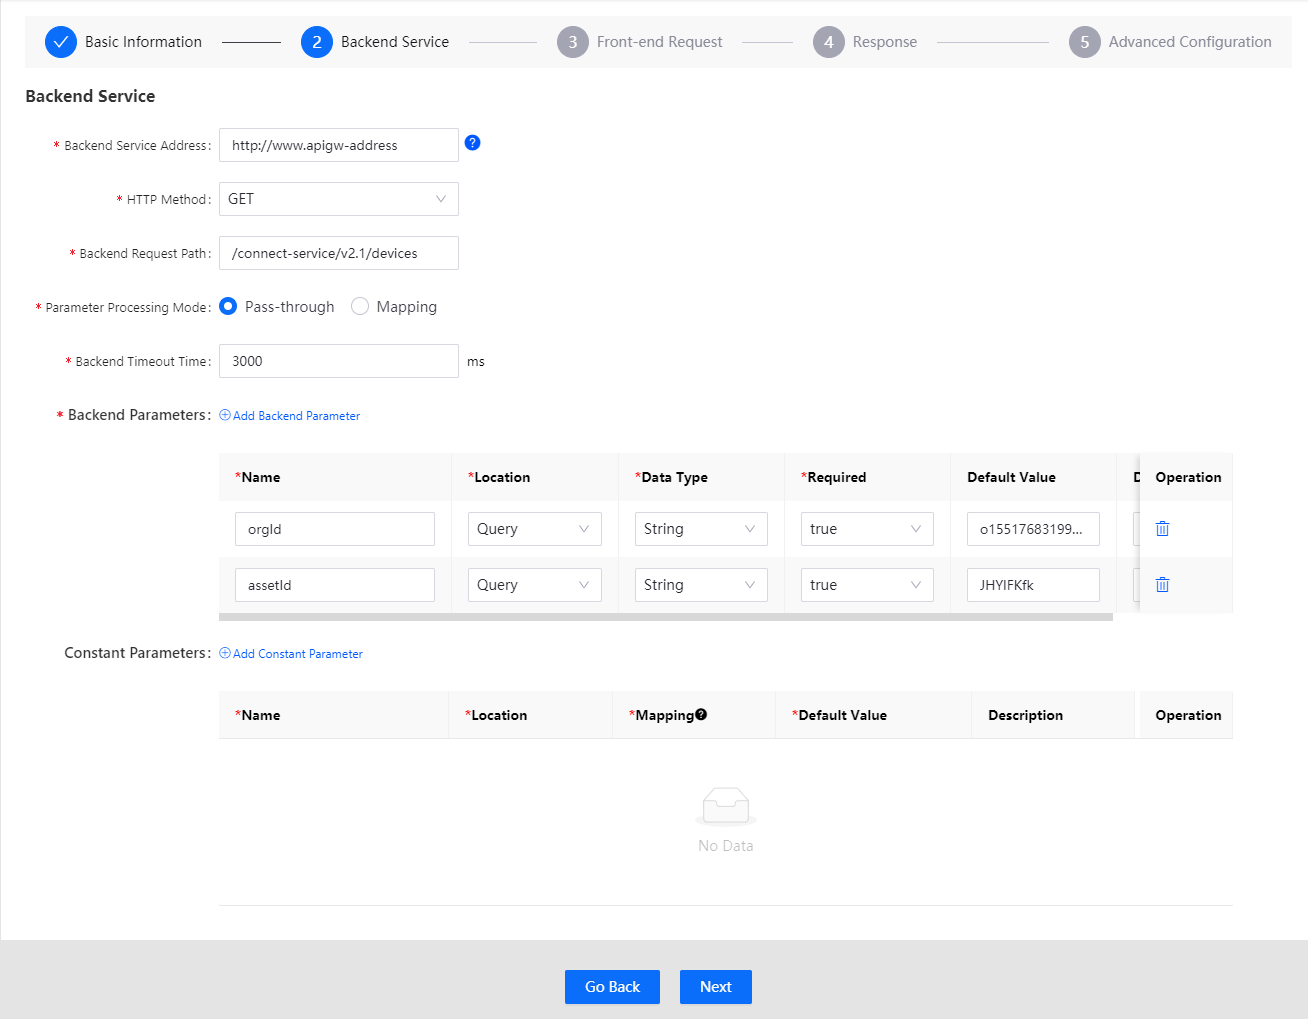
In the Backend Service page, enter the details for the following fields.
Backend Service Address: The HTTP address and port that provide the API service.
HTTP Method: GET, POST, PUT, and DELETE are supported on EnOS currently.
Backend Request Path: The path where the resource providing the API service is located.
Parameter Processing Mode: The processing mode of the API gateway for incoming parameters, where Pass-through and Mapping are supported.
Mapping: When the API gateway receives the API request from an API consumer, it converts the request into a format required by the backend through a mapping relationship.
Passthrough: After receiving the API request, the API gateway forwards it directly to the backend service rather than processing it.
Backend Timeout Time: The response time of the API gateway invoking the API backend service when receiving the API request. That is, the time from when the API gateway requests the backend service to the time when the API gateway receives the response. The time is calculated in milliseconds. If the response time exceeds this value, the API gateway will stop requesting the backend service and return an error message to the user.
Files in the request body (when HTTP Method is POST or PUT): Select whether the request body contains a file.
No: Default
Yes
Files in the return body: Select whether the return body contains a file.
No: Default
Yes
Request Body Type (when HTTP Method is POST or PUT): Select the request body type.
None
Format
JsonBody
Backend Parameters: The parameters that are required to invoke the backend services. Taking the example of the Get Device API, the parameters include
orgIdandassetId.Name: The name of the parameter.
Location: The location of the parameter in the request, which can be Head, Query, or Path.
Data Type: The data type of the parameter, for which String, Int, Long, Float, Double, Boolean, Binary, Date, DateTime, and Password are supported.
Required: Whether the parameter is mandatory or optional.
Default Value: The default value of the parameter, if any.
Description: The description of the parameter.
Constant Parameters: These parameters are invisible to API consumers. However, the API gateway will add these parameters to the specified location in the request when transferring the request, and then pass the request to the backend service to meet the backend business needs.
Name: The name of the constant parameter.
Location: The location of the constant parameter in the request, which can be Head or Query.
Mapping: Indicates whether this parameter is mapped to a fixed backend service.
Default Value: The default value of the constant parameter.
Description: The description of the constant parameter.
Click Next.
Front-end Request
Configure the front-end service for the API and control the API version according to the naming standard of the API version iteration. If Pass-through is selected as the Parameter Processing Mode in the Backend Service, then the Request Path in Front-end Request is consistent with that in the Backend Service.
Enter the details for the following fields and click Next.
Version: This helps to identify different versions of the API. Different versions of the same API can be mounted under the same API group.
Request Path: The path used by the API consumer to invoke the API. If Mapping is selected for Parameter Processing Mode in the Backend Service, the request path can be set by the API developer. If Pass-through is selected, the request path must be consistent with the path in Backend Service.
Front-end Parameters: When Mapping is selected as Parameter Processing Mode, you need to set the parameter definition of the API request. The API parameter definition contains the following fields.
Name: The name of the parameter to be displayed to the API consumer.
Backend Parameter Name: The backend parameter to which the parameter is mapped.
Location: The location of the parameter in the request.
Backend Parameter Location: The location of the corresponding backend parameter in the request forwarded by the API gateway.
Data Type: The data type of the parameter.
Backend Data Type: The corresponding backend data type.
Required: Whether the parameter is mandatory or optional.
Default Value: The default value of the parameter, if any.
Description: The description of the parameter.
Among the above fields, some fields, including Name Required, Default Value, and Description, can be set by the user. Other fields are automatically matched with the corresponding fields of the Backend Parameters in Backend Service.
Click Next.
Response
On the Response page, enter the response information and error code.
Content Type
Success Sample
Failure Sample (Optional)
Error Code
Click Next.
Advanced Configuration
API Management provides rich plugin services for every API. Click “+” to add plugins. The plugin services currently available include traffic control, black and white lists, and MOCK tests.
In the Advanced Configuration page, you can add additional configurations for the API to be published in EnOS. The EnOS currently supports the following functions.
Network Traffic Control
Rate Limiting
Request Size Limiting
App Rate Limiting
IP Restriction
Mock
Click OK.
Results
In the Group Overview page, you can see the API that has been created successfully, and its status is shown as Unpublished with the Visibility as Private.